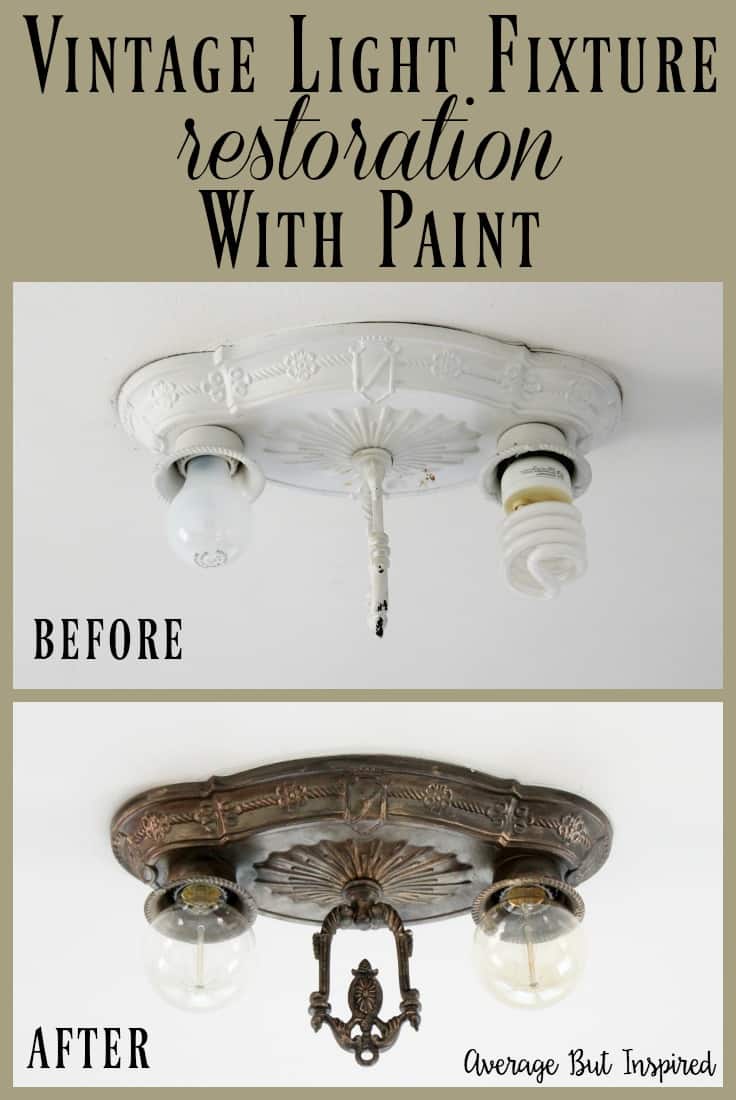
I’ve been plugging along on my playroom to office makeover! Over the weekend I crossed a big project for that space off of my list: restoring the original 1920’s light fixture to an authentic look with a faux antique brass finish. And you guys, I can’t wait to show you how to paint any surface with this faux brass painting technique!
Getting this faux antique brass finish required some trial and error, but in the end it was totally worth it and pretty easy to achieve!
This paint technique can be replicated on so many items: furniture hardware, lamps, light fixtures, decorative accessories and more!
Also, you can use this technique to create a brass finish on metal, a brass finish on wood, or really a brass finish on any surface.
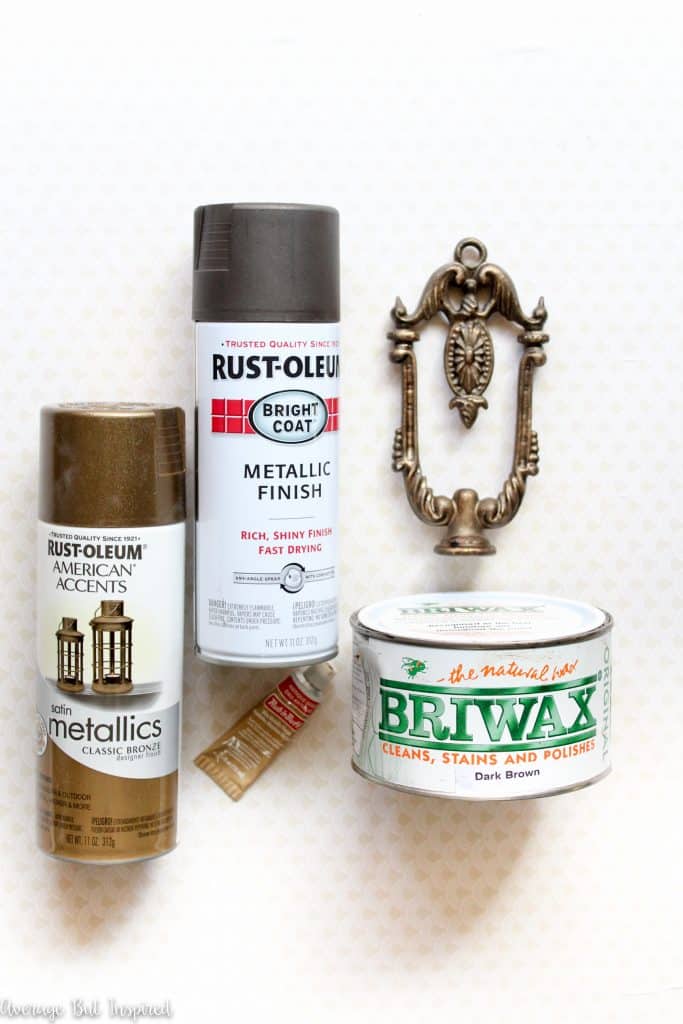
Supplies Needed to Create a Faux Antique Brass Finish
Some of these links are affiliate links, which means I earn a small commission at no added cost to you if you purchase through the links. To read my full disclosure policy, please click here.
- Rustoleum Bright Coat Metallic Finish Spray Paint in Dark Bronze
- Rustoleum American Accents Satin Metallics in Classic Bronze
- Briwax in Dark Brown
- Rub n Buff in Antique Gold
- Small stencil brush
- Small paint brush
- Clean, lint-free cloth
How to Create a Faux Antique Brass Finish With Paint
So, you guys, look at this light fixture that was hanging in the abandoned playroom. HEINOUS! At some point in time, a previous owner of the house spray painted it white. WHY? I don’t know.
It removed all of the character and charm from the fixture and left it plain and ugly. (Note: see how neglected this room was? We didn’t even care enough to put matching light bulbs in this fixture!)

Because my husband and I want to keep as much of the original character in the house as we can, I decided that I had to try to restore this light fixture to some of its former glory. Thankfully my husband was on board, and he took the fixture down for me.
Step One: Clean the Item to be Painted
Once it was safely removed from the ceiling, I brushed off the loose paint with a wire brush. Some shiny gold started to peek through. Because it was SO shiny, I don’t think that was the original color; the underneath side of the fixture was a much more muted brass.
Step Two: Paint with Dark Bronze Spray Paint
Next, I spray painted it with a coat of the dark bronze spray paint.
Step Three: Paint with Classic Bronze Spray Paint
After it dried, I sprayed a coat of the classic bronze spray paint over the entire piece. I stood farther away so that I wouldn’t be spraying such a concentrated amount onto the fixture.
Step Four: Apply Briwax Dark Brown Wax
Once the paint dried, I took the fixture inside for round two. At this point, the paint finish looked VERY spray painted. It was pretty much a solid color all over, though there were some spots where the dark bronze paint was visible underneath the shiny bronze. The finish did not look authentic at this point, however.
I got out my trusty Briwax, which I love for furniture refinishing projects, and applied it all over with a small stencil brush. This instantly darkened the finish and added some variation in tone to the entire piece. (Please ignore my son’s half-eaten sandwich in the background of this photo. He is the world’s slowest eater and I could not wait for him to finish lunch to work on this!)
I let the Briwax sit for about 20 minutes and then gently buffed off the excess with a clean cloth.
Step Five: Add Rub ‘n Buff in Antique Gold
Next, I grabbed the Rub n Buff and applied some to the raised portions of the light fixture.
This added some awesome highlights to the fixture, and really helped give it an authentic look! Can you believe this was white just a short time ago?
Once everything was dry, it was time to hang up my new, old light fixture! My husband was ready to get it installed when he decided that the old cloth wiring was definitely a fire hazard.
I thought that meant all of my work was for nothing, but then he surprised me with secret master electrician skills, and he re-wired the entire thing in no time! I was shocked (but not really, since I didn’t touch the wires – ha (get it?)), and I have no idea where he learned this from. He’s been holding out on me, I tell ya!
Anyway, once he worked his magic, he hung the light fixture with its faux antique brass finish in the office-in-progress, and I did a dance of happiness (and popped some cool new Edison bulbs in there)!
I mean, seriously, can you even believe this is the same light fixture I showed you above?!?
It looks good – doesn’t it?
This faux antique brass finish turned out so much more realistic than I expected, and I am so grateful for that! I love that I was able to save a piece of my home’s history, and keep this fixture that had been mangled and unsightly for so long.
I think Nicole Curtis will want to be my friend because of this project. (She never called me after I refinished my front door instead of painting it, but I think this project might put me on her radar. 😉 )
I’m assuming that most of you don’t have an ugly 1920’s light fixture in need of restoration, so tell me what you would use a faux antique brass finish on instead? (And please ‘pin’ this graphic if you enjoyed this post!)
Bre
John Watry says
not on plastic. lol
bri wax caused both layers of paint to come off.
learned a lesson
Aenne says
The house next to us was built in the 1870’s. You’d walk in and see a curving stairway to the left, and a double parlor to the right, each room (separated by pocket doors) with an identical marble fireplace. On the ceilings were large plaster ceiling medallions and period light fixtures. The previous owner spent several years restoring this gem of a house. FORMER gem. A new couple bought it and gutted it. Fireplaces, chimneys, staircase, fixtures, all removed. The rooms are now sterile boxes with track lighting. I mention this only because by contrast, there are people like you who will lavish time and attention on a single period light fixture, appreciating its beauty. Old and historic homes are sometimes owned by the wrong people.
H says
I found your post because I’m trying to refinish a metal lamp. Your fixture looks great! I think your fixture looks like it might have had a glass globe or shade? The middle rod having a circle (for no apparent reason) is probably a clue that it held something. Perhaps metal arms that held up a glass shade? It still looks better than before!
Bre says
Thank you so much! Yes, I think it probably did have shades back in the day. :-). I like the edison bulb look for an updated twist now, but shades would be nice, too! Good luck with your project!
Queannah says
Hello there,
That looks wonderful. I recently bought a house (sold as is). We’re getting things done slowly but surely. We ordered all new backdoors and we picked out some really nice antique bronze fixtures. Only problem is just about everything else in the house is gold. Door knobs and faucets are easy enough to find for a good price. The problem is finding affordable ceiling fans to match. The ones we have are all in good shape so I’d really hate to have to change those too. Some are gold others are white. Do you think this would work on them? Would I need to prime them first?
Bre says
Hi, Quennah! Congrats on your new home!! OK yes you can TOTALLY update those fans! I wouldn’t even do as much work as I show in this post. I would just spray paint them. Rustoleum makes some amazing paint and primer in one spray paints, in beautiful metallic shades. I think a couple of coats of spray paint would definitely do the trick!
Stephanie says
Very nice! I’m surprised it was as simple as that. I like your husband’s t-shirt too.
Bre says
Yes – not bad at all! And thank you re: the tshirt! 🙂
Jan says
I love how your light fixture turned out.
I have.some inexpensive gold picture frames that I’d like to try this on.
Wish me luck!
Bre says
Hi, Jan! That’s so great!! Good luck – I am sure it will be beautiful!
Kevin says
Wonder if you ever thought about stripping off the white paint down to the original finish and then waxing it…? Why did you decide to add to it? Just curious:)
Bre says
Hi! I did not because I was worried about the possibility of disturbing lead paint. So I just went over the other layers. Thanks!!
Marissa says
Would this technique work on a flat surface? I’d love to make a flat mirror frame look like this.
Bre says
Hi! Yes! It will work great. Since you don’t have raised elements to highlight with the rub n buff, you may want to try dry brushing a gold multi-surface paint instead. It will be cheaper ($2 for a tube of craft paint vs $11 for rub n buff), and easier to control, I think. Good luck!
Lauren says
Your post is exactly what I need! I’m planning to buy a secondhand metal headboard and repaint it, but I’m not handy or a DIYer. Your project is an inspiration and now I feel confident about how to proceed. Thanks.
Bre says
Hi, Lauren – that is awesome!!!! I hope your project goes well! Let me know if you run into any snags along the way and I will try to help!
Vanessa says
Wow, thank you so much for this fantastic technique! I didn’t have Briwax, so I tried shoe polish, but it took the paint off. Instead, I used a light wash of burnt umber craft acrylic and brushed it until it was just a light film over the spray paint. I also used European Gold Rub’n Buff, which has a brassier color. This was not too difficult and I’m so pleased with the result!
Bre says
AWESOME!!! I am so glad to hear it helped you out! I will need to find that European Gold Rub n Buff – thank you for the tip! Have a great day. 🙂
Sarah says
Awesome! I’m going to try this on some brass repro sconces:)
Bre says
That is great! I hope it works well for you!
Becky A Johnson says
I have some whiney brass candle sticks that I want to do this to. Also to a hanging fixture to for my bedroom. Thanks for the tips.
Bre says
Hi, Becky! You’re welcome! I hope your projects turn out wonderfully!
Cherie says
This is gorgeous and just what I needed to restore some of the fixtures I found for my Victorian house. May I ask what color BriWax you used in this project? Thanks!
Bre says
Hi, Cherie! That is awesome!!! For this project I used the dark brown Briwax. Good luck!
Sarah says
So I actually DO have some antique 20s light fixtures laying around in need of refinishing! Any recommendation for other products in place of briwax? I can’t get it locally and Amazon has been a pain about shipping stuff to Alaska lately. I have Lowe’s, Home Depot and Walmart to find a product at.
Bre says
Aaaah that’s amazing!! OK so I think there are a couple of things you could do. First, you could buy a different brown wax, like Rub n Buff. That’s pretty available in the big box stores or craft stores. If you don’t have that, you can mix brown paint (acrylic or chalk paint) into clear wax to make your own dark wax! Just put some clear wax into a bowl and then mix a little bit of paint in until you get the color you want. That’s a great solution because then you don’t have to buy clear wax AND brown wax! Good luck with your project – let me know how it turns out!!
Susan in Richmond says
Unfortunately, this did now work for me. My sconces, which are original to our 1920s Richmond house, are made of pot metal. They were clean of all original paint. I then spray painted the sconces using the product/instructions above. They looked great but then things went wrong in the next stage. Gently buffing off the excess Briwax with a clean cloth wiped off all the paint that the Briwax touched, exposing the pot metal. Any ideas as to what went wrong? How much time did you wait between your last paint application and the application of the Briwax? Wanted to have the same look you achieved for our scones. Thanks!
Bre says
Oh no! It sounds like the spray paint is having a hard time adhering to your fixture. I think what you might need to do is prime the fixture first. You could use a spray primer that works on metal, and then follow all of the steps again to get the authentic vintage brass look. OR, if you’re not wanting to re-spray and start over, you could try slightly watering down some brown acrylic paint (multi-surface), and brushing it on the painted portions of the fixture. In the places where the spray paint rubbed off, you could try actually painting the brown paint on there to cover the missing paint. Then you could gently finish by rubbing the Rub n Buff on subtly, but NOT buffing so as to be sure not to remove the paint. Good luck and I’m sorry you experienced some trouble with it!
Vanessa says
I had the same problem so I used a thin wash of acrylic paint instead of Briwax. My practice metal was quite slippery and it all adhered fine. I did this on hinges, and they came out almost like these pictures!
Erin says
I’m not familiar with the briwax and rub n’ buff. I want to apply this whole technique to a metal bed frame. Would those materials rub off on the sheets do you think?
Bre says
Hi! No, you should be totally fine! They both dry hard. If you’re really concerned, test the products on a small piece of the frame or a different piece of metal and see how they dry. Good luck – I bet it will look awesome!
Sheila S says
I have a 1915 house with absolutely gorgeous light fixtures throughout. The only thing I couldn’t understand is why they all had ceiling medallions except the stunning stained glass chandelier in the dining room. It made the ceiling look “naked” in my opinion.
I bought one of those plastic-y foam-y medallions from a big box store. I haven’t installed it yet because I had no clue how to make it look like it had always been a part of the house…until I found your post!
THANK YOU!!!!
Jenny says
OMG I have nearly identical fixtures! Mine have been painted white too!How did you know yours were from the 1920’s? I assumed mine was original to my 1920s house but wasn’t sure.
Thanks for the post. I have been really struggling with what to do with these fixtures.
Bre says
Hi, Jenny! OK so our house was listed as having a lot of original features (including light fixtures), and I did some research on fixtures from the 20’s, so that’s why I am confident these are original to the house. Plus, my area is filled with homes from the 20’s, and some still have fixtures like this one, so I think it’s a safe bet yours are original, too. I am so glad this post was helpful to you!
Angie @ ambient wares says
Those details can’t be ignored now! It looks authentic and gorgeous!
Bre says
Thanks, Angie! I’m so thankful I didn’t ruin it!!!!! 🙂
Karen says
This is amazing, Bre, and I learned a thing or two that I’m stashing away in my diy files. 🙂
You have an amazing eye and I absolutely love how you gave this gorgeous piece its dignity again. Enjoy your beautiful fixture!
Bre says
Hi, Karen! Oh, you are the sweetest! Thank you so much for saying all that. I really appreciate it! 🙂 Hope you had an amazing weekend. 🙂
Amy | Canary Street says
That’s such a gorgeous and unique fixture and you really brought it to life with the new finish. It looks fantastic, Bre!
Bre says
Amy! Thank you, friend! I am so happy that it turned out like this! It was really hideous, but we felt like we had to keep it. At least I like it now! 🙂