One hot summer night I sat in front of the TV, watching reruns of an intellectually stimulating show (most likely Real Housewives of Dallas or some other random city), while mindlessly scrolling through Facebook. Suddenly, a post showed up in my newsfeed of someone selling a gorgeous and antique roll top desk in my local resale group . . . for $40.
I had to have it!
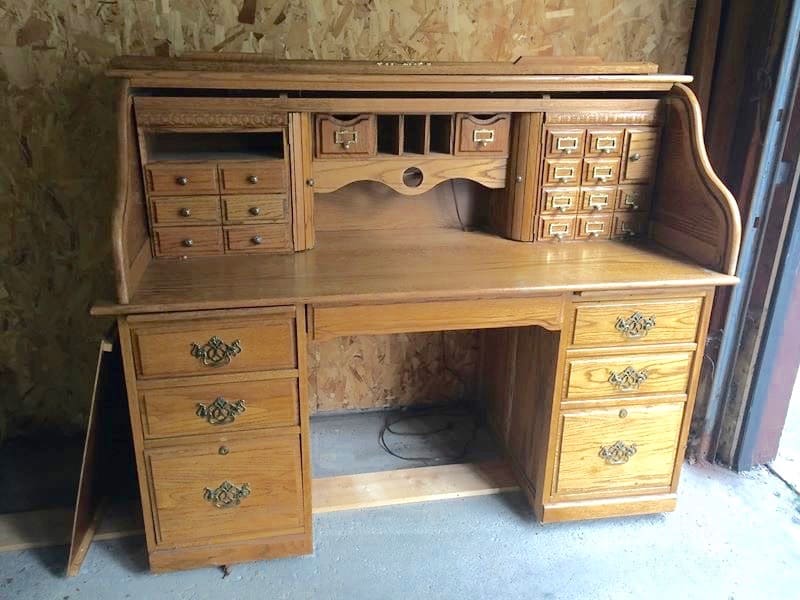
Without hesitation, I commented “SOLD” and committed to purchase this stunning* desk that gave me butterflies! (*Stunning in pictures only. Keep reading.)
I didn’t need a desk and I certainly didn’t know how I was going to get it to my house, but I was thrilled to have “won” it!
Reality set in the next day when I had to send my poor husband to retrieve it (by that I mean make two trips to the seller’s house, dismantle the desk, and bring it home to me), and I realized it was way too large to use in my own home. At that point I decided I would give it a makeover and re-sell it. I assured my husband I would be able to sell it for way more than I paid, and that his efforts in bringing it home for me would be worth it.
But, as I’m sure you can guess from the title of this post, things did not go according to plan.
Instead, this furniture makeover was a TOTAL DISASTER; destined for failure from the beginning. But, my friends, I learned some valuable lessons from it, which I am happy to pass along to you in hopes that you learn from my mistakes (or at least find satisfaction in knowing you’re much smarter than me because you wouldn’t have been so dumb)! 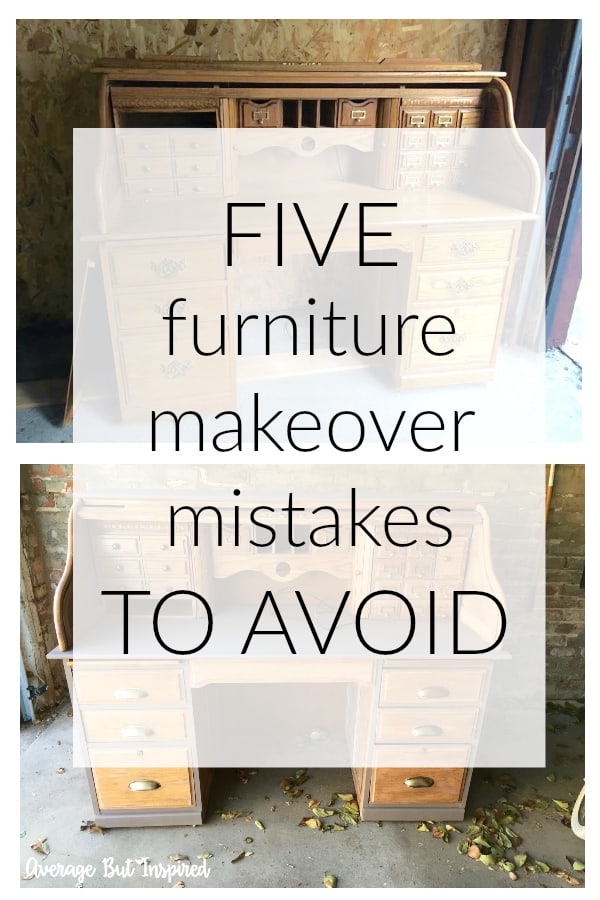
5 Furniture Makeover Mistakes to Avoid
No. 1: Don’t buy furniture without inspecting it in person first.
This probably seems super obvious. It really should be, but sometimes emotions can get the best of us. I got caught up in the immediacy of this desk being available on Facebook. Because I didn’t want to lose my chance to get it, I commented SOLD before I even saw the piece in person!
If I would have looked at it before buying, I would have seen that it was not an antique (it had a big stamp on the back that said “Made in Mexico 1992”), that it was not solid wood (there were several cheap-looking plastic wood veneer parts), and that one of the bottom drawers was broken and not functional.
The desk looked beautiful in the photo posted on Facebook, but when my husband got it home for me, I immediately knew that it wasn’t as nice as I’d thought! Looks can be deceiving.
No. 2: Make sure you have space for the furniture you’re refinishing.
Normally I refinish furniture in my laundry room inside my house. (You can see my successful furniture makeovers in my Furniture Makeover Gallery!) This desk was too large for that, so I had to keep it in my garage (which meant that I couldn’t park my car in there for months . . . well into the winter.)
The hassle of parking outside aside, keeping this piece in my garage was a terrible idea because the garage was not a safe place for it. After I’d begun repainting it, my husband put a giant scratch in it accidentally, and, unbeknownst to me, water from the garage door was dripping on it, ruining a part I’d refinished.

It also turned cold really early in the season, which made it very difficult to work on the desk. Paint and wax do not cure properly in cold temperatures, and working outside in the cold is no fun!
Never again will I commit to a piece that I cannot refinish inside or in a location that’s safe from the elements and the hazards of daily life!
No. 3: Paint colors from different containers are not always the same.
After the painted portions of my desk sustained the scratch and water damage, I tried to fix them with a fresh coat of paint or two. The problem was that my original jar of paint had frozen, thanks to our early cold spell and me leaving it in the garage. I purchased another container of the same paint and touched up the affected areas, only to find that the paint in the second jar was a slightly different shade than the paint in the first jar!
In order to get a cohesive look, I was going to have to remove the hutch portion of the desk to re-refinish the desk top, but I was not strong enough to disassemble it and remove it! Plus, the freezing weather had set in, and I wasn’t able to repaint and re-seal the entire thing. At this point, I decided to throw in the towel. My antique impostor desk was becoming too much of a hassle and I wanted my garage parking space back.
No. 4: Furniture can be harder to get rid of than you might think!
Because I was fed up with this desk, I hopped online and scheduled a Salvation Army pickup for the earliest date possible, which was about three weeks out. A few days before pickup day, the truck coordinator called me to get the desk’s measurements. When I told him what they were, he said the desk was probably too large for pickup, but he’d put the order in anyway and leave it up to the driver to take it or leave it.
On the day the Salvation Army truck pulled into my driveway, I was a nervous wreck. I showed the driver the desk and he laughed, saying that there’s no way they’d take the desk because “nobody wants old looking stuff like that.” (A. I didn’t think that would be the problem!; and B. I guess he doesn’t read blogs like mine. I love “old stuff!”)
I begged him to take it, so he took some pictures of it and sent them to his supervisor. His supervisor initially said “no,” but friends, I was praying SO HARD that he would change his mind, and then, miraculously, he did! So, the guys loaded this beast of a desk onto their truck, and then drove off with lots of snacks and all of the cash money that I could give to thank them for taking this desk out of my life. (People really love snacks!)
For days after that, every time I heard a truck come down the street, I was worried it was the Salvation Army bringing the desk back! Post-traumatic stress, I think.
So, let that be a lesson that it’s not always as easy to get rid of furniture as you might think!
No. 5: Even if you fail, don’t let it defeat you. Enjoy the creative process and learn from it!
I totally blew this furniture makeover. No question. I had to apologize to my husband about ten gazillion times and I still probably owe him a six-pack or something (the Salvation Army guys said I need to go buy him the “good stuff” (yes, they heard this whole story)), and I spent a whole lotta time and money on a project that went nowhere.
BUT . . .
I learned SO MUCH from this failed furniture makeover!
On top of all of the lessons I’ve already shared in this post, I tried a cerusing finish (basically, using white wax on natural oak woodgrain), on the parts I didn’t paint, which was really fun and something I’d never done before. I found out that I really like using white wax as a subtle way of taking down the orange in an oak finish. It’s definitely something I’ll try again.
Although this most recent furniture makeover of mine was a failure, it won’t be my last. I enjoy refinishing furniture and this mishap taught me some valuable lessons that I’ll use going forward.
I hope that my mistakes will inspire you to keep forging ahead with your creative endeavors (furniture makeovers or anything else!), despite bumps in the road that will occur from time to time. We can’t all be perfect all of the time (just most of the time – HA!). Now please excuse me while I go park my car in the garage.
-Bre
Cheryl says
I am well into my second year of redoing furniture and selling about half of it. These are definitely good tips for the beginner. The first piece of furniture I bought specifically to resell was a jewelry armoire. Looked great on Facebook, picked it up without really looking at it and when I got it home I realized what bad shape it was in. It had obviously been dropped and poorly put back together. Parts did match up. All of the felt inside needed to be replaced because it was beyond repair. I learning how to take furniture apart and acquired many new tools. A mitre saw, a bunch of different size furniture clamps, had to buy felt off of Amazon to replace the inside, a ton of paint, gold leaf, etc. I did manage to get it back together so it lined up correctly. Finally figured out how to replace the screws on the top that didn’t hold. And managed to sell it for more than I had invested in it. But I got about $10 for my hours and hours of labor. If was definitely a learning experience.
Still learning but Tip #1 really resonated with me. Definitely go take a look at what you’re getting and don’t be afraid to say no thanks if it’s not what was advertised.
Bre says
Cheryl your situation sounds frustrating and beneficial all at once! All I can say is BEEN THERE!! :-). All of that knowledge and experience you gained from that project will be so helpful down the road. I’m always amazed at how many DIY skills I’ve picked up from refinishing furniture. It’s really awesome!
Katie S. says
I needed these tips. I have failed many times but learned a lot in the process. I think everyone should try updating their furniture at least once.
Bre says
Thanks – and I agree!
Gina Schueszler says
Thanks for the funny story.I am new to the refurbishing experience.I definitely thought it looked easy and I decided to whitewash our mission bedroom furniture. Not turning out like I envisioned and it sits in our bedroom with 2 drawers whitewashed. Ugggh. Not sure which direction to proceed now. Thanks for sharing your experience. At least I know I’m not the only one.
Bre says
Hi, Gina – oh no!! I’m sorry to hear that you’re not having good luck with your vision! Well, I bet you can come up with a new plan. Maybe stripping and restaining OR maybe doing more of a solid coat of paint? Whatever you decide, good luck!!
Anastasia says
I love your sense of humour, especially the comment at the end about going to park your car in the garage.
Bre says
Anastasia, thank you!!! I mean, that project was so bad that if I didn’t laugh about it, I’d cry. 🙂 I’m so glad you enjoyed the post, and I appreciate you taking the time to let me know!
Eleanor says
So funny and heartfelt! I also love doing up unwanted old furniture and have both success and (“learning journey”) less successful goes. Keep going!
Bre says
Hahaha, thank you, Eleanor!! I am glad you can relate to my “situation.” LOL! I think the learning part of it is what keeps it interesting! I’m sure you do, too!
Amy says
Love your post! Did you sand before you used the wax?
Bre says
Hi, Amy – thanks!! Oh goodness – I honestly cannot remember because this was so long ago now. My hunch is that I did not. 🙁
Marie says
Thank you for pointing out the flip side. Every other DIY refinishing project I have read shows a beautiful, successful ending. Of course they are proud of the outcome but they do not expose the learning curve that brought them there. I am a beginner and am grateful for your hard earned lessons.
Bre says
Hi, Marie! Oh goodness, I’m so glad this was helpful! :-). It’s true that not everything goes to plan and there is always a learning curve to EVERYTHING! So excited you’re painting furniture – it is one of my favorite hobbies!!
Alys says
I just started trying my hand at upcycling furniture and reading this post had me laughing….and feeling better. Glad you were able to help us find the humor in literat everything going sideways!!!
Bre says
Hi, Alys! Ha!! Thank you!! I’m so glad it made you laugh. How fun that you’ve started furniture projects. I know you’ll have some troubles, but the victories are so worth it. Enjoy!
Rose says
A great resource for perusing is Woodworking with Wes on YouTube. One of those guys that’s been in the biz all his life.
Bre says
Rose, thanks for this tip!! I will check him out!
Paula Manning says
Thanks Bre. A good story but it’s added a bit of fear to the makeover I wanting to do. I am somewhat experienced in painting walls and small furniture pieces. I have knotty pine cabinets that I stained with Miniwax wood stain with the polycrylic in it 26 years ago. It’s a medium brown shade. I am wanting to whitewash or pickle them to make the kitchen brighter since it has no window. I want the wood grain and knots to show through and slightly whitening the woodgrain. I have scope the internet and not found a whole lot on the process except for basics. I don’t want to have to do days of prep. Just degreasing cleaning and a small bit of sanding. Can you suggest what brand of stain would work the best for what I have in mind. And the best method. I would greatly appreciate any help. Thanks.
Bre says
Paula! I am so sorry I am just now seeing this comment! I actually think I have something that will work great for you – have you heard of Briwax Liming Wax? It is gorgeous (I’ve used it before), and it might be just what you need. I think you’d need to clean, lightly sand, and then apply the wax and gently buff, and you should be good to go. Of course, you’d want to test it in a small spot first but this sounds like it will give you the look you’re after. Let me know if this helps!!
Danielle says
I would have broken down the pieces and sold them separately like the apothecary drawers on the top right hand corner of the desk.
Bre says
Danielle, that is a great idea!!! If those nice men from Salvation Army wouldn’t have taken it, I hope I would’ve thought of that!
Tina says
Ha!, i can feel your pain.
I wanted to redo my oak kitchen stained in golden oak to a different colour! And I’m stuck, can’t find a write up on refinishing, any ideas?
Bre says
Hi, Tina! Yes! You can totally do this with gel stain and you won’t have to strip the cabinets first. You will have to clean thoroughly though! I have a post on refinishing a wood door with gel stain that might help, and I also have a post on gel stain tips and tricks that might also help. Here are links to them both: https://averageinspired.com/2014/07/refinishing-exterior-door-with-gel-stain.html and https://averageinspired.com/2020/05/helpful-gel-stain-tips-tricks-for-a-perfect-finish.html . Good luck!
Ashley S says
I totally feel your pain! Thanks for sharing your story about the roll-top desk. I completely relate!🌷
Bre says
Ugh! It’s the worst feeling, isn’t it, Ashley! 🙂 Oh well, you live you learn. Thanks for your note!
Marlly says
I’m learning so much and I love your blog! Thank you for sharing all of the good bad and ugly!
Bre says
Hi, Marlly! THANK YOU! That is so kind of you to say! I definitely try to keep it real around here. That’s part of DIY! It hardly ever goes exactly how you plan!!! 🙂
Norma Rolader says
Awesome and thank you for sharing mistakes can be made but they will not break you learn
Bre says
Thanks, Norma! Exactly – there’s always something to learn from our mistakes!
Jamie says
OH MY GOODNESS…
IM SORRY BUT I LAUGHED SO HARD READING THIS I ALMOST PEED.
NOT AT YOU BUT AT THE EXPERIENCE OF IT ALL.
I WOULD HAVE SWORN SOMEONE HAD BEEN WATCHING ME AND DOCUMENTING EVERY MIS-HAP.
YOU’VE A GREAT SPIRIT AND YOUR WRITINF MUSE IS TO BE ADORED.
THSNK YOU FOR MAKING MY DAY.
Bre says
Hi, Jamie! Ha!!! I’m so glad you thought this was funny! I swear that desk was cursed! LOL!!! I am so glad it is out of my life now! 🙂
Courtney says
Thank you so much for sharing this! This was hilarious by the way and it reminds me of pretty much all my furniture makeover fiascos. I bought a side table from FB marketplace that I thought would take me a day or two to makeover – annnddd 3 months later it’s still sitting in my garage! Cheap/ fake wood and stain that bleeds through no matter how many coats of primer I paint on have made me throw in the towel haha. But it’’s all part of the learning experience I guess 🙂
Bre says
Courtney, the struggle is real! Hahaha!!! OK I’ve had that bleed through problem before, and the saving grace is a product called Zinsser Shellac – I buy it in the spray can. Just spray it over the piece (right on the paint), let it dry, and repaint. The Shellac prevents the stain from coming through again! Hope that helps!