Learn how to use peel and stick wallpaper on the back of any built-in or bookcase for an easy update!
I thought I was excited about the limewash fireplace makeover I completed on my 1970s stone fireplace. But then I finished this project, and I was even more excited
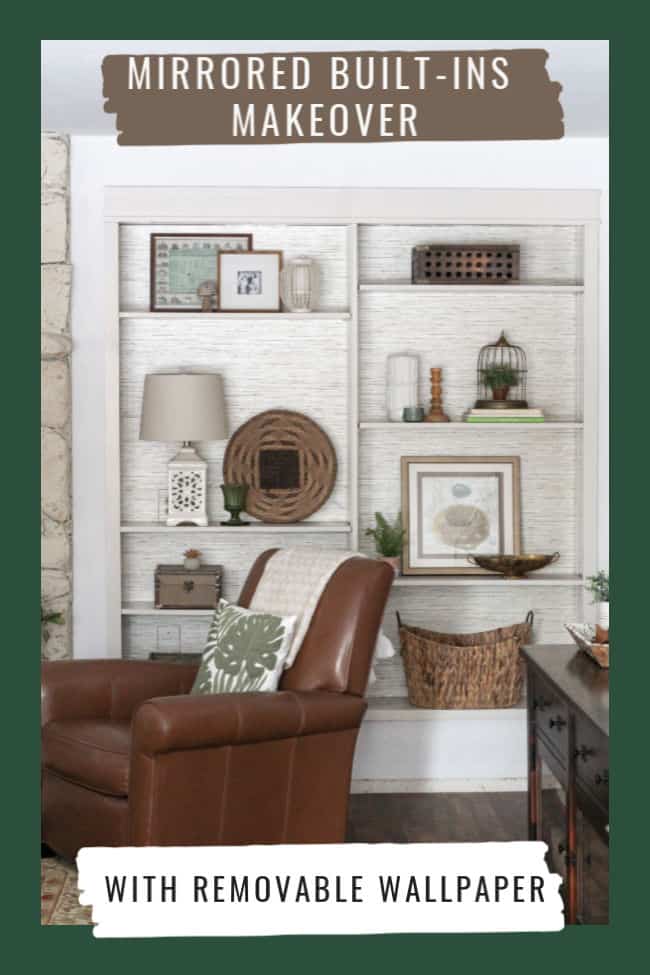
Updating the mirrored built-ins on either side of the fireplace was a game changer. Painting the orange oak and adding wallpaper behind the shelves (to cover the mirrors that were there) transformed my living room instantly!
And . . bonus . . it was very budget friendly.
This post contains affiliate links. To read my full disclosure policy, please click here.
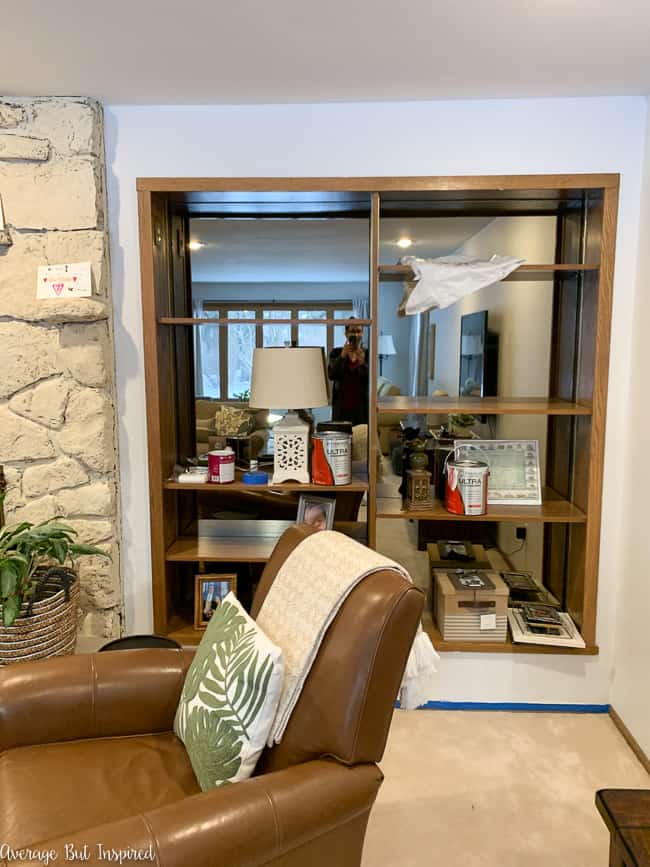
In case you haven’t been following my progress on Instagram, here is what one of the mirrored built-ins looked like after the fireplace makeover but before I got to work.
So reflective.
Built-In Makeover Part 1: Bulk Up the Trim
I started by ripping off the top piece of trim on each built-in, simply because I thought it was a little flimsy and I wanted it to be a bit more substantial.

Once that trim was down, I built craftsman-style headers with two 1×2 pieces of lumber and one 1×4 piece of lumber per header.
I used this tutorial for building craftsman window trim as a guide, but modified the tutorial to just use my trusty Ryobi brad nailer instead of screws. Much easier, in my humble opinion.
And yes, I did all of the building myself. I also installed them myself, though my husband held them in place while I nailed them up so they wouldn’t move out of place. (If you do this please make sure to find studs to nail into!)
Once I had the new headers on the built-ins, they already looked nicer!
Bookcase Makeover Part 2: Prime and Paint
Next, I removed the shelves from the built-ins and admired myself in the mirrors. It was wonderful. (ha! Just kidding.)
I cleaned all of the woodwork, including the shelves. I used TSP but another great pre-paint cleaner is Krud Kutter.
Then I primed the built-ins and the shelves. I used the same Multi-Surface Primer that I used on my painted marble fireplace hearth, and I’m so glad I did because the shelves had A LOT of stains. That primer is amazing because it sticks to almost any surface AND it blocks stains.
I set up folding tables all over my house and painted away. My family wasn’t really thrilled but I told them sometimes you have to suffer for beauty.
After priming, I painted with Behr Cabinet & Trim Enamel paint in Manchester Gray.
The Cabinet & Trim Enamel was a great paint to work with. It had very little odor, covered well, and self-leveled nicely (meaning fewer brush strokes).
I used a synthetic brush to paint it on, as well as a 1/4″ nap foam roller to roll it on wider swaths of the built-ins as well as the shelves.
It took two coats of paint (plus the primer) to cover the old oak bookcases. But they looked soooooooo nice.
Built-Ins Makeover Part Three: Wallpaper Behind the Shelves
I let the paint cure for a few days, and then I got to work covering the backs of the bookcases (Mirrors! Why????) with peel and stick wallpaper.
My original plan was to cover large foam boards with fabric and rest those foam boards in the backs of the shelves, but I changed my mind and chose to use this peel and stick grasscloth wallpaper instead.
Now, I somehow deleted all of the photos showing the process. I wish I could SHOW you how I did this, but I will do my best to explain it without pictures.
To hang peel and stick wallpaper in a bookcase, behind shelves, I gathered these supplies:
- Level
- Tape measure
- Pen
- Scissors
- Wallpaper smoother and knife kit
- White crayon (specific to hanging peel and stick wallpaper on a mirror); Sharpie marker will work for non-mirrored surfaces.
I started by measuring the length of the back of the bookcase and cutting a piece of wallpaper a little longer than that.
Because my peel and stick wallpaper wasn’t wide enough to cover the whole back of the built-in, I measured the width of the wallpaper and marked that width on the back of the bookcase. I did that all the way down the bookcase, and then connected those dots with the level to make a straight, vertical line going down the back of the boockase.
This line gave me a visual reference of where the right edge of the wallpaper should go in the bookcase, so that it would remain straight.
Because I was writing on a mirror, a white crayon worked perfectly. If you’re going this on a painted surface (or wood), you can use a Sharpie marker.
I peeled back about 6 inches of the wallpaper backing paper and pressed the first part of the wallpaper into place, starting at the top – making sure to keep it aligned with that line I drew down the bookcase.
I used the wallpaper smoother to remove air bubbles as I went along. This was really tricky on the mirror, but it was doable. If you’re putting wallpaper onto a painted or wood bookcase, this will be much easier!
I repeated this process all the way down to the bottom of the built-in, and then cut the excess wallpaper with the utility knife.
Then, I measured the remaining width of bookshelf back to be covered with paper, and cut the next strip of wallpaper to a little wider than that. And again, I cut the length just a little longer than the length of the bookcase.
This time I used the edge of the wallpaper I’d already placed as my guide, and worked all the way down the bookcase.
Once the paper was smoothed and in place, I cut any excess at the side and bottom with the utility knife.
I really wish I had photos of the process, but all I can show you is how that peel and stick grasscloth wallpaper looks in my newly re-finished built-ins!
P.S. you may notice we removed the carpet and had luxury vinyl plank floors installed. That’s part of the reason I decided to paint the built-ins – I think there would’ve been too many wood tones happening.
And no, we don’t have the baseboards in yet. 🙂
Do you need a BEFORE photo to remind you where I started? (I think you do!)
Totally different, huh? So much less shiny!
Instead of being an eyesore, these built-ins are now a perfect place for me to display my thrifted and vintage finds, family photos, and other little decor items I love.
The baskets on the bottom are also a perfect place to store blankets and other random junk I don’t want out on display!
I’m proud to say that those two baskets are the only new things I bought to style these shelves, as I had everything else already. Yay for being fiscally responsible! 🙂
If you have dated built-ins that could use some new personality, give this a try! Painting the bookcases and adding wallpaper to the backs can give them a whole new life!
Poppy says
Bre it looks great! I am surprised you did not remove the mirrors. I never would of thought of covering them!
Bre says
Hi, Poppy – thank you!!! :-). Ugh yeah I think removing the mirrors would’ve been a bigger job than I’m qualified to handle. Ha!
Danielle says
Hi! Did you ever do a post on papering the mirrors? I couldn’t find it and was curious about your process/anything you learned!!
Bre says
Hi, Danielle! I never wrote the post (I’m terrible)! I’m sorry! I think you emailed me and I responded with tips though. I hope those helped!!
Sherry Green says
Hi. What a great idea: covering mirrors with removable wallpaper! Did you ever do your post on this? Could you please send me a link?
Bre says
Hi, Sherry! Oh my gosh, I never wrote that post. I am so sorry!! If you decide to do this, please email me or contact me through my contact form, and I can send you some tips. I am going to try and put together a post about this though – I just need to see if I can find my photos!
Sheila DeKosky says
Need help with wallpaper (stick on grasscloth) on a mirrored wall. Have you posted that yet?
Thanks!
Bre says
Hi, Sheila! Aaaah! I am so sorry – I never wrote that tutorial! I need to go back and see if I can find photos and get that written. In the meantime, feel free to email me (averagebutinspired@gmail.com), and I can give you some tips!
Laura says
What a transformation! Looks great, lady!
Bre says
Thank you so much, Laura!!
Kim says
Gorgeous, Bre! I love how it all came together. It doesn’t even look like the same room!
Bre says
Thank you, Kim!! I appreciate it!
Jan says
Love this! Great idea. So calm, neutral and just everything!!
Bre says
THank you, Jan!
Laura Harrie says
You are doing a fantastic job with this room! So well done!
Bre says
Thank you, Laura!!