Earlier this year I totally transformed my 1970s orange rock fireplace with limewash. Because that project went so well, I decided to try my hand at a DIY limewash stone exterior makeover of the same 1970s orange rock on the outside of our house, too! (This orange rock musta’ been on sale in 1977!)
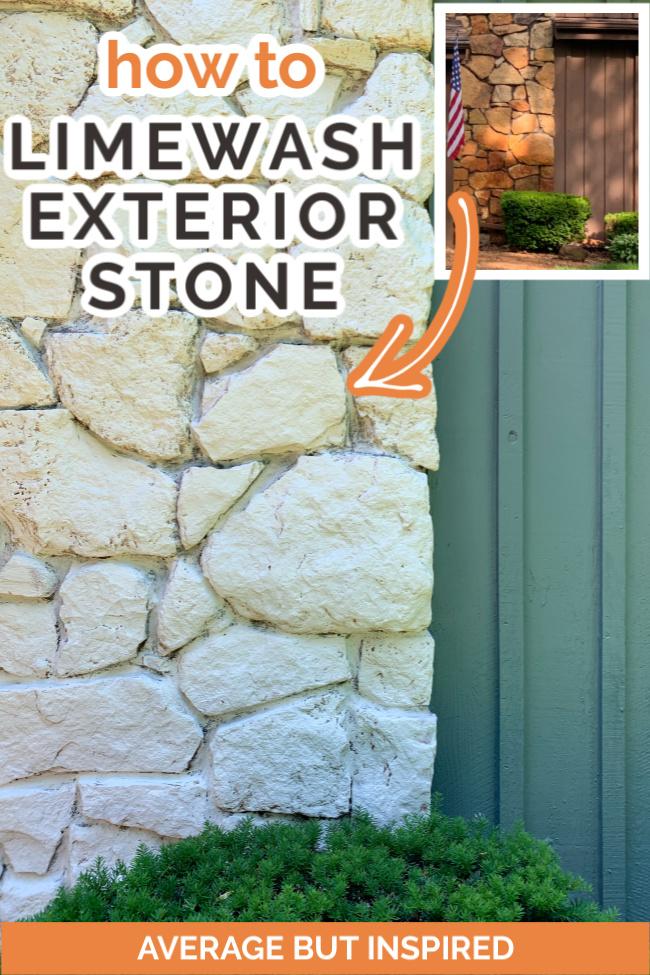
This limewashed stone project was the first part of our outdoor overhaul (which you can see here!), and was an absolutely PERFECT DIY project that significantly updated my home’s exterior! Limewashing is definitely the easiest way to change the color of a home’s stone facade or rock facade.
What Supplies Do You Need to Limewash Exterior Stone?
This post contains affiliate links. To read my full disclosure policy, please click here.
Listed here are all of the supplies I needed to limewash my exterior stone column. Some of the items I needed may not be required for your job – especially if your stone or rock is low to the ground. I have noted those items with an asterisk (*) in the list. The rest of the items are actually quite inexpensive, so this job can be done on a budget.
- Romabio Classico Limewash (I used two of the one quart containers of the Riposo Beige color to complete my large stone column) (**Limewash comes in many colors. Make sure to choose a shade that coordinates with your home’s paint colors, roof color, etc.)
- Masonry brush
- 3″ Chip brushes
- Water spray bottle
- Paint stir sticks
- Mixing bucket
- Hose with spray attachment
- Terry shop towels
- Drop cloth or tarp
- *Scaffolding (we rented it from a local rental company for around $180 for a week) or ladder
- *Extension pole
- *Lockjaw Tool Holder
How Do You Limewash Stone Outside?
Limewashing exterior surfaces is actually easier than limewashing interior surfaces because you don’t have to be as careful to protect surrounding surfaces (limewash is all natural so it doesn’t harm plants!), and you don’t really have to clean the surface the way you do inside.
Now that you know that, let me show you how it’s done!
Mixing Limewash
Begin by mixing the limewash for the first section of your project. I mixed one quart at a time to keep the limewash “liquidy” the entire time I was using it.
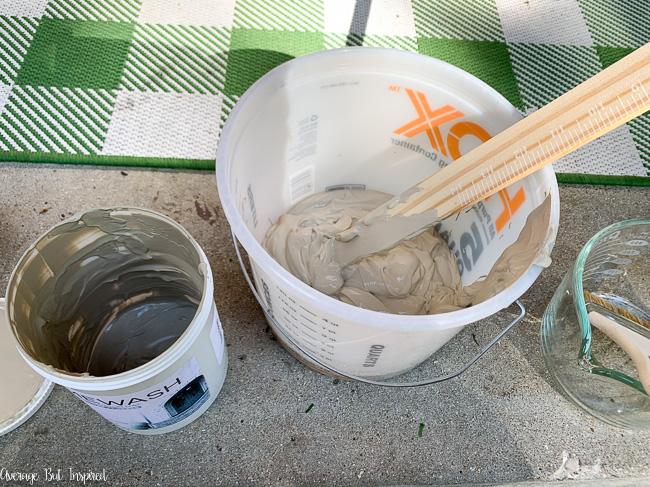
I emptied the one quart container of limewash into my mixing bucket, and thinned it with three cups of water. When mixing your limewash, check to see what dilution ratio you’d like. The product contains instructions for how much water to add. I diluted this batch of limewash more than the limewash I mixed for my fireplace makeover, because I wanted to let a little more of the rock show through.

I made sure to stir until all the lumps and clumps at the bottom had dissolved. Once everything’s mixed, it’s time to get to work.
For me, that meant climbing the scaffolding. I was scared to do this! When my husband could sense my fear and said (in a nice and caring way) that he didn’t think I was going to be able to do this, I got the jolt I needed and climbed right up. Once I was up there, I was fine (see – I’m smiling!).
Wetting the Stone or Rock
To start the actual limewashing of the stone, I sprayed a small section of the rock with the garden hose. As Romabio (the manufacturer) recommends, I worked from top (left to right), on down.
Within each section, I used my water spray bottle to re-dampen stones prior to applying limewash, where necessary. I found that as I got to the end of a section I’d sprayed with the garden hose, the sun had dried up much of the water. So, the water bottle was a great way to get the stone wet again to accept the limewash, without wetting it too much with the garden hose.
Applying the Limewash to the Stone
With a small section wet, I began applying the limewash to the stone. My scaffolding didn’t get me high enough to reach the top left corner of the stone column, so I used my extension pole and brush extender to reach that corner with the masonry brush.
I used the masonry brush to cover the large stone pieces and rocks, and then I got into the grout and crevices with the 3″ chip brushes. I find the masonry brush too unwieldy to get into the grout, but the chip brushes make this part of the job easy.
Because the sun was pretty hot on the day I was painting, I was wiping off excess limewash pretty soon after applying it to the rock. I didn’t have to do too much of that, however, because the rock was so crevicey and jagged that a lot of the natural stone was showing through anyway. The terry towels worked great to cover my bucket of limewash and catch drips, too.
I worked section by section, going down the column, making sure to keep the application uniform and to pay attention to parts that were easy to miss, like the sides of rocks and bottom parts of rocks.
I finished the entire column in a day of work (about 7 hours, including a lunch break), and saved myself a lot of money by limewashing the exterior stone myself.
Admittedly, the Riposo Beige limewash doesn’t look fantastic with the 1970’s brown siding of the house. I think it’s too stark of a contrast. It does, however, look FABULOUS with the new color of our house (which you can see in my 1970s exterior makeover post)! Here’s a teaser to whet your appetite!
Why Limewash Exterior Stone Instead of Painting It?
I know you’re probably wondering why I chose to limewash my exterior stone column to change its color instead of painting it or whitewashing it, and I have lots of good answers for you!
First of all, limewashed rock – unlike painted rock or whitewashed rock (whitewash is just thinned down paint) – has a much more natural appearance. It is ultra matte, just like rocks and stone, and allows the natural patina to show through (where desired). I did not want a totally polished or covered look that paint would have given, so limewash was the natural choice here!
Next, limewash can be removed within 5 days of application! So, I knew that if I limewashed the stone column and hated it, I could rent a powerwasher and remove it. That “insurance policy” is huge, in my opinion!
I also like that the limewash will continue to patina and age with time, unlike paint. I didn’t want to destroy the rock – just update it to work with our new color scheme – and that is easily accomplished with limewash.
Finally, limewash poses no harm to the environment or surrounding surfaces. I didn’t have to worry about some of it dripping on the bushes or grass below the stone, because it’s totally natural and non-toxic and washed away as soon as it rained. It was nice not having to think about any of that!
This limewash finish will last approximately 10-15 years, which is the same as an exterior paint job. So, I will have to re-do it at some point to maintain the look, but that is the case with any painted finish.
Let me know if you have any questions about the limewashing process at all. I am such a huge fan of this material and want to sing its praises from the highest mountain! It is so DIY friendly and makes such an impact at a low price. It’s amazing. 🙂
Make sure to come back in a week or two to check out the entire exterior makeover reveal!
-Bre
Holly Mco says
Well, this is the post I didn’t know I needed. I see a change a’comin!
Bre says
I LOVE that! 🙂
Sam says
Hi Bre!
this is exactly what we are hoping to do with out exterior stone on our house. It has all the browns/oranges that we really don’t enjoy. I am hoping to re paint the house in grey tones and change the whole look and think lime wash might work. However, we were told by multiple associates at a natural stone place that it wont work and the iron in the stone will bleed and look bad. Did you have any problem with that as looks like your stone is semi similar although I do see ours has a lot of the iron/rust areas? These were sales associates so I kind of take it with a grain of salt as re doing the stone work would be a huge sale but not something we are interested in replacing.
Bre says
Hi, Sam! OK one great development since I did this project and wrote this post is that Romabio came out with a sealer for limewash. It’s called Mineral Shield, and it will be a great protective covering for limewash on your stone. I have never heard of anyone having a problem with bleed through of minerals. The thing with limewash is that it is meant to patina and age with time, so you may get some of those original undertones appearing with time, but they will be muted. That is what’s happened to ours, and it’s made the stone look even more realistic/less painted, without the original in your face orange. Anyway, I think you could even try it in a small, inconspicuous area and see how you’re liking it after a few months, before doing your entire exterior. 🙂
Exterior painting says
I’m so impressed with your DIY limewash stone exterior makeover! It’s incredible how a simple technique like limewashing can breathe new life into an old, dated exterior. Your project looks fantastic, and thanks for sharing the supplies you used – very helpful for someone like me who’s considering a similar makeover. Great job! 😊
wendy ingorvaia says
Hi. I would love to see the finished product of the exterior. Can you email me a picture? i have to do the same to my home. thank you.
Bre says
Hi, Wendy! The finished photos are in this post! :-). I also have a post here with more photos of the house once painted: https://averageinspired.com/2020/07/our-1970s-house-exterior-makeover.html. Thank you!
Charisa Hays says
Will this Turn yellow rock to a white . I wish I could sone syoybkictures of my rock so you could tell me how to lighten it
Bre says
Hi! Yes – my rock was orange!! This can definitely handle yellow.
Canny says
Bre, pleeeeeease, don’t hate me for asking… but, suppose someone wanted to do the opposite? I.e., darken or tint some of the naturally white limestone rocks? I can’t find any clear cut instructions on that anywhere— I guess, as usual, I’m a bit out of step with current trends. All I’ve been able to determine is that 1) I shouldn’t use paint, and 2) if I use stain, it should be water-based. Would you agree with those two things, and do you have any suggestions for application?
Bre says
Hi there! Oh gosh, no worries at all! I love darkening things, too – it just wasn’t the right look for my living room! Anyway, guess what? Limewash comes in dark colors, too! I’m not certain that the brand I used (Romabio) makes a dark limewash, but there are definitely brands out there that do. So, you might want to look into that. It could be perfect for your needs. I’m sorry but I don’t have any experience with staining rock, so I can’t answer your question about that. Anyway, good luck with your project!!!
Jayla says
Oh I love this!! We just got a new (to us) church building and the entire exterior is stone like your fireplace. It needs an update big time! I’m curious to know how it’s held up over the last couple of years. Has the color faded more or is it still the beige color you said it changed to after about a week?
Bre says
Hi, Jayla! Great questions. It is holding up great and the color has remained consistent. There is one random spot where the limewash seems to be coming off – like we’re starting to see more of the orange coming through. I’m not sure why it’s happening on this one spot because it isn’t like it’s more exposed than other parts of the stone. It will be an easy touch up though. 🙂
Danielle Nolan says
We’re buying a home and the middle front is stone and I was thinking of painting until now! Any tips?
Bre says
Hi, Danielle! My biggest tip is to not be scared! You might feel like you’re ruining the stone and have a freak out moment, but it will all work out!!
Ellen M says
We have faux stone on the exterior of out home. Do you know if you can limewash faux stone? Love how yours turned out.
Bre says
Hi, Ellen- I’m sorry, I don’t know! I’m not familiar with faux stone, but if you call or email Romabio (or message them on Instagram), I’m sure they can help!
Sandy says
Hi! Does it leave a residue? Like if someone leans on it? I have a rock wall, and I figure if one sits on it, they know they might get dirty, but a grazing of it in shouldn’t make one need to change clothes.
You did a beautiful job!!
Bre says
Hi, Sandy! No residue at all. Nothing rubs off. It’s like paint in that it forms a bond with the surface/rock, so you won’t have any troubles with that!
Krissi says
So thankful for your post! I just painted our siding Natural Choice by Sherwin Williams thinking it would be warm enough for our yellow limestone… big was I wrong!!! The yellow stone is making my very warm white/beige siding look GREEN!!! Ahhh!!! So instead of repainting, we are thinking of limewashing the stone, which is what we don’t want to stand out. So, have you seen the outcome when used on a more yellow limestone? Also was the color you chose true to description? I’m a bit gun shy now of picking a color! Thank you!
Bre says
Hi, Krissi! Oh man – I totally know this feeling. The same thing happened to me when I limewashed my fireplace and then the hearth looked AWFUL with it! The good news is that limewash will definitely solve your problem – I have no doubt. Here’s what I would suggest: buy two or three of the quart size limewash colors and test them on your limestone. It’s the only way you’re going to be SURE that the color will work. The quarts are around $30, so they’re not cheap, but then you will be sure that you get the look you want. It will all be ok – this will work! Good luck!!!
Karin Eppert says
This is exactly the answer I’ve been looking for to “fix” our stone on the exterior of our home. My husband is concerned that the stone will need to be sealed after lime washing, but I don’t see that you did this. Necessary step? Thoughts? TIA!
Bre says
Hi, Karin! YAY! I’m so glad this could be a great solution for you! You absolutely DO NOT seal limewash – it’s just not something you do with this product/material. It kinda seeps in there and forms a bond with the stone, and they don’t even make a sealer to be used with it. SO it really is as easy as it looks! Good luck with your project!
Charlie says
Hi Bre, a great description of how to lime wash stone. I see where you say the manufacturer says the lime wash can be removed within 5 days of application via pressure washing. Do you have any idea if it could be removed at a later date, via pressure washing or other means? Thanks!
Bre says
Hi, Charlie – thanks! My understanding is that after five days, you cannot remove it with pressure washing. However, over the years (like 15-20 years), the finish may start to wear off to the point that you’d want to reapply (just as you would paint on siding). I hope that helps!
Kristina says
Hi Bre – your post on your lime-washing project is incredibly timely. I would love to soften the gold/brown tones of the stone portion of our mostly brick home and the lime-wash appears to be a much softer, natural look than painting. Your column came out beautifully – congrats – and I really appreciate the list of items you used for the project as well as your narrative. Huge thank you from Oklahoma!
Bre says
Hi, Kristina – oh, thank you!!! I really appreciate this nice note! I’m glad the post was helpful. I think you will love the limewash; it is such a fantastic product!
Viv says
Hello! Sending love from California!! My husband and I recently bought our first home and while I love our rock facade, I definitely think it needs to be updated. I loved this post- just a few questions though 1) did you wash or clean the rock with an exterior wash prior to the lime wash application? 2) Did you have to set the lime wash with something after application?
Bre says
Hi, Viv! Congrats on your new home!!! Happy to answer your questions: (1) I did not wash it at all! I only wet it with the garden hose; and (2) Nope! Nothing needed to set it at all! It’s good to go upon application! It’s a really easy process – you can do it!
Gale says
Hi Bre, Our “70’s” exterior rock on our ranch home is different colors like blue, dark green, dark tan yuk, yuk! We can’t afford to tear it off and replace with brick ( although I’d love to) but wouldn’t mind at all if I could change it to all white! We live in WI so four seasons, rough winters. Would limewash color over these dark colors?! I wouldn’t mind doing several coats. But would like it to look great at least ~5 years without having to constantly retouch. Thanks
Bre says
Hi, Gale! I’m in WI, too!! SE WI! I hear you about the weather concerns! Romabio, the manufacturer, says it will hold up! They say around 15 years. That’s what I’m hoping for as I don’t want to have to rent that scaffolding again anytime soon. Ha! I think that if you mix the limewash at a thicker consistency (at least 1:1 ratio), you should be able to cover those colors no problem. The beauty of it is that it still looks like natural rock – not like painted rock. So you may have tone variation in there, but that will keep it looking “real” instead of painted. I hope that makes sense! Also, wait until late spring/early summer to tackle this job!! 🙂
Kerri says
My stone is a mix of grays, browns, tan and reds. I don’t mind the grays and tan but the browns and reds are limiting my choices for shutter color. Do you think I could limewash only certain stones or would that not look right?
Bre says
Hi! I definitely think you could. You could try it on a couple of those stones/rocks, and live with it for a bit. If it doesn’t look right to you, then do the others. But, I think it would be great!
ChrisT says
How does it patina with age? More rock showing through? When it’s time to re- limewash it, is the limewash all gone from the rock or just spotty looking? I’m so very curious about this even though I have no rock to work with at the moment. My old house would’ve been perfect for limewashing the brick fireplace inside and out. The new owners did a really ugly solid gloss black paint on the fire brick chimney outside and I’d love to sneak over and do this during the night to bring that beautiful home back to it’s historical roots (built in 1897 – not the age of gloss black paint)
Bre says
Hi! Oh gosh – I can envision the glossy black paint and it’s making me cringe!!! Yikes! OK so as for limewash, it tends to get more color with age. For example, when I put it on the rock about a month ago it was stark white almost. But after a week it was already more of a beige color like it shows on the manufacturer’s website. With age it will get even more tones as it fades away and the elements age it. My understanding is that the limewash should last 10-15 years outdoors before recoat is necessary. As for whether it’s all gone or just spotty, I don’t know the answer to that. Sorry!
Mary C. says
Looks great and really updates the exterior so nicely! Does it need a “cure” time to set? We’ve been having a lot of rain in our area lately – would a heavy rain affect the wash if it hadn’t had time to harden?
Bre says
Hi, Mary – this is such a great question!! According to the manufacturer, you should be good within four hours of application! Apparently limewash hardens or calcifies immediately, so the rain will not remove it after that time period.