I am a total lover of pretty paper goods. One of my favorite things to do is stroll around cute paper shops and admire all of the adorable card, stationery, notepad and calendar designs. Luckily I have a Paper Source nearby, so I can stop in for a dose of happy whenever I feel the need.
On a recent trip, I spotted their updated custom stationery line. After I “oohed” and “aaahed” for a bit and conducted an internal debate on whether to order some of my own (all the while bribing my two year old with M&M’s to stay near me, stay quiet and stop touching everything in sight), I decided to try a DIY version first (primarily because I’d run out of M&M’s and the you-know-what was hitting the fan.). So, I bought a set of plain notecards and envelopes and off I went.
I guess I’m actually glad my son is insane so I couldn’t order anything. My stationery turned out pretty well and I saved myself about $17 for a set of 20 cards and envelopes. (Manicure money. Holla!)
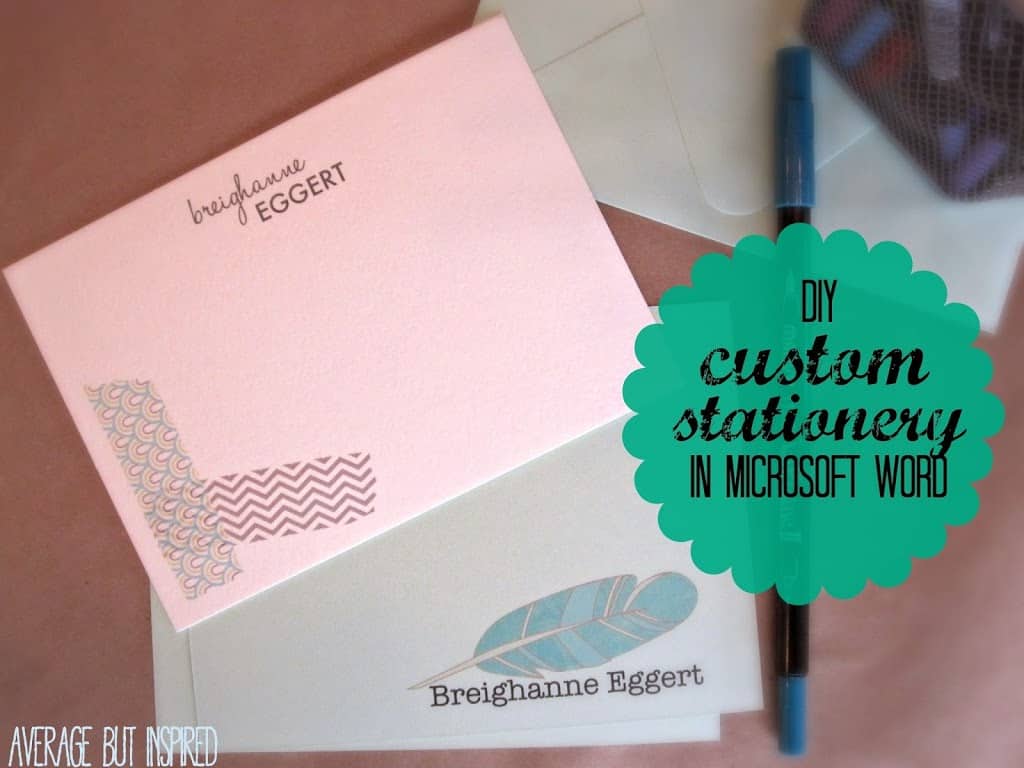
If you want to try making your own custom stationery, I’m happy to share my tips with you today. If you have a basic understanding of Microsoft Word, you should be able to do this with great success!
Tip 1 – Download Pretty Fonts
The first thing you need to do is find yourself some pretty fonts. Search Pinterest for some good fonts and font combinations, and then download them (or similar ones), from dafont.com for free. If you’ve never downloaded fonts before, make sure to install them once downloaded. After you’ve installed them, you may need to reboot your computer for them to show up in Word.
Tip 2 – Search Pinterest for Free Graphics Downloads
Pinterest is full of links to great clip art and images that you can use for your stationery! I found my washi tape clip art and my feather clip art right there. If washi tape and feathers aren’t your thing, look for something else! Just make sure that any image you use is not copyrighted and/or that the creator has given express permission for personal use of the image. Nobody wants to receive a cease and desist over a notecard gone wrong.
Tip 3 – Format Your Page
Once you have your fonts and your graphics, you’ll need to format your page in Microsoft Word so that it corresponds with the size of the notecards you’ve purchased. In my version of Word (2008 for Mac), you do this by going to File > Page Setup > Paper Size > Manage Custom Sizes. Then you enter the width and the height of your notecard in the appropriate boxes. At this time you can also change the size of your margins (the non-printable area), by entering those numbers in the Top, Right, Bottom and Left boxes. The smallest margins my computer or printer would allow are .25″.
Tip 4 – Use Text Boxes
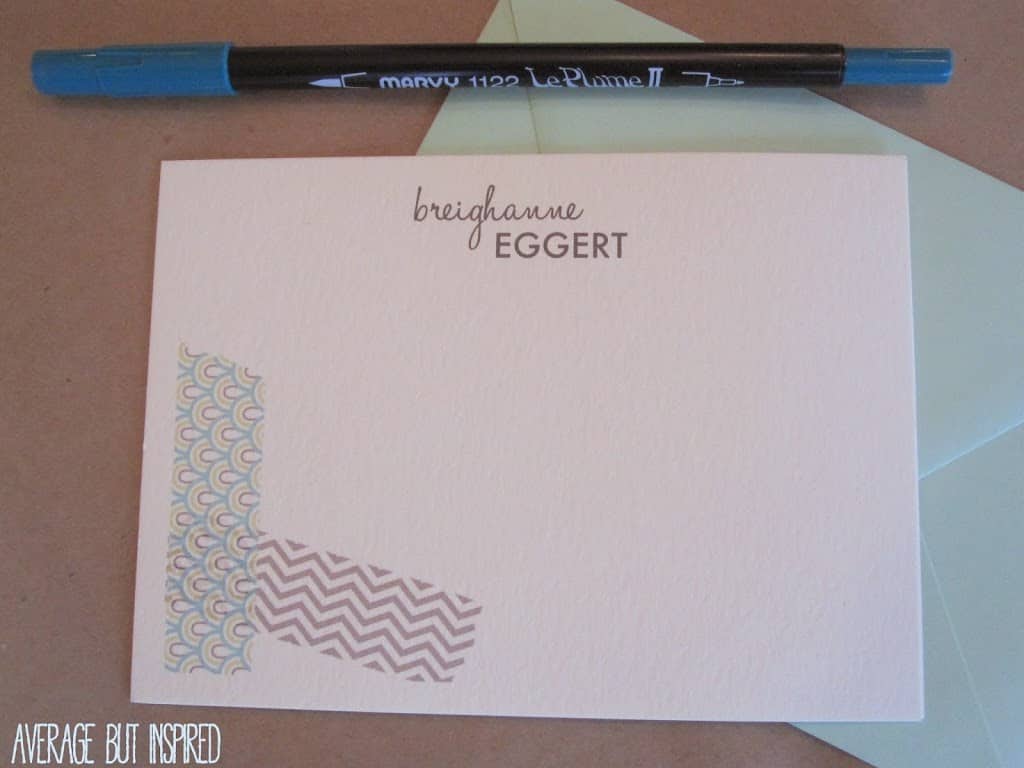
When you’re ready to enter your name on your stationery, don’t simply type it like you would in a regular document. Instead, use text boxes to get the placement exactly where you want it and how you want it. This is how I was able to achieve the stacked and staggered text in this piece of stationery.
Tip 5 – Insert and Format Your Image
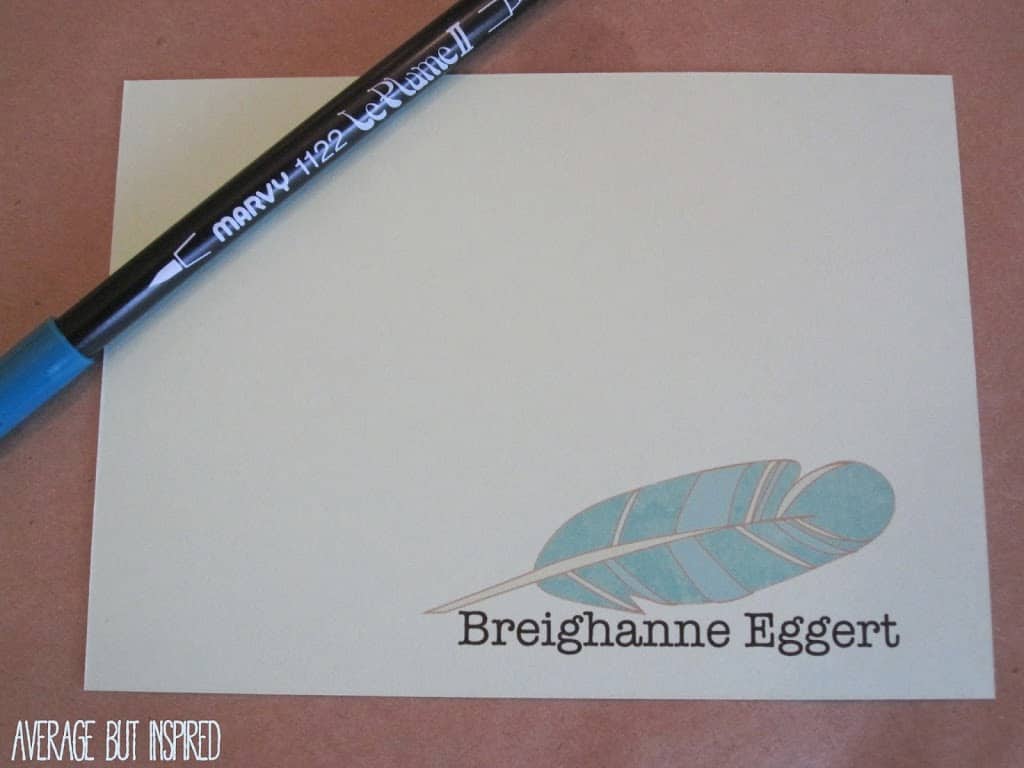
To add a graphic to your stationery, simply go to Insert > Picture > From File, and then choose the appropriate file from the drop down menu.
When your image appears in your document, click on it so that it becomes active on the page. Then click Format > Picture. A box will appear that lets you manipulate the orientation, transparency, color, size, position, etc. of the picture. I always click Layout > Behind Text. This allows me to layer text and images, similar to my feather stationery. (The tip of the feather image is actually layered underneath the text.)
Tip 6 – Test Print
Finally, make sure to run some test prints before you print your actual stationery. Although your notecards may look perfect on screen, the margins can require a little tweaking, the colors can be off, and text can run off the page unexpectedly. If you do some test prints in fast draft mode on your printer, you’ll save ink and frustration. Be prepared that your stationery probably will not print perfectly the first or second time. But once you get it, you’ll be all set.
I hope these tips have you well on your way to making your own beautiful correspondence cards. You can definitely mail me a thank you note later. 🙂
– Bre
Yvonne I. Wilson says
These are beautiful! I love the idea of personalized stationery so thanks for sharing. Hope you’ve enjoyed your day thus far. Happy SITS Day!
Bre Eggert says
Hi, Yvonne – thank you!
Martha Woods says
Love your ideas here! I would go nuts in Paper Source if I could but since I’m on a budget, a DIY is much more practical for me. Happy SITS day!
Bre Eggert says
Hi Martha – I know! Paper Source is so fantastic. I seriously love it. But I hear ya on the budget – that’s why I have to DIY! 🙂
EstheticGoddess says
Very cool idea! My hubby is a phenomenal at drawing so I can totally see him really personalizing some stationary for me! Another thing to add to his to-do list!
Bre Eggert says
Hello! Oh yes – that would be so amazing! I hope he’ll help you out with that. 🙂
Karen says
what a great idea…so going to try this. Happy SITS day.
Bre Eggert says
Hi, Karen – thanks!
Nicole Nenninger says
Pretty! It really came out nice! I don’t really send out a whole lot on stationery, but I do send out a lot via emails. You’ve inspired me to look into changing how my emails look when they go out. Visiting from SITS…
Bre Eggert says
Hi, Nicole – thanks so much for your sweet comment! I need to “beautify” my e-mails too – thanks for inspiring me to do that!
Maria says
So pretty and such a good idea! I love nice stationery (especially personalized!) and this is so cute!!
Bre Eggert says
Hi Maria! Thank you! It is really easy to do – thank you for your sweet note!
Aanie says
Hi Bre,
These are gorgeous! I am always drawn to beautiful stationary but very rarely splurge on it so thanks for sharing how to DIY! I have featured you on ‘Do Tell Tuesday’ over at http://www.aanikalouise.com
Have a wonderful week!
Aanie
Bre Eggert says
Hi Annie! WOW, thank you so much!! I seriously appreciate it. That is so sweet of you!
Amanda Taylor says
I just made custom baby shower invites in word. I love it! You can buy 4×6 blank note cards at wal mart (100 of them) for less than a dollar, if you don’t need a card that folds. 🙂
Bre Eggert says
Hi, Amanda! Thank you for the tip on the cards at Walmart!!! That will be so much cheaper than Paper Source.
Elena says
I too love stationary…and pens. One of my favorite stores is Papyrus. I could just hang out there for hours drooling over all the papers, cards, pens, etc. I am excited to try your project. Thanks for being so detailed and specific in your explanations.
Bre Eggert says
Hi Elena! Oh I love Papyrus, too! There’s not one near me so I have to get my fix at Target (I’m so glad they carry some of their cards)!
Bre Eggert says
Hi Tanya! Thank you – that is so sweet of you! Good luck with your own – I hope they turn out amazing!
Tanya Raymond says
Those are amazing! Thank you for sharing and for inspiring me to create some of my own printables!
Barb Marshall says
Nice to meet you fellow lover of paper goods! I am a bit of an addict (self confessed) so I feel right at home here. Love the washi tape corners and your choice of fonts are just perfect. Thanks for sharing. I’m stopping in via DIY SITSGirls Linkup
Bre Eggert says
Hi Barb! Don’t you feel like there should be a support group for us paper lovers? It’s an addiction! Thanks for your sweet comment. Enjoy the rest of your weekend!
Angela @ Life in Velvet says
Thanks so much for linking up at Thursday STYLE! This is so creative! I have put DIY stationery on my to do list! Have a great weekend 🙂
Bre Eggert says
Hi Angela! Thank you! Oooh I can’t wait to see what you come up with. I hope you have a great weekend, too!
Brittany Kemp says
Thank you!! I have been trying to figure out how to use the fonts I’ve been seeing free downloads for – never really sure what to do with them lol. Does the download/install/possibly restart process work for macs, or is that only for pcs?
Bre Eggert says
Hi Brittany! I have a Mac and that’s how it works on mine! Good luck and let me know if you have any other questions – hopefully I can help you out!
Brittany Kemp says
Oh awesome thank you!!
Bre Eggert says
Hi Sharon! Thank you very much! They were fun to make. I hope you enjoy making some of your own!
Sharon Brickell says
These are ADORABLE. I love stationary. Thanks for the inspiration!