• Skip to primary navigation
  • Skip to main content
  • Skip to primary sidebar
Average But Inspired logo - DIY and craft

Average But Inspired

Craft a home you love. DIY and craft tutorials.

  • About
    • Contact Me
    • Disclosures
    • Privacy Policy and Copyright Policy
  • DIY
    • Furniture
  • Crafts
    • Dollar Store Crafts
    • Seasonal
      • Patriotic & Summer
      • Valentine’s Day
      • Easter & Spring
      • Fall & Halloween
      • Christmas & Winter
  • Home Decor
    • Organization
  • Shop
    • DIY Guides
  • Home

Crafts

DIY Wood Bead Bunny Wreath: A Dollar Tree Spring or Easter Door Hanger

March 17, 2025 by Bre 1 Comment

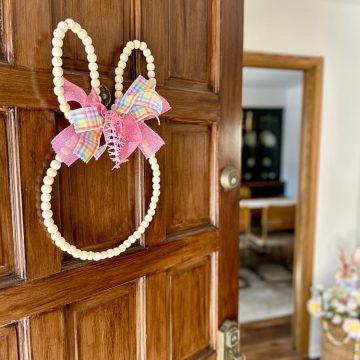
You can make the cutest DIY wood bead bunny wreath for your spring door decor. Let me show you how!

When wood bead hoops first appeared at Dollar Tree a few years ago, I purchased some without a plan. Typical me – lol.

I stashed them away and finally came up with the PERFECT idea for them: turning them into a DIY wood bead bunny wreath!

Make a DIY wood bead bunny wreath with Dollar Tree craft supplies! This is a great wood bead wreath idea for Easter or spring.

This simple spring door decor is perfect to leave up all the way through Easter! And, it’s a really quick project that’s easy on the wallet, too.

Here’s how you can make your own charming Easter bunny wreath.

DIY Wood Bunny Wreath Supplies

This post contains affiliate links. Please read my disclosure policy for more information.

  • TWO wood bead wreaths (note: I purchased these in-store at Dollar Tree, but have linked for your online shopping convenience)
  • Floral wire
  • Wired ribbon
  • Needle-nose pliers

How to Make a Wooden Bead Bunny Door Hanger

You’re going to love how easy this Dollar Tree spring craft is!

Start by using the needle-nose pliers to take apart one of the wooden bead wreaths.

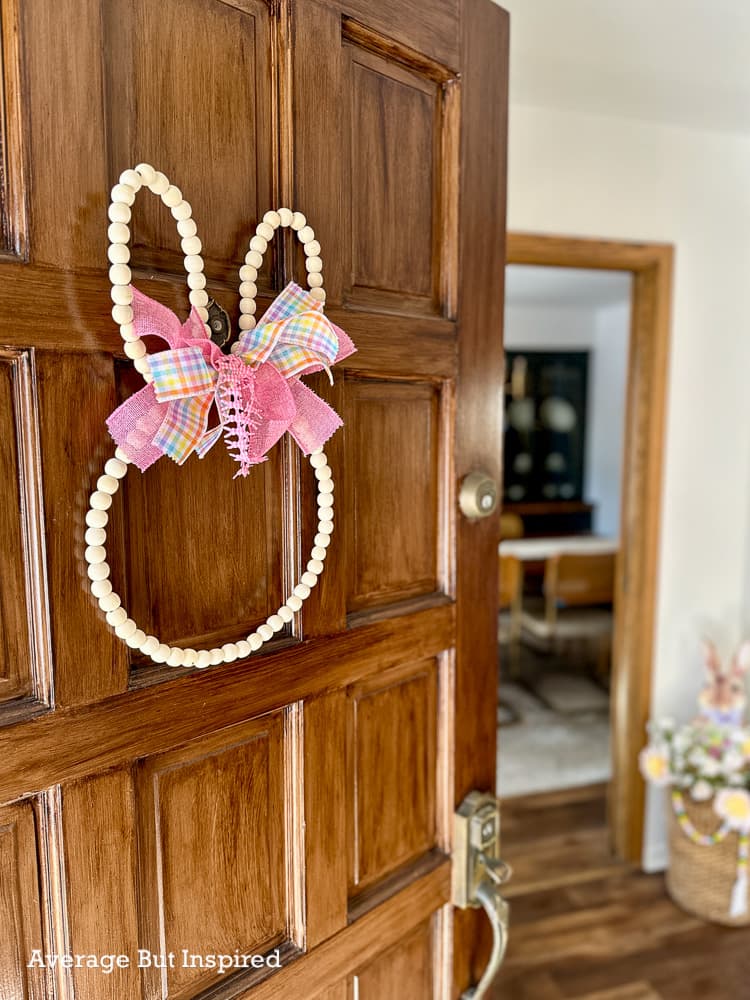
With that beaded wreath separated, fold it in half, and then bend both ends in toward the center of the beaded strand. This is how you make the bunny ears.

Dollar Tree wood bead wreaths can be turned into the cutest spring door decor. Bend one of the wreaths into the shape of ears.

Use the needle-nose pliers to bend the end wire pieces outward. Then fasten those ends to the wood bead wreath that’s still together.

Use wood bead wreaths or wood bead hoops to make a beautiful DIY easter bunny wreath for spring.

Cut a piece of floral wire and wrap it around the center of the ears to attach the ears to the wreath at that center point.

Check Out My Other Spring Door Decor Ideas!

DIY Mossy Basket Wreath

Spring Carrot Door Hanger

DIY Egg Tray Wreath

You can also make a loop with the ends of the wire so that you can hang the bunny wreath when it’s complete.

Use floral wire to attach the wood bead hoops together to create an Easter bunny wreath.

Now, make as simple or as elaborate a bow as you like!

I cut six pieces of wired ribbon and stacked them on top of one another. Then I twisted floral wire around the center of that stack and cut the ends to make a bow without loops.

Dollar Treewired ribbon makes the cutest bow for this DIY spring wreath.

Once the bow was complete, I wired it onto the wood bead bunny.

Make a DIY wood bead bunny wreath or door hanger for Easter or spring. This is a cute Dollar Tree spring craft.

Super simple but super cute! I love it when I find a reason to use supplies I’ve been hoarding for so long.

Like this bunny wreath idea? I’d love for you to “pin it”!

Use Dollar Tree wood bead wreath hoops to make this adorable DIY Easter wreath or DIY spring door hanger! This post shows you how to make this spring craft for adults.

Filed Under: Dollar Tree, Easter Tagged With: Dollar Tree, Easter, Spring, Wreath

Dollar Tree Flocked Bunnies: The Cutest 2026 Easter Decorations

March 11, 2025 by Bre 5 Comments

blank

If you’re looking for budget-friendly Easter decoration ideas, here’s a cute way to use the Dollar Tree Plus flocked bunnies this spring.

This post contains affiliate links. For more information, please read my disclosure policy.

I went into Dollar Tree to buy birthday cards and I walked out with three flocked bunnies.

Not on the shopping list! đŸ™‚

But these mossy-look bunnies in the Dollar Tree Plus section were so cute that I had to have them.

Dollar Tree flocked bunnies are the perfect addition to your Easter tablescape or spring centerpiece. Read this post to see how this blogger used them in her spring decorating.

They come in three poses and measure 10 inches high, so they’re a perfect size for Easter tablescapes, spring centerpieces, Easter crafts, and just general spring decorating!

And at $5 each, the price is right. ($5 is the 2026 price. I purchased these in 2025 when the price was $3.)

You know I couldn’t leave them as-is, right?

I cut off their tags and raffia bows. Then I cut strips of floral fabric and attached those to the bunnies as prettier ribbons.

Dollar Tree flocked bunnies are one of the cutest Dollar Tree Easter decorations in 2025. Give them a makeover and use them in your spring decor.

I also used Dollar Tree pearls in the center of each bow, which I fastened with straight pins.

Dollar Tree Plus flocked bunnies are so cute on an Easter tablescape. This spring centerpiece with moss bunnies is also filled with thrifted items to make beautiful Easter table decor.

I used the flocked bunnies on my dining room table as part of a larger Easter tablescape.

This dining room Easter display is filled with thrifted finds like a wood tool caddy centerpiece that has brass flower candlestick holders, and green flocked bunnies.

Check Out Some Other Dollar Tree Easter Crafts & Spring Decor Ideas

Egg Tray Wreath

DIY Bunny Planters

The wood tool tote was a thrift store find that I filled with my Grandma’s brass flower candlestick holders, moss, and faux eggs.

A thrifted wood toolbox or tool caddy gets new life as a table centerpiece for spring. Filled with moss, artificial eggs, brass candlestick holders, and a gingham ribbon, it's an adorable thrifted tablescape.

I also used some of my dishes, woven placemats, and baskets to add height and texture to this spring centerpiece.

The Dollar Tree bunnies are the perfect addition. Will you be hunting for them?

Filed Under: Dollar Tree, Easter Tagged With: Dollar Tree, Easter, Spring

Dollar Tree Stackable Presents: Transform Them Into Beautiful Christmas Decor

November 11, 2024 by Bre 6 Comments

blank

Get your hands on the Dollar Tree stackable presents and give them a makeover! Here’s how to transform these stacked gifts into beautiful Christmas decor.

In 2023, I transformed the viral Dollar Tree stacked pumpkins into a pretty pumpkin topiary. It has been one of my most popular crafts since then!

So, I was REALLY pumped to find that Dollar Tree introduced a whole new line of stackable holiday decor this year: a stackable snowman, a stacking Christmas tree, and stacked presents.

All are priced at $5, and the stacked snowman and stackable presents are my favorites! (I have seen some cute ideas for using the Christmas trees as kids’ toys / in kids’ activities, though.).

Dollar Tree's stacking presents decor can be given a beautiful makeover for Christmas decor!

I was lucky enough to find two sets of the stacking presents, and of course, I had to give them a makeover!

I ran into some snags along the way, so you’ll want to read about that if you’re also looking to transform this Dollar Tree Christmas decor for yourself!

Dollar Tree Stackable Presents Makeover Supplies

This post contains affiliate links. Please read my disclosure policy for more information.

  • Stacked presents decor (note: while these are “Plus” items, they weren’t located in the Plus aisle of my store! So, look all around any Dollar Tree you visit because they could be anywhere! As of publication, they’re not available online.)
  • Dollar Tree tag ornament
  • Rustoleum Universal Metallic Spray Paint in Pure Gold
  • Plaid wired ribbon, 1.5″ wide
  • Glue Dots permanent dots
  • Cricut Joy machine and white permanent vinyl OR white dot stickers and white Christmas tree stickers
  • Scissors

Stacked Presents Makeover: How To

Just like last year’s stacked pumpkins, the stacked presents are totally plastic. They’re a little cheap-looking, to be honest.

The red paint on the “ribbon” portion of the gifts was sort of chipped or missing, and the colors of the present boxes were kind of “meh” in my opinion.

These Dollar Tree stacked presents are begging for a makeover! See how they turn into gorgeous Christmas decorations.

Spray Paint the Present Boxes

Because of that, I decided to paint them. I wanted to have each gift box be a different color: one gold, one green, and one off-white.

But . . . I quickly found out that my favorite spray paint, Rustoleum 2X (which works on plastic), absolutely did not work on these plastic stacking presents!

The green and off-white presents immediately looked AWFUL. The paint didn’t stick to them at all!

Rustoleum 2x spray paint did not work to cover the Dollar Tree stacked presents.

The present box I spray painted gold with a different spray paint, Rustoleum Universal Metallic Spray Paint, worked much better!

Rustoleum Universal Metallic was the spray paint that worked for painting the stacked presents.

A couple of days later, I tried to spray over the green and off-white presents with the gold spray paint, but the paint immediately bubbled and cracked. It was not working!

So, I opened up the other set of stacking presents and sprayed two boxes from that set with the gold spray paint. (Note: the “bow” on top of the gift stack is removable, so I took that off for painting.)

Rustoleum Universal in Pure Gold is the spray paint that successfully covered the Dollar Tree stacked presents.

Two coats of paint were all it took for good coverage. Unfortunately, the spray paint did run in places. It’s almost like the metallic flakes in it settled strangely in spots. BUT, I was able to cover those problems for the most part! (See more below!)

Attach Ribbon to the Stacked Presents

For the next part of the project, I attached real ribbon to the present boxes. I started with the bottom gift box and cut 1.5″ wide wired ribbon to the length needed to cover each section of plastic ribbon on the box.

I pressed Glue Dots permanent dots to the “ribbon” on the box, and then pressed the real ribbon onto that. I used Glue Dots instead of hot glue because hot glue and plastic don’t always play well together.

Glue Dots were used to hold the ribbon on the presents.

You could try a different type of glue, but it might be hard to hold the ribbon in place while the glue sets up or hardens. The Glue Dots gave an instant hold, which I liked for this project.

Once I had the base present finished, I attached ribbon to the other two present boxes. For the top box, I cut two very long pieces of ribbon and wrapped them over the top of the gift box.

Plaid ribbon pressed onto the face of the stacked presents adds a festive touch.

Then I made a bow out of the same ribbon and hot-glued that to the overlapping ribbon on that top box.

A real bow takes the place of the plastic bow on the Dollar Tree stackable presents.

Hang a Gift Tag From the Box

Next, I hung a Dollar Tree ornament that looks like a gift tag from the bow on the top of the box.

It’s the perfect size for this present stack decoration!

I Think You’ll Love This Other Dollar Tree Christmas Craft, Too!

Dollar Tree DIY Candy Cane Wreath

Add Details with Vinyl or Stickers

Because I wanted my stacked presents to be multiple colors, I didn’t love the solid gold look of my project.

So, I cut permanent vinyl with my Cricut Joy into dots and Christmas Trees. Then I stuck that onto the bottom gift box and the middle gift box to help them look like patterned wrapping paper.

Adding vinyl cutouts to the stacked presents helps them look like they are wrapped in gift wrap.

I did not use transfer tape as I was worried that would rip off the spray paint from the presents. So, I just eyeballed the placement of each vinyl cutout and applied them like stickers.

Using these vinyl shapes was also a great way to hide the spray paint imperfections on these painted gift boxes!

DIY Stacked Presents Decoration

All in all, I’m pretty happy with how this stacked present decoration turned out. It’s definitely not perfect, but it’s not horrible either.

I originally thought I would use this outside, but it’s pretty lightweight and I’m worried it might blow away. So, it will stay inside. đŸ™‚

The Dollar Tree stacked presents got a beautiful new look for Christmas! This stackable presents decor makeover is a must see.

Have you found these adorable stacked presents in your Dollar Tree store? How do you plan to decorate them?

Filed Under: Christmas, Dollar Tree

DIY Photo Coasters: an Easy Tile Craft

October 17, 2024 by Bre Leave a Comment

DIY Photo Coasters made with tiles are such a great DIY gift! You can make them as a DIY Christmas gift, Father's Day gift, Mother's Day gift, and more!

These DIY photo coasters make a perfect personalized gift! They’re an easy tile craft that can be made for any occasion.

In this day of all photos living our our phones, printed pictures take on extra significance. And, this is especially true when the photos are presented in a way other than in a traditional picture frame.

Making these DIY photo coasters from inexpensive tiles is a wonderful way to make memories and see memories! These picture tile coasters are an easy craft and make an absolutely wonderful gift.

Let me show you how to make your own set of photo coasters!

Supplies Needed to Make DIY Photo Coasters

This post contains affiliate links. Please read my disclosure policy for more information.

  • Plain ceramic tiles
  • Mod Podge Dishwasher Safe Formula
  • Acrylic multi-surface paint in the color of your choice
  • 1″ foam brushes
  • Photos printed on a laserjet or inkjet printer
  • Spray sealer
  • Scissors
  • Felt bumper pads
  • High-temp hot glue gun or multi-surface glue

How to Make Photo Coasters from Tiles

I put together these photo coasters as a DIY Father’s Day gift, so you’ll see that the pictures on these coasters are all of my husband and kids. But . . . this isn’t just a Father’s Day craft. You can make photo coasters for any occasion!

I happen to think these could make a great DIY Christmas gift, for example!

Step One: Prep the Tiles

Start by choosing ceramic tiles that are flat across the surface and measure approximately 4″ x 4″. Ceramic tiles will work great for this – not something like travertine or marble with divots and dimension.

Rinse off the tiles and let them dry.

Once dry, paint the unfinished edges of each tile with multi-surface acrylic paint. Use any color you like! Then, set the tiles aside to dry.

Paint the edges of the tiles with multi-surface craft paint.

Step Two: Prep the Photos

Now it’s time to print out the photos of your choice! I recommend printing the pictures on an inkjet printer or a laser printer because the thin copy paper is easy to work with.

You can crop and resize photos before printing them in an online design program like Canva. (Or, you can print them out, trace the tile onto the photos, and cut them that way.)

Before you cut any photos, spray a light coat of sealer onto the photos. This is essential because otherwise your ink will run when you apply the Mod Podge in the next step.

Spray photos printed by an inkjet printer with spray sealer prior to using Mod Podge on them. This prevents the ink from running.

Once the sealer has dried, cut the photos to size.

Step Three: Apply the Photos to the Tiles

Apply a thin, even coat of Mod Podge to the back of a photo that’s been cut to size, and then press it onto the face of a tile.

Apply a thin layer of Mod Podge to the back of the printed picture.

Carefully smooth out the photo so that it’s flat on the face of the tile. Be careful so that you don’t tear the photo while doing this!

Press the photo with Mod Podge on the back onto the tile. You're almost finished with your DIY photo coasters!

Repeat the process with the other pictures and tiles, and let the photos dry on the tiles.

Once they’re dry, apply two to three thin coats of Mod Podge on top of the photos and all the way to the edges of each tile. (Let the Mod Podge dry in between coats!)

Once the Mod Podge underneath the photos has dried, apply two to three thin coats of Mod Podge on top of the photos.

Set the coasters aside to dry.

Step Four: Apply Felt Bumpers to the Coasters

Once the coasters are totally dry, attach felt bumper pads on the back of each coaster, in all four corners, so that the tile doesn’t scratch any surfaces.

Hot glue bumper pads to the back of each tile so that the photo coasters do no scratch any surfaces.

If you’re giving these sweet photo coasters as a gift, wrap them up with a bow and present them with the recipient’s favorite beverage!

DIY photo coasters are a wonderful gift - especially when gifted with the recipient's favorite beverage. For Father's Day, these photo coasters were gifted with Dad's Root Beer.

Since I made these for Father’s Day, I had to give Dad’s Root Beer – obviously!

You May Like These Other Photo Craft Ideas, Too!

DIY Wood Block Photo Holders

DIY Picture Frame Flower Box

Handmade and sentimental gifts or projects are always appreciated! So take the time to make some photo coasters for someone you love today (even if they’re just for yourself)!

Filed Under: Crafts

Picture Frame Flower Box: a Mother’s Day Gift DIY

April 26, 2024 by Bre 5 Comments

Make a DIY Picture Frame Flower Box out of Dollar Tree picture frames! This is an awesome Mother's Day gift DIY idea!

Looking for a sweet and sentimental Mother’s Day gift DIY project? Try this easy DIY picture frame flower box!

This DIY picture frame flower box craft is SO cute! And because it’s a bit sentimental, I think it’s a great DIY Mother’s Day gift.

But . . . it’s definitely NOT limited to Mother’s Day.

You could make this for anyone at any time. đŸ™‚

Now that we have that disclaimer out of the way, let me fill you in on how you can make this adorable picture frame vase. Best part? The supplies are SO inexpensive! They’re all from Dollar Tree!

Use Dollar Tree wood bead picture frames or other 4x4 picture frames to create a DIY flower box. This picture frame vase is a wonderful Mother's Day gift DIY project!

Supplies Needed to Make a Picture Frame Flower Box

This post contains affiliate links. Please read my full disclosure policy or more information.

  • Four, 4×4 picture frames
  • Wood box
  • Vase
  • Hot glue gun
  • Lazy Susan (optional but amazing)
  • Pictures
  • Flowers

How to Make a DIY Picture Frame Flower Box as a Mother’s Day DIY Gift

Start by removing the stand or flap on the back of each picture frame.

Remove the flaps from Dollar Tree frames to create a picture frame flower box craft.

Then, hot glue one of the frames to the front of the wood box. If you buy the same box I used, they come in a set of three (like nesting boxes), and you’ll use the largest of the three boxes.

Glue picture frames to a wood box to create a photo frame flower box.

Next, glue a frame to the outside edge of that first frame. This second frame will not touch the wood box (if you’re using the same box I did). None of the other frames will touch that box – just the first frame!

Glue wood bead picture frames from Dollar Tree to create a sentimental Mother's Day gift DIY.

Continue gluing the frames together until you’ve formed a cube.

Create a photo cube with four Dollar Tree picture frames.

Love Dollar Tree Crafts? I Bet You’ll Also Like These Dollar Tree Projects!

  • DIY Decorative Plates Decor
  • DIY Vase Fillers
  • DIY Bud Vases

Now you can insert some special photos, and then – if you’re extra – glue a lazy susan or turntable to the bottom so that it can spin. Mom will love turning her photo cube planter to see the special photos!

Want to see it spin? Check it out in this Instagram Reel!

Finally, place the vase into the wood box.

Fill it with flowers and present this as a beautiful and sentimental Mother’s Day gift!

Use Dollar Tree picture frames to create this Mother's Day gift DIY! It's a beautiful picture frame flower box vase that mom will love.

I also think photo flower boxes like this could be beautiful centerpieces at things like bridal showers, weddings, milestone birthday parties, and more!

Filed Under: Crafts, Dollar Tree Tagged With: Dollar Tree

Which Craft Laser Cutter is Best? A Comparison of Glowforge Aura and xTool M1

October 19, 2023 by Bre 2 Comments

blank

Thinking about purchasing a craft laser cutter? Here’s a thorough comparison of the Glowforge Aura and xTool M1: both laser cutters that I own.

I am so fortunate because I own both the Glowforge Aura Craft Laser and xTool M1 Laser Engraver. #HappyCrafter I am.

I was gifted both of these lasers (by Glowforge and xTool, respectively), but I want you to know that neither company has sponsored this post and that all opinions I share are my own.

These are expensive pieces of equipment, and I want you to be able to make the best purchasing decision possible! So, read on and feel free to ask any questions in the comments!

Which craft laser is best for you: Glowforge Aura or xTool M1? Get all of the details and a full comparison of these laser cutters in this post.

This post contains affiliate links. For more information, please read my disclosure policy.

What are the Glowforge Aura and xTool M1?

If you’re not familiar with these machines, both the Glowforge Aura and xTool M1 are laser machines that let you cut, engrave, and score many types of materials.

They’re different from electronic cutting machines like a Cricut, for example, because they don’t use a blade (*except for certain materials in the xTool M1 – more on that later), but instead cut, engrave, and score with a laser.

This means you don’t need any sticky cutting mats or blade replacements (unless you use the blade feature of the M1 – again, more on that later!).

Using a laser, as opposed to a blade, leads to cleaner cuts, the ability to cut more intricate designs, and the ability to work with materials a blade cannot always accommodate (like leather, wood, and acrylic, for example).

Both the Glowforge Aura and xTool M1 can cut and engrave leather.
Unlike most Cricut or Silhouette machines, craft lasers can cut materials like leather, wood, and acrylic.

Both of these laser cutters open up a huge realm of possibility for crafters and small business owners. There are so many ways to expand crafting capabilities with these types of machines!

Comparison of xTool M1 and Glowforge Aura

I thought long and hard about the information I’d want to know if I were deciding which craft laser to purchase, and I’ve written about all of those factors in this post. If there’s something you’re wondering about that’s not included, please comment at the bottom!

What’s the price of the Glowforge Aura and the xTool M1?

At the time of publication (October 2023), the Glowforge Aura retails for $1199. The Personal Air Filter (which I HIGHLY recommend purchasing), is an additional $399.99. This brings the total cost for Glowforge equipment to $1598.99.

The xTool M1 retails for less at $1099. But, the xTool Smoke Purifier (which I also recommend you buy – just as is the case with the Aura), is an additional $799. This brings the total cost of xTool M1 equipment to $1898.

Is a filter required for the Aura or the M1?

Neither the Aura nor the M1 requires use of a separate filtering device, AS LONG AS YOU PROPERLY VENT the machines out of a window and/or use them outside.

In my opinion, it’s easier said than done to properly vent out of a window. I tried that with the xTool M1 for awhile (you can read more about that in the post about my experience with the xTool M1). Not only was it very energy inefficient for my home, but the smell of burning wood lingered inside, even with the window open.

If you choose to vent either of these machines out of a window, I recommend checking their community groups (on Facebook, for example), for proven ways to properly vent and fan the devices.

If you’re able to buy the Personal Air Filter for the Glowforge Aura or the Smoke Purifier for the xTool, I recommend doing that instead.

What type of laser is the Glowforge Aura and the xTool M1?

Here we’re entering the scientific portion of our program. Wink wink. You may not think the type of laser matters to you, but it should because it can impact the types of materials you can cut and what you’re able to do with your craft laser.

The Glowforge Aura uses a 6-watt diode laser. This is different from the other Glowforge models, which use much more powerful 40-watt and 45-watt C02 lasers.

Similarly, the xTool M1 also uses a diode laser, but it is higher wattage at 10-watts. This means it should have faster cutting and engraving times, and be more efficient than the Aura.

Importantly, for both the Aura and M1, because they are diode lasers there are limitations on the colors or types of acrylic that can be used. Diode lasers cannot cut or engrave blue acrylic or clear acrylic, and generally, dark and opaque acrylic colors work best.

Glowforge Aura and xTool M1 can cut acrylic, but not blue acrylic or clear acrylic.
Dark acrylic, like the lettering and bat cutout on this Halloween decoration, works best with both the Glowforge Aura and the xTool M1.

While there are some tricks for cutting translucent, blue, clear, and/or light acrylics with diode lasers, those are not foolproof. So, just be aware of this!

What materials work with Aura and M1 craft laser?

With that understanding of how diode lasers work with acrylic, it’s important to know that both Aura and M1 can cut a wide variety of materials that every crafter will find useful!

Popular Materials Compatible With These Craft Lasers

This is not an exhaustive list, but it will give you a great idea of the most popular types of materials that are compatible with both Glowforge Aura and xTool M1:

  • wood
  • acrylic (certain colors and thicknesses)
  • laser-safe vinyl (for cutting with the laser function); regular vinyl (ONLY XTool M1 when using the blade function)
  • leather (must be laser-safe vinyl)
  • slate (engrave only)
  • paper materials (cardboard, cardstock)
  • felt
  • metal (certain types for engraving only)

You can find a more thorough list of Aura-compatible materials on the product landing page, and a more complete list of M1-compatible materials on its product landing page (you have to scroll down a lot).

The Glowforge Aura can cut vinyl, but ONLY laser-safe vinyl (which can be hard to find in stores). The xTool M1 can blade cut all types of vinyl.
The Glowforge Aura can cut vinyl, but ONLY laser-safe vinyl. The xTool M1 can blade cut all types of vinyl, which makes it a great option for crafters who do a lot of vinyl work.

Material Thickness

The Aura is able to cut materials up to 1/4″ thick. It can engrave materials up to 3/4″ high. And finally, it can fit materials measuring 12″ x 12″ inside the machine. Aura’s passthrough slot lets you work with materials that are longer than that, though, which is a huge asset to this small machine.

The M1 is able to cut materials up to 8mm in thickness (which is just over 1/4″ thick). As for engraving, I cannot find an official measurement anywhere as to the maximum height the M1 can accommodate for engraving! I did find that if you add the optional Riser Base you can engrave materials up to 120 mm high (which is around 4.7 inches). Finally, the M1 can fit materials measuring 385 mm x 300 mm inside the machine (which is approximately 15″ x 12″).

Cylindrical and Spherical Objects

If engraving objects like tumblers, rings, balls, and rolling pins (among others!), is important for you, only the xTool M1 is able to do that (not the Glowforge Aura). However, you must purchase the xTool RA2 Pro attachment separately (retails at $319 at time of publication), to have that capability.

What software is compatible with Glowforge Aura and xTool M1?

Both the Aura and the M1 use their companies’ respective software or apps.

Glowforge Aura works with the Glowforge App, which is not actually an app you download on your device, but instead is accessed through the internet. There are two versions: free and premium.

The Premium Glowforge app is $50 per month or $239 per year, and gives you extra features like unlimited design storage, faster processing times, thousands of free designs in the Glowforge catalog, DXF file processing, and 20% off Proofgrade materials. (Proofgrade materials are Glowforge’s premium quality materials that are guaranteed to work with Glowforge models. The cut, engrave, or score settings automatically populate when using these materials, which makes them incredibly user-friendly.)

This is a preview of the Glowforge app, which is the software used when you work with the Glowforge Aura craft laser cutter.
Glowforge Premium is an online interface that includes free downloads of numerous designs.

The free version of the app does not have as many bells and whistles. It also does not allow you to store your projects in the app (which means you’ll need to store files in the cloud or on your computer), and limits you to file sizes under 100k. This can be frustrating, especially for people who are not tech-savvy. If this is you, I recommend the Premium subscription for Aura. You will want to add that extra cost into your pros and cons list!

As for xTool M1, there is only one level of software and it is free! xTool Creative Space doesn’t offer upgrades like Glowforge Premium does (for example, faster processing), but you can do all of the same things if you have the tech know-how. Unlike Glowforge, xTool Creative Space is an actual app you download to your device.

This is an image of the xTool Creative Space software, which is free with the xTool M1 craft laser.
xTool Creative Space is an app you download to your device and includes a simple interface similar to Cricut Design Space.

How large are these craft lasers?

In my opinion, one of the big benefits of both the Aura and the M1 is their smaller size. They are much less intrusive than larger laser cutters! Glowforge even goes so far as to call the Aura “portable” – but it’s not like you’d pack it in your purse and take it somewhere.

To give you some reference, I store my xTool M1 in a small closet, and I store the Glowforge Aura in a little nook next to a desk. Both laser cutters fit perfectly on this rolling craft cart (to be clear: I have a cart for each tool; two carts total).

The Glowforge Aura measures 20.5 x 22 x 5 inches and weighs 21 pounds.

The xTool M1 measures 22 x 18 x 9 inches and weighs 21.6 pounds.

Comparison Chart of Glowforge Aura & xTool M1

This is my first time making a chart like this on my blog! I hope it helps to see the comparison of these craft lasers in a scannable format.

Glowforge AuraxTool M1
Laser Price (at publication)$1,199 USD$1,099 USD
Optional Filter or Purifier Price (at publication)$399.99$799
Software Price$0 for regular / $50 per month or $239 per year for premium$0
Laser TypeDiodeDiode
Wattage / Power6 watts10 watts
Warranty12 months standard. Unclear if extended warranty available for Aura. 12 months standard. Extended warranty (xTool Care) available for $89.99
Materials DifferencesOnly laser-safe vinylAll vinyl when blade function is used
Ability to Engrave Cylindrical & Spherical Objects (like tumblers & rings)NoYes when additional RA2 Pro product is purchased ($319)
Machine Sizes20.5 x 22 x 5 inches22 x 18 x 9 inches
Inner Working Area12″ x 12″approximately 15″ x 12″
Cut ThicknessUp to 1/4″ thickUp to 8mm (just over 1/4″) thick

Which Craft Laser is Best? Glowforge Aura or xTool M1

After working with both of these craft lasers for months and writing this post (which was a lot of work!), here’s my final decision: the best craft laser is the one that’s best for YOU.

I know, I know – you may be thinking that’s a cop out. But it’s the truth. You need to weigh the factors set out above and do your research, and decide which of these machines makes the most sense for your needs and/or wants.

For example, if you must have the ability to engrave cylindrical or spherical objects, then you should purchase the xTool M1 (and the RA2 Pro attachment). If you want to have the ability to work with longer objects, you should purchase the Glowforge Aura because of the passthrough feature.

Here’s one thing I’ll tell you though: don’t stress about it too much. I love both the Glowforge Aura and the xTool M1, and I don’t think you’d be disappointed with either if you do your research. Both companies offer great support if you have a problem, and the user communities are strong in forums like Facebook.

Thanks for reading my thoughts on these laser cutters, and please don’t hesitate to leave any comments or ask any questions!

Filed Under: Crafts

  • Page 1
  • Page 2
  • Page 3
  • Interim pages omitted …
  • Page 21
  • Go to Next Page »

Primary Sidebar

Let’s Connect!

Hi, I’m Bre! Thanks for visiting Average But Inspired, where I show you how to work with what you’ve got to create a home you love.

Bre of Average But Inspired - a DIY and craft blog

Love DIY? Subscribe to Get Posts E-mailed!

How Can I Help You?

blank

7 Tips for Hosting a Party on a Budget

blank

My DIY Kitchen Makeover Reveal!

blank

How to Paint Over Tile

blank

How to Paint a Countertop to Look Like Marble!

Looking for Something?

Copyright © 2013-2022, Bre Eggert (Average But Inspired). All rights reserved.
  • Home
  • DIY
  • Crafts
  • Home Decor
  • Privacy Policy and Copyright Policy
  • Disclosures
  • Contact Me