If you want to change the color of a stone or rock fireplace or wall, try limewash! This post shows how to limewash stone fireplace to retain a natural look.
Last September I announced that we were moving from our beloved home outside of Chicago to the Milwaukee suburbs. On December 21 we moved in to our new home, and since then, I have been busy unpacking and trying to make this house feel like our home!
I tackled my first big project, which was a makeover of our massive 1970s fireplace, and I am thrilled to share my limewash stone fireplace makeover with you now!
(Update: I subsequently finished my limewash stone exterior makeover, too! Be sure to check it out!)
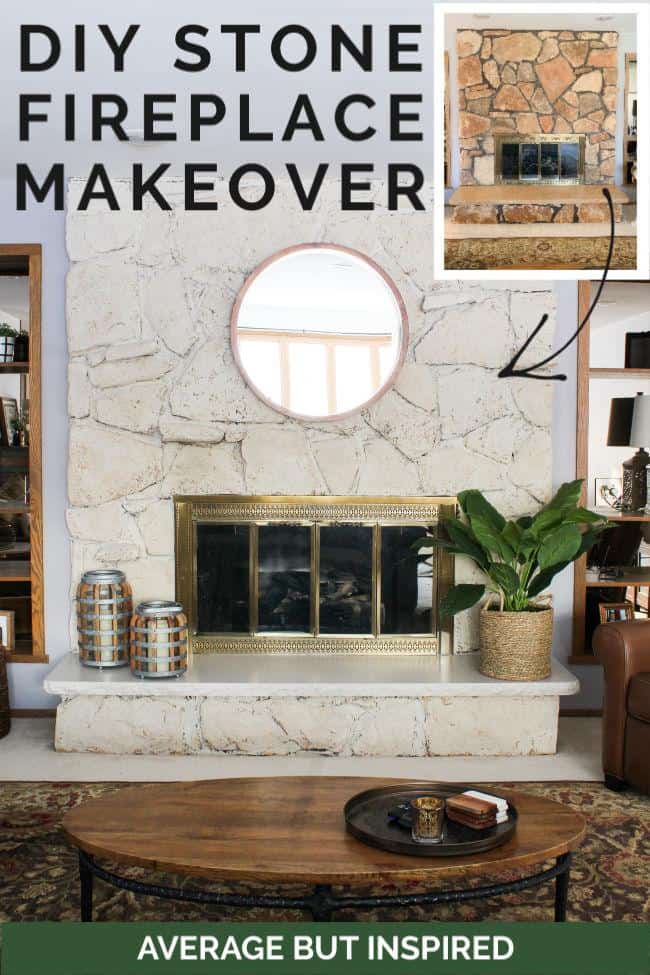
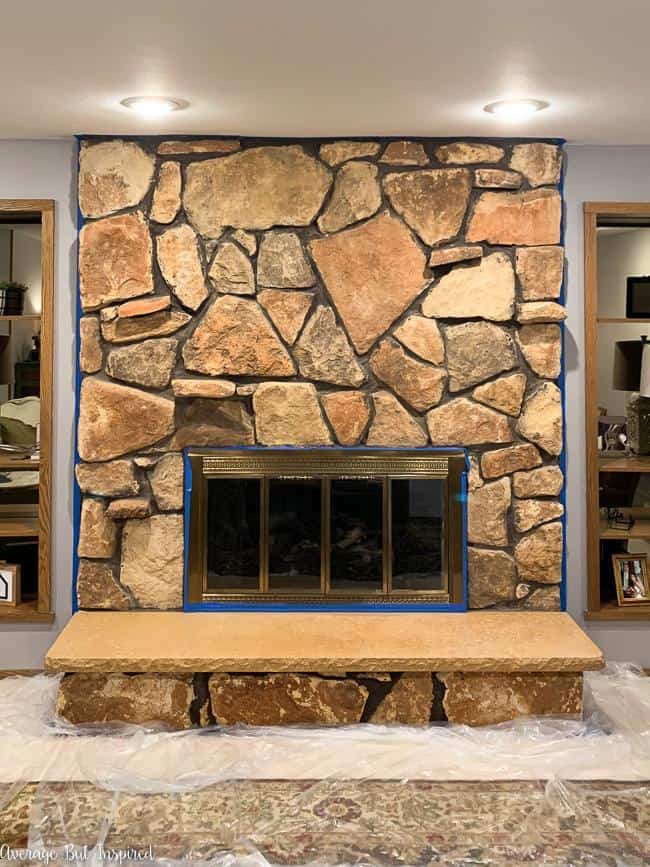
Before I show you all the pretty “after” makeover fireplace photos, I have to show you the beast I was working with! Complete with a wide variety of orange rocks, this extra large fireplace really clashed with my living room decor.
This post contains affiliate links. Please read my disclosure policy for more information.
As much as I can, I like to work with what I’ve got, though, and I did not want to tear down this fireplace (can you imagine the dust and mess?!?), concrete over the rocks, or frame it out with wood and ruin the 70s vibe we’ve got going on here. So, I did some research and decided to do a DIY stone fireplace makeover with Romabio brand limewash.
What is Limewash?
Sorry if you already know this, but I thought that some of you might be unfamiliar with limewash, so let me fill you in! Basically, limewash is a heavily mineral-based paint that produces a very chalky and matte finish.
The minerals seep into the porous surface to which the limewash is applied and give a really authentic and aged look. It is VERY popular for painting bricks and other masonry, like stone!
There are several brands of limewash on the market, and apparently, you can even make your own! I chose to use Romabio brand limewash because I follow the company on Instagram and love every makeover I see with their products, and because their limewash is affordably priced and comes in many colors. I used the Riposo Beige shade for my limewash fireplace makeover.
Why Use Limewash on Stone and Brick Instead of Paint?
You might be wondering why I chose to limewash my stone fireplace instead of painting it . . .
Well, there are several reasons!
First, I like that limewash is removable within the first five days of application. This made the project seem less risky to me. Although it probably would have been messy and tedious to remove the finish if I didn’t like it, I felt good knowing that it wasn’t permanent if I hated it.
Next, I like that limewash has little to no odor, unlike many types of paint! I did this project in January with no windows open, and there were no stinky fumes invading my house.
Third, I liked that the finished look was completely up to me in terms of how much of the original stone color I wanted to show through. Simply by thinning the limewash with water, I would have been able to get a more translucent effect and would have allowed more of the natural stone color to show through. This is perfectly fine with limewash and does not affect the durability of the product!
In my case, I was trying to mask the orange tones, so I applied the limewash in a more opaque finish. But had I wanted to, I could have allowed more of the stone color to show through.
Limewash Fireplace Supplies Used
Now that you have a little more background on limewash, let me fill you in on the supplies you need to limewash a stone fireplace. Surprisingly, it isn’t that much!
- Masonry brush
- Dropcloth
- Cleaning rags/towels
- Spray bottle with water
- Mixing bucket
- Stir stick
- Limewash (I used Riposo Beige for my fireplace)
- Painters tape
- Optional: smaller paintbrush to get in crevices and hard-to-reach areas
All in, this project cost me just under $70, and that is because I had to buy things like painters tape, rags, and a protective tarp (since the ones I already had are still packed away from the move). If you already have these items, your project cost will be less.

How to Limewash Stone
I think you won’t believe how easy it is to limewash a stone fireplace, or any rock surface!
Step One: Protect Surrounding Surfaces
First, make sure to protect surrounding surfaces with a tarp and painters tape.
Step Two: Clean the Stone or Rock
Next, clean the stone with a wet rag. Make sure to get rid of any cobwebs hiding in between the rocks, and get the rocks wet (but not dripping wet).
Step Three: Wet the Rock or Stone
After the stone fireplace surround is clean, get out your water bottle and spray the rocks. You want the rocks to be wet, but you don’t want water running down the rocks.
Step Four: Mix the Limewash
Now it’s time to mix up the limewash! For this step, make sure to read the product instructions that come with the limewash you have purchased.
I chose to mix my quart of limewash with half the amount of water (so, 16 ounces in this case), and this resulted in a thicker cover of limewash.
Remember to mix, mix, mix the product so that there is no extra water left at the top of the bucket, and so that everything is all mixed together. This could take up to ten minutes because limewash is very thick to begin with!
Once the product is fully mixed, it’s time to apply the limewash to the fireplace.
Step Five: Apply the Limewash
I started on the top left side and worked my way down the fireplace with the masonry brush. I watched carefully to see when the limewash was almost dry (but not totally dry), and then began to wipe it off very lightly.
Doing this let some of the rock tones show through – but not too much!
I repeated this application/drying/wiping process across the front and couldn’t believe the immediate difference the limewash made! I won’t lie – I did have a minor time of doubt as it was such a drastic difference, but I know that I always do that with any project, so I calmed down and kept working.
Step Six: Get the Nooks and Crannies
Once I finished the entire fireplace, I went back into the nooks and crannies I missed with the bulky masonry brush, and touched up those spots with a small paintbrush. (If you’re working with a limewash solution that is more diluted than my mixture, this may not be an issue for you!)
I stood back and admired the look of my limewashed rock fireplace, and then noticed how awful the orange hearth looked against it. I felt a pit in my stomach because I couldn’t let this orange hearth ruin this makeover!
The limewash did not work on the marble hearth (I accidentally got some on the hearth, and it wiped right off even though it had dried), so I had to think of a different solution.
The good news is that I did come up with a way to paint my marble fireplace hearth, and the whole project came together gorgeously! (Click that link if you want to learn how to paint a marble fireplace hearth, too!)
The Completed DIY Stone Fireplace Makeover
I know, I know – you want to see it! Here is the completed fireplace makeover – it looks so different!
I cannot believe what I accomplished for under $70!
And in case you’re wondering why I didn’t paint the brass fireplace doors – it’s because I like them! Brass is one of my favorite finishes.
Decor should be about what you like and not what others say you should do, so I am leaving them. (For now, at least. ;-)).
Final Thoughts and the Nitty Gritty on a Limewash Fireplace Makeover
In total, I spent just about 4.5 hours on this DIY stone fireplace makeover – from cleaning, to wetting the stone, to mixing the limewash, and applying the limewash. Note that if your limewash solution takes longer to get to the “wipe off” phase, your project time could be longer.
It was TOTALLY worth it. My living room is so much brighter, and my fireplace looks so much better. I didn’t have to spend a ton of money to make it look fresh, and I am so thankful to have found out about limewash!
I used an entire quart of limewash in the Riposo Beige shade for this fireplace and I didn’t have any left over. If you use Romabio Classico Limewash, they have helpful tools on their website that will let you figure out how much product you need for your specific project. They say that generally, a quart is enough for a fireplace makeover.
The next step in this living room overhaul is to paint the wall surrounding the fireplace (it’s currently a gray/purple color), and then paint the built-ins and get rid of the mirrored backs! UPDATE: I finished the mirrored built-ins makeover, and we replaced the carpeting with luxury vinyl plank flooring (you can read my luxury vinyl plank review here!)
We would also like to have a mantel built for the fireplace, but it is surprisingly expensive (according to the one quote I’ve gotten), and my large round wood mirror gives the natural wood look we’re after – at least for now!
So, what do you think? Was this 1970s stone fireplace makeover a success? Let me know in the comments, and please share this post to Pinterest to help others learn how to limewash their fireplaces, too! We stone fireplace people need to stick together! 🙂
And, if you’d like to see another DIY fireplace makeover I did, check out my DIY wood slat fireplace! This is a total transformation of the 1970s brick fireplace in my bedroom, and it’s aaaaaa-maaaa-zing!
Anita Ferrante says
Hello Bre,
Fireplace is done! Thank you so much for step by step DIY information. It was very helpful.
Kara says
Love this! I have a similar stone slab at the bottom. What paint did you use? And is it durable? I have little boys that like to run their cars and monster trucks across it …
Bre says
Hi! I used a paint called Americana Decor Satin Enamels! I have a post all about it here: https://averageinspired.com/2020/01/how-to-paint-a-marble-fireplace-hearth-in-four-easy-steps.html. It’s held up amazing! We don’t drive monster trucks on it though LOL!!! :-). I feel like with an added topcoat you would be just fine though!
Anita says
Hello Bre,
Your DIY came up when I was researching limestone washing for a fireplace. I love how yours turned out. It’s beautiful! If I could accomplish something similar I would be thrilled. Could you tell me how much you distressed the stones? Your instructions is what we plan to use when we take the plunge. Thank you.
Bre says
Hi, Anita! Oh yay!! Thanks for checking out my post. I’m really glad it is going to be helpful to you! I actually did not distress the stones at all. I kind of just applied the limewash in a “rougher” manner (as opposed to how you paint a wall like where you’re trying to get full coverage). I didn’t want the mess that distressing would cause. :-). Let me know if you have any other questions! And good luck!
Ruth says
Hi, I love how your project came out-it looks magnificent ! I have a similar furnace but mine is wood burning & I’m concerned that the smoke might darken & damage the finish. Can this finish be wiped clean or is there another option (of finish) you need to use for a wood burning fireplace? Thanks
Bre says
Hi, Ruth – thank you! Well that is a good question you raise! I would say that this cannot be washed clean – it could wash the finish off I think! However, I think if you gave it it a try and found that it was getting smoke or ash on it, perhaps you could re-limewash that area only once in awhile. (Like if you save some of the unmixed limewash to use in the future). Or, if you reach out to Romabio, perhaps they can help!
Jennifer Mak says
Thank you for the detailed post. I’m about to embark on transforming my fireplace (stacked rock) and appreciate your tips!
Is there anything you wish you had done differently?
Bre says
Hi, Jennifer- that’s so exciting!!!! I know you’ll be thrilled with the outcome. I’m happy to say that there is not anything coming to mind that I would’ve done differently. That is a great question though! 🙂
Chelsey says
This looks great! How did you hang the mirror, though? I have this same stone and can’t figure out how to hang things on it.
Bre says
Hi! If I’m remembering correctly, my husband used a toggle bolt!
Katherine Zitter says
We have the exact fireplace (1979 ) I am going to try it !! Thank u !!!!
Bre says
LOVE IT!!!! Good luck – I know it will turn out amazing!
Kelly Epstein says
Can you seal this now to give it a teeny bit of sheen? Also when you did this outside, did you seal it??
Bre says
Hi! I am not sure if it can be sealed! You would want to check with Romabio on that! As for when I did it outside – no I did not seal it. There was no sealer available at that time. However, I think I saw there may be a new product you can use as an exterior sealer? Not 100% sure on that though!
Barbara Tennent says
I have been searching for a solution to my very drab stone fireplace. I like the looks of this, perhaps in a tanner look. I am nervous, but I am tired of the old 60″s look .
Bre says
Barbara, I totally get it!! I was SUPER nervous, too! But I promise the reward is worth it. You’ve got this!
brit says
Do you know if I can lime wash slate tiles? I have a fireplace with the tiles around and they are blues, greens, grays and doesn’t flow. I want to lighten it but not sure how it works on slate tile. Can’t find much online. Thanks!
Bre says
Hi there! I’m sorry but I do not know! Two things you could do: (1) call Romabio and ask them. They should know. (2) buy a slate tile somewhere and get a sample of limewash and test it out. My hunch is that slate may not be porous enough for the limewash to work, BUT I could be wrong. Good luck!!! If the limewash doesn’t work, you could use chalk paint because that would have a similar finish to the slate, I think!
Kim says
did you seal the lime wash afterwards?
Bre says
Hello, no I did not! No sealer needed (especially inside where it won’t be exposed to the elements).
Jammie says
My rocks seem to be sealed with something. They are shiny. Do I need to sand them first?
Bre says
Hello! Oh goodness, I think you should check with the manufacturer first. I am thinking it would not work on sealed rocks. Worst case scenario you may want to buy the smallest package possible and test in an inconspicuous spot first!
Charlene says
I love the look of the fireplace after being lime washed. I’ve been wanting to this for a while and weren’t sure of the process. You explained it really well in detail. I can’t wait to try it this spring/summer!
Thanks
Bre says
Hi, Charlene – YAY! That’s awesome! Thanks for letting me know this was helpful. Good luck on your project – I know it will turn out amazing!
Lisa says
Love it!!! Thank you for sharing your process. I’m moving into a home soon that has a stone fireplace that is very dated, and I definitely will now consider the Limewash! I love how yours turned out. Amazing job!!
Bre says
Hi, Lisa – that’s awesome!!! Congrats on your new home, and good luck with all of the fun projects I’m sure you’ll be tackling soon! 🙂
Mette Egholm says
Hi, I love the look af the lime wash, now my ? Does it totally dry so you can use a wet cloth and wipe for dust does the lime wash stay?
Bre says
Hi, Mette! Well, honestly, I’ve never tried to wipe it with a wet cloth! I think that with a damp cloth it would stay just fine, because I also used it outside on my house and it hasn’t washed away. 🙂
Michael says
Please can someone tell me where I can purchase some 70’s stone ? I have a beautiful stone surrounding my fire place with a few orange type stones missing.
Bre says
Michael, you may want to try an architectural salvage company – even if they don’t have something now, they might keep an eye out for you! Good luck!
Cassie says
This looks beautiful, great job. I am curious about the long term effects however, which I dont see anyone addressing. I have a very similar fireplace and I HATE the orange but the spot directly above the fire is darkest due to the soot. How do you keep this from happening or do you clean it? I worry once its white it will only look worse in that spot with time.
Bre says
Hi, Cassie! OK, I’m not a fireplace expert, but I think that the soot on the outside of your fireplace is a sign of a larger problem that you should have addressed by an expert. That’s not supposed to happen, from my understanding. I would get that figured out, clean it off, and then do the limewash. I would not limewash before that problem is fixed. 🙂
Dottie Fisher says
I did this yesterday for my dad, his house definitely needed the update! I can believe the difference – it went from a light sucking thing in the room to almost light emitting! It looks great, I wish I could add a pic. Thanks for the idea!
Bre says
Hi, Dottie! YAY!!! That is so awesome!!! I wish you could add a pic, too! You could send me one on Facebook or Instagram if you’d like – or you can email me (averagebutinspired@gmail.com). I’d love to see it!!
Kelly L says
Hi! Beautiful! How did you attach the mirror to the rocks? Looks fabulous!
Bre says
Hello and thank you!! We had to use a serious masonry bit to drill in there and attach an anchor. It made a lot of dust. :-).
Kirsten says
We are in the process of doing this to our fireplace! Did you have to use some type of a seal on this? We are finding the lime wash is very powdery when dry 😬
Bre says
Hello! No, I did not seal it, and I haven’t had a problem with it being powdery. May be worth contacting the manufacturer. Good luck!
Meghan says
Hi Kirsten, I just painted my fireplace two days ago and it is also powdery. Did you find a solution? I’m hoping it will be ok once it fully cures.
Tawni says
Hello! I love what you have done with your fireplace, the end result is beautiful! I just bought a house that the entire wall is a stone wall fireplace, but it is rounded stone that has the orange undertones like yours did. I thought it was I thought it was interesting you chose the beige color limewash. I am looking to make mine more of a white color, but yours does look somewhat white in your pictures so now I’m second guessing what color to actually get of the limewash, I was thinking the Avoria white. Since I also have that orange type of stone do you think using the white is a bad decision? Much like you I’m afraid of doing something and hating it and then I can’t go back! Thank you!
Bre says
Hi, Tawni! I think the Avorio White will totally work! It will cover the orange (unless you mix the limewash super thin). My fireplace looks whiter in the photos than it does to me in real life. It definitely is not white when you look at it in person, so if you’re wanting white, stick to your guns – don’t use Riposo Beige like I did. And here’s the thing – if you buy Avorio White and get it on and don’t like it, you could totally topcoat with a different shade of limewash! But, I have a feeling that won’t be a problem. :-). Good luck with your project!
Bethany says
Thank you for this. I haven’t heard of limewash. I wonder how it compares to chalk paint. Do the rocks still feel like bare rock? I have a entire wall of my living room with similar stone -less orange, more white and the mortar in the cracks is brown. It’s the irregular shapes of the rock /mortar line that really bug me. You see similar fireplace walls on tv whenever they’re depicting a outdated home/low class family. I’ve lived with it 15 years hoping it would come back in style by some miracle. Changing wall color on adjacent walls helped somewhat. But you have given me the motivation to fix the rock. I like what you said about using what you have already, which is why I tried to like my rock wall for so long. I will limewash in a fairly light neutral I think and then over grout the cracks with an off white to make the wall smoother. I like your brass surround also. -Bethany
Bre says
Hi, Bethany! Great questions!! So limewash is similar to chalk paint in that it’s heavily mineral-based. However, with limewash you definitely have to dilute it prior to application, and you have much more control over intensity of color than with chalk paint. The rocks still feel like bare rock. and they look like it, too. The rocks do not look painted – the limewash makes it look as though the rock is that color. It’s really amazing and super affordable, too! Less expensive than it would cost to chalk paint the rock. This project will seem scary at first, but it will turn out great (it’s seriously foolproof), and I think you’ll love it!!
Ana Walker says
Hi Bre, love how your fireplace turned out. Would you happen to know if I could limewash a slate fireplace wall? It has beautiful colors on it and is matte not shiny. Thanks
Bre says
Hi, Ana! Thank you! Unfortunately I do not know if limewash works on slate. I bet the Romabio website will have information on that. If not, you could message them on Instagram or call customer service and they should be able to help you!
Patty says
Happy New Year! Your fireplace is beautiful! We are in the process of updating our farmhouse kitchen. We have installed a brick backsplash that I want to lime wash. I’m having trouble choosing a color that will blend well with the walls. Our Home Depot does not carry samples. I’m hoping you can help. I love the soft off white appearance of your fireplace but the product in the bucket you have posted definitely looks beige. Did the color mellow to a off white? My kitchen walls are a soft off white… So I would like a soft off white lime wash color. Thank you for your help.
Patty 🙂
Bre says
Hi, Patty! This sounds like such a fun project you have planned! The color I used, Riposo Beige, definitely has some beige undertones, and I don’t think it’s the shade you’re looking for. The color of my limewashed stone tends to look different in different lights, but there is definitely a beige look at times! I would guess that Cristallo White might be the soft white you’re looking for. You could look on Romabio’s Instagram to see examples of that particular color – that might help! Or, it would be worth it to buy the quart size of the product and test. It’s around $32 from what I remember, so while it’s not cheap, it’s cheaper than buying the big size of a color you don’t like. Good luck!!
Robin Hirano says
I just came across your site while I was looking for information on lime wash vs white wash. You’ve sold me! I’ll be using lime wash on our fireplace, which looks exactly like yours! Thank you so much for including excellent directions – this will make the process so much easier for me! Your end product (as well as your bookcases) looks absolutely beautiful! Thank you for sharing.
Bre says
Hi, Robin! THANK YOU!!! Comments like yours are what keep me going! I’m so glad this post helped you!! Please feel free to reach out during your project if you need any help at all. I’m so excited for you. You’re going to LOVE it!!!!
Lauren J. says
Looks great! I’ve been scouring Pinterest trying to find a project like this! I’m having a similar issue with my limestone fireplace in our new house – but the orange and brown in it appears to be visible rust. Did what you were working with have visible rust on it? Or did the stone just seem to be orange colored? Mine is a mix of the white-ish limestone color and deep rusty spots imbedded throughout. Thanks!
Bre says
Hi, Lauren! Our stone definitely was orange colored and not rusty. If yours is rust/mineral that’s part of the stone I am fairly certain that you wouldn’t have any issues with the limewash. To be safe you could definitely contact Romabio (limewash manufacturer) to double check, but I am thinking you will be good to go!
Gwen says
What did you end up using for your hearth? Looks great!! My daughter just bought a new house and her fireplace looks just like yours, so we saw you post and loved the transformation !
Bre says
Hi, Gwen! AAAAH so exciting!! OK, so I have an entire post on the hearth, which should be helpful to you and your daughter. Here it is: https://averageinspired.com/2020/01/how-to-paint-a-marble-fireplace-hearth-in-four-easy-steps.html Check it out and if you guys have any questions, don’t hesitate to reach out via the comment box or email!
Debbie says
I absolutely love this. I have a fireplace that looks exactly like yours and have been struggling for years trying to figure out what to do with it. Now I know. Going to go out and purchase the products and get started on it. I also found your info about the luxury vinyl planks very helpful. We are slowly updating our 70’s house also. Thanks again.
Bre says
Hi, Debbie! So exciting!!!! I’m so happy this post was helpful to you! Let me know how your fireplace turns out. I’m sure it will be gorgeous; this limewash stuff is so easy to use! Thanks for your nice comment.
Stacey says
Hi! I just came across this post on Pinterest. You did a fabulous job! I was wondering, could you go even more opaque with lime wash.? I’m not sure I want any of the existing stone color to come through. Thanks so much for the tutorial!
Bre says
Hi, Stacey! Thank you! Yes – you definitely could go more opaque. The limewash has to be mixed with water for application, but you can mix with the minimal amount of water, apply rather thick, and not wipe any off, and you should achieve a color that doesn’t let stone show through! Good luck with your project!
Laura says
Love the finished product! I’m looking at doing something similar but have lava rock not stones and mine goes all the way to the vaulted ceiling. Do you think this would work well for my project?
Keri R Traylor says
I have the same question, mine is lava rock too!
Kas says
Wow, what a simple solution to a dated fireplace! It looks lovely now and I love that you left the brass. Very curious to learn what you used on the hearth. I’m also looking forward to seeing the rest of the house and seeing how you transform and decorate other parts of it!
Bre says
Thank you so much! Yes, I am so thankful that it turned out well and was an easy fix! I am excited to share the updates to the whole house. Thank you so much for stopping by!
Cheryl Schultz says
It looks great! I will keep this mind in case we need it.
Bre says
Awesome! Thank you! So glad you like it. 🙂
susan says
It’s beautiful! My daughter did the same to hers and what a difference! I did wonder about the brass doors but after I looked again I like them! Can’t wait to see how you painted the hearth!
Bre says
Thank you, Susan! Yes the brass is “iffy” as they say, isn’t it? 🙂 I am happy I left it – at least for now! So happy your daughter’s fireplace turned out great. 🙂