Nothing makes as much of a curb appeal impact as a beautiful front door. If your wood front door has seen better days and needs to be refinished, do not fear! It’s so easy to restain a front door with gel stain, and the best part is that you can refinish it without removing it from the hinges!
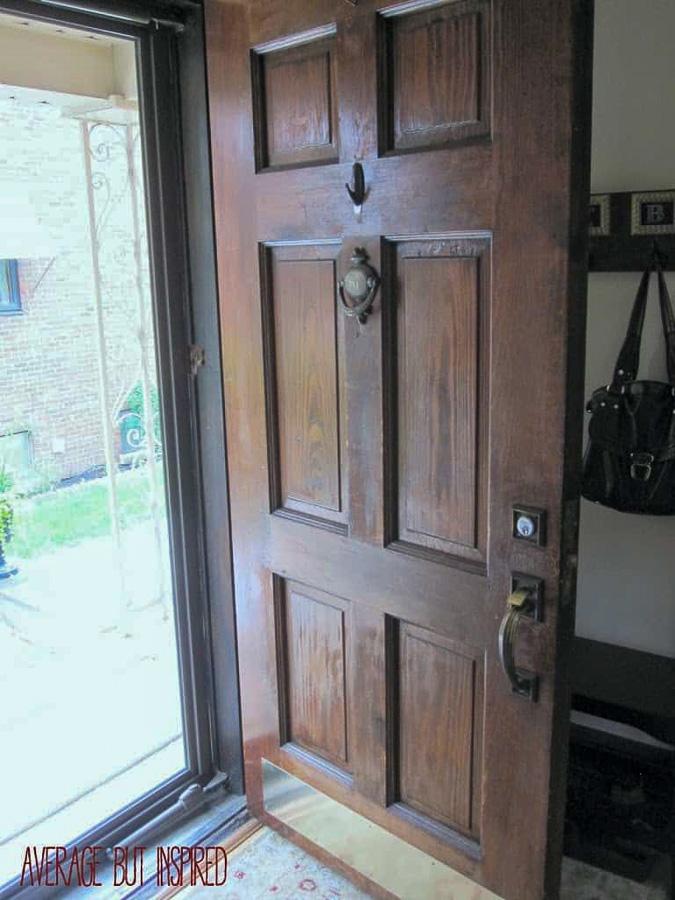
My home had a very sad and neglected wood front door. My husband and I believe that the door is original to the home (built in 1927), and that it had been unloved since that time.
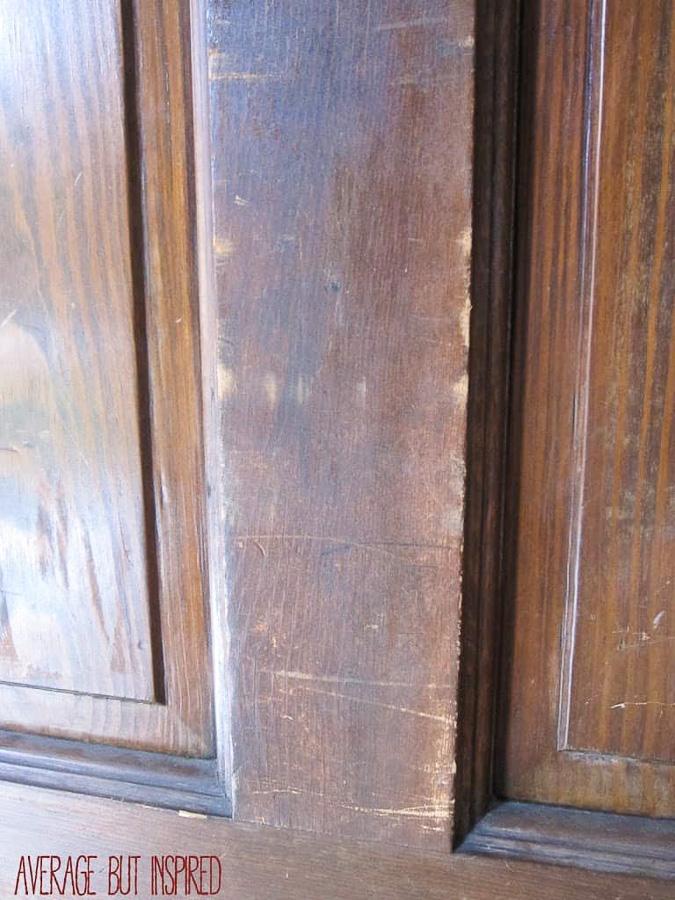
It was dull, scratched, worn and making a very bad first impression. Not a very welcoming entrance to the home that we’ve put so much time and effort into! This “before” photo actually makes the door look better than it should.
Since our door was in such bad shape, we really wanted to replace it with a new, craftsman-style wooden door with windows. But after researching the cost of replacement doors, we decided that refinishing the door was better for our budget.
We weren’t sure if I could get a wooden door that looked THIS bad to look better, but we figured it was worth a shot. (Spoiler Alert: it TOTALLY WORKED and I’m going to show you how to get the same results!)

After doing a lot of product research, I settled on using gel stain to refinish this wood front door. Restaining a door with gel stain has a lot of benefits – one of which is that you don’t have to remove the door from the hinges, strip the door prior to restaining, or do any extensive prep work. The easy way is my way.
What Is Gel Stain?
In case you’re unfamiliar with it, gel stain is different from traditional stain because it does not penetrate the wood. It sits on top of the wood, much like paint does.
When applied, it has a pudding-like consistency and looks rather opaque. But when you wipe off the excess gel stain, it has a translucent finish that lets the wood grain show through, just like regular stain does.
Since originally publishing this post, I have used gel stain on LOTS of projects. I even have a helpful blog post on Helpful Gel Stain Tips and Tricks for a Perfect Finish. I recommend reading that post after this post to give you even more information about the process of refinishing a door with gel stain.
Can You Restain a Door That’s Already Stained?
Before we jump into the step-by-step process, I want to answer the number one question that I get on this topic: can you stain a door that’s already been stained?
The answer is YES! You can use gel stain to restain a door that’s already been stained. That is exactly what I show you how to do in this post.
The key to restaining a previously stained door with gel stain is sanding just enough to remove any protective sealer that’s left on the door. You don’t need to sand down to bare wood, but you do need to remove that shiny layer of protection before staining again.
Can You Use Gel Stain on Exterior Applications?
Throughout the years, many people have asked me if it’s okay to use gel stain on an exterior door. Some people have told me their cans of gel stain say the product is for interior use only.
My can of gel stain says nothing about it being for interior use only, and my door’s finish stood up wonderfully! I moved out of this house in 2019 so I haven’t seen it since then, but from 2014 – 2019, my restained door was in excellent condition.
Also, in my new home, I painted the front door to look like wood with gel stain! This is another exterior use of gel stain that is working out just great.
So, you may be nervous to refinish your front door with gel stain, but I assure you that it’s going to look fantastic!
Supplies Needed to Restain a Wood Door with Gel Stain
These are the supplies I used to refinish my wood front door as shown in this post. Obviously you can use a different color of gel stain to refinish your door. Pick a shade that works best for your home!
This post contains affiliate links. Please read my disclosure policy for more information.
- General Finishes Gel Stain (as shown in Brown Mahogany)
- Foam brushes in varying sizes
- Cheesecloth
- Spar Urethane in Satin (formulated for exterior finishes)
- Sandpaper (I used 100 grit)
- Disposable gloves
- Painters tape
How to Restain a Wood Front Door with Gel Stain
This is the complete process of how I restained my wood front door with gel stain, and without removing it from the hinges.
STEP ONE: Clean the Door
I washed the door to remove the dirt and grime that had accumulated over the years. Then I taped off the door knocker and handle set because I couldn’t get them off the door!
STEP TWO: Sand the Door
I lightly sanded some parts of the door, focusing on the areas that still appeared to have some protective finish on them. Then I used a cloth to remove the dust that appeared during sanding.
VERY IMPORTANT: If your door has protective finish left on the entire thing, make sure to sand the entire door. You want the surface to be in the same condition on the entire door when you start staining. This will ensure that the stain looks even.
STEP THREE: Apply Gel Stain to the Door
I followed the directions on the can of gel stain, and I applied stain to a small section of the door with a foam brush.
I had a temporary freak out when it appeared to be a really dark, solid color – almost like pudding. I thought I’d ruined my door.
STEP FOUR: Remove Excess Gel Stain
I used cheesecloth to wipe off the excess gel stain on the area to which I’d recently applied the stain. Here you can see that stain had been applied to the right side of the door, but not the left. Look at the difference already!
I repeated this process until I finished restaining the entire door. I breathed easy because I hadn’t ruined the door.
STEP FIVE – Repeat the Gel Stain Process
I then let it dry overnight, and repeated the gel staining process again.
This is the door with two coats of gel stain, but no protective topcoat yet. Already beautiful, right?
STEP SIX – Apply Protective Topcoat
After the second coat of gel stain had dried 24 hours, I began applying my protective topcoat, per the manufacturer’s directions.
I applied four coats throughout the course of the day, which allowed me to finish the topcoat portion without sanding in between any of the coats. This was key to ensuring ease of application.
Several people have asked if I am sure that it’s okay to apply a water-based topcoat over gel stain. I am totally sure that it is okay to use water-based topcoats on gel stain! General Finishes (the manufacturer of the gel stain I used to refinish my door), even says it is ok to use water-based topcoats with gel stain.
The Restained Front Door
Can I just say that my wood door is now GLEAMING?
It looks totally amazing – almost like a new door.
This restaining process took some time, but it was time well spent. Refinishing the door with gel stain made a huge impact on my home’s curb appeal, and it was an inexpensive way to upgrade the look of the door.
Matt Somers says
Hello, Thanks for the description of the process. I found that you have to completely remove any top coat in order for the gel stain to adhere evenly and correctly. This process /stripping took 8 hours to remove all the top coat and repair damages. Then I had to stain with 2 Coates and wait 2 days and then another day before adding a UV clear coat. I should have had a professional do this correctly. It would have save me a lot of frustration. Bonus, with gel stain it acts as a crack filler too!
Jack Pollack says
It’s been ten years and this page is still helping people. I just did my front doors using your instructions. I’d never done a door before, this came out amazing. I was quoted an enormous amount of money for someone to do this “professionally” and would have had no doors for days while it was being done. Thank you for such specific instructions. Saved me thousands.
Bre says
Jack! Oh my gosh!!! THANK YOU!!!!! I can’t tell you how much I appreciate this kind comment. Makes my day! Really, I’m so glad the tutorial was helpful. Thanks for coming back to let me know!!
Sean W.C. Fields says
Thanks for the tips, Bre. I think I’ll try this next weekend. I can’t believe you didn’t move that rug or at least put a drop cloth down. You’re lucky you didn’t ruin it, but you sure are cute.
Kwhite says
What is the name of this color of gel stain?
Bre says
Hi – I used aged oak!
Kim says
General finishes site certainly states not to use where there is direct exposure to water (for any oil based stain, not just gel) so I may only recommend using if you have a glass storm door. Outcome looks great though.
Bre says
Hi, Kim! This is why you need to topcoat with the proper outdoor sealer / top coat like I used here! Certainly a storm door would be beneficial, but if you’re doing this to a garage door, for example, that’s not possible. The sealer is what protects that gel stain. Thank you!! 🙂
Daria says
Hi! I am so inspired! However I have a question – my door is pretty scratched up (dogs) and I feel like those spots need to be covered up with a wood filler. What kind would you use and when should I use it – before staining or after? I actually found a jar of stained wood filler and the label states to stain and seal the wood BEFORE using it. However my damaged areas are pretty extensive (but not that deep) and I’m afraid if I save stained wood filler for the last step it’ll be very noticeable. Would appreciate any suggestions! Thank you!
Bre says
Hi, Daria! Oh gosh . . . this is tricky. I personally have a tough time with wood filler looking right. But I will tell you that I restained patio doors in my new home and didn’t fill the scratches from the previous owner’s dog, and the door does not look good. If it were me doing it, I would probably do this: 1. fill the scratches with paintable/stainable wood filler (using as little as possible and trying really hard not to go outside of the scratches); 2. GENTLY sand that area in case any wood filler raised up out of the scratches; 3. paint over the wood filled parts with a brown paint that matches the color of the door; 4. restain the door as I set out in the blog post. I can’t guarantee that this will look perfect, so maybe try it on one scratch and see what it looks like. It will be a trial and error type process. GOOD LUCK!
Sue A. says
My front door really needed to be refinished, and you were there to show me. Followed all your tips. Thank you!!
Bre says
Hi, Sue! I love this! Thank you so much for letting me know. I’m so glad this worked for you!
Marcy M says
This DIY is still helping people 7 years after the original post date! You gave simple steps in easy to understand language. And you gave a great understanding of the amount of time and tools needed to complete the project! I was able to stain my door without any hiccups! Now it looks great and I’m a happy girl! The hardest part of my job was taping the lock and handles… oh, and waiting for the stain to dry! Thank you so very much for this great post!
Bre says
Marcy!! THANK YOU!!! I’m so appreciative that you took the time to come back and tell me this. Thank you thank you! Very happy you’re pleased with your door!!!
Randy says
I am trying to restain and poly the back door and side windows. I used min wax for interior. Bad mistake. turn very white in spots. West side of house in AZ. Had to remove the poly then take steel wool with liquor to remove the white formation i guess from the heat. I have yet to find a stain that wont do this. I put on golden pecan by min wax. I have worked to hard and still at a stand still. Need help please
Bre says
Hi, Randy – my hunch is that your stain is drying too fast or condensation is getting trapped under the poly. I’d suggest doing some online research on how to prevent this, and applying it to your situation. Since you’re in AZ you may need to stain at a very specific time of day where there is not direct light/heat on the surface. Good luck!!!
K.C. says
Hi! I know this is an oldie, but hoping you will still have some insight as this has been the best tutorial on the subject I have found! Couple of questions – what size can did you use/need for the door? Did you do both sides? And I know you’ve touched on this a bit, but I don’t have a storm door and will need to close the door at night, could I apply the first coat of gel in the morning and close the door that night without ruining it (or sealing myself in!)? And lastly, for the 4 coats of sealer, did you use a foam or regular brush? Sealers are my enemy for some reason, so what to make sure I get it right! Thank you for your time!
Bre says
Hello! (1) I used one pint of gel stain for the door. (2) I only did the front of the door. (3) This can be tricky depending on your weather. If it’s very humid, it’s possible that it will still be tacky at night. If it’s not humid, you will probably be OK with closing the door at night. But try to only do it that one time (like don’t be going in and out that night). (4) I used a foam brush for the sealer. I also don’t like applying sealers! This went on just fine though and I didn’t have any issues. Good luck!!!
Sung Park says
Bre, I’m a big fan of this post and ready to refinish the exterior door exactly following your steps. I have two questions to ask:
1. Are you against using Minwa gel stain? My door color seems to match with Minwax cherry wood color, which General Finishes doesn’t seem to carry. I can certainly go darker with one of colors General Finishes carry, but besides colors, do you think General Finishes gel stain is far superior than other brands?
2. For the top coat choice, Home Depot carries oil based Spar Urethane version for outdoor use as well. If you were to do the job again, what would you suggest? Water or oil based top coat? Looks like it has been six years since you did this project. Is your door still look good?
Thank you in advance!
Bre says
Hi, Sung! I’m so sorry for the delayed response to your questions!!! I’m sure you’ve refinished your door already, but I will answer your questions anyway. 🙂 1. No, I am not against Minwax, and actually have been using it more in recent years. I still love General Finishes, but the price difference has led me to use Minwax more often and I think it is good. 2. As for the top coat, the water based has held up perfectly, so I wouldn’t hesitate to use it again!
Sahar says
I bought all the material and read your instructions and watched many videos and did the first coat this morning but it’s looking very patchy and ugly. Plan to sand it down and do a second coat and see if it gets any better. Any tips? I also wasn’t sure what the best way was to wipe given the different sections of the door go in different directions…..
Bre says
Hi, Sahar! I’m sorry you’re experiencing that. It sounds like it could be one of two things: (1) the gel stain could be drying too quickly before you’re wiping it off. That can lead to patchiness or blotchiness, which often feels like a sticky or tacky finish on the top. You can use mineral spirits to wipe that tackiness off and then try again; or (2) the wood below is uneven in original tone/finish (ie glossy vs no gloss/topcoat), which is causing the stain to take hold differently. If you can get that wood to be an even surface/gloss level, it would stain better. My hunch is that its the first thing happening. I would reapply and not let the gel stain sit as long as you did the first go round, and work in smaller sections to avoid the drying issue. I hope that helps! Keep me posted.
Sherry Black says
Did you sand before applying the top coat? I’ve applied my stain and am about to start with the top coat, but was not sure if I should sand first. Thanks!
Bre says
Hi, Sherry! I’m sorry for the delayed response. I’m sure you’ve moved past this now. Honestly, I don’t think I did. It was so long ago now! But I’m pretty sure I remember being scared that I’d ruin the gel stain finish, so I just applied the topcoat without staining. How did your project turn out?
Amy LeBlanc says
Hi there! I am tagging this as my quarantine project – I have already removed my knocker and address numbers, but am keeping my door handle intact. I have similar brass hardware, and was wondering if you have any tips on shining it up? I don’t want to remove the door handle, so did taping around it work fine? Also, there are a few areas that have top coat on from when the door was first stained – should a light sand paper help lift these off? Thanks again!
Bre says
Hi, Amy. This is a perfect quarantine project!!! 1. The tape definitely protected the door handle. It was totally fine to leave it on. 2. As for shining up brass, I have used a few different methods I’ve found online. None work perfectly well, but Google how to shine brass and see what comes up – try something that works with what you have on hand and for a piece already in place. 3. Yes, sand those areas w/ topcoat to try and get an even finish with the rest of the door. I hope that helps and makes sense! Reach out if you need more help!
Lee says
Thank you for the instructions. I followed them and the door looks great. I still need to topcoat – that is next. Used the general brand gel coat finishes – they are the best. I have a before and after photo if you want to share.
Bre says
Hi, Lee! I would LOVE to share your before and after photo, if you don’t mind! You could email it to me at averagebutinspired@gmail.com. I’m so happy the process worked well for you! 🙂
Kevin says
It looks great, but kind of scary that the “easy” way involves sanding, two coats of stain and 4 coats of urethane.
Bre says
Thanks! Yeah it is beautiful. And seriously – it’s way easier than taking the door down, stripping to bare wood, sanding, staining, and sealing. Not sure if you’ve ever done that, but this is definitely the easy way.
Yvette says
Hi! Thank you so much for this post. We’re getting ready to sell our house , and are doing a bunch of updates before listing. The front door really needed a pick-me-up. It looked exactly like yours before you refinished. Super weathered and worn. I ended up getting the Varathane brand gel stain in mahagony and it works just as well. The only issue I had was the sanding… I sanded and thought what I did was enough. I mean, I thought I had gotten any finish that was left on the door, because like yours, my door was barely covered in anything… so I would just warn anyone doing this to thoroughly sand.., make sure you really get any finish left on the door because of you don’t you’ll have a super blotchy stain job… but other than that little hiccup, this is amazing! Super helpful so again thank you!
Bre says
Hi, Yvette! YAY!! I’m so glad it was helpful to you!!! Thanks for letting me know about the Varathane gel stain. I wasn’t even aware that they made one! So glad to know it works well! Also, thanks for the helpful tip re: sanding. I should add in your caution to the body of the post. Thanks so much!
Vivian says
This is awesome…exactly what I was looking for. Was the 1 pint of gel stain enough to do the whole door? Thanks so much for the tutorial!
Bre says
Hi, Vivian! You’re so welcome! Yes – the pint was more than enough! A little goes a long way with this stuff. Good luck and I hope your door turns out amazing!
Amanda says
Oh wow, your door looks amazing! I’ve been needing to do our front door for about 2 years, but keep putting it off because I don’t want to take the whole door off the hinges!
What did you use to apply the stain and the sealer – a brush?
Thanks in advance!
Bre says
Hi, Amanda! Sorry for the delayed response! I used those disposable foam brushes to apply the gel stain. Good luck with your project!
Monique says
Thanks for posting this, I was looking for an easy way to do our front door. I received a quote for $325 & thought no way I can do this myself, now I feel even more confident after seeing your post.
Can’t believe someone would find the need to say something insulting about your wreath when you were so nice to go thru the trouble of posting this. Thanks again, you just saved me lots of money. BTW….I think your wreath is adorable.
Bre says
Hi, Monique – thank you!! Yeah, I don’t know what’s up with people sometime and the silly comments. I think they don’t realize that bloggers are real people, not robots. Hahaha! Anyway, good luck with your project! You can DEFINITELY do it!!! 🙂
Traci says
Hi, I am one of those people that plunges headlong into a project regardless of the consequences, so getting such great results was a welcome relief. I am amazed at how accurate your process was. I went from a sad, tired door to one that looks almost new. Keep in mind my front door it probably 20-30 years old. My only issue is the urethane when applied with sponges bubbled and it took a bit of time to correct that issue. Other than that it is “fabulous”.
Thank you so much.
Bre says
Hi, Traci! Oh my gosh – you made my day with your comment! I’m so happy that you had great success and that your door looks amazing. 🙂 I bet you can’t stop staring at it – ha! Thanks for taking the time to come back and leave me a note. I truly appreciate it! – Bre
Don says
Thank you on you door refinish guide. I too have several doors to refinish, these are on the inside. they are solid pine wood interior doors. The staining on these doors is going to be hard to match. It’s more about the technique used rather than just matching a stain. If it where only the color of stain match I would have hit the nail on the head by now. This is my 3rd weekend on this single “test door”. I’m thinking about lightly sanding over my new dark stain now with a 150 grit sandpaper and apply a lighter stain. This “test door” as I’m calling it. I’m going to re-applying a 2nd coat in a lighter color of stain on a finer sanding. Yes, there is some bit of insanity going on here. And I’m not a expert but I’m pretty sure this is close to the original technique that was used back in 1985 on it. I hope it matches.
Bre says
Hi, Don! Oh my goodness! Yes, it sounds like you have quite a project happening there! Best of luck getting that perfect finish that you’re in search of!
Jenny B. says
Thanks for sharing this! We desperately need to refinish our front door to get our house ready to sell. Did you have to leave the door open while it was drying? We need to do this really soon, but… it’s February (brr!). When you closed the door to dry overnight, did it take off the finish where it touched the door frame / weather stripping?
Bre says
Hi, Jenny! You’re so welcome!! I did leave the door open while it was drying, but I had my screen door closed. As for shutting it at night, it was not a problem at all! I think it had enough time during the day to dry that it wasn’t an issue. One thing I’d recommend is for you to check the suggested temperature range for the gel stain and topcoats, just to make sure it isn’t too cold where you live to refinish now. GOOD LUCK! 🙂
Jenny B. says
Thanks, Bre! 🙂
Bre says
You’re so welcome!! Good luck! 🙂
Robert Christie says
You used oil base gel stain and then water based spar urethane? Weren’t you worried abt mixing the two? How long did you wait before too coating?
Bre says
Yes! I know it sounds counterintuitive, but it is totally okay! You can read more about it on General Finishes’ website, too! https://generalfinishes.com/blog/2014/12/do-gel-stains-need-a-top-coat#.WguaaxOPLVo There is a suggested time in between coats, but I honestly can’t remember if I waited that long or not (it’s been so long).
Nancy says
Love how your door turned out! Did you do anything to even out the worn areas of the door before applying the gel stain? Or put an extra coat of gel stain in those areas? I would think that the color difference would show through if you didn’t. We have a banister where the stain has similarly worn off in a few spots, so is love to find out how you dealt with this. Thanks!
Bre says
Hi, Nancy! Thank you!! So aside from the light staining I gave the door, I did not do anything extra for those worn areas. I think that because the gel stain sort of sits on top of the existing finish (instead of being a penetrating stain), it all kind of evens out. However, if your door presents an issue, I’m sure you could add a little extra gel stain to the worn areas if you’re seeing a difference. Good luck with your project! P.S. my door still looks awesome as the day I refinished it!
Bliss says
All I can say is THANK YOU THANK YOU THANK YOU! My door was in way worse shape than yours – it gets direct sun most of the day, and we have no storm door. I paid to have it restained a few years ago and it lasted less than a year (and cost me hundreds). I’m not completely done with my door yet and already the difference is astounding. Even if I had to do this each year, it’s worth the cost savings to do it myself and the gel stain is easy to use!! Thanks again for such a clear tutorial.
Bre says
Hi, Bliss! YOU MADE MY DAY! Thanks so much for leaving me this note!! I can’t tell you how happy it makes me that you’re happy. I am really glad this tutorial helped you with your door, and I hope the rest of the project turned out great! Thanks again. 🙂
Ed says
Hi Bre,
Thank you for taking the time to share with the rest of us. Your article has given me the inspiration I needed to attempt to refinish my own front door. I have a question, is there a reason why you chose to use Rust-Oleum Varathane Clear Water Based Outdoor Spar Urethane over the General Finishes Water Based Exterior 450 Clear Satin as your top coat? I rather use the top coat from the same manufacturer insuring compatability with the Gel stain and hopefully better protection.
Thanks Bre
Bre says
Hi, Ed! Such a great question! When I took on this project, I wasn’t actually sure it was going to work (ha!), so I purchased the Spar Urethane as a topcoat because I could buy it locally at the hardware store and it was cheaper. It has held up marvelously for me, but I think your reasoning behind using General Finishes’ topcoat makes absolute sense! I have heard wonderful things about General Finishes’ topcoats though I haven’t used them myself. Anyway, I think you can’t go wrong either way and I wish you the best of luck with your project. I hope it turns out fantastic!
Michelle says
Thank you for your tutorial, Bre. My door has been bothering me for years, when the house was new the front door was in direct central Virginia sunlight every day (now it’s shaded by trees, yay!), and within three years it looked pretty bad. It’s been nine years now and finally I decided to do something about it. Like you I considered painting it, but then looked at a bunch of YouTube tutorials from guys all over the country (they are funny, as each one has a regional accent from a different area of the country but it’s kinda like they are all the same guy… ; )) By after that I was wondering if I wanted to go through all the steps that many of them were going through, and I knew I didn’t want to take the door off… Voila! Your blog, thank goodness from a woman. I wasn’t sure if the gel stain would be as good as the stain/varnish process but when I saw your photos I was convinced. I sanded it down (bought a simple stripper piece to connect to my regular household drill), sanded a bit more, then just this morning bought the stain and have applied the first coat. Looks great already! Thanks so much! I bought a polyurethane to use as the top coat but could not find a matte finish, just satin. I’m hoping that won’t be too shiny…. Thanks again. Michelle
Michelle says
Note: I recommend against using the Minwax brand as it is too dark (in mahogany color anyway).
Bre says
OK good to know! Thanks for the tip!
Bre says
Michelle – YOU MADE MY DAY!!! I love love love this comment! Thank you so much! I am so glad this tutorial was helpful to you; and yes – much easier than taking the door off and stripping it! I am sure the satin topcoat will be just fine; anything will be better than the before, right? Anyway, thank you so much and send me a pic of your before and afters! averagebutinspired@gmail.com
Sue says
How has your door finish spans the test of time? It’s been about 3 years since you finished the door. Are you still happy with the results?
Bre says
Hi, Sue! I know I emailed you back, but I’m commenting here, too, so others can see it! YES – the door still looks fantastic and I will be updating the post to show what it looks like now! Thanks for asking such a good question!
Mary Beth says
I’m dying at the Nicole Curtis comment. I thought I was the only one who played that scenario in my head when considering painting over anything original lol.
Bre says
Hahaha! Mary Beth I am glad I’m not the only one! LOL!
DH says
How much gel stain did you need for the door? 1 pint can? Thanks
Bre says
Hi! Yes, I didn’t even go through an entire pint can for the front side of my front door (I didn’t do the inside). Hope that helps and good luck with your project!
Julia says
Bre, thank you so much for this tutorial!! I’ve got my door prepped and am nearly ready to stain. My can of gel stain also says “interior use only” but I’m thinking it may be because there is some urathane in the stain, not enough finish to stand up to exterior wear but with the addition of the spar urethane I’m confident it should hold up. Perhaps the company added the qualifier for that reason?
One thought, we don’t have a storm door so I’m removing our weather stripping before I stain and finish (it needs to be replaced anyway). That way when I close the door I can lock it without the front surface contacting the door jamb. It’s held proud by the lock, deadbolt and hinges. Once my finish has cured 24 hours I’ll install new weather stripping and I won’t have to remove the door at all 🙂 hope that helps someone and thanks again Bre, I’ll be thrilled if my door comes close to looking as great as yours 🙂
Ps. I think your wreath is lovely and you responded to that stinky comment with such grace!!
Bre says
Hi Julia! Aaaaah I hope your door turned out perfectly!!! If you have a chance, please let me know! I am hoping it looks just how you imagined. 🙂 And thank you re: the wreath. You wouldn’t believe some of the nasty things “keyboard warriors” leave on blogs! 🙂
Debbie Whillock says
Thank you for the information! I have double front wood doors that are about thirty years old. You can imagine how faded and bad they look. This is my spring project over objection of a husband who would never notice if we had a door or not. You have inspired me and I am going to do it. Thank you, thank you!? I like the wreath!
Bre says
YAY! Debbie that’s awesome! You just have to go for it! My husband was the same way . . . until I did the door and then he couldn’t believe the difference it made! You’ve got this – let me know how it goes!
Emily says
I just bought a house and the door is all faded. You can see the wreath imprint from the sun bearing down on the door all day. Would Gel Stain be an ok product to hold up in intense sunshine? My porch is not covered and I don’t have a storm door. How is yours lasting? I wonder if I need a different GF product.
Bre says
Hi, Emily! I think that anything would probably fade due to the intense sunlight it sounds like your door gets. However, I checked the Spar Urethane can that I used on my door, and it says it provides superior UV protection – so you probably want to use a great topcoat like that to prevent fading as much. Good luck!
Kimberly Henwood says
Bre,
After reading your article I decided that this sounded like the best way to refinish an Antique Walnut exterior entry door on my new home , that is in desperate need of attention. I have purchased my gel stain, and exterior top coat. I have done my prep, and was about to try a test spot when I noticed that the gel stain says “interior only” on the back. I am wondering if this is the same thing you used with the exterior top coat? General Finishes does offer an exterior stain, but it is not gel stain. Has your door held up well?
Bre says
Hi, Kimberly! OK I went down and looked at the GF gel stain I used on my door, and I don’t see that “outside use only” warning anywhere on there! I did buy my can at the time I wrote the post though (which was two or three years ago now), so they could have changed the label. All I can tell you is that the door has held up perfectly – I mean no issues at all. I know people use gel stain on exterior things all the time – I’ve seen a million garage doors refinished with it – so I have no idea why they would say interior use only. My door looks as good as the day I refinished it – promise. Good luck with your project!
Bre says
Kimberly – following up on my previous reply – look at Rockler’s description of the product – they say interior and exterior use. http://www.rockler.com/gel-stain-general-finishes-java Also, I ran a quick search on Google and did not see anything that said you can only use gel stain inside.
Barb says
You are a life saver!! I thought I had ruined my front door, and then I saw your post and tried the gel stain. It looks like new again! Thank you, thank you, thank you!!!
Bre says
Barb! This makes me SO happy!!!! I am so glad this post helped you and that your door is looking good as new! Isn’t gel stain the best? I was SO excited when I found out about it and was able to revive my own door. Thanks for reaching out!
Deanna says
Your door looks beautiful!! This may be a silly question but did you do both sides or just the front?
Jennifer says
Thank you Bre. I appreciate your advice.
Bre says
You are so welcome! 🙂
Jennifer says
Bre,
You are so kind to respond so promptly. You are an amazing, inspiring woman. The cracks are actually just in the varnish finish, not the actual wood itself. I was wondering if I could just sand down the areas where the varnish appears to have blistered and cracked. I’m sorry I wasn’t more clear.
Is you suggest, I can try and find a general finishes dealer, but if you have thoughts on this, I would love to hear them.
Thank you again for your time.
Bre says
Hi, Jennifer! OH, ok that’s good! Yes, I would think that you would be able to sand down that varnish and apply the gel stain over it just fine. You will probably want to sand the entire door lightly anyway, and just pay extra attention to those spots. Good luck!
Jennifer says
Bre,
You are so kind to respond so promptly. You are an amazing, inspiring woman. The cracks are actually just in the varnish finish, not the actual wood itself. I was wondering if I could just sand down the areas where the varnish appears to have blistered and cracked. I’m sorry I wasn’t more clear.
Is you suggest, I can try and find a general finishes dealer, but if you have thoughts on this, I would love to hear them. Thank you again for your time.
Jennifer says
Bre,
You did a lovely job with your door. Thank you so much for sharing. I have some areas where the sun has caused the finish to crack on my door. Do you think I can simply sand down the affected areas, or would you recommend my sanding the entire door. I am a little scared about this project, but eager to improve the look of my door.
Thank you.
Bre says
Hi, Jennifer! Thanks for your sweet note! Without seeing the cracks, it’s hard to say. Perhaps you could try and fill the cracks with stainable wood filler and then sanding down those areas and applying the gel stain. However, before you do that, you should investigate whether gel stain will adhere over stainable wood filler. I honestly do not know if it will or won’t. If the cracks are really shallow, you probably could just sand down those areas more than the others, as long as it doesn’t make the door noticeably uneven! If none of this makes sense, you could also take pictures of the door and go into a place like Rockler Woodworking and ask for help. They would definitely steer you in the right direction. GOOD luck! 🙂
hollie loosemore says
Where did you buy the metal kickplate item?
Bre says
Hi, Hollie! I either got it at Home Depot or Lowe’s – I honestly cannot remember. However, I have seen them at both stores so you should be able to find one easily. Thanks and have a great day!
peter says
Looks great
Presume you used water based varnish and not oil based?
Bre says
Hi, Peter – thanks! Yes – I did use a water based sealer. It was Spar Varathane and it’s worked wonderfully!
Hiratio says
get rid of that junky wreath and it will look 20 times better
Bre says
Sorry you don’t like my wreath and that you felt the need to comment on it, but I hope the tutorial helped you. Have a wonderful day!
Cindy says
I have a situation very like yours. My house was built in 1918 and I am sure it is the original door. I live alone and don’t’ feel comfortable taking the door off the hings. I saw your post and thought that looks like something I can handle. My question is this, I got Miniwax gel stain and it says you have to have all the previous stain, paint and finish off of the old door. I have sanded, scraped and scrubbed till my hands ache but there is still some spots of old finish on my old door. I will give it another try tomorrow. I worked on it for hours today. Did the product you used need to have that much prep? I would appreciate a reply. If the other brand is better I can order it instead. thanks so much for the inspiration!
Bre says
Hi Cindy! Oh you poor thing- it sounds like you’re working so hard! So I haven’t used the Minwax brand, but my guess is that it’s totally comparable to the General Finishes stain I used. With that in mind, if you’re using the same color stain (or darker), as what’s already on the door, I think you will be fine because you have sanded. If it’s lighter than I believe you will have to remove all of the finish. I would apply a coat and see what it’s looking like. I think it should all blend in and look good as new. Good luck and let me know how it turns out. You’ve got this! 🙂
Nicole says
Hi there, how did you allow 24 hour dry time? Leave your door open all night? Been wanting to do my door but am running into this issue.
Bre says
Hi, Nicole! So, I have a storm door, which was very helpful in all of this. I restained very early in the day and let it dry as long as possible (though definitely less than 24 hours), before closing it again. Then, for the poly application on the subsequent days, I followed the directions and made sure to reapply within the 2-3 hour timeframe the manufacturer recommended. Again, I had the storm door closed during this. At night I did close the door because I could tell the stain and poly were dry. Although that probably is not the perfect way of doing it, it worked and nobody came into my house and robbed me that night. ;-P I hope that’s helpful to you!!
Robin says
Bre, what kind of Spar Verathane? I foolishly went to the store thinking Spar was a brand name. Hope you you reply befor Covid wipes out all the inventory:) thank you so much!!!
Robin
Bre says
Hi, Robin! I saw your email this morning and responded to that. Also, there is a link to the exact product in this post in the supply list. :-). The product is made by Rustoleum. Thanks!
Ginny says
Love the door-can you tell me the product name and color ? Thanks
Bre says
Thanks, Ginny! I used General Finishes Gel Stain in Brown Mahogany to refinish it.
Jessica Fleming says
How beautiful! (And encouraging!) do you remember how many cans of stain you needed for your door?
Bre says
Hi, Jessica! Thank you!!! True story – my father in law thought we got a new door when he saw it! I only used one can of stain, too! It is a miracle product! I can’t remember if I said it in the post or not, but if you’re going to do this, I think they recommend that you use either the same color or darker as what is already on your door. Lighter stain probably will not look good at all! Hope that helps! Thanks again.
Michelle Beaton says
Gel stain?! How cool. I have never heard of that! Thanks for stopping by the Creative Spark Link Party. Hope you link up again today! http://bit.ly/1t2Ohhl
Griffin MC says
Looks great Bre, what a difference some new stain made! I’ve been tempted to use gel stain, I even bought some for a past project and chickened out and went with normal stain, but it sounds like it’s actually very easy to use, thanks for sharing!
Bre Eggert says
Hello! Yes, it is SO easy! I only like easy things, so trust me on this. 🙂 Thanks for your note!
Lisa @ Crazy Adventures in Parenting says
Wow, gorgeous!!!!
Bre Eggert says
Hi, Lisa! Thank you!! 🙂
Breanna Bertolini says
This is amazing Bre! And I would have been scared of Nicole too, she’s one feisty lady! But I love her 🙂 I’ve seen the gels around but haven’t used them before, so this was super helpful! Does it have a smell to it?
Bre Eggert says
Hi, Bre! Yay – I’m glad you found it helpful. No, the gel really didn’t smell too much at all. There was a slight odor, but it wasn’t overpowering. And that was great since I was working with it indoors. I seriously love the stuff. I am sure you will, too!
Erica Sooter says
Love how this turned out! The rich tone of the door and smooth finish just makes it absolutely perfect. Cute wreath, too! 🙂
Bre Eggert says
Thank you, Erica!! It is such an improvement. I am so happy. Thanks for your note!
Seana Turner says
I think it looks amazing!! I can’t believe you didn’t have to sand in between the coats – that is so worth it. Just walk over every couple of hours and add another layer? It really is beautiful:)
Bre Eggert says
Hi, Seana – thank you!! Yes, I didn’t have to sand in between the topcoat layers, as long as I applied them within two hours of each other. It could be different based upon the different topcoat brands, however. This kind didn’t require it – LOVE!
Sarah Cook says
Wow, Bre! I looks like a completely new door. I love the color you chose!
Bre Eggert says
Thanks, Sarah! I know – I can’t believe the transformation. I am in love with gel stain!
Leigh Anne Watts says
It looks GREAT! I love it!
Bre Eggert says
Hi, Leigh Anne – thank you! That means a lot coming from you, lady!
Frank J Ward says
Beautiful job – great to save a beautiful old door. Don’t think its mahogany. Probably fir, pine or alder.
Bre says
Thank you, Frank! Jeeze, such a novice over here! I just assumed it was mahogany because of the color! 🙂