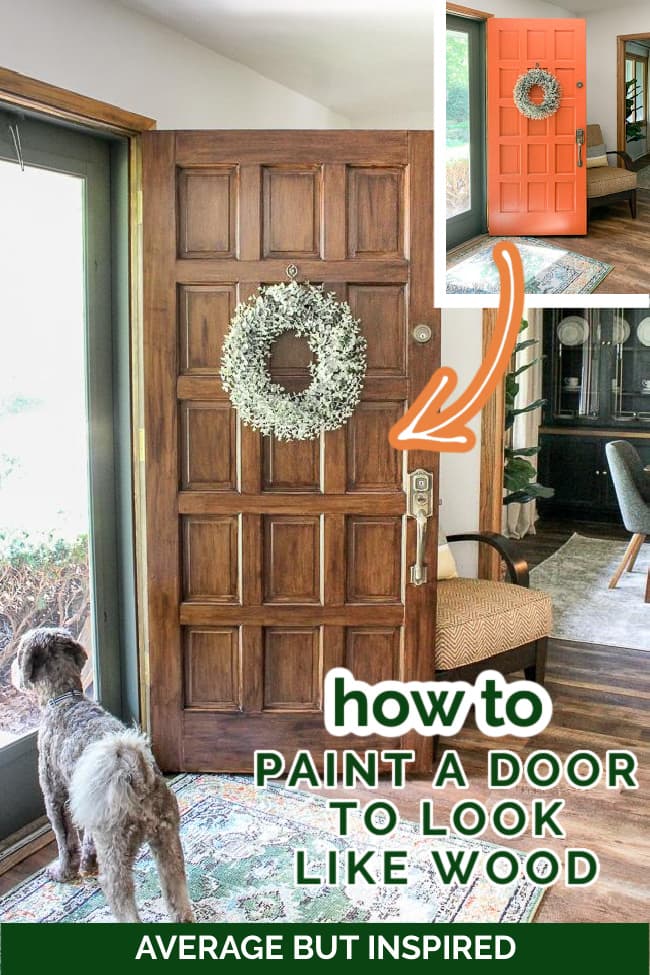
Our house had a vibrant orange front door, which I actually loved. But when we repainted the exterior this summer, the orange door wasn’t right.
I decided I wanted a wood front door to coordinate with our wood-look garage door and wood-accent exterior lights, but I did not want to strip and restain the door: too messy!
I became determined to figure out how to paint a door to look like wood so that I could get the wood look without all of the hassle.
FULL DISCLOSURE: I totally messed this up at first! Because of my mistakes, I probably did not save myself any time and could’ve stripped and re-stained in the same amount of time. That being said, I perfected the faux wood finish technique and can now share it with you, so it isn’t a total loss!
How NOT To Paint a Door to Look Like Wood (My Mistakes!)
Before we get to the good stuff and how to really achieve a convincing faux wood finish, I HAVE to show you how badly I messed this up the first time around. I was trying to get a wood finish with orange undertones . . .

So I applied two coats of gel stain right over the orange paint. And it was awful – so bad that I could only laugh about how horrible it was!
Can you believe this? It was embarrassing to even close the door for anyone passing by to see. Ha!
OK, so take it from me – you cannot paint a door to look like wood with orange paint. Not gonna work!
How to Paint a Door to Look Like Wood
Now that we’ve gotten THAT out of the way, let me show you how I redeemed myself and actually painted my door to look like wood! You can read my step-by-step tutorial in this post and watch the video I’ve put together that shows you how this all went down!
Supplies Needed to Paint a Door to Look Like Wood
This post contains affiliate links and sponsored links as part of the Amazon Influencer program. To read my full disclosure policy, please click here.
- Flat latex paint in a shade of brown
- Gel stain in the color of your choice
- Varathane Ultimate Spar Urethane
- Stain pads
- 1.5″ or 2″ angled paint brush
- Small artist brushes
- 3″ chip brushes
- Painters tape
- Cardstock or cardboard with a straight edge
- Drop Cloth
- Sandpaper
- **May need primer if your door has never been painted
Step One: Sand and Tape Off Hardware or Remove Hardware
Before you start, make sure to protect your door hardware with painters tape or to remove it.
You’ll also want to spread a drop cloth underneath the door to protect surrounding surfaces and the floor beneath.
Then, lightly sand the door to remove any glossy surfaces, and wipe the door clean.
Step Two: Paint the Door Brown
OK so after my orange paint plus gel stain disaster pictured above, I realized that the gel stain wasn’t the problem; the orange paint was. I went to my basement and found a gallon of flat latex paint in a soft brown shade. It was left by the previous homeowners and I considered it a gift from God.
I painted over all of my ugly orange mess with the flat latex paint.
Even my dog looks sad in this photo.
Thank goodness that ugliness was gone!
**If you’re painting a door that has never been painted, make sure to prime it first!
Step Three: Apply a Coat of Gel Stain to the Entire Door
Once the paint dried, I started applying gel stain right over the paint. I began by using a 1″ foam brush to spread the gel stain, but quickly switched to a stain pad, as it was much easier to get it in all the nooks and crannies. (Make sure to read my post on The Best Gel Stain Tips and Tricks, too. It will help you have better success with gel stain!)
For the tight corners, I used artist paintbrushes to spread the gel stain.
Once the whole door was covered in gel stain, I let it sit overnight to dry. It already looked better than it ever did with the orange base color, but it still wasn’t great.
Step Four: Apply a Second Coat of Gel Stain
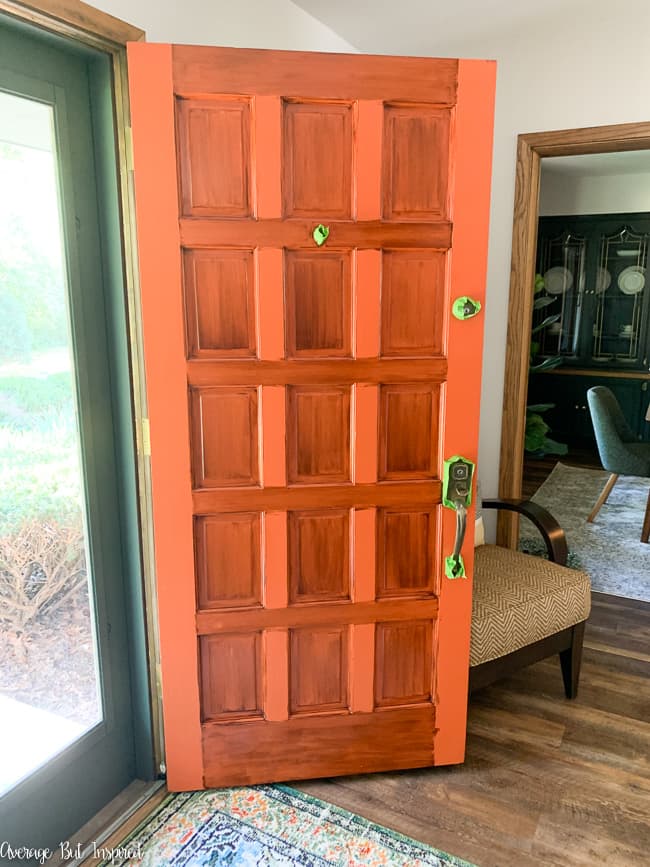
Here’s where the magic starts to happen. For this next step, I worked rectangle by rectangle, and then row by row, and then column by column, to create the look of wood grain with gel stain.
I will show you how I did this in a rectangular part of the door. I started by applying a coat of gel stain in a rectangle with my stain pad, and I got into the corners with the artist brush.
Then, I took the 3-inch chip brush, and I gently ran it over the flat part of the rectangle, from bottom to top, to remove some of the gel stain and to add a woodgrain pattern to the door.
I varied how I moved the brush: in some rectangles it was straight down to up, and in others I did a little bit of a curve, as you see in woodgrain sometimes.
I did this “apply gel stain and then remove some of it” process all across the door. I used thick card stock at the edges of each row or column to create a barrier between the edges of each section, since the woodgrain travels in different directions in these different pieces. This made the junctions crisp, just like a regular wood door.
Here you can see the second coat of gel stain and woodgraining process on the entire door, except the outer columns. The second coat of gel stain is necessary for getting a wood look finish!
Step Five: Seal the Door to Protect the Faux Wood Finish
After I applied the second coat of gel stain to the entire door, I let it sit overnight so that it could totally dry. Then, I applied three coats of this sealer to the door throughout the course of one day (no sanding in between coats needed).
I let the door dry for the time recommended on the sealer, and in the end, I succeeded at painting my door to look like wood!
It’s hard to believe I was able to fix that disaster I created the first go-round!
Check Out Other DIY Door Projects You Might Like!
Questions About Painting a Door to Look Like Wood
I feel like there will be some questions about this process, so I’m trying to anticipate them!
Does this process work on metal doors or fiberglass doors?
Yes! Although my door is wood, you can use the exact same process and products to paint your metal door to look like wood, or to finish your fiberglass to look like wood. Awesome!
Can you use this process to paint a garage door to look like wood?
Yes! This exact same process will work to paint a garage door to look like wood.
Can I use gel stain to refinish a wood door that hasn’t been painted?
Yes! You can, and I’ve done it before! Check out my post on refinishing an exterior door with gel stain for all of the info you’ll need.
Any other questions? Ask them in the comments section, and I will do my best to answer them!
-Bre
Diane says
I love your door. I have a friend who swears on gel stain but I have not ever tried it. With your knowledge and all your help in these comment reviews, I am guessing gel stain would work on kitchen cabinets? Mine were done 15 years ago using Granite transformation but I am ready for another change before I retire. Not sure if I want to try gel stain to bring back a grain effect or paint a color of choice. Your thoughts? I live in an older home build in the 50’s.
Bre says
Hi, Diane! Yes you can totally do gel stain on previously stained wood cabinets, as long as there is a good topcoat on there. :-). You can make them go darker, generally, but not lighter. And you’ll need to add another topcoat once finished. There are lots of tutorials out there online, so I’d research before you get started. Good luck!!
Tina says
I’d like to do this on our white single car garage door at our cabin. The door has an orange peel finish/feel to it. Do you think this process will work on it?
Bre says
Tina! Oh my gosh, I am so sorry I didn’t see your question until now (almost a month later!). Honestly, I think it WILL work but I would try to test a patch or find a panel with a similar texture to test on first. I think that when you add the “woodgrain” with the chip brush, it will help hide the orange peel, but you’d want to be sure before you do the whole thing!
Stephanie says
Hello! I did a faux wood door on my metal door a few years ago and can’t remember all my steps but need to redo as it has chipped over the years. Do I need to sand and repaint a soft brown (it’s currently hickory)—I got a coffee stain and am not sure which steps I need to start with but do not want it to look like I’m just piling pain and stain on top of the door. Please advise!
Oliver Straszynski says
Hi this is a bit off topic but your dog looks EXACTLY like mine
Is it by any chance a Whoodle from southern Ontario, Canada?
Cheers, door looks great I will be using this method
Thanks
Oliver
Bre says
Hi, Oliver – oh my gosh, that is so fun!! No, my Jasper is a labradoodle from Illinois! 🙂 But, it sounds like you’ve got a cutie!
Max Jones says
Thanks for the tip to get primer if you have a door that has never been painted before. I am thinking about getting an aluminum door for my home because it will withstand the weather better than a wood door, but I love the appearance of wood. I’ll consider these tips if I end up getting an aluminum door and want to paint it.
Dave Whitmire says
Thank you!
Bre says
Thank you!!!!
Robin says
Hello! My question does not have anything to do with the process or products used. Here goes, did you leave your door open through the night to let it dry between steps? I don’t live in the country and I don’t have screened doors! Hmmmm?..
Bre says
Hi! I suggest starting the process as early in the morning as possible, so that you can leave the door open as much as possible during the day. Then, by the time night comes, you can close it without it being too sticky or without risking it ruining the finish. You don’t have to have the door wide open – just open enough so it doesn’t touch the new finish. Hope that helps!
Erika says
Hello! Your door looks fantastic!!! I am doing something similar with a metal door. However, I started with a dark brown on my door as a base color. Because I used a brush, it already has almost a wood look. That in mind, do you think it would be okay to use one coat of the gel stain and the chip brush? Then I would use a few coats of the spar urethane to finish. I don’t want to skip any steps if they are completely necessary for the wonderful results you got. Still, the stain and base coat are quite close in color on my project, so I’m not sure a second coat of the gel is necessary. Any thoughts would be appreciated!!
Bre says
Hi, Erika! I think it would be absolutely fine to do only one coat of gel stain, if it gives you the look you’re after! The gel stain is just decorative so there’s no harm in only using one coat. Good luck with your project!
Heather says
I love the look of this! I want to do the same thing to a painted wood dresser. Do I need to apply the clear seal for indoor furniture or is that only for outdoors? Thank you!
Bre says
Hi! You should definitely seal it once you’re finished (to protect your hard work!), but it doesn’t need to be an outdoor sealer. You could use an interior polyurethane, for example! 🙂
Dawn Coates says
Our door is an interior condo wood with a painted finish. Will a quick sanding be sufficient to allow the gel stain adhere?
Bre says
Hi, Dawn! Is the current paint color brown? If not, you’ll need to paint it a shade of brown to get the wood look with the gel stain. If it is brown, then you don’t need to sand before applying the gel stain.
Sarah Bee says
Hey! Thank you so much for this post – it was beautifully written/documented. I will probably be attempting this soon.
Quick question… it is a few years later, how is it holding up and what has the maintenance been like.
Thank you so much.
Bre says
Hi, Sarah – thank you so much! I am glad it was helpful! Great follow up question: the answer is it still looks just as good as the day I did this, and I have done zero maintenance. I do have a storm door, which protects the door from the direct elements. It does get direct sun for several hours of the day though. I hope that helps! Good luck with your project!
Gemma says
I actually liked the before and after photo of the outside of your house with the “orange” door but I do like orange. Getting ready to paint our new front door Paprika. My question tho is where did you get the large flat rug you have in front of the door? It looks like the no pile rugs that I have been looking at for my living room. Do you like it and is it durable? Thanks and love all your posts.
Tina says
I have wood frames that are painted white. Can I use this method to paint them to look like wood? Should I pain them brown first or will the stain be sufficient?
Bre says
Hi, Tina! Yes – you can definitely do that on those frames! You will need to paint them brown first. 🙂
Deni Barraza says
Did you paint the storm door, too?
Bre says
Hi! I did not paint the storm door, but I think it would look good if I did!
Andrea says
Love this! can you share what the paint color is? I know different browns have undertones, so I am curious!
Bre says
Hi, Andrea! I am so sorry but I actually don’t have a color name for it! I legitimately found it in my basement – it was left from a previous owner! There was no label on it!!
Terri says
Beautiful door! I’m going to take on our garage doors. My hardware store had 2 types of Minwax Gel Stain—one can said “semi-transparent”. Thoughts please? The semi transparent was a little more expensive otherwise I didn’t see much of a difference.
Bre says
Hi, Terri! I’m sorry but I haven’t seen that and I don’t have any familiarity with it. When I look at Minwax’s website, all I see is the regular Gel Stain (which is what I used on the door). I suggest purchasing the regular gel stain since it’s what I used! 🙂 Good luck!!
Susan says
I really like the design of this door. Where can you purchase this 15 panel door?
Bre says
Hi, Susan, thanks! Unfortunately it’s an oldie! It came with the house! So I don’t have any purchasing info. Sorry!
Kaitlyn says
How has no one asked for the paint color? Have I missed it? Please share? Thank you!
Bre says
Hi, Kaitlyn! You didn’t miss it – I don’t have a color to list! It was a random can of paint I found in my basement, leftover from a previous owner! Can you believe it? I mentioned that somewhere in the post, but there’s a lot of info so it’s probably buried. Anyway, just pick a creamy brown color and you’ll be good to go!
D says
This looks gorgeous! So I came across your page bc I’m looking for ways to get a terra red painted wooden covered deck looking like gorgeous, organic natural wood. It was recommended not to try to strip it bc it’s super old. Was thinking can I paint it a “woody” brown and then give a really good faux grain look. You’ve totally mastered that here on your door. Thoughts for what I’m trying to do with this 20 year old porch?
Bre says
Hi! Ooooh that sounds like a project! For yours I would definitely recommend trying one of those faux wood grain tools. If you Google them you’ll see what I’m talking about. I think if you painted the deck a shade of brown, and then once dry use the wood grain tool in a darker shade, it could work! You’ll have to seal everything, too. Definitely practice with the wood grain tool. I have one and they take a little getting used to. Good luck!!!
Bliss says
I’d say you redeemed yourself and the door. Hope the dog cheered up.
Bre says
Hahahaha, thanks Bliss!!! 🙂
Ellen says
I am attempting to do a wood grain finish on a hollow core paneled door and possibly paint and lightly sand the interior panels for an old-western effect. These are new doors that are meant to be pocket doors in a tiny cabin I am restoring. Your tutorial helps a bunch. Thank you so much for posting!
Bre says
Hi, Ellen – that’s awesome!! Thanks so much for letting me know. I appreciate it! I know your project will go awesome. So fun that you’re restoring a cabin – I love it!
Sarah says
Love how this project turned out for you! I am about to take on this same project at our house and am curious if you could tell me what color “soft brown paint” you used under the stain. Thanks!
Bre says
Hi, Sarah – thank you!! Oh man, I wish I had a name, but it was just a can of paint in the basement left by the previous homeowners, and it had no label on it at all! Really though – any shade of brown will work great. 🙂
Kaitlyn says
This post saved my front door, THANK YOU SO MUCH!!!! I had a red door that I wanted to strip down to it’s natural wood and stain it. Once I stripped off the red, and brown, the original layer of paint from the 70s was BRIGHT orange. It was stained into the wood so no amount of stripper or sanding would get it out. So I did what you tried and stained over it, such a disaster!! I had given up hope until I found this post!! I was so happy to see I wasn’t the only one who had an orange door issue. I painted over it with primer, followed all your steps and have a beautiful wood gel stained door! I have received so many compliments and people are shocked to learn it is paint! So thank you again for saving me probably over $700 for a new door, now I want to gel stain everything!
Bre says
Hi, Kaitlyn – oh my gosh, that is amazing! I can’t believe you had an orange door and also tried to do what I did. Ha! It was AWFUL, I know! :-). I’m really glad you persevered and saved yourself a ton of money. That is awesome!!!!!
Brook Barnes says
Hi! The door looks great! We are building and I was hoping to gel my doors to look like this! Just to be clear, what was the color of your stain? It pulled up the Aged Oak, is that right? Thank you!
Bre says
Hi, Brook! Yes – you are correct – I used Aged Oak! good luck with the build!
Brewer Hicklen says
Hey there,
I’m in the middle of this project and the first coat went on great, but for some reason I just tried to apply second coat and it was still somewhat sticky and did not smooth well with my foam pad at all.
Any suggestions?
I am assuming I’ll need to sand off the two sections I did and start over?
Bre says
Hey, Brewer – thanks for your comment! Glad to have helped you via Instagram messages. Your door turned out wonderful!!!
Jennifer says
Hey There, Door looks lovely and I want to do this! Just one quick question—is it required to start out with a light brown base? And what paint color/type/brand did you use for your base? Thanks so much for posting this!
Bre says
Hi, Jennifer! You can choose whatever shade of brown you like, but if you don’t start with a good base color it will look wrong (like my orange did!). Choose a color that is a common wood undertone, so a brown, or maybe a deep yellow/ochre, or even a super brown orange, and it will work! As for the base I used, it was just a random gallon of paint in my basement left by the previous homeowners. It didn’t even have a label on it! Regular latex paint will work. I hope this helps!!
Leigh says
Can this process be used on a painted solid wood dresser? There are too many crevices etc for me to strip and sand on this particular piece so I’m trying to find options to paint to make it look like wood. Thank you! And your door is beautiful!
Bre says
Hi, Leigh! Yes – totally! And to encourage you . . . I’m currently trying to strip and restain my kitchen table. It’s going terribly. I’m actually thinking of doing it this way if I can’t get it to look nice the old fashioned way. :-).
Susan says
I love your door looks so good .. what did you use to
Apply the seal? I was worried of streaks .
Thank you ,
Susan Keating
Bre says
Hi, Susan – thank you! Great question and sorry I didn’t specify that in the post. I used a foam brush for that step. I did not have any streaks. Good luck with your project!
Molly says
Hi! Wondering if regular stain would work. I’m in a very small town and no one here seems to sell the gel stain. I have plenty of regular stain at home.
Do you think it would work??
Bre says
Hi, Molly – I am SO sorry it took me so long to respond. I got really far behind on all things blogging! Anyway, unfortunately regular stain will not work. Regular stain is formulated to seep into the wood, whereas gel stain sits on top of the surface and dries there – that’s how you’re able to create the faux finish with it. I’m really sorry!
Leslie Moreno says
Hello! I love how your door turned out!
I want to do the same to mine, but I’m wondering how many cans of gel stain you used? I want to do the inside and the outside. Would that look good?
Bre says
Hello! Thank you so much! I used under 1 quart of gel stain to do the front of the door. I think you could do both sides with one quart – and that’s with two coats of gel stain per side. It really doesn’t take much. :-). Good luck with your project – I hope it turns out amazing!!
Emily says
I have a metal door and would like to paint it to be white but with a wood grain texture. Do you think this is possible?
Bre says
Hi, Emily! I think you could totally do this with a wood grain texture tool! Have you ever seen those? I’ve seen them at Michaels and online of course. You could paint the door white, and then do the wood grain with the tool in a different shade or finish of white. 🙂
Brian says
I had a professional refinish my fiberglass door as you mentioned. Brown primer, gel stain and 2 coats urethane sealant. Door looked great first year, but faces east and hot sun basically burned off sealant ina little over a year and now the door needs to be touched up again with gel stain and resealed. Do you have any suggestions on a sealant that will last longer than a year or do you recommend I just paint the door? Paid a lot for a professional to do the work and don’t want to have to do this every year. Thanks in advance for your thoughts.
Bre says
Hi, Brian, oh man that is so disappointing! I’m really sorry! So my door at my old house and at this house face east as well, but they do both have some cover. Do you know if the professional used the Ultimate Spar Urethane that I used? That has excellent UV protection and I haven’t experienced issues (but again – I have a covering over the porch/door so the door isn’t baking in the sun). That is the only UV sealer I’m familiar with. I’m sorry I can’t comment on others!
Mqcola says
Hi,
I read your post and found it very interesting. Could I paint a “flat” fiberglass door to look as wood grain? I am looking to replace our door with a wood grain look and the price is very high. If I can use a flat fiberglass door ( for paint) it would save us a good chunk of money.
Also, would you rate this as something for a beginner or more experienced “painter” and would you think it would stand well winter months..
Thank you!
Bre says
Hello! Yes, you can totally do this on a fiberglass door! One thing to check out before you do it: find out exactly what type of paint you need for the base coat (the brown I used in this post). Double check at the paint store what paint they recommend for fiberglass, and then do the rest the same as I show here. In terms of difficulty – this is not difficult. You can definitely do it!!!
Brenda says
I have a metal door that has been painted using a stain or some type of paint and it is peeling in a few places.I would love to paint it to look like wood,I’m not sure how with the problems it has or it may too hard to do.What do you think?
Bre says
Hi! I think you could do it, but you’d need to sand off all of the peeling paint first, and then use a really good primer for metal surfaces! Then, once you’ve primed, you could paint the door brown and then use the gel stain to create the wood look. Good luck!
Cammy says
Hello! I have a white primed door, so I need to do that base brown coat like you did? Or were you just covering up the orange? Awesome project by the way, as new wood doors can get super pricey 🤑
Bre says
Hi, Cammy – such a great question!! I should’ve been more clear about that. Yes – you will definitely need to do the base brown coat of paint. The gel stain is sort of translucent, so if you have a white base coat, the door will not end up looking like wood, but instead, a streaky mess. :-). Thanks for asking! Good luck with your project – you’ve got this!!
Jasmine says
Hey! I followed your steps to do this to trim in our house. However I have not proceeded to second coat of gel stain as the stain is still tacky after almost a week. In your steps it doesn’t say anything about wiping off excess gel stain while still wet but I am finding a lot of posts that state that….was your first coat of gel stain still tacky after the day of drying? Any suggestions? Please and thank you!
Bre says
Hi, Jasmine! Oh no! I’m sorry you’re having this problem! So, I did not wipe off excess gel stain, but I also didn’t apply it in a thick coat, so that may have had something to do with it. There are a couple of things you could try: (1) use a heat fan on the parts that haven’t dried up yet and see if that speeds things along; or (2) you could dip a rag or sponge in mineral spirits and super gently touch the spots that aren’t drying and see if you can remove the excess stain. Since you’re going for a tone-on-tone wood look, the base layer doesn’t need to be totally solid color – do you know what I mean? So then when you apply your second coat of gel stain the variations in shading add to the dimension. I would try the fan first though.
Heather Hiltz says
Your door looks amazing! You’ve certainly inspired me! I want to try this on a few interior doors (painted whire right now). I’m thinking of doing the same to the trim, base and cornice molding. What are your thoughts? Suggestions? Thanks so much for sharing!
Bre says
Hi, Heather! I think this finish will absolutely work on those other areas you mentioned! Good luck with your projects!
Andrea says
Hi! I love this! Door looks beautiful! I am renovating my kitchen currently. I am debating right now what to paint my cabinets. I actually really love the rustic wooden look. Would this be good for kitchen cabinets? Also they’ve never been painted before, so would I just sand everything then go straight to the staining two coats or would I still need to paint the cabinets the brown color like you did before moving on to staining? Thanks so much in advance for your time and help!
Bre says
Hi, Andrea! If you’re starting with stained cabinets that have a protective sealer on them (I am almost sure they do!), you just need to clean and then apply gel stain in a darker color to change up the look! No need to paint them brown.
Cheryl M Davis says
I have a question…how has the door held up? I noticed you used water based sealer over oil based stain and that generally doesnt work. Curious if you had any issues with that.
Door looks great!
Bre says
Hi, Cheryl! Great comment and observation! So actually with gel stain, you CAN use a water based sealer! Both General Finishes and Minwax (gel stain brands I use regularly) talk about that on their websites. I refinished an exterior door with gel stain in 2014 and sealed with the same Varathane product and that held up perfectly until 2019 when we moved, and I’d imagine it’s still great though I don’t know since I don’t live there anymore. And this door that’s the subject of this post is also looking fabulous! I like to use water base sealer because it doesn’t smell, but if that’s not an issue and you’re concerned about longevity you can absolutely choose an oil-base sealer!