My little guy is growing up so quickly and is ready for his big boy room! We recently started getting his gender neutral nursery transitioned over to an airplane theme room. So far I’ve painted the walls, assembled bunk beds, and done this gray chalk paint dresser makeover. The room is coming together!
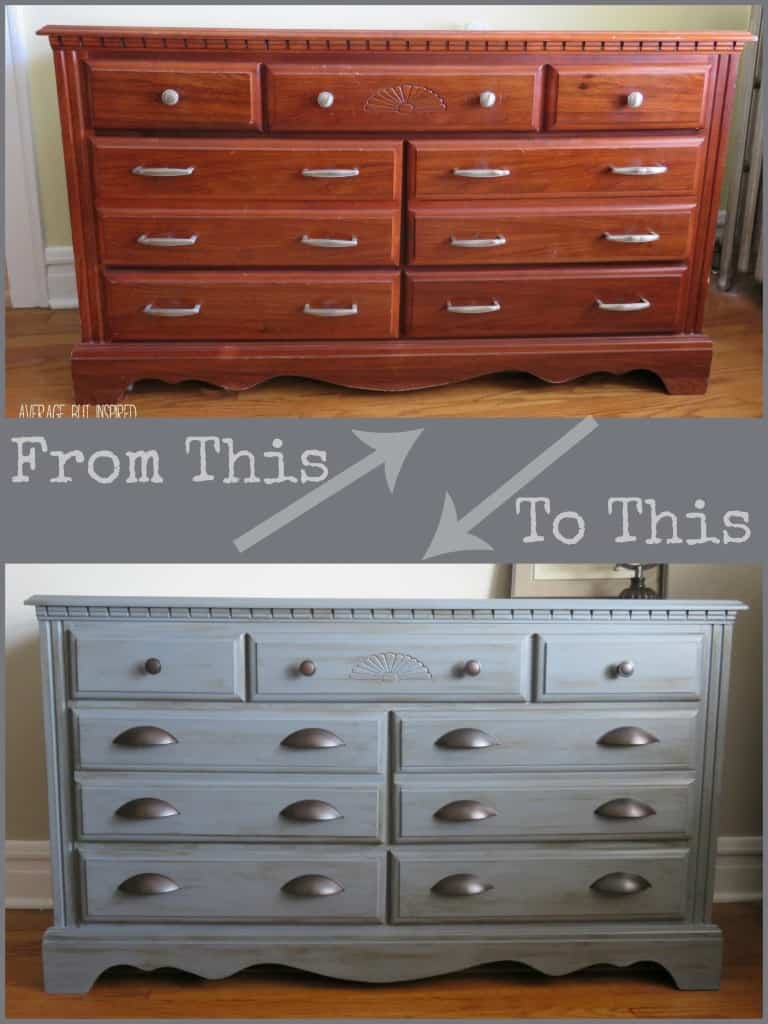
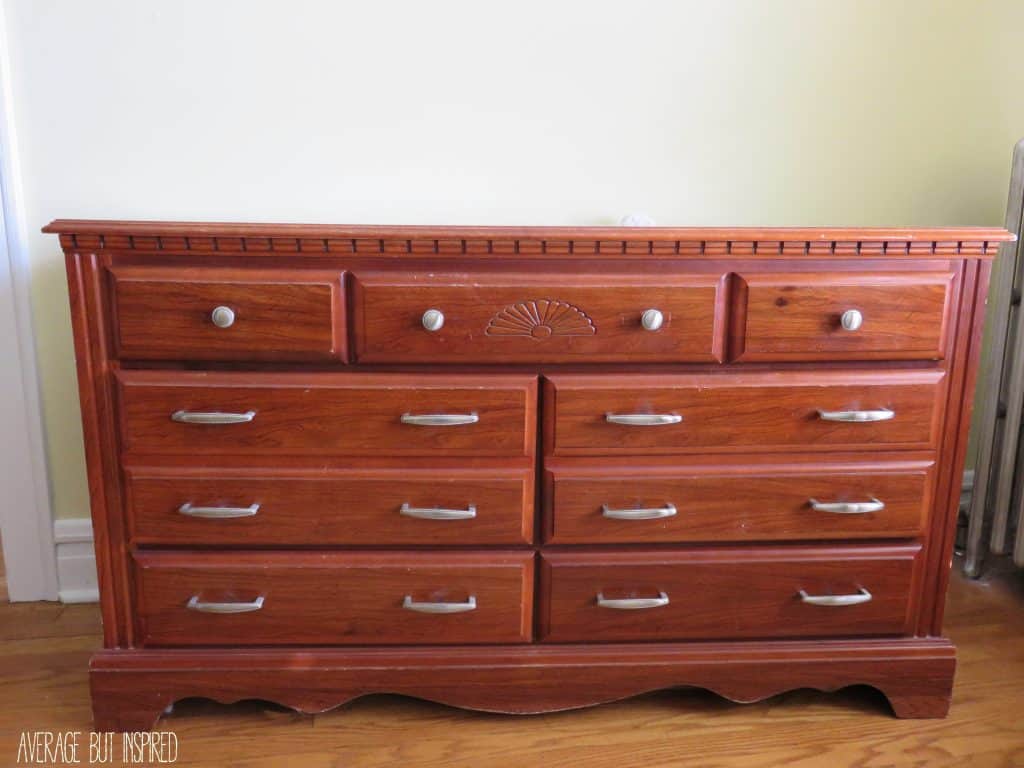
The Dresser Before Painting
So this was my lovely dresser that my parents bought me when I was around nine years old. It had different hardware at the time (much more old-school looking in brass and with those weird flourish thingies), but my husband and I switched it out when our daughter was born, and that’s what you see in this photo.
This post contains affiliate links. To read my full disclosure policy, please click here. Many thanks to DecoArt for providing the awesome paint for this project! The project and opinions are all my own.
My son’s bunk beds are an orange wood tone – one that looks really bad with the color of this dresser. Since we purchased the beds used and for a bargain price, I got over the color pretty quickly. (I figure we saved around $700 by purchasing them used.) And since I’m too lazy to paint bunk beds, I decided to paint the dresser in an effort to make his furniture not look so awful together.
Gray Chalk Paint Dresser Makeover: The Painting Process
Since we’re going with a vintage aviation look in the room, I knew I wanted to do a gray color on the dresser. I checked out DecoArt’s line of Americana Decor Chalky Finish paints and decided to mix two of their gray chalk paint colors — Yesteryear and Relic — to create my own hybrid color.

The paints mixed easily, and after I’d done my prep work (which was literally just wiping down the dresser to remove dust), I applied my first coat.
I used a small roller for the top and sides, and a 1″ brush for the rest of the piece. The paint applied SO smoothly and easily, and it dried really quickly, which is a plus when working with little kids in the vicinity. (I would have taken all the drawers out to paint, but they wouldn’t come out!)
I was able to apply my second coat almost immediately, and was totally pleased that the coverage was fabulous! Two coats, and 16 oz. of paint, was all it took for this entire piece of dark furniture!
Sealing the Chalk Painted Dresser with Wax
After I was sure that the paint was totally dry, I applied a protective topcoat of SC Johnson Paste Wax, using my large natural bristle brush. (DecoArt has a line of finishing waxes, too, but since I already had finishing wax at home, I didn’t want to be greedy and ask them to send me theirs.)
I let that dry to a haze and then buffed it. I love using wax to seal chalk paint because it produces such a beautiful, velvety finish.
(Sidenote: this is what was happening while I was waxing. My kids were systematically emptying the bookshelf of every.single.book.they.own and jumping in the pile. Nutcases.)
Adding Dark Wax to Antique the Dresser
A couple of days later, I got out my Briwax Dark Wax and got to “vintageizing” (made up word) the dresser. I wanted to give it some depth and character, so I streaked on the wax with a lint free cloth. I was a little overzealous though and got some MAJOR streaks and mistakes (on the dresser and on myself).
Yikes. Pretty awful.
Removing too much dark wax on furniture
But it was all fine because I grabbed my clear paste wax, put a little on a rag, and went over the spots where I’d applied too much dark wax. The dark wax came right off and my mistakes vanished. Phew!
Now my childhood dresser looks like new with its gray chalk paint makeover and new hardware!
I can’t believe the difference! It’s so much better for a boy now (in my opinion), and I think it helps set the stage for the vintage aviation bedroom!
I couldn’t be happier with the results. Let’s just hope the rest of the room turns out as well as this dresser!
– Bre
Laura Sullivan says
I love this!! We are in the process of making one big boy room for my boys to share and have an old dresser that I want to paint to make it “fit” better. I want more of a navy blue color but don’t see anything along those lines when I clicked on the link. do you have any suggestions?
Bre says
Hi, Laura! You can totally do it!! DecoArt has updated the colors recently, and they have two that are in the navy family: Preservation and Honor. Here is a link to an updated chart: file:///Users/Breighanne/Downloads/Americana_Decor_Chalky_Finish_Color_Chart.pdf Hope that helps!! Good luck with your project!!
Barbara Ann says
I love how it came out. I too use this paint. I painted my step-daughters kitchen cabinets in the Relic you mixed with. My husband couldn’t believe how easy it went on. But I sealed with a spray poly since it was her kitchen. For the dark grey it gave a nice shine and reflects the limited light she get in the kitchen.
I bet there is a lot of life left in this dresser.
Bre says
WOW! You are the nicest mom ever to repaint her cabinets for her! I love it!!! So glad you had a good experience with the paint, too. I bet the Relic looks amazing in there!
Doug says
How much paint did you have to purchase for a dresser that size. Did you mix 50/50 on the two colors or what. Thank you.
Doug
Bre says
Hi, Doug! I used 16 oz. total for that dresser – 8 oz of Relic and 8 oz of Yesteryear and I did a 50/50 mix. I even had some paint leftover when I finished! A little goes a long way!
Marian says
Hi! I tried this kind of chalk paint today in vintage color. My problem was, I got some brush marks. How were you able to achieve the smooth finish???
Bre says
Hi, Marian! Yay! Good for you! OK, so you are almost always going to get some brush marks. Don’t be discouraged! I did use a foam roller for the top of the dresser and the sides, so those parts are quite smooth. But the other parts I brushed on, and with two coats the finish was pretty smooth (though not as smooth as with a roller). Here’s what I’ve found though. . . (1) a good quality brush makes a HUGE difference; (2) applying the wax and buffing it gives the piece such a velvety and rich finish that the brush strokes almost blend away; and (3) distressing the piece with sandpaper (prior to waxing – if you’re going to go the sandpaper route), or applying a dark wax to vintage-ize it, also minimizes the look of any brushstrokes. Anyway, I’m sure that in the end, any brushstrokes will only be noticeable to you, since you did the work. GOOD LUCK! 😉
Romona Guidry says
All I can say is OMG I love it !!!!! as the other comments I’ve been wanting to do this BUT didn’t know how. My question is do you need to do any thing to the wood before I repaint.? I too have a set that looks like this maybe a little darker. Do I need to take the varnish off before I repaint it using the chalky paint? I want to use a off white color with a darker stain or varnish to give it the look as you did. And did I say how much I LOVE LOVE what you did to this dresser !!!!!!!!! LOL Thanks Romona
Bre says
Hi, Romona! THANK YOU – your sweet note made my day!!! 🙂 You can TOTALLY do this! You will be so happy you did it! Really all the prep you need to do is wipe down the dresser to make sure it is free of dust and lint! If it is extra shiny with varnish, maybe give it a light sanding. But that’s it. Since you plan to do a white color, you may need to give it three coats, depending on whether you want a smooth, solid finish or not. If you’re going for an antique, chippy finish, two coats should do the trick! Make sure you seal the piece with clear wax BEFORE you apply any dark wax. And any dark wax streaks or mistakes can be removed by applying clear wax over it. GOOD LUCK and let me know if I can help in any way!
Cindy says
Dresser is fab! I have a loooong and very heavy dresser that was there when we purchased the house. Did you do your refurbish in the house? We’d never get it out without breaking backs. What is the safety end of having lungs that work if I do it in the bedroom where it sits now? Thanks in advance!
Bre says
Hi, Cindy! Thank you!! I did redo the entire thing right in my son’s bedroom! The Americana Decor Chalky Finish paint has hardly any odor to it, so it’s very easy to use, especially if you’re able to crack a window. The finishing wax that I used, however, had a TERRIBLE odor. I used SC Johnson Paste Wax, which produces a great finish, but it really is best used outdoors. My son couldn’t sleep in the room for three nights because of the smell. Since I did the dresser I have tried the Americana Decor creme wax and varnish, and both of those are much less smelly than the wax I used on the dresser! Good luck with your project!
Irina Behrend says
Love your dresser!!! That’s the pulls I was looking for! Thank you for the link to amazon!! Very nice combination of paint. It’s my second favorite paint after Annie Sloan’s:)
Bre says
Hi, Irina – thank you! I’m glad the link helped! And yes, it is really great paint, especially for the price! Have a great day. 🙂
Sandy says
Love the look! I am going to try on my cheap particle board cabinet. However, I wanted to ask where you got your pull handles from?
Bre says
Hi, Sandy. Thank you!! Totally give it a try – I bet you will be thrilled with the result!! I ordered my pulls on Amazon. You can get them here: http://www.amazon.com/gp/product/B007IIR8SO/ref=as_li_tl?ie=UTF8&camp=1789&creative=390957&creativeASIN=B007IIR8SO&linkCode=as2&tag=averbutinsp06-20&linkId=GIRRZTS2HJ5S6NEX. (Please note that the link I just gave you is an affiliate link. If you purchase through that link, I receive a small commission at no added cost to you, because I am a member of the Amazon affiliates program. You can read my full disclosure policy here: https://averageinspired.com/about-me-contact/disclosures.) I hope that helps! Please let me know if you have any other questions! Have a great weekend! 🙂
Hi Bre! says
Hi Bre, I love the way this piece came out. I have a bedroom set similar to this one that I want to paint but I have no clue on how to do it. Could you be kindly enough to tell me what kind of paint you used and where can I get it.. Steps by steps will be helpful to.
You are an inspiration,
Blessings
Carmen
Bre says
Hi, Carmen! First of all, thanks so much for stopping by and for your kind note! Next, I used DecoArt’s chalk paint, which is called Americana Decor Chalky Finish paint. You can find it at Home Depot, Hobby Lobby, and Michaels. Near the beginning of my post there is a link to their website where you can also order it and see all of the colors its available in. As for steps on how to do this, I don’t really have anything to add other than what’s already laid out in this post. It sounds like you may have found this project through another website, which didn’t set out the steps. If you read the post as it is set out here on my site, it should answer your questions. But if you have other questions, please feel free to ask them here or email me at averagebutinspired@gmail.com. I am happy to help! It is so fun and you will feel amazing when you refinish your bedroom set!! Thanks again, Carmen!!
Angela @ Simply Beautiful By Angela says
That is stunning! I really need to get on this chalk paint and wax kick–they always turn out so pretty 🙂
Bre says
Hi, Angela – thank you!! Yes, please do hop on the bandwagon! I swear, it is virtually foolproof! Happy Holidays! 🙂
Jamie | anderson + grant says
Hi Bre! I wanted to let you know that I included this fantastic dresser in my features yesterday at our Your Turn to Shine party. You did a beautiful job on it!
Bre says
Hi, Jamie! Aw, thank you SO much!!! I linked up through Amy so I didn’t see that! I really appreciate it! I hope you’re having a great holiday season!
susan sapp says
Hi Bre! The dresser looks great! love it… Just wanted to say that you seem like such a wonderful Lady. Be Blessed. Merry “CHRIST”mas!
Bre says
Hello, Susan! Thank you SO much! I am so happy that you like the dresser and I truly appreciate you taking the time to leave me such a beautiful note. I hope you have a wonderful and blessed Christmas season! 🙂
Maddy says
Hi Bre,
The dtesser looks fantastic! Great job! I did want to ask a question though….my understanding was that latex based paint – which chalk paint is – cannot adhere to a surface which has previously been sealed. I would have lightly sanded the dresser pror to painting. Is the paint adhering properly without any issues? I don’t understand why no prep was required over the original finish?
Bre says
Hi, Maddy! You are spot on about “regular” latex paint. But this is the beauty of chalk paint. Really and truly, no sanding prep or stripping required (unless the piece was sealed with wax – then you will want to do some prep work, from what I understand.) The calcium carbonate in the paint gives it the amazing ability to adhere without prep work! That is why I LOVE it so much! I have done several pieces in chalk paint now – all with no sanding prep – and they’re all holding up wonderfully. This dresser included. Let me know if you have any other questions. I am definitely not an expert but I’m happy to help in whatever way I can!
MJ says
Wow! I have looked at that paint several times wondering how well it worked….I’m headed to the store for some tomorrow after seeing how great your dresser turned out!
Bre says
Hi, MJ – awesome!! Yes, it really is great! I’ve used this brand in particular on several projects now, and I’ve been so happy with how it’s turned out and held up! Good luck with your project!
Rebekah @ Charming Imperfections says
I love the color! Its so wonderful what paint can do!
Bre says
Hi, Rebekah! Thank you! I really appreciate it!
Crystelle says
haha! Love the book-pile!! And I love the dresser too! Those drawer pulls really finishes it off…..Wishing you a merry Christmas 🙂
xox, Crystelle
CrystelleBoutique
Bre says
Hi Crystelle! Thank you! Yes, as much as I hate to admit it, the book pile happens quite frequently. Those kids! 🙂 I hope you have a wonderful Christmas, too!
Lauren @blesserhouse says
I love the color! It’s amazing what paint and new hardware can do for a piece. Your little ones do exactly what mine does when I’m in the middle of a project- destroy the house! Haha
Bre says
Hi, Lauren! Thank you!! I know – paint is so fabulous! I’m glad I’m not the only one who cannot accomplish a project without having my house torn apart! It is ridiculous! 🙂 Hope you had a great weekend.
polly says
Do you know if this process would work on formica cabinets
Bre says
Hi, Polly! Let me preface my response by telling you that I am by no means an expert in chalk painting! My understanding, however, is that you can use it on any surface, really! I did a quick Google search and it looks like people have painted formica cabinets with it. I don’t know how durable it is, but it might be worth doing some more research. Have a great weekend!
Gwen Harden says
Your paint finish is beautiful. How will you ever be able to change paint colors with the wax finish on top? I love the finish it leaves, but can’t imagine getting another coat of paint on that wax finish.
Bre says
Hi, Gwen! Thank you! So about the finish, I’ve read three things: (1) you can simply chalk paint right over it; (2) you can remove the wax with mineral spirits; or (3) you can put on a coat of Zinsser primer and then repaint. I haven’t tried to repaint a piece that’s been waxed, so I don’t know what the best option is, but at least it isn’t permanent! Thanks for stopping by and I hope you have a great weekend!
Breanna says
Bre I love this! It turned out awesome and is the perfect neutral piece for your little guy’s room 🙂 Love the dark wax and your choice of hardware. Also, my Dad is pilot and my brother recently got his pilot’s license. I grew up surrounded by airplane decor!
Bre says
Hi, Bre! THANK YOU! That means a lot coming from you. 🙂 Love that you have a family of pilots, too! Next up – YOU! 🙂
Amanda @ Dwelling in Happiness says
Loooove this, Bre!! So gorgeous!! The color is totally perfect. And the wax totally makes it look so vintage! A fab makeover, I’m sure your son will love it! Well, maybe not, but at least YOU can enjoy it! 🙂
Bre says
Hahaha, thanks, Amanda!! I think he actually does like it! My daughter, on the other hand, keeps saying that she misses the old dresser. PUNK! 🙂
Cassie @ LittleRedWindow says
It looks great! I really love the new hardware!!
Bre says
Thanks so much, Cassie!! 🙂
Seana Turner says
I think it came out really well. I think the “cup” drawer pulls make a HUGE difference as well. I liked the ones you had used before, but these are really modern. I so admire the way you just dive in and get it done!!!
Bre says
Thank you, Seana! I am happy with the way it turned out and I do like the new pulls much better, too! Hope you have a great night!