I love copper accents for home accessories, but I don’t love the price tag. That stuff is expensive, man! We put copper gutters on the front of our house last year and let me tell you – ouch.
So it came as no surprise to me that real copper planters for my front porch were out of the question. I was going to have to use my plain black urns again this year. That is until I found out about copper patina paint, and made some DIY Faux Copper Planters!
I.AM.OBSESSED.
This was such a fun project, and I am going to “copperize” everything because, well, I can!
Supplies Needed to Make DIY Faux Copper Planters
This post contains affiliate links. To read my full disclosure policy, please click here.
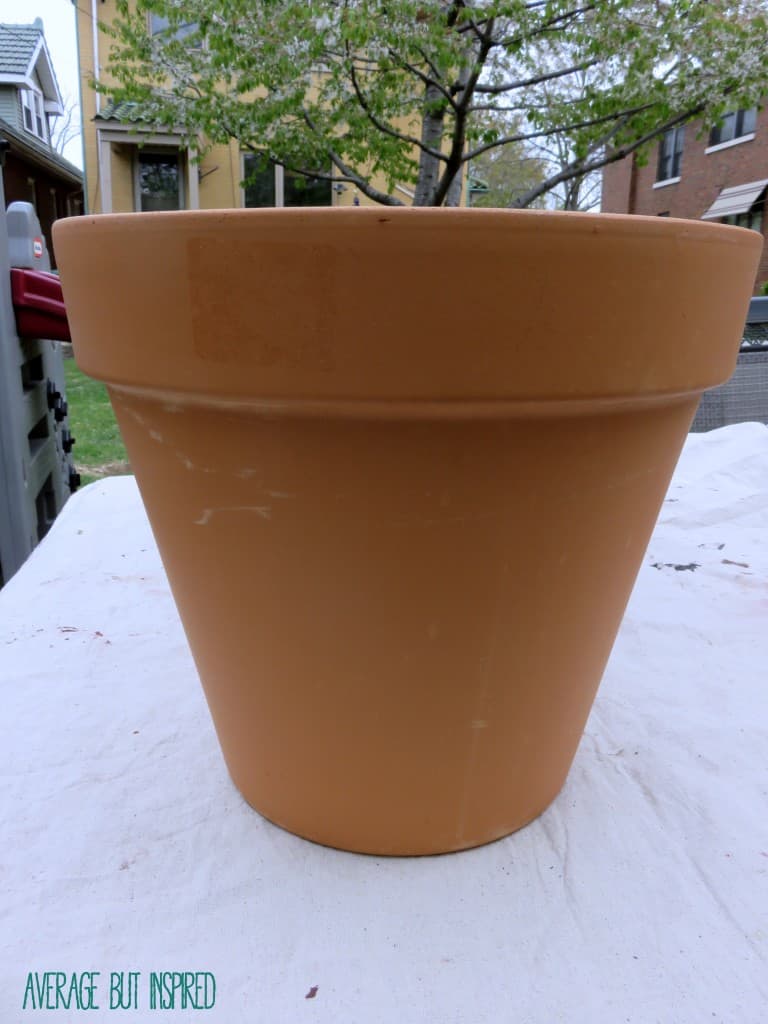
- Terracotta pots
- Paintbrush
- Modern Masters Metal Effects Copper Paint and Green Patina Kit
How to Make DIY Faux Copper Planters with Copper Patina Paint
First I wiped down my terracotta pots to remove dirt and dust.
Next, I applied two coats of Modern Masters Metal Effects Primer, which came in the copper patina paint kit, per the instructions on the bottle.
I primed the inner rim of the pots because I knew that some of the inner rim would be visible even after I planted flowers.

After allowing the primer to thoroughly dry, I applied a coat of the Copper Reactive Metallic Paint, which also came in the kit.
My pots were so shiny!
Then a crazy storm decided to move in, so I had to transfer this operation to the messy garage. (It WILL be cleaned out this summer. Public accountability.)
I added a second coat of Copper Reactive Metallic Paint, and while it was still wet, I sprayed on the Green Patina Aging Solution (again, this came in the copper patina paint kit). In this photo you can kind of see the spots where it was sprayed.
The Activator started working immediately, and it was super exciting to see the green patina appearing right before my eyes.
Within about ten minutes, the pot looked like this! I felt like a science geek because this was making me so happy.
I let my pots sit in the garage overnight, and I filled them with flowers the next afternoon while I pretended my children were not throwing dirt at one another.
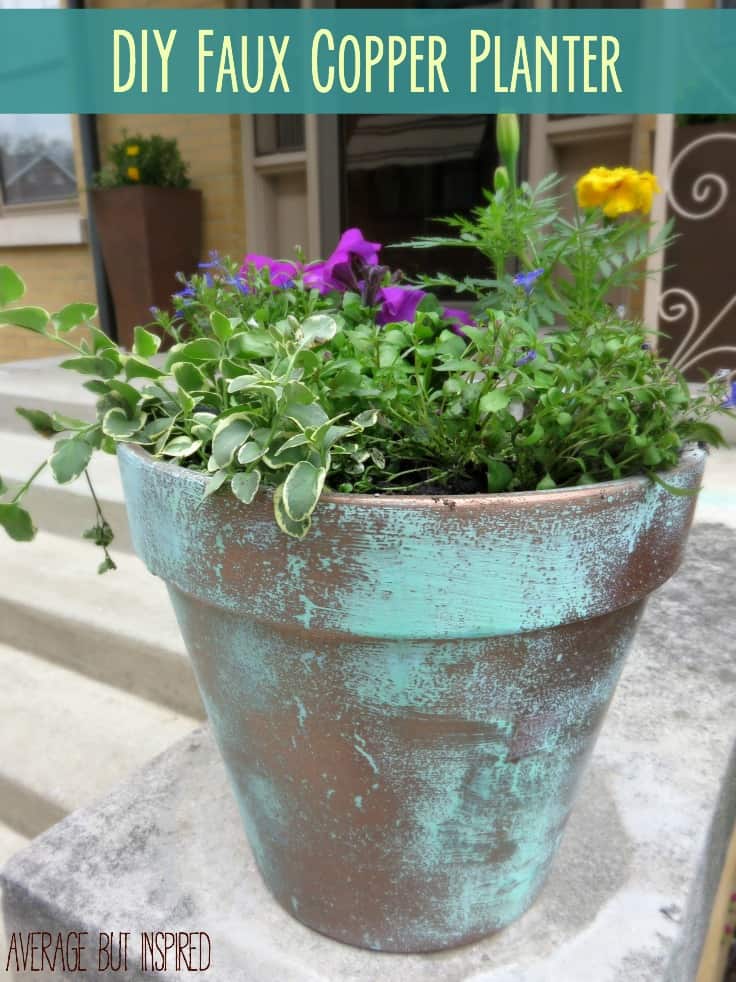
The copper patina looks realistic enough to pass inspection – in my opinion at least!
Can you believe what kind of copper patina you can achieve with a paint set?
My little guy likes them, too. Or so he says.
I’m so happy spring is finally here and I have some color near my front door. The fact that I got the copper look for less also makes me ecstatic! I am so thankful for this copper paint!
– Bre
Kate says
I love the copper colour without the added aging patina. Thank you for your tutorial.
Bre says
Thank you!
Diana Williams says
Great idea, I just did this with my mail box.
Diana
Bre says
Hi, Diana – oh that’s cool!!! I bet your mailbox looks gorgeous!
Brittany says
Do you have to use the patina spray or can it just be left copper?
Bre says
Hi! You could definitely just leave it copper. If you’re not looking to have the pantinaed look, you may want to research if there is a cheaper crafty paint on the market that you could use. I think the magic of this product is that it works with the patina spray, but if you don’t want that patina it doesn’t make sense to pay for it. Know what I mean?
Laura says
Can this be used on plastic planters? 🙂
Bre says
Hi! Honestly I’m not sure! The manufacturer says it can be used on any paintable surface, but I don’t know if plastic qualifies. If you reach out to Modern Masters they should be able to help you. Sorry I don’t have a definitive answer!
julie says
I really like the look of these pots. Think this may be my first retirement project.
Bre says
YAY!
Kristi says
They look fantastic! That paint is incredible!!!
Bre says
Thanks, Kristi! And yes, I am totally obsessed with the paint. A little goes a long way, too, so I will be sharing some more copper projects for sure! 🙂