Have you guys ever seen those adorable customized peg dolls that you can buy on Etsy and other creative places like that? I have been obsessed with the idea ever since I saw it, so of course I had to try my hand at making my own peg doll family. It was the MOST FUN craft project I’ve done in a while, and I love my little personalized peg doll family! I bet you’ll want to make one, too!
It’s the perfect little dose of happiness over my kitchen sink. And very realistic too, I might add. Right down to the womanly hairstyle my husband has and my long flowing ponytail. (OK, I wasn’t as skilled with the paintbrush as I’d hoped.)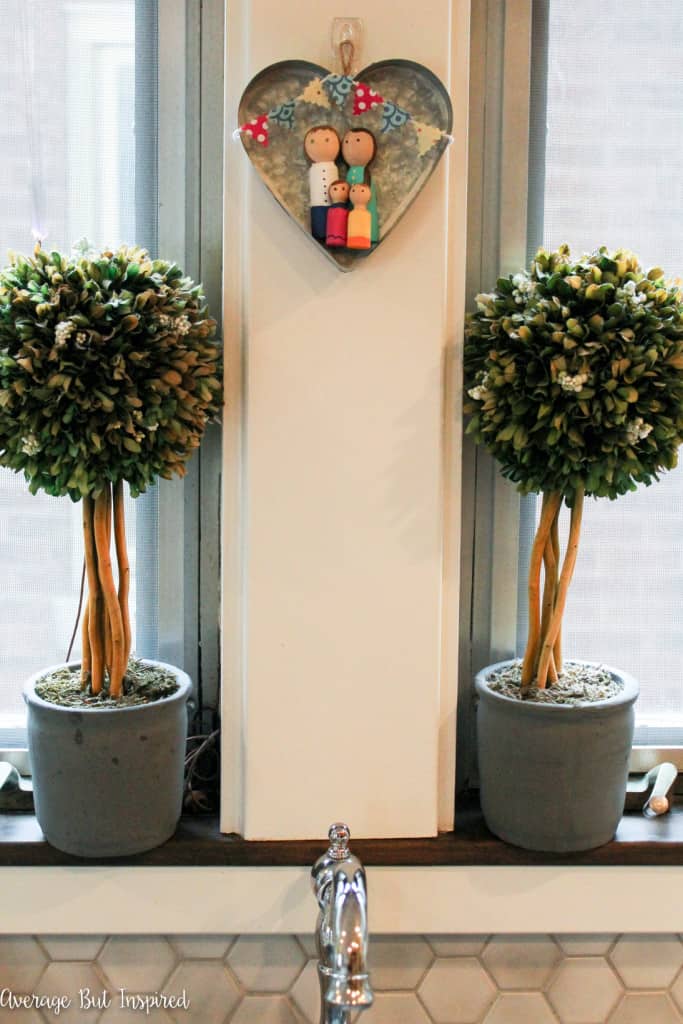
Supplies Needed to Make a Personalized Peg Doll Family
Some of these links are affiliate links. To read my full disclosure policy, please click here.
- Wooden peg dolls in the quantity of your family and in varying sizes (Here’s a family with five kids for a bargain price!!)
- Acrylic paints in several colors (think about hair color, eye color, and clothing choices for your family members)
- Artist paintbrushes in a variety of sizes
- Baker’s twine
- Fabric scraps
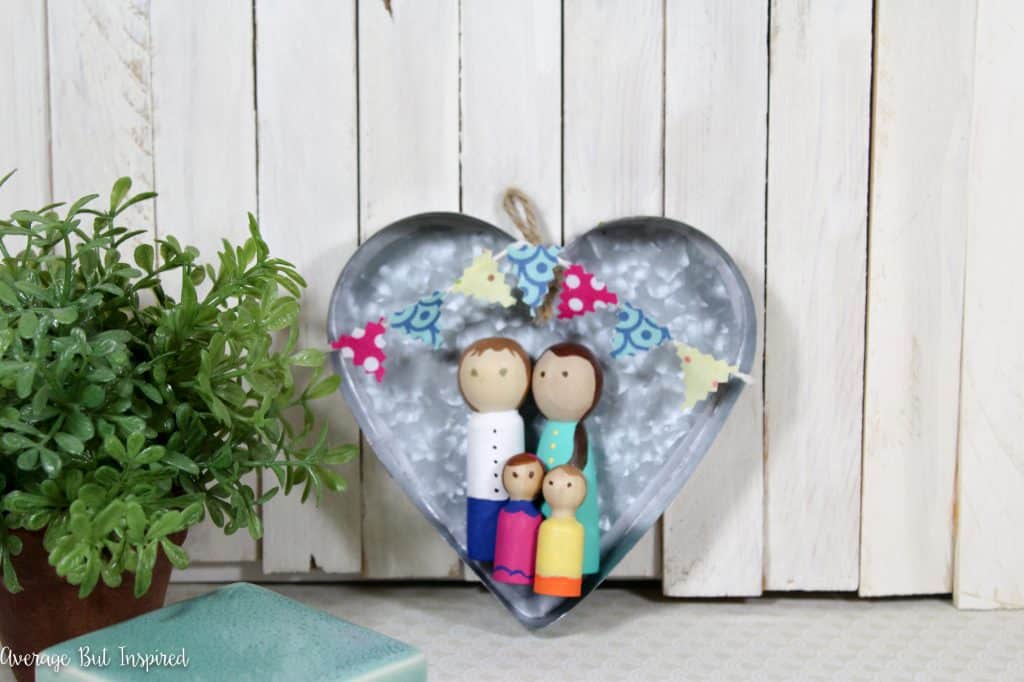
- Backer for your peg doll family (I used a galvanized metal heart from Michaels)
- Elmer’s ProBond Advanced glue
Instructions for Making a Personalized Peg Doll Family
So this is really a pretty easy project. As long as you have a steady hand and some patience, you can do this.
I started by painting very simple colors on my peg dolls. The girls got one solid color (for dresses), and the boys got two colors (pants and shirt). 
Once the “clothes” dried, I painted on some embellishments, like buttons, a collar and ruffle on my peg daughter’s dress, etc.
After that, things started to get real. I had to paint eyes and hair. The girl hairstyles weren’t so bad. I gave myself a nice flowing ponytail like you see on models, and my peg daughter got a cute little bob. Very stylish. (Very unrealistic.)
Then I painted my peg husband’s hair. He, unfortunately, got a pseudo-bob / mullet look. Kind of like the time he had me cut his hair in law school when we had no money and he could not pay for a real hair cut. So I guess his is somewhat realistic. My peg son’s turned out a little better. Lucky him.
I thought my peg family was just adorable, until I realized I had painted my own face on sideways. See, this particular peg doll I used had a special place for the face (it was lighter in color than the rest of the head portion of the peg doll), and I managed to paint half of the face on that designated spot and the other half off of it. So if you do this project, make sure you look for designated face spots on your peg dolls. You’re welcome.
Once everything was dry, I used my favorite glue to adhere everything to the galvanized metal heart. This stuff sticks anything to anything. It’s the best!
After my peg family was firmly in place, I glued some baker’s twine to my galvanized metal heart.
Then I cut fabric scraps and glued them on to make a little pennant banner. Adorable.
Aren’t we a cute family?
So even though we have our flaws, such as strange hairstyles and faces on the side of our heads, we’re a pretty good-looking family.
And if you want a fun project to make for yourself or as a gift for someone else, I would recommend making a personalized peg doll family of your own. It has the potential to become your favorite family “photo” yet!
-Bre
Amy | Canary Street Crafts says
Such a cute project, Bre! Your little peg family is adorable.
Bre says
Thank you so much, Amy! 🙂
Samantha says
Oh my goodness, this is the cutest thing ever! I think I’m having heart palpitations over it! The tiny bunting really takes it over the top! You did a great job with the hair do’s, if I say so myself! I’m totally going to make these…and give myself long (non frizzy) perfectly styled hair. 😉
Bre says
Oh my gosh, Samantha – you are the cutest! Thanks for this sweet comment. Yes – if you make one, definitely give yourself the best hairdo that you can. My peg doll’s hair is so much better than my own. 😉 Thanks again!