You know those “skinny jeans” you’re hanging onto – those jeans you wore 12 years ago before you had two kids, a dog, a job, and reality TV to prevent you from actually wearing them buttoned? Those jeans are like my master bathroom.
See, for almost eight years (as long as my husband and I have owned our house), we’ve been thinking that we’re going to gut and remodel our master bathroom. Because of that, we kept it in a state unaltered from the time we bought it: beige, dark, mildewy, and just gross. We kept it like this because we were wishfully thinking that one day soon we would rip it all out and build a beautiful new bathroom of our dreams. Like those skinny jeans, we were hanging onto a dream that just wasn’t going to happen. But after eight years of this nonsense, I’m coming to my senses. A gut job is not going to happen anytime soon (and I’m not going to wear those “skinny jeans” anytime soon either!), so I’m going to embrace what I’ve got and get it to a place where I can at least not cringe every time I walk into it! 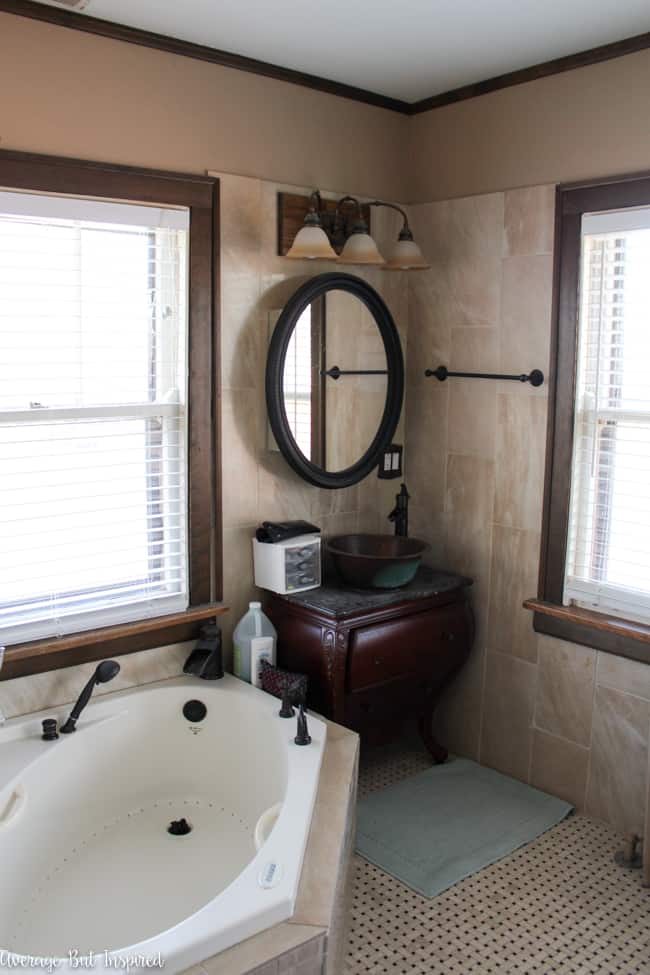
When I heard that the One Room Challenge was starting again, I knew it was the perfect opportunity to give my master bathroom a bright and budget-friendly makeover! To give you a little background, the One Room Challenge is a semi-annual design challenge hosted by Linda at Calling It Home, where twenty “real” designers completely re-do a space in just six weeks. They share their progress and advice all along the way. Then the rest of us wannabes with blogs join in on the fun and link up our own makeovers and progress, too! SO . . . for the next six weeks you’ll get to follow along with me as I give this space a new look!
![]()
Before I jump into my plan for this space, I’m going to get really real here and show you this master bathroom of mine. Ladies and gentlemen, it is not a pretty sight. It has been totally neglected, and while the previous owners who DIY’ed it used nice materials, they did a terrible job putting it all together! (Sorry if you happen to read this previous owners, but you should’ve hired out this job!) The tile work is probably the WORST you will ever see in your life, the plumbing barely functions, and the overall construction is just shoddy as can be. There’s not much I can do about these issues in this makeover, but at least I can make it “pretty” until a real renovation is in the budget!
Anyway, here is my “favorite” spot in the room – the area that’s had a hole in the wall for seven years (I distinctly remember the plumber cutting this hole in the wall two days before my daughter was born). Somehow we just haven’t gotten around to patching this hole. I guess we’ve been over-scheduled for seven years. 
Are you so bored already? There is NOTHING interesting happening in here. Well, except for that nice pendant light that illuminates the toilet like it’s a sacred spot.
Wow. I am really embarrassed posting these photos. Isn’t it crazy how you can have some really awesome spots in your house and others that are just plain bad?
Another problem with this bathroom is that because of the poor ventilation, the ceiling has started to peel. And in the actual shower, it gets covered in mildew all the time. Puke.
On the other side of the room, we have a prissy vanity with a copper vessel sink that I HATE. Unfortunately I am going to keep this vanity because if we really do get around to renovating the bathroom we will be replacing the vanity, so I don’t want to spend money on that now. (Hi! That’s me in the mirror.)
Here’s a better view of the vanity with its missing hardware and stupid faucet that makes me think I’m pumping water from a well in the 1800’s.
Okay, so you can see how this space could use some TLC. And now that I feel like I’ve shown you one of the deepest, darkest secrets of my home, I’m ready to show you my rough plan for giving my master bathroom a makeover that my husband and I can feel proud of.
This post contains affiliate links. To read my full disclosure policy, please click here.
Sources: Vanity Paint | Wall Paint | Trim Paint | Cornice Board Fabric | Vanity Drawer Knobs | Ceiling Fixtures | Shower Curtain | Towels | Rug
So what I’m thinking is to really brighten up the space with new paint on the ceiling and walls, and on the window trim. The window trim in my master bedroom was already painted white when we moved in, so I don’t feel guilty about painting the trim in the master bathroom to match. Oh . . . and in order to accomplish this, I will finally patch that hole in the wall.
I’m also going to add some color to the room with cornice boards over the windows. This will also help hide the uneven tile near the vanity. New light fixtures and decorative accessories will also help the space feel more cohesive and like less of an afterthought!
Now that I’ve got a plan, I just have to make it happen! And of course, I’m sure some of this plan will change along the way. I never really operate this way when it comes to decorating. I usually go with the flow as I find things I like. So don’t be surprised to see some of this changing up along the way!
I’m excited to hear what you think about my plan (and about how awful we let our master bathroom become)! Please make sure to check back here each week to see my progress. Next week I plan to show you my to-do list and what I was able to accomplish in week one of the One Room Challenge! Also, please make sure to stop over to the ORC Linking Participant Page to see what the other challenge guests have up their sleeves!
Wish me luck!
Bre
Brittany Goldwyn says
Awesome—another master bath! We are taking on a lot but I had to settle and keep the vanity, vanity top, and sink fixtures in ours, too. In a perfect world they’d go, but momma wanted her standalone tub, soooo…sacrifices!
Bre says
OOOH I need to swing by and check out your plans! So glad you’re getting a tub. Hey, priorities!!!
Jenny says
I’m so excited to see you are participating, Bre! Your commentary about your bathroom is hilarious, and it’s clear that you just love so much about that room. I can’t wait to follow along with you!
Bre says
YAY! Ugh yeah that bathroom really makes me want to puke. It is SO bad!! I’m glad to be participating, too! I am enjoying having a timeline that I need to stick to. It’s really motivating!
Breanna Bertolini says
The before photos are always the best! You’ll feel much better about them when you have a crazy amazing new bathroom! So excited you decided to take part and can’t wait to follow along!
Bre says
Hahaha man . . . the before photos are the best and the worst at the same time! Thanks, Bre!
Kendra @ www.joyinourhome.com says
It’s going to look amazing Bre! This room is such a nice size and your inspiration board looks beautiful! Can’t wait to follow along!
Bre says
Thanks, Kendra!! It definitely needs some improvement – fingers crossed it all comes together!
Nicole Q-Schmitz says
Ha, I would have totally put my hand through the hole while trying to turn on the light late at night. We’re doing a half-bathroom update for this round, so I wanted to make sure to check out the other bathrooms too – good luck 🙂
Bre says
LOL – I know – so ridiculous that it was right there and for so long!! Thanks so much for stopping by; I am looking forward to seeing the makeover of your brother’s bathroom, too!
Seana Turner says
How exciting! It is funny how we get used to things like a hole in the wall. Many times, people don’t get around to fixing things up until they are trying to sell their house, at which point it is too late to enjoy the change! I love what you’ve chosen and look forward to seeing the “new” unfold:)
Bre says
Seana – I know!!! Seriously it was as if we didn’t even see it anymore! SO EMBARRASSING! 🙂 Thanks for your sweet note. I hope you like how it all turns out!
Kristi Mercer says
Awwww Bre, those before photos are always the hardest part of the ORC (well, aside from crushing through all that work in just six weeks). I cannot wait to see how you transform this space!
Bre says
Hahaha, I know – they are so awful! Thanks for the encouragement, Kristi!