If your home is like mine, it never has an outlet where you need it, and it lacks natural light. For years, my house felt like a dark cave (thankfully minus that dirt cave smell).
But then I started experimenting with rechargeable, battery-operated lighting in different spaces, and things started to look a whole lot brighter.
Today’s battery-operated lights aren’t the bulky and bright white LED tap lights you might remember. While those are still available (and useful in certain applications), there are now choices that exude warmth, are dimmable, remote-controlled, and made to look like built-in fixtures.
I have used them all over my home: from under-cabinet lighting to decorative wall sconces, and even in the shower. And I love them all. So if you have any trouble spots in your home, keep reading because I just might have your solution.
This post contains affiliate links. Please read my disclosure policy for more information.
Motion sensor shower light
The tub and shower area in my kids’ bathroom is very dark, especially when the shower curtain is closed. My kids were always complaining that they couldn’t see a thing in there, so I found this amazing battery-operated ceiling light that is suitable for use in damp spaces.

This wireless shower light has made all the difference in this bathroom. There are three light shades to choose from, it can be turned on with the remote or you can use the motion-sensor setting, and it is easily removed from the mounting bracket for charging.
Shop This Waterproof Shower Light
Under-cabinet battery-operated kitchen lights
My first foray into wireless lighting was when I added these rechargeable under-cabinet lights to my kitchen.

The lights attach underneath the upper cabinets with a slim magnetic strip, which makes them easy to mount and remove for charging. They also have three light temperatures, a timer and are remote-controlled.
Shop These Battery-Operated Under-Cabinet Lights
I use a six-port USB charger to recharge them all at once, and I love how they made my kitchen feel fancier without requiring the help of an electrician.
Lights like these also work well in closets and pantries. You can read more about them in my post all about wireless kitchen lights.
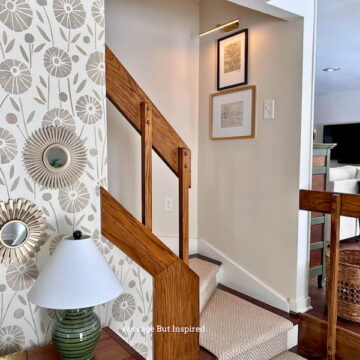
Wireless picture light
At first, I used this wireless picture light to illuminate a dartboard in our basement, but then I moved it to my staircase to highlight artwork hanging on the landing area. It was a switch that made an immediate impact.
This particular art light operates with a gentle tap on the side, and it pulls off the mount attached to the wall for easy recharging.
Shop This Wireless Art Light
I usually only turn on this battery-operated picture light when we have guests over, so it holds a charge for a long time. (Read between the lines: we rarely entertain.)
Battery-operated wall sconces
When you need a little accent lighting or something to help fill empty wall space, sconces are a great choice. But if you don’t have the wiring or outlets nearby, the situation could seem dim.
Battery-powered sconces were the perfect solution in three areas of my home: to flank a wall-mounted TV, to add extra light in a gameroom area and to fill some space above wall shelving in a dry bar I built.
Admittedly, the sconces I hung above the shelves aren’t as easy to charge because I mounted them so high on the wall. But if you hang wireless sconces in an easy-to-reach place, you won’t have that issue.
Shop These Battery-Powered Sconces
All of these battery-powered lighting solutions get my stamp of approval. Of course it would be easier if they were hardwired in (because I wouldn’t have to recharge them), but they are an amazing solution for my needs.
Let me know if you have any questions in the comments below, or if you have any wireless lighting products you’ve tried and loved!