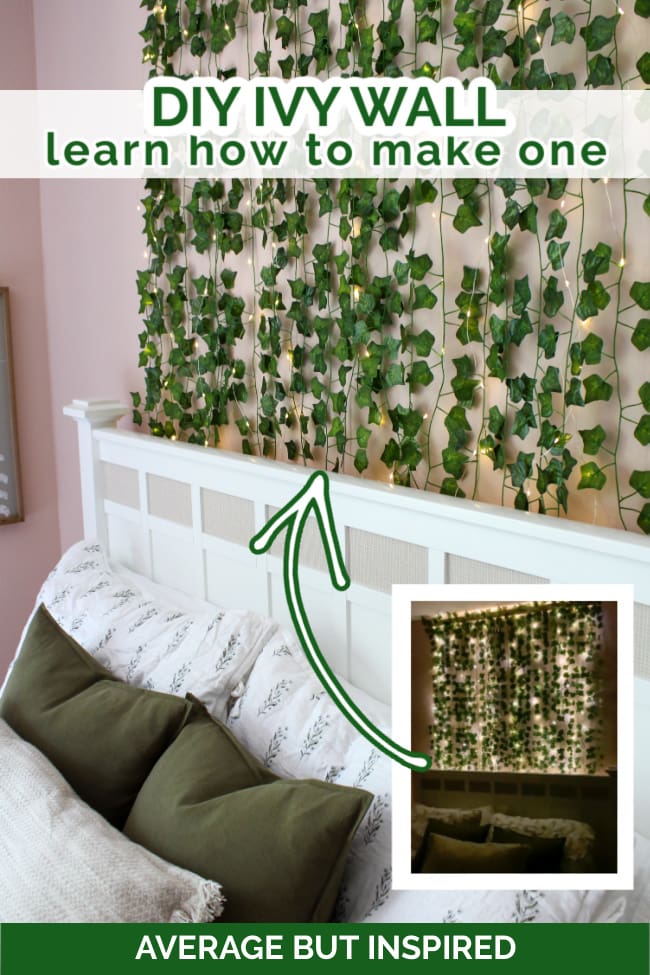
Learn how to make trendy faux ivy vine wall decor with twinkling fairy lights.
When my daughter and I set out to make over her bedroom and give it a bookish boho vibe, she insisted on having fake ivy vines behind her bed. Not liking the pre-lit artificial vines I found online, I decided to make DIY ivy wall decor for her.
To be honest, I just wanted to hang a painting over her bed. I didn’t like the idea of sticking fake vines on a wall and calling it decor.
But, she had her heart set on this faux ivy backdrop look, so I decided to make it happen. And, I had no idea how popular it would be. My DIY faux vine wall video on this project got over 34 million views on Instagram – holy smokes!
I guess it just goes to show you that I am old, and my daughter is young and hip. (Don’t tell her I said that!)
This post contains affiliate links. Please read my disclosure policy for more information.
Faux Ivy Vine Wall Supplies
These are the supplies I used to make the light up ivy wall as shown in the post. Feel free to modify these items and materials to fit your needs!
- Wood piece (I used a 1 x 2 pine furring strip, cut down to approximately 5′ long)
- Hand saw and miter box (OR you can have a store employee cut the wood to size for you)
- Optional: paint
- Artificial vines (I used one package of these fake ivy vines)
- 10-strand battery-operated and remote-controlled fairy lights
- Utility stapler
- Scissors
- Small d-ring hangers
- Wall anchors & screws
- Screwdriver
How to Make a DIY Ivy Wall
Making your own vine wall is a great way to get the exact length you need, and also a really full look (unlike a lot of the premade ivy wall options out there).
And, the great thing is that this goes together very easily. It takes a little bit of time, but it is not difficult.
Step One: Air Out the Ivy
The ivy vines I used for this project worked great and were a wonderful price, but they were REALLY smelly. They came shrink-wrapped and smelled awful when I unwrapped them. I let them air out on my screened-in porch overnight, and I suggest you air out your ivy, too! (That sounds so funny.)
Step Two: Prepare the Wood Backing
If your wood strip is not the correct length, begin by measuring and cutting it to size. (Remember: you can have wood cut to size at places like Home Depot and Lowe’s.)
Then, paint the wood strip if you want it to match the wall. In hindsight, I would have painted the wood the same color as the wall (Benjamin Moore Odessa Pink), because I think it would have looked better. Oh well. Learn from my mistake (unless you like the wood look, which is totally fine!)
Step Three: Cut the Faux Vines to Size
Measure the length of the wall you want to cover with ivy, and then use that measurement to determine where, if at all, you need to cut the faux vines.
For my daughter’s wall, we were able to cut each of the vines in half (roughly) and have them hang slightly behind her headboard.
For us, one package of faux ivy (cut in half) was enough to create the entire project.
Step Four: Staple the Vines to the Wood
Next, using a utility stapler, attach the vines to both sides of the wood.
I stapled ivy across the front of the board, and then carefully flipped the board over to staple ivy all along the back side.
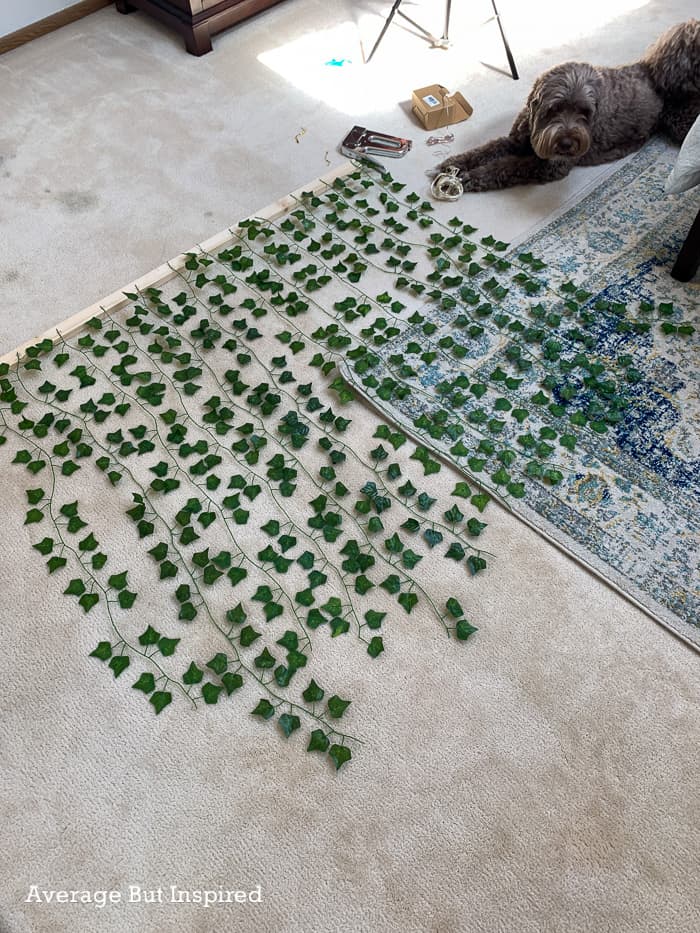
Stagger the ivy on the front with the vines on the back; this helps give the ivy wall its full look.
Step Five: Staple the Fairy Lights to the Wood
Once the ivy is in place, it’s time to add the magical part of this wall decor: the twinkle lights or fairy lights!
For this step, it helps to work with the lights ON, as it’s easier to see where you’re placing them.
Also, it’s important to note that you should NOT staple through the wire! You will ruin the lights if you staple through them. Place the stapler so that the ends of each staple go into the wood around the light wire, but not through the wire. And, if the staple pinches the wire too close to the board and the lights turn off, use a flat-head screwdriver to gently lift up the staple ever so slightly. This should turn the lights back on.
For the 10-strand lights I used, I carefully attached the wire connecting the battery pack to the back center of the wood.

Then, I worked strand-by-strand to attach the lights across the board. I definitely crimped a few wires along the way and had to lift up the staples as mentioned above. Don’t worry if this happens to you – you can fix it!
Step Six: Attach the Hanging Hardware
On the back of the wood, I attached two small d-ring hangers to the outside edges. I knew this would be an easy way to hang fake vines in my daughter’s room, but there are other ways you can do this, too. I will talk about alternatives later in this post.
Flip the wood over and staple a piece or two of ivy vine across the front of the wood board to help hide it.
Step Seven: Hang the Faux Vines Wall
With the hanging vines ready to go, I installed two anchors and screws in the wall above my daughter’s bed. Once those were in, she and I placed the ivy wall hanging vines on the screws.
The battery pack for the fairy lights hangs all the way to the floor, so it’s hidden behind her bed. The lights are remote-controlled, so there’s no need to access that battery pack on a regular basis.
Alternative Ways to Hang Fake Vines
As with any project, there are always other ways to do things. In case you’re looking for some options, here are different ways to hang a faux ivy wall backdrop.
No-Damage Methods of Hanging Vines
If you’re not able to, or a fan of, putting holes in your walls, there are a couple of alternative methods for attaching vines on walls without damaging them.
If you make an ivy wall hanger like I show in this post, you could attach 3M Command Picture Hanging Strips to the back of the wood and attach the entire treatment to the wall that way. These Picture Hanging Strips can carry as much as 20 pounds (depending on the size of strips you use), so they will work for hanging vines.
If you don’t use a wood backer like I did, and instead are looking for a way to hang greenery vines directly on the wall, or hang ivy from the ceiling perhaps, you could use clear 3M Command Hooks. Simply place those on the wall and string the vines or ivy through the hooks.
Do Not Hang Vines With Tape
People have asked if you can hang vines with tape (regular or double sided tape). I do not recommend that. Any tape that would hold up the vines will damage the walls or surface to which you’re attaching it. So don’t even try it. 🙂
Add Curtains to Diffuse the Lights
If you’re looking for an extra-romantic or fairytale look, consider hanging curtain rods on the wall with sheer white curtains. Then hot glue ivy vines behind the curtains, and string fair lights around the curtain rod. This method could also be used for a pipe and drape setup, like at a wedding.
****
So, there you have it: a really easy method of making a lush and full ivy wall backdrop.
Although it’s not my favorite look in the entire world, my daughter’s smile made this whole process worthwhile. She loves it in the daytime, but when we turn it on at night, it is amazing.
Rachel says
Hi Bre.
Really like your idea!!
Where did you get the fairy lights??
Bre says
Hi, Rachel! Thank you. I got them on Amazon! Here is my affiliate link: https://amzn.to/3IMNdfI if this helps!
Sheila says
OH what we do for our kids! lol! So sweet though. The room does have a serene vibe to it. Can you please share where you got the bed and bedding? Thank you Bre.
Bre says
Hi, Sheila! Oh gosh – you’re telling me!! :-). As for the bed, it’s an oldie from Crate & Barrel that I updated with peel and stick wallpaper. :-). The bedding is from Target! Here’s my affiliate link if you’re interested: https://rstyle.me/+rg8NoXeWr8stAqRELO6LAA. Thanks so much for stopping by!