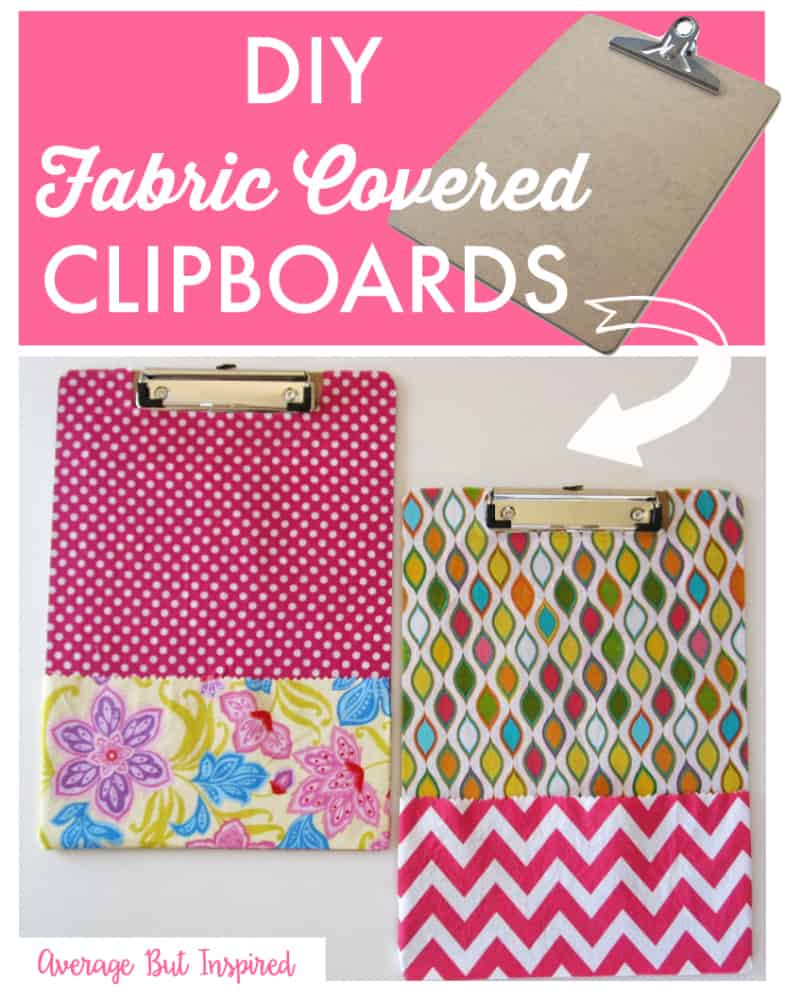
Did you know that Teacher Appreciation Week is around the corner? I don’t know how teachers do it . . . putting up with all of the craziness children throw at them on a daily basis. Some days I can barely even handle my own children, let alone other people’s kids. Teachers truly are special people, worthy of a week devoted to making them feel appreciated!
I always like to give teachers little gifts throughout the year, and one of my favorite teacher gifts is these DIY Fabric Covered Clipboards. Swap out teachers’ boring, plain and uninspired clipboards for these fabulous fabric covered clipboards! This is a great Teacher Appreciation Week gift, or a gift for anyone who likes to be organized! 
Supplies Needed for DIY Fabric Covered Clipboards
This post contains affiliate links. To read my full disclosure policy, please click here.
- Clipboard
- Fabric of your choice
- Mod Podge (I used matte finish)
- Foam brush
- Hot glue gun & glue
- Rotary cutter, Xacto knife, and/or sharp fabric scissors
- Optional: fabric stabilizer (see step six below)
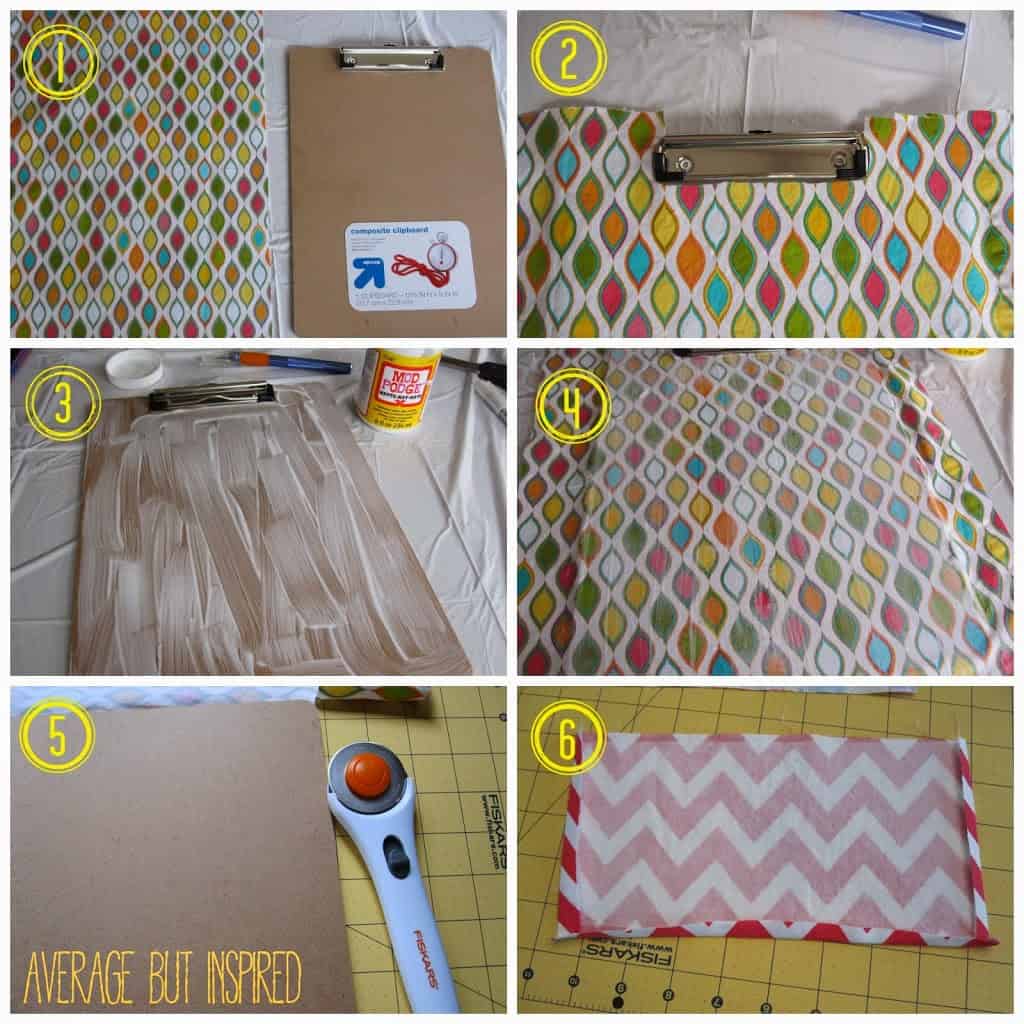
How to Make DIY Fabric Covered Clipboards
It’s so easy to make these clipboards!


Sonnet says
Bre these are SUPER CUTE!!!! Love them! I am thinking you already linked up at Link it or lump it this week, but if you have not PLEASE DO! Thanks lady 🙂 http://www.sohosonnet.com/link-it-or-lump-it/link-it-or-lump-it-sunday-link-party-35/
Bre Eggert says
Hey, Sonnet – thanks girl! I just linked up! I thought I was too late so I was going to do it next week, but I’m all good. Thanks!
Leslie says
What a cute idea! I love how you added the pocket, too. This would be extra as a class gift if you used plain fabric and had all the kids sign it. Thanks for the inspiration!
Bre Eggert says
Hi, Leslie – OMG that is the best idea ever!! So cute and creative. Thank you!
Jenny Hills says
Oh, thank you for the reminder about teacher appreciation week! This is a great idea. Plus, I love anything with Mod Podge.
Bre Eggert says
Hi, Jenny – thanks! I love Mod Podge, too! Best craft invention of all time!
Kimberlee Gibson says
These are so cute! I love the idea of the pocket on them. I need to make one of these for myself – thanks for sharing.
Bre Eggert says
Hi, Kimberlee – thank you!
Heidi says
What a super cute idea! Happy SITS day!
Bre Eggert says
Hello, Heidi – thank you very much!
Rachel Lavern says
Wishing you a great SITS Day!
Bre Eggert says
Hi, Rachel – thank you!
Leigh Havelick says
Wonderful idea and so easy! I NEED easy. Happy SITS Day!
Bre Eggert says
Hi, Leigh! Thanks so much for stopping by!
Jennifer - The Deliberate Mom says
What an awesome gift idea! Although I’m with Anna… I need to make one for me!
Thanks for sharing.
xoxo
Bre Eggert says
Hi, Jennifer – thank you so much! 🙂
Anna Elise says
This is seriously so cute! Forget the teachers, I need one for me! 🙂
Bre Eggert says
Hi, Anna – ha! I sort of want to keep the ones I made for my mom and sister . . . 🙂 I feel ya!
mypixieblog says
Awwww, SO CUTE!! i love this idea. I don’t have kids in school (and I myself graduated a thousand years ago, LOL) BUT think this would make a great gift for teacher friends 🙂 Thanks for sharing and hope you are having a wonderful SITS day!!
Bre Eggert says
Hello and thank you! You are very kind!
Katherine says
Happy SITS day.
I’m terrible. I rarely get my kids’ teachers things. I have no good excuse. Especially with this cute project.
Bre Eggert says
Hi, Katherine – oh my goodness, that doesn’t make you terrible! Seriously, I didn’t even know about Teacher Appreciation Week until last week. 🙂
Lori Hil says
Great idea and such a nice gift! Stopping by from SITS!
Bre Eggert says
Hi, Lori – thank you very much!
Lana L. says
This is so cute and I think even I could do it. My favorite thing is the pocket at the bottom. Happy SITS day!
Bre Eggert says
Thanks, Lana! Yes, I promise – super easy!!
Chihuahua Mommy says
I love all these projects (AND your blog design!)!! Can’t wait to try some out 🙂 Happy SITS day!
http://www.chihuahuaandthecity.blogspot.com
Bre Eggert says
Hello and thank you all around! I really appreciate it. 🙂
The Dose of Reality says
FABULOUS! What a great idea! And teachers are the BEST! Happy SITS day! 🙂
Bre Eggert says
Hello and thank you! Yes, teachers are the best – I agree! Well, maybe next to bloggers. Hahaha just kidding 🙂
Elizabeth Lund says
So fun and easy!! Thanks for a doable post!! Happy SITS!!
http://balmtomysoul.com
Bre Eggert says
Thank you, Elizabeth!!
Lewis Lane says
Fantastic idea. So easy. Thanks for sharing Happy SITS Day!
Bre Eggert says
Thank you! Hope you had a great day, too!
Nan @ Granny Fabulosa says
These are great! And so easy! Thanks for sharing such a good idea.
Meg C says
So cute, and so handy! Awesome idea. 🙂
Bre Eggert says
Hi, Meg – thank you!! Have a good one. 🙂
Erica Buteau says
How cute are these? I teach College students- I love my kids but there’s no way I could do what these teachers do every day! Happy SITS day to you!
Bre Eggert says
Hi, Erica – thank you! Oh my – I’m sure college students present an entirely different set of challenges. Anybody who teaches is amazing, in my opinion! Have a good day.
Jenna Brussee says
What a cute idea! I love it. Happy SITS Day!
Bre Eggert says
Hi, Jenna – thank you!!
Nan @ Granny Fabulosa says
These are really great! I am definitely going to try this.
Bre Eggert says
Hi, Nan – thank you! It is super easy! I hope you have fun with it!
Mommie Daze says
Cute and what a great idea for a teacher gift. It’s so hard to think of things they can actually use.
Bre Eggert says
Hello and thank you!
Thea Morris says
Thank you, Thank you, Thank you! I am a former teacher and I so appreciate your wonderful words and respect for teachers. I also love this gift. If someone had made it for me I would have loved it as a teacher and made all kinds of use of it. Thank you again! Pinning!
Bre Eggert says
Hi, Thea – THANK YOU! I really appreciate your sweet words and that you’re pinning this project. Thanks again!