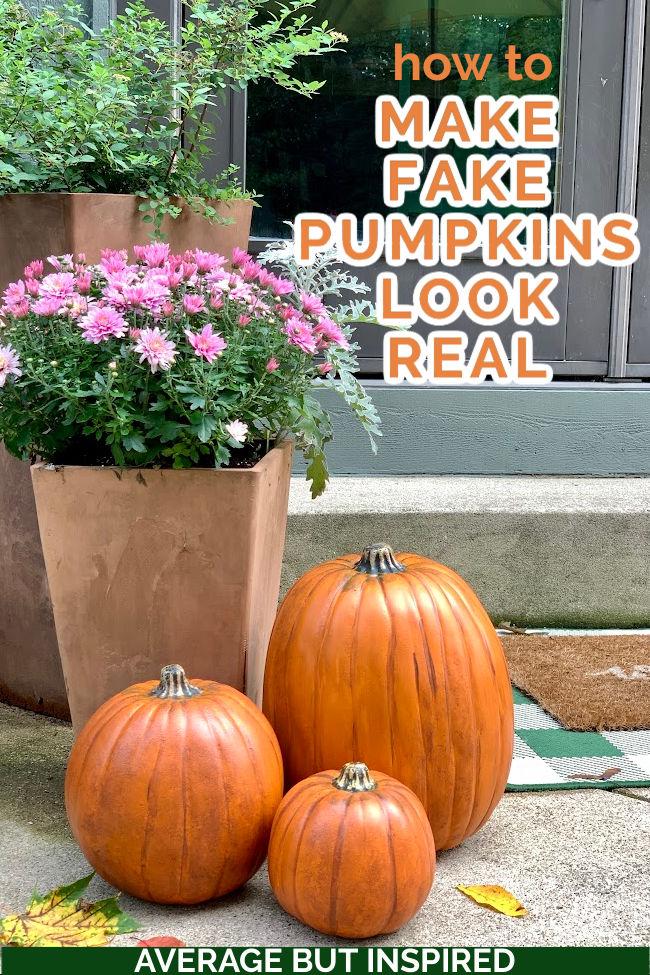
Squirrels: my arch enemies. In the past, they’d eat the beautiful pumpkins my family selected at the pumpkin patch – mangling them before we’d even had a chance to enjoy them in our planters or carve them.
But as soon as I figured out how to make fake pumpkins look real, that all changed.
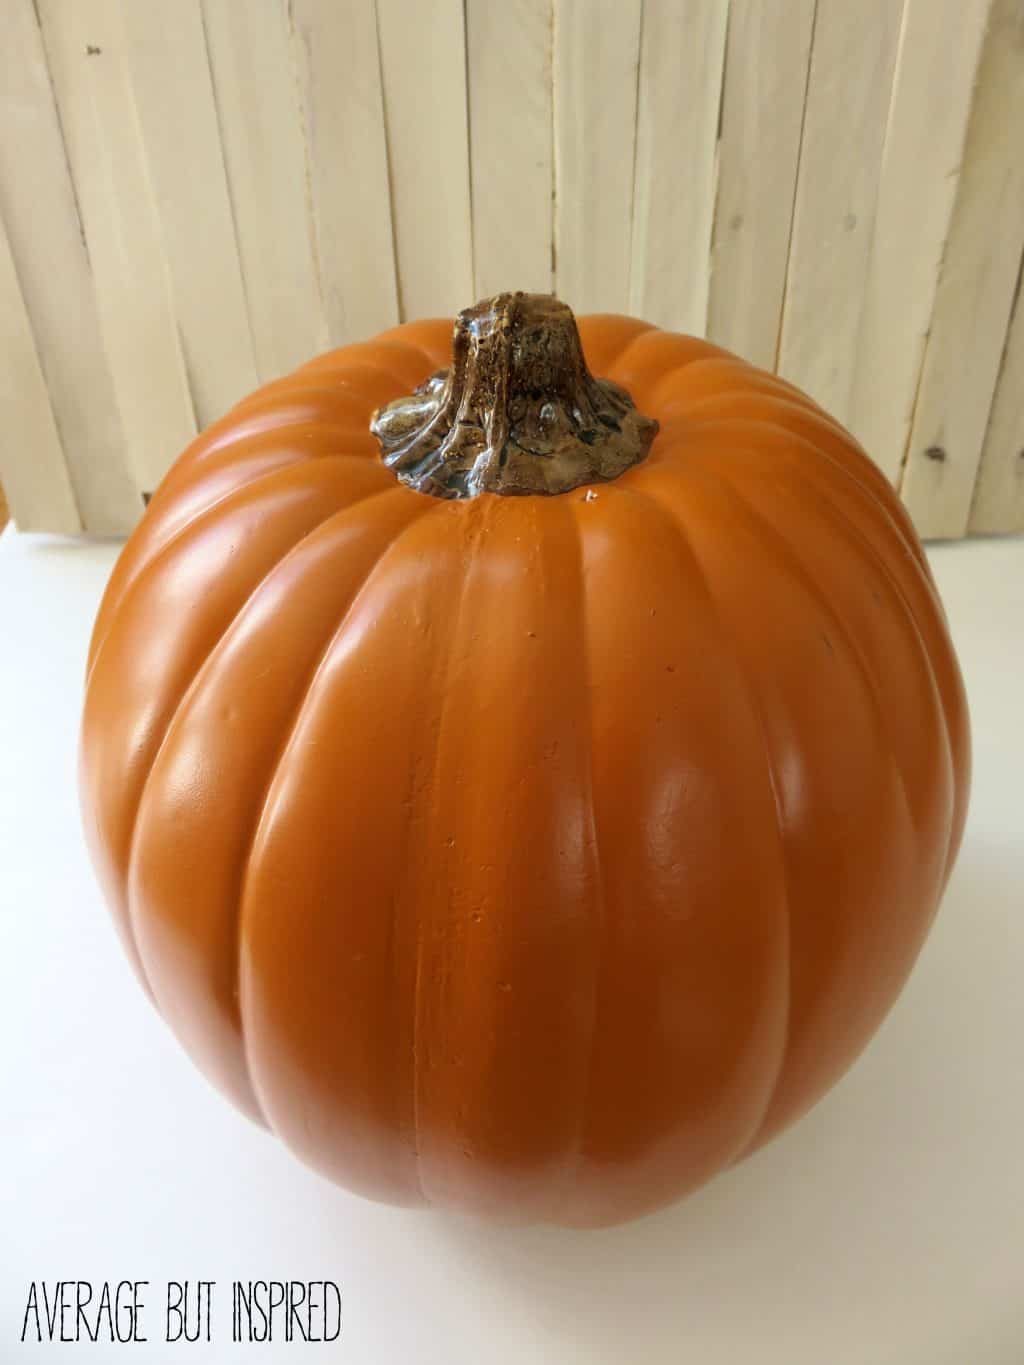
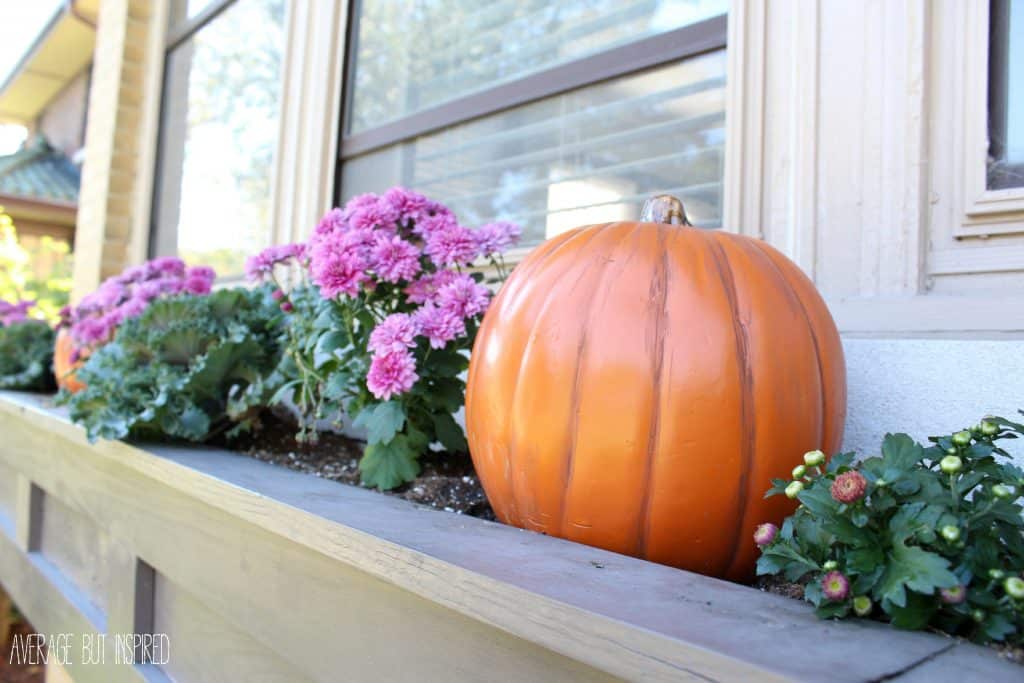
Squirrels do not like faux pumpkins. Therefore, I love fake pumpkins. The problem is that they sort of look like plastic blobs when you get them fresh from the craft store: bright orange, super shiny, not realistic.
But with just a little bit of paint, it’s so easy to make fake pumpkins look real! And, you can even put these painted faux pumpkins outside!
Before we begin, let’s have a quick look at what a fake pumpkin from the craft store looks like. It’s like a bright orange ball with some grooves in it. Not very realistic at all.
The good news is that it doesn’t take many supplies or very long to get fake pumpkins looking more realistic.
Supplies Needed to Make Fake Pumpkins Look Real
This post contains affiliate links. Please feel free to read my full disclosure policy for more information.
- Artist’s paintbrush
- Brown acrylic paint
- Green acrylic paint
- White or cream acrylic paint
- Paper towel
- Sponge
- Spray sealer
How to Make Faux Pumpkins Look Real
Making fake pumpkins look real is definitely more of an art than a science. It will be helpful to read through these instructions before painting, and to watch the video in this post to show you more of the technique.
First, use a thin paintbrush to add brown acrylic paint to some of the faux pumpkin’s grooves.

Let the paint sit for a few minutes (but not long enough to fully dry), and then use a paper towel or sponge (or both) to smudge the paint. It’s good if it smears outside of the grooves, too.
Once you’ve finished smearing a section, move to another section of the pumpkin and repeat the line painting/paint smearing process.
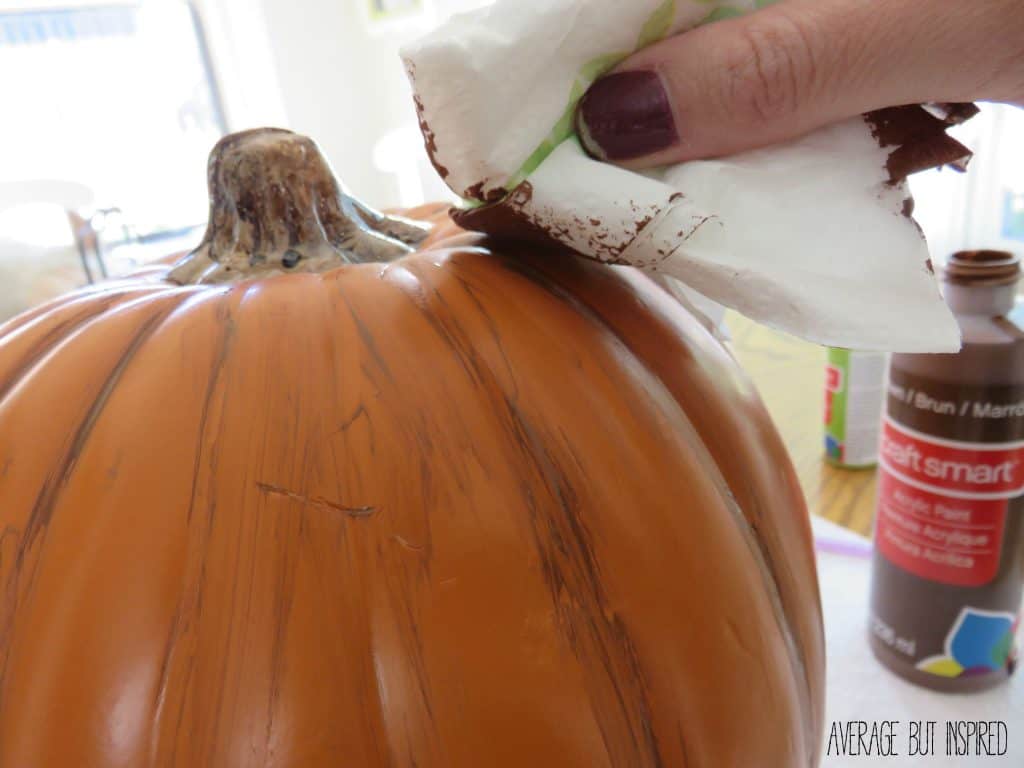
Once you’ve finished that part and the paint has dried, dot some more brown paint on spots that still look too “fresh.” Pumpkins are dirty, people! Give these fake pumpkins what they want – fake dirt! Smear this paint just as you did the painted lines – using a paper towel or sponge.

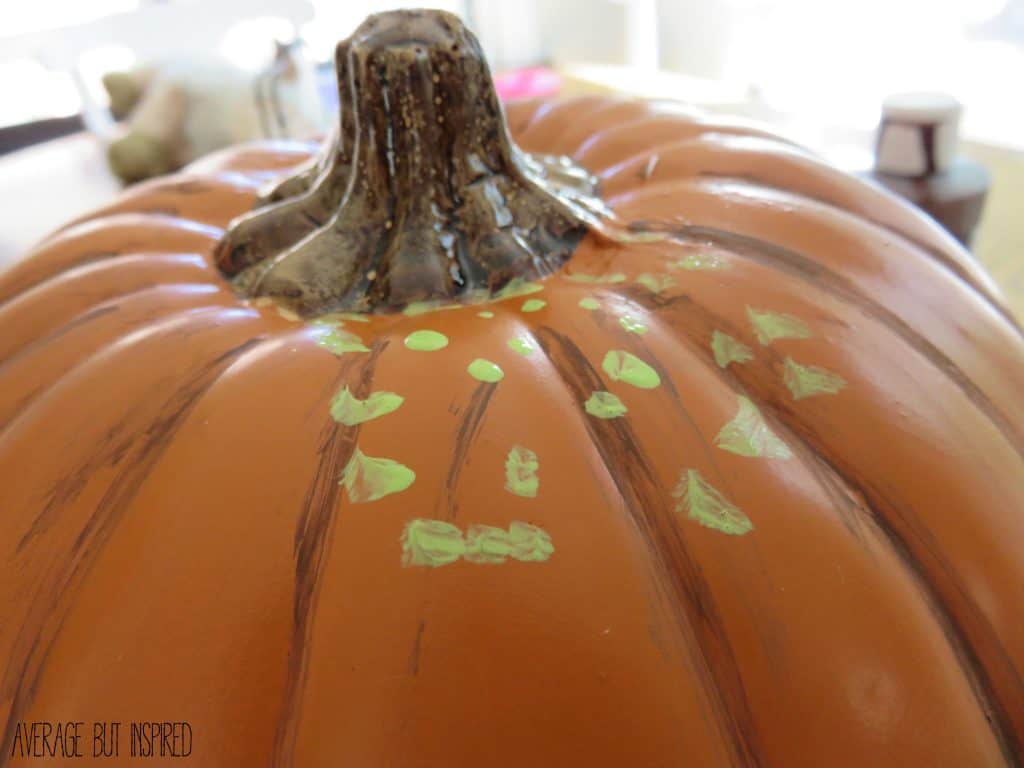
Finally, dot some green and cream acrylic paint around the top and bottom sides of the pumpkin. Remember, pumpkins are not solid orange. They have a lot of color variation, so this step helps make fake pumpkins look even more realistic!
Let the paint sit for a couple of minutes and smear it around and blend it in, just as you did with the brown paint.
With that, your fake pumpkins look real! At least much more realistic than all of the other faux pumpkins at the craft store.
If you used good quality acrylic paint, your pumpkin paint should stay on with no issues. If you’re concerned about longevity of use outside, you could definitely spray the fake pumpkins with a spray sealer. A matte finish would be best.

How to Keep Fake Pumpkins From Blowing Away
If you’re using the realistic faux pumpkins outside, I have a great trick for you to keep the pumpkins from blowing away and in place!
Cut a small slit in the bottom of each pumpkin and stick a wood shim into the slit. Then stick the shim and pumpkin into the dirt. It works like a charm! The fake pumpkins stay in place and don’t blow away – even when it’s really windy!
Another option is to cut a small section out of the bottom of the faux pumpkin and add a handful of rocks inside the pumpkin. Press the cut out piece back into place, and secure with tape, if necessary. This is a great way to keep fake pumpkins from blowing away on porches or other flat surfaces.
So what do you think? Will you be outsmarting the squirrels this year?
-Bre
Kris says
I bought some foam pumpkins that I want to put on my porch steps. What can I use to protect them from rain ? Is there anyway to waterproof/outdoor proof them? I’d hate for them to have to be thrown away at the end of the season
Bre says
Hi, Kris! I’m sorry for the delayed response; I wasn’t getting comment notifications so I just saw this today! Anyway, yes – you can totally waterproof them. Simply spray with spray sealer (Krylon triple thick or a Rustoleum spray sealer will work great). They will hold up perfectly! I reuse mine every year!
Cathey says
Bre, your designs are wonderful. I’ll bet the squirrels were surprised ! ! Thank you for sharing these ideas.
Bre says
Hi, Cathey! You are so sweet! Thank you so much for your note. And hahaha – I sure hope those squirrels were surprised. Get outta here!! 🙂
Helen says
I live it very much thank you
Bre says
Thank you, Helen! 🙂 Have a great day!
Virginia says
Love the idea. How do you keep the pumpkins on the porch or window boxes from blowing over and away? The pumpkins are ‘light’, no weight to them. If I made a pumpkin arrangement on my front porch, I would have to go down the street each day and retrieve the pumpkins. Have designers found a way to keep the craft store pumpkins ‘weighted down’?
Bre says
Hi, Virginia!! Great question – what I do is cut slits in the bottom of the pumpkins and then shove a stick or wood shim up into the pumpkin, with some sticking out the bottom still. Then I use that as a stake to hold the pumpkins in place. It works perfectly! They stay out there all season without blowing away.
Nancy says
If I am putting my pumpkin on steps I carve what I want into it, cut a small hole in the bottom for water drainage, then weight it down with small rocks. I then put a small flame less candles in it. I also have a really cool haunted house one I did that took so long I was not going to do it on a real pumpkin. I used a fake one and coated my finished product with a craft protection spray so I could put it outside.
Bre says
Nancy those are FANTASTIC ideas!! I would love to see your haunted house one! I wish you could post a picture here!
Sherri says
Hi! Love the idea to make the fake pumpkins look real. I actually carved a couple fake pumpkins for my husband and I to use year after year and added uncarved fake pumpkins to my fall porch arrangement. I’ll have to go back and add the paint….thanks for the idea!! BTW, I used dowel rods to “plant” the pumpkins in the bale of straw. It works to keep them in place too. 🙂
Bre says
Hi Sherri- thank you! Aren’t fake pumpkins the best? I am so happy they aren’t destroying my pumpkins this year! Great tip on the dowels, too! Thanks!
Dawn says
Where do you put the solar led light for pumpkin?
Raysie says
I love this idea and you did a wonderful job. Are the wood shims the same kind you can buy at Lowes in a huge plastic wrapped block or are they more like skewers for food?
Bre says
Hi, Raysie – thank you! And yes, I used regular wood shims that are narrow but wider than food skewers. You could also try paint stirrer sticks or kindling wood, if you have that on hand!
TwoPlusCute says
They do look real!
Loved the tip on keeping them in place; I always worry about strong winds.
Bre says
Thank you! Oh gosh, trust me, this tip works! We had the CRAZIEST wind in Chicago for four days straight last week, and my pumpkins didn’t budge! Meanwhile, one of the mums I planted flew straight out of the pot I put it in! 🙂
L. S. says
I made some faux pumpkins this year with solar lights at the top. I had removed the stick because it was too long. Then I used just the pointed end of the stick to secure it into my window box.
Bre says
BRILLIANT!!!
Kim~madeinaday says
This post is so clever! It’s sure to be a hit this season! Sharing Friday at the P3Party share! If you have any Halloween posts I’d love for you to link them up at my Halloween linky, weekly features in Oct. Have a great week!
Kim
Bre says
Hey, Kim! Awesome – thank you! I will check out your Halloween party – sounds fun! Thanks for the invite. Have a great weekend!