• Skip to primary navigation
  • Skip to main content
  • Skip to primary sidebar
Average But Inspired logo - DIY and craft

Average But Inspired

Craft a home you love. DIY and craft tutorials.

  • About
    • Contact Me
    • Disclosures
    • Privacy Policy and Copyright Policy
  • DIY
    • Furniture
  • Crafts
    • Dollar Store Crafts
    • Seasonal
      • Patriotic & Summer
      • Valentine’s Day
      • Easter & Spring
      • Fall & Halloween
      • Christmas & Winter
  • Home Decor
    • Organization
  • Shop
    • DIY Swag
    • DIY Guides
  • Home

Fall and Halloween

DIY Yarn Ghost Art: a Macrame-Look Halloween Decoration

September 18, 2023 by Bre 1 Comment

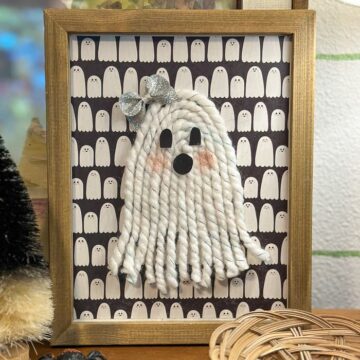
This Halloween yarn craft is sweet and spooky all at once! Yarn ghosts with a macrame look are on-trend, and the perfect addition to your Halloween decor.

Yarn ghost garlands are a favorite DIY halloween decoration, and in recent years, macrame ghost wall hangings have become another popular Halloween yarn craft.

These are both adorable, but also a little time consuming to make. I decided to have the best of both worlds and create a cute little piece of yarn ghost art.

It turned out simply boo-tiful (if I do say so myself), and I think you’ll enjoy making a yarn ghost for yourself, too!

Supplies Needed for Yarn Ghosts Artwork

This post contains affiliate links. For more information, please read my disclosure policy.

  • Unfinished wood canvas or framed sign you no longer enjoy
  • Decorative scrapbook paper (I purchased the ghost paper in-store at Joann Fabric & Crafts. I can’t find it online); black scrapbook paper or cardstock
  • Spray adhesive
  • White yarn (a thicker yarn is a good idea for this project)
  • Premade bow sticker or ribbon
  • Light pink craft paint
  • Scissors
  • Artist paint brush
  • Aleens’ Tacky Glue

How to Make Yarn Ghost Art Decor for Halloween

Instead of using an artist’s canvas for the base of this project, I actually used a piece of clearance artwork I found at Hobby Lobby.

Clearance artwork from Hobby Lobby is great for repurposing into other decor, like Halloween DIY yarn ghost art.

TIP: check the clearance section at Hobby Lobby when it goes 90% off, and stock up on framed art and signs like this. They are incredibly inexpensive (this one was $2.24), and are perfect for repurposing into other decor!

Inexpensive wood plaques (like I used for this DIY Halloween Bug Decor), would also work great for this project!

Step One: Cut the Decorative Scrapbook Paper to Size

I used the cutest ghost scrapbook paper as the backer for my macrame-look ghost artwork.

I cut it to size and attached it to the frame with spray adhesive. I chose to use spray adhesive because it lets the paper lie completely flat with a good bond and does not wrinkle the paper at all!

Attach decorative scrapbook paper to a wood sign to make this Halloween decor.

Step Two: Cut Yarn and Attach it to the Canvas or Frame

Next, I cut seven pieces of yarn. The number of yarn pieces you’ll need to cut will depend on how thick your yarn is. Don’t be surprised if you need more or less than I did!

I put down a thin line of glue in an arch shape for the outermost edge of the yarn ghost. Then I placed a piece of yarn on top of that glue and pressed it into place.

I repeated this process of gluing and pressing down yarn, working inwards, until the ghost silhouette was completed.

Glue white yarn to the frame to create this DIY yarn ghost art.

The yarn may hang down funny and not be the length you want it, but that’s ok. Once the glue dries, you can cut those ends.

Step Three: Make a Ghost Face with Black Cardstock

Next it was time to give this macrame ghost some expression and personality!

I cut a little face out of black cardstock and glued that onto the ghost. Another great material choice for this step would be black felt.

Attach black cardstock to the yarn ghost to give it eyes and a face.

Step Four: Embellish the Ghost

Finally, embellish the yarn ghost to make it even cuter!

I added a hair bow on top with a cute bow sticker, but you could easily make a bow out of ribbon. Use it as a hair bow or a bow tie!

Adding embellishments to the yarn ghost, like a hair bow and pink cheeks, makes it extra cute.

And, my favorite part of this little ghost is the soft pink cheeks I painted on it. I think it makes it so sweet!

Host a Halloween Craft Party

Because of the simple supplies needed to make this cute yarn ghost art, I think this is a perfect Halloween craft for adults! It would be so fun to make at a Halloween craft party with your friends!

This macrame-look yarn ghost art is an adorable piece of DIY Halloween decor that anyone can make! It's a great adult Halloween craft and wonderful for a Halloween craft party.

Set a table with a disposable Halloween tablecloth and all of the project supplies, and make sure to have some spooky food and beverages for your guests.

You’ll all make an adorable piece of Halloween decor and fun memories! Win win!

Filed Under: Fall and Halloween

Dollar Store DIY Pumpkin Topiary

September 11, 2023 by Bre 6 Comments

blank

Get ready for the autumn season with a beautiful DIY stacked pumpkin topiary.

A piece of fall decor that I’ve always admired is a pumpkin topiary. I love the way stacked pumpkins look when added to a pretty planter on a front porch, or when displayed on a cozy fireplace hearth.

On a recent trip to Dollar Tree I spotted a set of plastic stacking pumpkins in the “Plus” section, and I knew I had to have them! My dreams of a pretty pumpkin topiary were within reach!

Dollar Tree Plus plastic stacking pumpkins

(Sidenote: do you have Dollar Tree Plus in your store yet? In mine it’s essentially one aisle of higher-priced items (in the $3-$5 range). They seem to have a lot of seasonal decor, home organization, and crafting items in the “Plus” section. It’s also online.)

These faux pumpkins were quite plastic-looking and not realistic at all (hello, candy corn colors!). But, for $5 I decided to see what I could do to make it work. Let me show you!

BEFORE: a stacked pumpkin topiary looked very fake.

Supplies Used to Make a DIY Pumpkin Topiary

This post contains affiliate links. Please read my disclosure policy for more information.

Here are the materials I used to create the DIY stacked pumpkin topiary as shown in this post. Feel free to substitute items to make this project your own!

  • Stacking pumpkins (from Dollar Tree)
  • Terracotta spray paint
  • Brown acrylic paint and paint brush
  • Faux leaves
  • Faux sunflowers
  • High-temperature hot glue gun and hot glue

How to Make Stacked Pumpkin Topiaries for Indoors or Outdoors

This project came together so quickly that I was able to make it in between soccer games one Saturday. How great is that? Practically instant fall decor!

Step One: Spray Paint the Pumpkins

As I mentioned, these Dollar Tree Plus plastic pumpkins are quite fake-looking. To combat that and give them a more natural look, I spray painted them in a traditional fall color: orange.

I used flat spray paint in a terracotta shade, that was suitable for indoor or outdoor use. Make sure to choose a spray paint that works outdoors if you plan to display your topiary outside!

Terracotta spray paint on plastic pumpkins

Two coats of paint later and the candy corn color scheme was gone. Yay!

Step Two: Add Detail with Brown Paint

As with anything spray painted a solid color, the pumpkins looked a little flat in their solid terracotta color.

To help fix that, I decided to add some detailing using brown craft paint. I used a pared down version of the technique I shared for how to make fake pumpkins look real, and this went a long way to improving the appearance of these plastic pumpkins.

I also painted the stem brown, as it had gotten a heavy coat of terracotta spray paint in step one.

Add detail to plastic pumpkins with brown craft paint

Step Three: Embellish the Pumpkins with Fall Decorations Like Fall Leaves and Faux Flowers

These particular pumpkins fit together nicely and did not require any modifications for stacking. So, the only thing left to do was dress them up a bit and make them even more cute.

I cut apart stems of fake fall leaves (in cream shades) and fake flowers (cream sunflowers), and used extraordinarily hot hot glue to fasten them to the stacked pumpkin topiary.

Glue fall leaves and fall flowers to plastic pumpkins to create a pretty pumpkin topiary

If you don’t have a hot glue gun that gets to a VERY high temperature, I recommend using a glue like E6000 to fasten your fall embellishments, because regular hot glue will not work well for attaching anything to the plastic pumpkins.

Step Four (Optional): Add Weight Inside the Bottom Pumpkin

This pumpkin topiary is pretty lightweight, so if you plan to display it outside, you should add rocks or something heavy inside the bottom pumpkin. This will keep it from blowing away.

***

That’s where I finished my DIY pumpkin topiary project, and I love how it turned out! Some other things I’d like to add to it eventually are grapevine and perhaps some twinkling fairy lights. Wouldn’t those look beautiful on it, too?

I plan to put this on my front porch once I get my fall decorating underway out there. Where would you display a stacked pumpkin topiary?

Make a beautiful fall decoration with this DIY pumpkin topiary project. Stacked pumpkins from Dollar Tree look beautiful on a fall front porch or on a fall fireplace.

Filed Under: Dollar Tree, Fall and Halloween

How to Make Fake Pumpkins Look Real

September 7, 2021 by Bre 21 Comments

blank

Squirrels: my arch enemies.  In the past, they’d eat the beautiful pumpkins my family selected at the pumpkin patch – mangling them before we’d even had a chance to enjoy them in our planters or carve them.

But as soon as I figured out how to make fake pumpkins look real, that all changed.

Squirrels do not like faux pumpkins.  Therefore, I love fake pumpkins.  The problem is that they sort of look like plastic blobs when you get them fresh from the craft store: bright orange, super shiny, not realistic.  

But with just a little bit of paint, it’s so easy to make fake pumpkins look real!  And, you can even put these painted faux pumpkins outside!

Learn how to make fake pumpkins look real with paint! It's an easy technique to make faux pumpkins look authentic. Use these fake pumpkins indoors or outdoors.

Before we begin, let’s have a quick look at what a fake pumpkin from the craft store looks like. It’s like a bright orange ball with some grooves in it. Not very realistic at all.

Love this! Make fake pumpkins look real with a little bit of paint! Use them year after year and keep the squirrels away!

The good news is that it doesn’t take many supplies or very long to get fake pumpkins looking more realistic.

Supplies Needed to Make Fake Pumpkins Look Real

This post contains affiliate links.  Please feel free to read my full disclosure policy for more information.

  • Artist’s paintbrush
  • Brown acrylic paint
  • Green acrylic paint
  • White or cream acrylic paint
  • Paper towel
  • Sponge
  • Spray sealer

How to Make Faux Pumpkins Look Real

Making fake pumpkins look real is definitely more of an art than a science.  It will be helpful to read through these instructions before painting, and to watch the video in this post to show you more of the technique.

First, use a thin paintbrush to add brown acrylic paint to some of the faux pumpkin’s grooves.

Love this! Make fake pumpkins look real with a little bit of paint! Use them year after year and keep the squirrels away!

Let the paint sit for a few minutes (but not long enough to fully dry), and then use a paper towel or sponge (or both) to smudge the paint.  It’s good if it smears outside of the grooves, too.

Once you’ve finished smearing a section, move to another section of the pumpkin and repeat the line painting/paint smearing process.

Learn how to make faux pumpkins look real with this easy tutorial.

Once you’ve finished that part and the paint has dried, dot some more brown paint on spots that still look too “fresh.” Pumpkins are dirty, people! Give these fake pumpkins what they want – fake dirt!  Smear this paint just as you did the painted lines – using a paper towel or sponge.

Love this! Make fake pumpkins look real with a little bit of paint! Use them year after year and keep the squirrels away!

Finally, dot some green and cream acrylic paint around the top and bottom sides of the pumpkin. Remember, pumpkins are not solid orange. They have a lot of color variation, so this step helps make fake pumpkins look even more realistic!

Let the paint sit for a couple of minutes and smear it around and blend it in, just as you did with the brown paint.

Love this! Make fake pumpkins look real with a little bit of paint! Use them year after year and keep the squirrels away!

With that, your fake pumpkins look real!  At least much more realistic than all of the other faux pumpkins at the craft store.

If you used good quality acrylic paint, your pumpkin paint should stay on with no issues.  If you’re concerned about longevity of use outside, you could definitely spray the fake pumpkins with a spray sealer.  A matte finish would be best.

Can you believe these realistic faux pumpkins? Learn how to make fake pumpkins from the craft store look real! All it takes is paint.

How to Keep Fake Pumpkins From Blowing Away

If you’re using the realistic faux pumpkins outside, I have a great trick for you to keep the pumpkins from blowing away and in place! 

Cut a small slit in the bottom of each pumpkin and stick a wood shim into the slit. Then stick the shim and pumpkin into the dirt. It works like a charm! The fake pumpkins stay in place and don’t blow away – even when it’s really windy!

Another option is to cut a small section out of the bottom of the faux pumpkin and add a handful of rocks inside the pumpkin.  Press the cut out piece back into place, and secure with tape, if necessary.  This is a great way to keep fake pumpkins from blowing away on porches or other flat surfaces.

Love this! Make fake pumpkins look real with a little bit of paint! Use them year after year and keep the squirrels away!

So what do you think? Will you be outsmarting the squirrels this year?

-Bre

Filed Under: Fall and Halloween, Holiday

Floral Candy Corn Topiary: A Unique DIY Fall Decoration

September 18, 2020 by Bre Leave a Comment

blank

Fall is my favorite season for everything!  Decorating, food, clothing – you name it!  Oh and I can’t forget crafting, too.  I LOVE coming up with fun fall crafts like this Floral Candy Corn Topiary!

This floral candy corn topiary is the cutest DIY fall decoration! It's so unique and adorable, and easy to make! Get written instructions and a video tutorial in this blog post.

Love it or hate in, candy corn is synonymous with fall, so this darling topiary is the perfect touch for any fall space.

Supplies Needed to Make a Candy Corn Topiary

This post contains affiliate links.  To read my full disclosure policy, please click here.

  • Floral foam cone
  • Floral foam block
  • Faux flowers in yellow, orange, and white
  • Dowel
  • Container (pot or vase)
  • Floral moss
  • Black paint and paint brush
  • Decorative ribbon
  • Optional: hot glue and hot glue gun

Note: you can get all of these supplies at Dollar Tree except the floral foam cone.  That you need to buy at a craft store or via the provided link.

How to Make a Candy Corn Topiary

I made this candy corn topiary as a video tutorial for my TikTok page, so I don’t have complete step-by-step photos for you, but I do have all the information you need in video form, and also written form for added help!  (PS I LOVE TikTok and am praying that it isn’t banished from the U.S.!)

Candy Corn Topiary Video

Watch me make this topiary and then read the instructions below!


Candy Corn Topiary Written Instructions

Step one: cut yellow flowers short so that only a small part of the stem remains.  Press yellow flowers into the base of the floral cone, about 1/3 of the way up the cone.

Step two: repeat this process with the orange flowers, and then with the white flowers.  (Note: if any of the flowers don’t have stems that easily push into the floral foam, simply hot glue them to the cone like I did for the white flowers.)

Step three: push a dowel into the bottom of the floral foam cone.  Then, press the other end of the dowel into another piece of floral foam, which will rest inside the pot or container.

Step four: tie a bow on the dowel, just underneath the floral foam cone.

Step five: hot glue floral moss on top of the floral foam in the pot or container.

This floral candy corn topiary is the cutest DIY fall decoration! It's so unique and adorable, and easy to make! Get written instructions and a video tutorial in this blog post.

Let me know what you think of this cute DIY fall decoration craft!  And . . . do you love candy corn or hate it?  🙂

-Bre

P.S. Check out my fall DIYs and crafts project gallery!

Filed Under: Fall and Halloween

Pool Noodle Pumpkins: A Fun Fall Craft!

October 14, 2019 by Bre 2 Comments

blank

Make an easy and adorable craft this fall: pool noodle pumpkins! This is a perfect large group activity or craft night idea!

While cleaning out my husband’s car this weekend, I found a pool noodle left behind after a trip to our local swimming pool this summer. 

A jolt of inspiration hit and I grabbed the pool noodle, ran inside, and got to work making some adorable Pool Noodle Pumpkins for my fall decor! 

Cute! These DIY POOL NOODLE PUMPKINS are super easy to make and oh-so-adorable! This is a great fall craft for groups because it's so cheap to make!

This post contains affiliate links. Please read my disclosure policy for more information.

I wasn’t totally sure if pool noodles transformed into pumpkins would be cute, but I gave it a try anyway.  And thankfully, they’re darling! 

Pool noodle pumpkins are the cutest craft in the patch!

Pool noodle pumpkins are also extremely easy to make and very, very cheap. 

These would be a perfect fall craft for large groups (I bet you could make ten pumpkins per pool noodle), and even for the least crafty people around.  They are SO easy to make!

Pool Noodle Pumpkins Supplies

These are the supplies I used to create this fun fall craft or Halloween craft!

  • Foam pool noodle
  • Fabric (this buffalo check fabric is similar to the fabric I used)
  • Dollar Tree Tumbling Tower game block pieces
  • Raffia (twine or other ribbon would work, too)
  • Scissors
  • Knife

How to Make Pool Noodle Pumpkin Crafts


The first step is to cut the pool noodle into pieces.  I used a serrated knife, and the noodle cut very easily. 

If children will be making this craft, please make sure to cut the pool noodle ahead of time; do not give the children knives! 

Cut a foam pool noodle to make pool noodle pumpkin crafts!

Next, lay the pool noodle piece on top of a piece of fabric.  Cut the fabric so that there is enough fabric on all sides to wrap around the pool noodle and tuck into the hole. 

Cut fabric to wrap around a pool noodle to create a cute fall pumpkin craft.

Once the fabric is cut, begin pulling the fabric upwards toward the pool noodle hole, and then tucking the end of the fabric into the hole. 

Wrap fabric around the pool noodle to begin creating the pool noodle pumpkin.

Continue wrapping, pulling, and tucking fabric until the pool noodle is completely covered with fabric.

Then, take the wood block from the Jenga game and stick it into the hole where the fabric is tucked.  The wood block will hold the fabric in place, but if you want a more secure hold, you could hot glue the block into the hole, too. 

Use a Dollar Tree Jenga block as the pumpkin stem.

Finally, tie some raffia around the wood block “stem” to create the look of a vine on the pumpkin.  Wired twine that’s curled around the ends would be adorable with this, too!

Tie raffia around the wood block pumpkin stem.

And that is all it takes to make the cutest pool noodle pumpkins in the patch! 

Transform foam pool noodles into adorable pumpkin crafts! This blog post shows you how. It's easy!

This craft was perfect for me right now since I can’t really decorate or work on large projects due to our move.  And, pumpkin crafts are my favorite!  (Check out this Dollar Tree Pumpkin Sign and this Dollar Tree Pumpkin Picture Frame craft, too!). 

Cute! Grab your kids' pool noodles and turn them into darling pumpkins! This fall craft could not be easier! Love this pumpkin craft and pool noodle upcycle.

Let me know what you think about this project! And, sign up for my email list to get DIY delivered! Happy crafting!


Filed Under: Dollar Tree, Fall and Halloween

Halloween Skull Decoration: Make a Mini Halloween Cloche!

September 30, 2019 by Bre 2 Comments

blank

The spookiest time of year is almost here again!  Get ready to pull out those Halloween decorations and deck the halls for trick-or-treaters.  And of course, don’t forget to make time for some Halloween crafting!  This year, Halloween skull decorations are all the rage, and I’m going to show you how to make a mini Halloween cloche with Dollar Tree plastic skulls.  It’s a piece of Halloween decor that’s cute and creepy all at the same time!

Skull decorations are so hot for Halloween! Use Dollar Tree mini skulls to make these cute and creepy Halloween cloches!  

This Halloween skull decoration is pint sized, which makes it totally perfect for any little spot in your home or office that needs a tiny dash of Halloween.  Think shelves, entryway tables, window sills, and more!

I need small and discreet Halloween decorations this year so I can easily stash them away for house showings.  (We’re moving!  Read up on our unexpected life change here.)  This is just right!

Also, because this Halloween cloche is miniature (well, mini as compared to a regular-sized cloche, but not fairy garden mini!), you can make the whole thing in about 20 minutes.  Not bad!  Use Dollar Tree mini skulls to make adorable Halloween cloches for Halloween this year!

Supplies Needed to Make a Mini Skull Halloween Cloche

This post contains affiliate links.  To read my full disclosure policy, please click here.

  • Unfinished wood candle holder
  • Empty baby food jar or 4 oz. small mason jar
  • Acrylic craft paint in black and silver
  • Paint brush
  • Spanish moss (from Dollar Tree)
  • Mini skulls (from Dollar Tree)
  • High-temperature hot glue gun OR E6000 glue
  • Optional: small unfinished wood furniture buttons

How to Make a Mini Skull Cloche For Halloween Decor

Begin by getting your paints and paint brush ready!  Paint the unfinished wood candle holder, the mason jar rim (or baby food jar lid), and the unfinished wood furniture button with the black acrylic paint.  

Learn how to make a skull decoration with cheap craft supplies.

Chances are that the black paint won’t cover the rim of the mason jar very well (even with multiple coats), but that is OK!  Let some of that silver color underneath show through – it adds to the look!

Once the black paint dries on all of those pieces, lightly dab some silver metallic craft paint or acrylic paint onto the wooden pieces.  You can also add some silver paint to the mason jar lid if it needs it.  Mine did not.

Paint a wooden candle holder.

Let the silver paint dry and then use hot glue (only with a high temperature hot glue gun) or use a glue made for plastic and wood (like E6000), to attach the mason jar lid to the wood candle holder.  

Turn a candle holder and mason jar into a cute Halloween cloche with skulls!

Place a little Spanish moss inside the lid, and be careful not to put too much in.  You can hot glue the moss to the lid if you like, or leave it loose.  (You might like to see how I used this same Spanish moss to make my fake fiddle leaf fig tree look real!)  

Spanish moss adds a spooky touch to a Halloween cloche craft project.

Then pop a miniature skull on top of the moss.  You can also hot glue the skull onto the moss if you want a more stable skull.  🙂  (That sounds so funny.) 

Use Dollar Tree mini skulls to make adorable Halloween cloches for your decor this Halloween.

Now, screw the mason jar onto the lid and trim off any Spanish moss that sticks out the sides.  If you choose to add the little wooden button to the top, go ahead and glue that on now.  

So adorable! Use mini skulls to make tiny Halloween cloche decorations.

Once that glue is hardened or set, your adorable mini Halloween cloche is complete!  

Make a Halloween cloche with skulls to add some creepy and cute to your Halloween decor this year.

This is one Halloween skull decoration that you definitely want to add to your haunted house this year!  

This Halloween skull decoration is creepy and cute at the same time! Make a Halloween cloche with miniature skulls in under 20 minutes!

-Bre

Filed Under: Dollar Tree, Fall and Halloween

  • Page 1
  • Page 2
  • Page 3
  • Interim pages omitted …
  • Page 5
  • Go to Next Page »

Primary Sidebar

Let’s Connect!

Hi, I’m Bre! Thanks for visiting Average But Inspired, where I show you how to work with what you’ve got to create a home you love.

Bre of Average But Inspired - a DIY and craft blog

Love DIY? Subscribe to Get Posts E-mailed!

How Can I Help You?

blank

How to Create a Faux Antique Brass Finish with Paint

blank

How to Paint a Door to Look Like Wood (It’s Easier Than You Think!)

blank

How to Paint a Countertop to Look Like Marble!

blank

7 Tips for Hosting a Party on a Budget

Looking for Something?

Copyright © 2013-2022, Bre Eggert (Average But Inspired). All rights reserved.
  • Home
  • DIY
  • Crafts
  • Home Decor
  • Privacy Policy and Copyright Policy
  • Disclosures
  • Contact Me