Average But Inspired

Inspiring creativity with crafts, DIY, and home decor projects.

  • About Bre
  • Contact Me
  • Disclosures
  • Policies
  • Home
  • Shop
  • DIY
  • Crafts
    • Dollar Store Crafts
  • Seasonal
    • Patriotic & Summer
    • Valentine’s Day
    • Easter & Spring
    • Fall & Halloween
    • Christmas & Winter
  • Home Decor
  • Furniture
  • Organization

April 13, 2016 by Bre

Rusty Iron Scrollwork DIY Jewelry Holder

Thank you to Modern Masters for sponsoring this post!  The project and opinions are all my own.

Hello and welcome to another edition of The Monthly DIY Challenge!  If you’re unfamiliar with The Monthly DIY Challenge, every month some of my favorite bloggers and I team up to create unique projects based upon a common product or theme.  This month we’re all about faux metal finishes, thanks to the amazing folks at Modern Masters and their fabulous Metal Effects paint line.

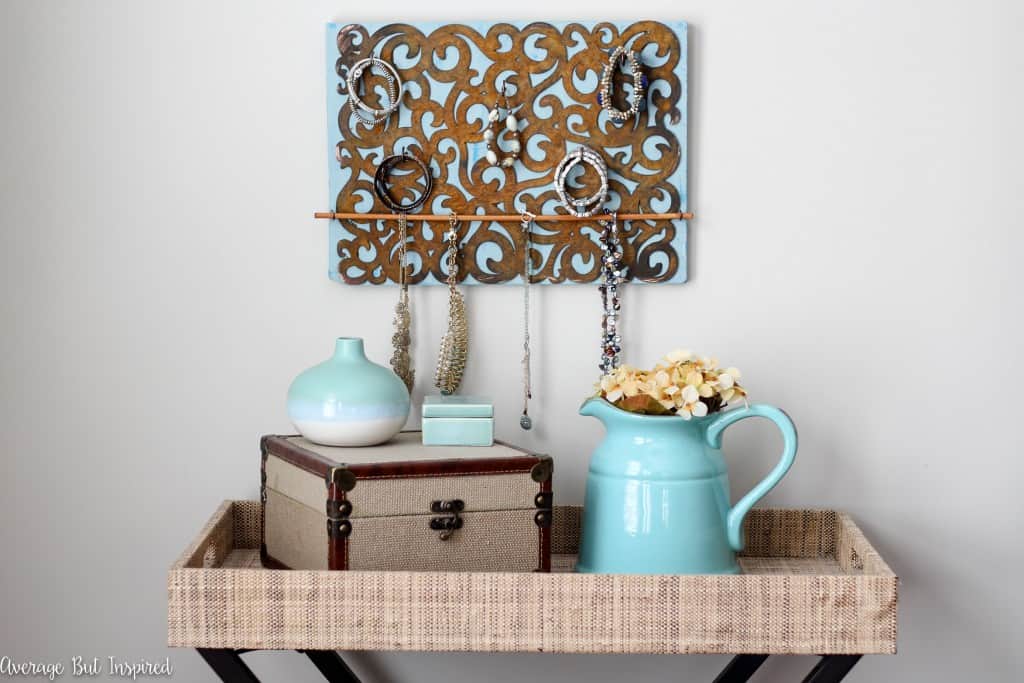
I used Modern Masters’ Metal Effects Rust Oxidizing Finish Kit to create a gorgeous rusty iron scrollwork DIY jewelry holder.  It looks like a piece you’d find at your favorite flea market, don’t you think?  So pretty! Make your own DIY jewelry holder and learn how to give it a faux rust finish with this great tutorial!

Before I give you all the details on how to make your own version of this project, here’s a teaser of the fabulous faux copper (with blue and green patina), and faux rust projects my friends and I came up with.  All of the projects are linked at the end of this post so you can click through to view tutorials for each one!  patina

OK, so let me fill you in on how I made this amazingly rusty jewelry holder!

So pretty! Make your own DIY jewelry holder and learn how to give it a faux rust finish with this great tutorial!

I bet you’d never believe that my “rusty iron scrollwork” was actually an unfinished laser cut wooden plaque that I bought at the craft store, would you?  So pretty! Make your own DIY jewelry holder and learn how to give it a faux rust finish with this great tutorial!

Yep, that’s how it looked when I started with it!  But it didn’t take long to transform it into a rusty work of art.  Using the Modern Masters Metal Effects Rust Oxidizing Finish Kit, which you can buy online at Home Depot, I gave it a whole new look (or should I say old look)!  Modern Masters Metal Effects Rust Oxidizing Finish Kit is an amazing way to give any paintable surface a faux rusty finish!

First, I brushed on a coat of the Metal Effects Primer that came in the box.Modern Masters Metal Effects Rust Oxidizing Finish Kit is an amazing way to give any paintable surface a faux rusty finish!

After that dried for about 30 minutes, I put on another coat of primer.

After I let that sit overnight, I painted on the Metal Effects Iron Paint.  It went on almost black, which made me a little bit nervous.  My scrollwork definitely did not look rusty at this point!Modern Masters Metal Effects Rust Oxidizing Finish Kit is an amazing way to give any paintable surface a faux rusty finish!

After that dried, I misted the entire surface with a couple coats of the Metal Effects Rust Activator.  Modern Masters Metal Effects Rust Oxidizing Finish Kit is an amazing way to give any paintable surface a faux rusty finish!

After about 45 minutes, a rusty finish began to appear right before my eyes.  It was so exciting!  Once all was said and done, I had a gorgeous and authentic-looking piece of rusty scrollwork.  I sealed it with the Metal Effects Sealer Permacoat Xtreme that came in the box.  Then I used wood glue to attach it to a painted piece of scrap wood.  Once that dried, I fastened some cup hooks and a dowel to the board, and turned the piece into a jewelry holder!Modern Masters Metal Effects Rust Oxidizing Finish Kit is an amazing way to give any paintable surface a faux rusty finish!

Look at the variation in tone and color!  Isn’t it gorgeous?  This is NOT a finish that you could achieve with paint alone.

So pretty! Make your own DIY jewelry holder and learn how to give it a faux rust finish with this great tutorial!

The amount of product in my Metal Effects Kit is enough to complete several more faux rust finish projects for indoors or outdoors.  I can’t wait to use my leftovers on some cool items for my “garden” (by garden I really mean dirt patch.  No green thumb here.)  So pretty! Make your own DIY jewelry holder and learn how to give it a faux rust finish with this great tutorial!

What would you be most excited to give a faux rust finish to?

Awesome! Learn how to make any paintable surface look rusty with this tutorial!

Now that you’ve seen how I used the Modern Masters Metal Effects Rust Oxidizing Finish Kit, be sure to check out how my friends used it and the Metal Effects Copper Finish Kit!

blank
Patina Plastic Bins
blank
How to Rust Anything!
blank
DIY Rusty Gate
blank
DIY Concrete Planters with a Rust Patina
blank
Rusty Iron Scrollwork DIY Jewelry Holder
blank
Coastal Tile Coasters with Copper Patina
blank
How to Get the Perfect Rusty Finish
blank
Brass Lamp Makeover
blank
Ikea Lantern Hack
blank
How To Create A Faux Patina Finish
blank
How to Create a Rust Look on Metal
blank
How to Create A Faux Rust Finish
InLinkz.com

-Bre

If You Liked This Post, I Bet You’ll Like This One, Too!

DIY Faux Copper Planters  DIY-Faux-Copper-Planter-header


❮❮ Previous Post
Next Post ❯ ❯

Comments

  1. Seana Turner says

    April 13, 2016 at 6:30 am

    Very pretty! What a nice way to show off your pretty baubles. I always think hanging necklaces is the BEST way to store them:)

    Reply
    • Bre says

      April 15, 2016 at 8:20 pm

      Thank you, Seana! I like to hang my necklaces, too, but I wish I had more space to do it. Most of them are balled up in a mess in my jewelry box!

  2. Amy | Canary Street Crafts says

    April 13, 2016 at 6:57 am

    I’m amazed at what that rust kit can do! The wood scrollwork really looks like old rusty metal! Just a cool idea to use it as a jewelry holder too. It looks so pretty hanging on the wall.

    Reply
    • Bre says

      April 15, 2016 at 8:21 pm

      Thanks, Amy! Yeah I am totally in love with the rust kit. It is such an authentic look! I can’t wait to use it again; I have so much left over.

  3. Christine says

    April 13, 2016 at 10:52 am

    ohhh I luve me some rusty things!!! your project is amazing and thanks for the paint tip!!!

    Reply
    • Bre says

      April 15, 2016 at 8:21 pm

      Aw, thanks, Christine!! I know rust is right up your alley! Hope you have a great weekend!

  4. Sarah @ Little Red Brick House says

    April 13, 2016 at 11:36 am

    This is so beautiful, Bre! I love how it pops against the blue background. And the jewelry holder idea is genius!

    Reply
    • Bre says

      April 15, 2016 at 8:22 pm

      Thanks so much, Sarah! I love the rusty finish – it really gives it a lot of character!

  5. Breanna says

    April 13, 2016 at 11:43 am

    Such a unique idea! Love the jewelry holder! And the finish came out so beautiful!

    Reply
    • Bre says

      April 15, 2016 at 8:22 pm

      Thank you, Bre! Isn’t the rust so pretty? I can’t wait to make other things rusty, too!

  6. Tara @ Anything & Everything says

    April 13, 2016 at 3:08 pm

    What a unique and clever idea! It’s so amazing what this paint can do!

    Reply
    • Bre says

      April 15, 2016 at 8:23 pm

      Thanks, Tara! I know – I seriously love this paint kit!

  7. simple nature decor says

    April 13, 2016 at 4:44 pm

    OH! I love the iron scroll work, its just beautiful. It perfect for jewelry. Maria

    Reply
    • Bre says

      April 15, 2016 at 8:23 pm

      Thank you, Maria! 🙂

  8. Samantha says

    April 13, 2016 at 7:52 pm

    No, way! Looks like totally legit rust! Love what you did with it, especially against the blue!

    Reply
    • Bre says

      April 15, 2016 at 8:23 pm

      I know, right? It is insane how realistic it is! You have got to try this kit sometime, Samantha!

  9. April R - Uncookie Cutter says

    April 13, 2016 at 10:01 pm

    This looks so cool! I’ve never heard of this stuff before, but I love the way it turned out. Will have to try it!

    Reply
    • Bre says

      April 15, 2016 at 8:24 pm

      Thank you, April! Yeah, it is really an awesome product! A little goes a long way, too. I know YOU could find a great use for it!!

  10. Erica @ Dwell Beautiful says

    April 14, 2016 at 12:46 pm

    Such an inspiring and unique idea! I had no idea it was wood to begin with and how brilliant to turn it into a jewelry holder! I love the old vintage vibe and it looks so great in your space!

    Reply
    • Bre says

      April 15, 2016 at 8:24 pm

      Thank you, friend!! Yeah, I am so pleased with the rusty finish it has now. It is such a cool product!

  11. Amanda Fettig says

    April 14, 2016 at 3:51 pm

    Girl, I love this!! It totally looks like rust!! Who would’ve thought special paint could do that?! Super cute way to hold jewelry, too! 🙂

    Reply
    • Bre says

      April 15, 2016 at 8:25 pm

      Thanks so much, friend!! This paint is amazing – I am telling you!

  12. Emily says

    April 15, 2016 at 10:05 am

    This is so cute! I love the look and function of it!

    Reply
    • Bre says

      April 15, 2016 at 8:25 pm

      Thanks, Emily! This definitely was a fun project to put together!

Leave a Reply Cancel reply

Your email address will not be published. Required fields are marked *

Let’s Connect!

  • Facebook
  • Instagram
  • Pinterest
  • Twitter
  • YouTube
Bre of Average But Inspired

Hi, I'm Bre! Thanks for visiting my blog. I hope you'll find ideas to inspire your creativity and beautify your home here.

Love DIY & Decor? Join the Fun!

    How Can I Help You?

    blank

    How to Build a Backyard Fire Pit

    blank

    How to Create a Faux Antique Brass Finish with Paint

    blank

    10 Craft Supplies You Should Buy at Dollar Tree

    blank

    How to Organize Digital Photos Using Amazon Photos

    Looking for Something?

    blank

    The Easiest DIY Under Cabinet Lighting

    As I’ve been talking about non-stop, I painted my oak kitchen cabinets and freshened up the space! Part of the kitchen makeover was enhancing the lighting, and I’m pumped to show you the EASIEST DIY under cabinet lighting that absolutely anybody can add to his or her kitchen for a little mood lighting and general […]

    blank

    Dollar Tree House Valentine’s Day DIY

    If you follow any Dollar Tree crafters on Instagram or YouTube, you know that the Dollar Tree house is one of the most popular crafting items around! Only available in-store and online once in awhile, these cute wooden houses are the perfect craft blanks to update for any style of decor or season!  I gave […]

    blank

    How to Get a Weathered Wood Look With Paint

    A couple of weeks ago I stumbled upon a new-to-me thrift store, and I was like a kid in a candy store.  My son . . . not so much.  He couldn’t wait to get out of there.  But I had really good luck and found this AMAZING end table from Ethan Allen for a […]

    blank

    Modern Vintage Dining Room Makeover

    It took me almost three months, but I’ve finally finished putting together the dining room in our new house!  It is no longer being used as our virtual learning classroom (thank goodness!), but instead is a beautiful modern vintage dining room that we love! This post contains affiliate links.  To read my full disclosure policy, […]

    Copyright © 2013-2021, Bre Eggert (Average But Inspired). All rights reserved.

    Pretty Chic Theme By: Pretty Darn Cute Design