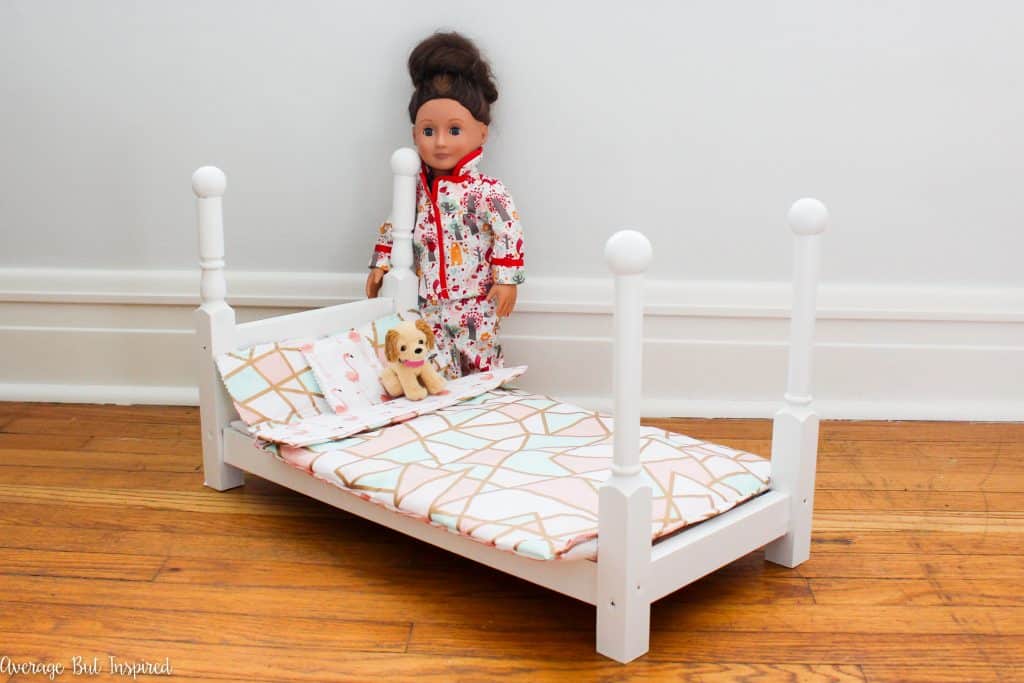
Even if you’re not a skilled woodworker, you can build a DIY American Girl Doll bed! This is an easy doll bed tutorial for all skill levels.
My daughter’s fake American Girl (she’s the Target-brand knockoff, Our Generation), Cailyn, needed a place to rest her weary head! So I built her one!
Building a DIY American Girl Doll bed was such a fun project that saved me a lot of money! (Doll beds on the American Girl website start at $150; this bed cost me under $20 to make!)
Also, this is an awesome beginner woodworking / power tool project because I got really comfortable with my tools and cannot wait to build something else! Trust me that even if you’re a novice, you can build this 18 inch doll bed!
Supplies Needed to Build a DIY Doll Bed
Some of these links are affiliate links, which means I earn a small commission at no added cost to you if you purchase through them. Please read my disclosure policy for more information.
- 1 x 2 lumber board (you’ll need 68″ minimum)
- Plywood project panel (you’ll cut down to approximately 21″ long x 10″ wide)
- 2 x wood balusters (each measuring at least 26″ in length)
- Pine lattice molding
- Circular Saw
- Impact Driver or Drill
- 1.25 inch wood screws (flat head, if possible)
- 1 inch wood screws (flat head, if possible)
- Wood glue
- 1.5″ Ball Knobs with Flat Bottoms
- Poster board
How to Build an American Girl Doll Bed
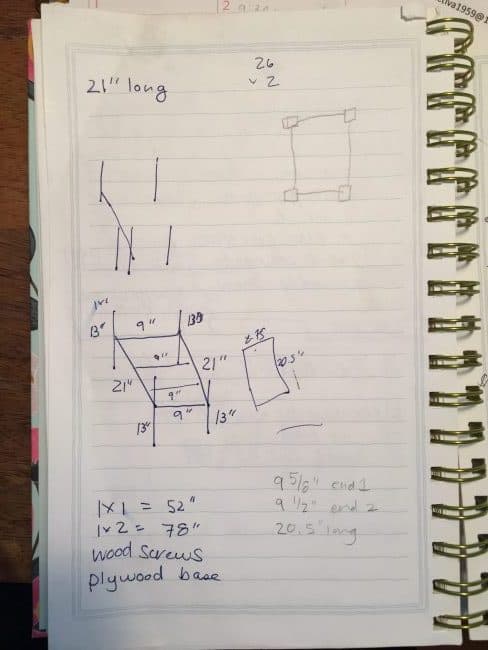
For this DIY 18 inch doll bed, I began by drawing a really rough sketch of my plan. Can you tell I’ve never done this before? (Note: don’t follow this plan. I changed some of it along the way.)
After that, here’s how this project went down.
Step One: Cut the Balusters
I started by cutting the little nubs off the end of the wood balusters. The balusters you purchase may look different than mine. That’s fine!

Next, I cut the balusters apart so that they each measured 13″ long.
Step Two: Cut the 1×2 lumber
After that, I cut my 1 x 2 lumber into four pieces: two 21″ long pieces and two 9″ long pieces.
(I don’t recommend using paint buckets as sawhorses, but it was freezing outside and our sawhorses don’t fit in our tiny work room!)
At first I was really scared to use a circular saw, but it was actually SUPER easy. It has a laser on it, which made keeping a straight line simple, and it was so easy to use. Plus I felt like a total bada** working this thing like a boss.
Once all the wood was cut, I measured where I wanted to screw the pieces together.
Step Three: Put Together the Bed Frame
I drilled pilot holes and then used my new impact driver to begin putting it all together! (Super relieved you can’t see my gray hairs in this extreme closeup.)
I started by attaching a side railing of the bed with the 1.25″ screw, and once that was in, I screwed the piece for the end of the bed onto the baluster (also using a 1.25″ screw).
Notice how I offset the placement of the screws so that the side rail screw is lower than the screw for the piece at the end of the bed. This was so that the screws wouldn’t hit each other in the baluster.
I repeated this process until the entire frame of the doll bed was complete.
Step Four: Make the Bed Rails to Hold the Mattress
Then, I cut thin trim strips to just slightly shorter than the length of the side rails of the bed (approximately 20.5″ long). These strips will be holding the bed’s base in place.
I fastened them to the inside side rails of the bed with the 1 inch screws, placing them about 1/4 of the way down the side rail.
Step Five: Make the “Mattress”
Then, I measured the inside area of the bed so that I could cut the plywood base. This was important because it wasn’t exactly equal on both ends. (Hey, I’m no expert woodworker here!)
I cut a piece of poster board into the less-than-perfect rectangle shape, and then traced that onto the piece of plywood. I cut that shape out with the circular saw and laid the plywood onto the attached trim strips with a thin layer of wood glue. It fit perfectly! (Sorry I forgot to photograph this step!)
Step Six: Add a Headboard
Then I decided that the bed needed a headboard. (Well, truthfully, my daughter made this decision because she was worried her doll would fall out of bed. I’m glad she spoke up because the bed definitely needed a headboard.)
So, I measured the space in between the balusters at the front of the bed and cut a piece of left over 1×2 wood to that size (it was about 9 5/8″ wide). I screwed it in to the balusters.
Step Seven: Add the Bed Post Balls
Finally, I used wood glue to attach the 1.5″ ball knobs to the balusters. This was the finishing touch on my simple DIY American Girl Doll bed!
Step Eight: Paint the DIY American Girl Doll Bed
After I gave the bed a coat of white paint and sewed some simple bedding in fabric that my daughter chose (she has good taste!), I put it in her room and was so happy that she LOVED it!
I’m telling you that building this doll bed was the best way for me to get comfortable with some easy building projects.
Plus, my daughter’s excitement over having a “real” bed for her doll made this whole thing worthwhile.
Not gonna lie – I’m also really happy that I spent a fraction of what it would cost to buy a real American Girl doll bed!
If you have a little girl or know someone who does, make them a doll bed! If I could do this, so can you! And please “pin” this post to share the idea!
Rosa says
Hi. It made me feel good reaiding your experiencia making a doll bed for your little girl. Since I was little always wanted a doll hoise and dols that I could play with. Know My dream is to have a doll house, but I’m going to start bye trying to make this bed for me. Thanks You for posting your ideas. Keep up your ideas strengh and may God bless you always.
Bre says
GOOD FOR YOU!! You’ve got this! Thanks for your sweet message.
Kristi says
SO stinkin cute!!!
Bre says
Thank you so much, Kristi!
Ashley ~ 3 Little Greenwoods says
What an fantastic job you did on this doll’s bed! And the price is WAY better than the original.
Thanks so much for the awesome gift idea!
Bre says
Thank you, Ashley! I wish I would have filled those screw holes, but I totally forgot until it was too late! Oops!
Nicole @ The Inspired Hive says
This is such a sweet idea!!!! And you def look like a bad a** with those power tools! Good work!!! 😉
Bre says
Thanks, girl! I think I’m gonna get myself a t-shirt with that emblazoned on it. 😉
Kendra @ www.joyinourhome.com says
This is the cutest Bre and what a fabulous idea! Our daughter loves these dolls and this would be so cute for them!
Bre says
Thank you Kendra! I am so pleased with how this turned out! I wish I would have filled the screw holes, but alas, I am a newbie woodworker. 🙂
Breanna Bertolini says
Bre! This is so cute. And power tools look good on you! Can’t wait to see what else you build 😉
Bre says
Thanks girl! I cannot decide what to build next. Currently on the list are the dog feeding stations from you and Nicole, Sarah’s farmhouse gate, and radiator covers! SO MUCH to build, so little time! 🙂