• Skip to primary navigation
  • Skip to main content
  • Skip to primary sidebar
Average But Inspired logo - DIY and craft

Average But Inspired

Craft a home you love. DIY and craft tutorials.

  • About
    • Contact Me
    • Disclosures
    • Privacy Policy and Copyright Policy
  • DIY
    • Furniture
  • Crafts
    • Dollar Store Crafts
    • Seasonal
      • Patriotic & Summer
      • Valentine’s Day
      • Easter & Spring
      • Fall & Halloween
      • Christmas & Winter
  • Home Decor
    • Organization
  • Shop
    • DIY Swag
    • DIY Guides
  • Home

Air Dry Clay Garden Markers

April 12, 2017 by Bre 4 Comments

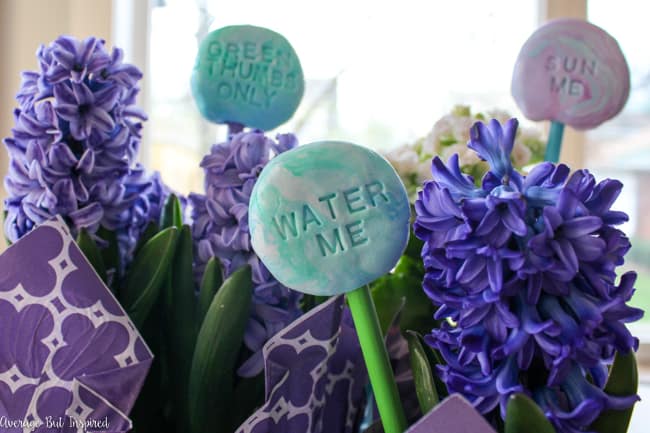
Looking for a cute and easy air dry clay craft? Look no further! These cheeky air dry clay garden markers fit the bill.

Use lightweight air dry clay to create adorable DIY air dry clay garden markers. Use paint to achieve a marbled air dry clay look and add some spunk to your garden or flower pots this season!

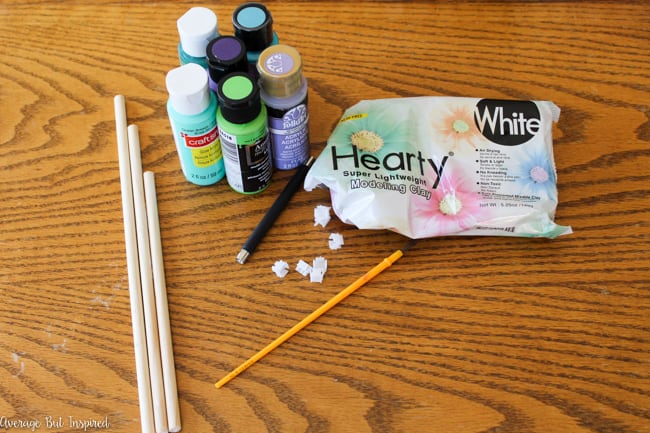
Supplies Needed for Air Dry Clay Garden Markers

Thank you to ACTÍVA Products, Inc. for providing the air dry clay used in this post.  The project and opinions are my own.  Also, some links are affiliate links, which means I earn a small commission at no added cost to you if you purchase through them.  Read my disclosure policy here.

  • Round dowels
  • Hearty Clay lightweight air dry clay
  • Clay text embossing tool
  • Acrylic paints in colors of your choice
  • Paintbrush
  • Triple thick clear glaze
  • Wax paper

Use lightweight air dry clay to create adorable DIY air dry clay garden markers. Use paint to achieve a marbled air dry clay look and add some spunk to your garden or flower pots this season!

How to Make Air Dry Clay Garden Markers

To begin, paint dowels in any color you like.  To make painting dowels easier, I always stick them into a piece of floral foam so I can get every part of them without smearing the paint.  Use lightweight air dry clay to create adorable DIY air dry clay garden markers. Use paint to achieve a marbled air dry clay look and add some spunk to your garden or flower pots this season!

Once the dowels have dried, take two chunks of air dry clay and work some acrylic paint into them.  Make sure your air dry clay accepts acrylic paints as a pigment or a finish.

I used Hearty Clay, which accepts acrylic paint prior to drying, because it is SO lightweight and I knew it would not be too heavy for the dowels – like making them fall over once they were in the flower pots.

Some air dry clays are really heavy once dry, so make sure you don’t choose a heavy clay for this project!Use lightweight air dry clay to create adorable DIY air dry clay garden markers. Use paint to achieve a marbled air dry clay look and add some spunk to your garden or flower pots this season!

I kneaded the paint into the clay, and then joined the two pieces of clay together to create a marbled look.Use lightweight air dry clay to create adorable DIY air dry clay garden markers. Use paint to achieve a marbled air dry clay look and add some spunk to your garden or flower pots this season!

Next, I formed a ball and stuck it onto one of the dowels.Use lightweight air dry clay to create adorable DIY air dry clay garden markers. Use paint to achieve a marbled air dry clay look and add some spunk to your garden or flower pots this season!

I flattened the clay ball on a piece of wax paper, and then I used my clay text embossing tool to write cute little messages on my air dry clay garden markers.

I’ve seen a million versions of garden markers, but they’re all so descriptive – saying things like “basil” or “parsley.”  Mine are funnier.  🙂  Use lightweight air dry clay to create adorable DIY air dry clay garden markers. Use paint to achieve a marbled air dry clay look and add some spunk to your garden or flower pots this season!

I let the garden markers dry for about 1.5 days, and then I sprayed them with triple thick clear glaze to give them a shiny look and to protect them if I use them outside.

Because the Hearty Clay is so porous, I sprayed about four coats of glaze onto the garden markers before I got a decent level of shine.  Use lightweight air dry clay to create adorable DIY air dry clay garden markers. Use paint to achieve a marbled air dry clay look and add some spunk to your garden or flower pots this season!

Once they dried, they were ready to go!  Use lightweight air dry clay to create adorable DIY air dry clay garden markers. Use paint to achieve a marbled air dry clay look and add some spunk to your garden or flower pots this season!

Use lightweight air dry clay to create adorable DIY air dry clay garden markers. Use paint to achieve a marbled air dry clay look and add some spunk to your garden or flower pots this season!

I love their marbled look!  Use lightweight air dry clay to create adorable DIY air dry clay garden markers. Use paint to achieve a marbled air dry clay look and add some spunk to your garden or flower pots this season!

They stand up just perfectly on their own – the clay is definitely light enough to work great on this project!  Use lightweight air dry clay to create adorable DIY air dry clay garden markers. Use paint to achieve a marbled air dry clay look and add some spunk to your garden or flower pots this season!

Use lightweight air dry clay to create adorable DIY air dry clay garden markers. Use paint to achieve a marbled air dry clay look and add some spunk to your garden or flower pots this season!

And can I just say that I’m so happy I had an excuse to buy all these pretty spring flowers?  They smell ridiculously good!  Use lightweight air dry clay to create adorable DIY air dry clay garden markers. Use paint to achieve a marbled air dry clay look and add some spunk to your garden or flower pots this season!

I’d really appreciate it if you’d PIN this post to share this idea with fellow creatives!  Use lightweight air dry clay to create adorable DIY air dry clay garden markers. Use paint to achieve a marbled air dry clay look and add some spunk to your garden or flower pots this season!

Filed Under: Crafts

Reader Interactions

Comments

  1. Amanda Fettig says

    April 12, 2017 at 5:05 pm

    These are so fun!! I need some markers in my garden, these would be absolutely perfect. And I love that you can paint them different colors to coordinate! 🙂

    Reply
    • Bre says

      April 12, 2017 at 5:44 pm

      Thank you so much, Amanda! Yeah the painting part is the most fun! I loved marbling the clay for sure.

  2. Erica @ Dwell Beautiful says

    April 12, 2017 at 1:39 pm

    Oh these are too cute! I love the bright colors and the marbled clay! I definitely need the reminder to water my plants, so perhaps I should make these so I don’t kill them 😀

    Reply
    • Bre says

      April 12, 2017 at 5:44 pm

      LOL – honestly, I don’t think that even these little markers could help me remember to water them! 😉 I am the worst!

Leave a Reply Cancel reply

Your email address will not be published. Required fields are marked *


Primary Sidebar

Let’s Connect!

Hi, I’m Bre! Thanks for visiting Average But Inspired, where I show you how to work with what you’ve got to create a home you love.

Bre of Average But Inspired - a DIY and craft blog

Love DIY? Subscribe to Get Posts E-mailed!

How Can I Help You?

blank

How to Create a Faux Antique Brass Finish with Paint

blank

How to Paint Over Tile

blank

Limewash Stone Fireplace Makeover: Bye Bye Orange Stone Fireplace, Hello Neutral Stone Beauty!

blank

How to Paint a Door to Look Like Wood (It’s Easier Than You Think!)

Looking for Something?

Copyright © 2013-2022, Bre Eggert (Average But Inspired). All rights reserved.
  • Home
  • DIY
  • Crafts
  • Home Decor
  • Privacy Policy and Copyright Policy
  • Disclosures
  • Contact Me