For the first time in my life I am officially an AUNT! You might recall me mentioning my excitement last month when I shared pictures from the Secret Garden Baby Shower that I hosted for my sister-in-law and “Peapod,” my soon-to-arrive niece. Well, I am so happy to report that “Peapod” is here, she has a real name, and she is perfect in every single way! To celebrate her arrival, I did lots of online shopping for the cutest baby clothes I could find, and of course I made her a little something for her nursery wall – this cute and colorful DIY Birth Stats Monogram! 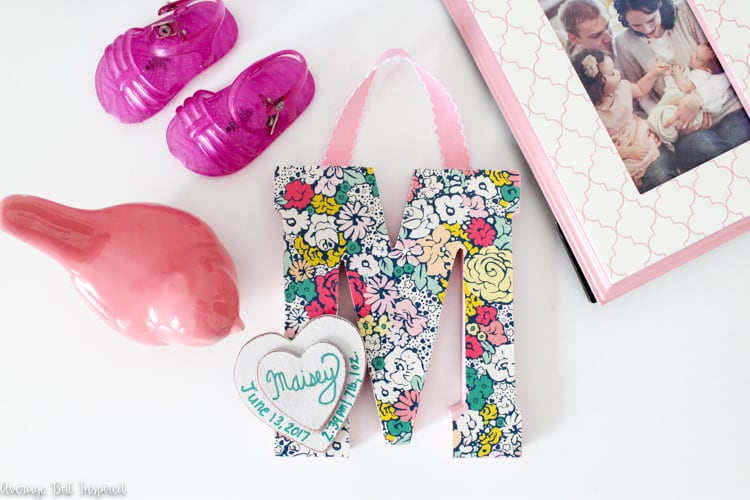
I’m so excited to give my niece her personalized baby gift because it was made with love (and I think it will look great in her nursery, which her mom and dad filled with adorable DIY and personal touches)!
If you have any babies in your life, consider making a personalized birth stats monogram for a gift or for nursery decor. It is such a fun project to make and doesn’t take a lot of time at all.
Supplies Needed for a Birth Stats Monogram
Some of these links are affiliate links. To read my full disclosure policy, please click here.
- Unfinished wooden letter
- Acrylic paint or chalk paint in the color of your choice (I used this paint)
- Wood craft cut in the shape of a heart (or any other shape you like!)
- Paint pen marker
- Scrapbook paper
- Pencil
- Scissors
- Mod Podge (I used matte finish)
- Paint brush
- Wood glue or other strong adhesive
- Ribbon
- Staple Gun
Making a Birth Stats Monogram – The How To
First up, paint your unfinished wood letter in the color of your choice. I used chalky finish paint on my letter because it had a black finish on it already, and I wanted to make sure the paint would stick really well. If you’re using acrylic paint on a letter with some pre-existing finish, get a multi-surface acrylic.
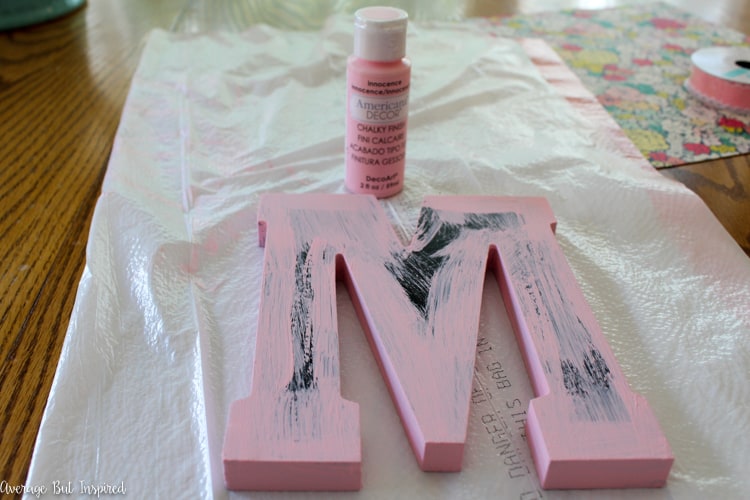
I gave the letter two coats of paint and let it dry completely. Then, I traced the letter onto a piece of adorable scrapbook paper. 
I cut out the scrapbook paper letter and applied a thin, even layer of Mod Podge to the front of the wooden letter.
I placed the scrapbook paper letter on top and smoothed it all down. Once that first coat of Mod Podge dried (about 25 minutes), I put a thin, even layer of Mod Podge on top of the scrapbook paper and let it dry.
While that was drying, I wrote my niece’s birth stats on a wooden heart. Double checked to make sure I had it all right, and then I went over the pencil with an oil based paint pen.
Once the Mod Podge dried on the letter, I used wood glue to attach the heart to the letter.
After that dried, I repeated the tracing, cutting, and Mod Podging (not a real word) of scrapbook paper onto the back of the letter. Because it’s the back, you definitely don’t have to do that! Anyway, when that was dry, I cut some ribbon and stapled it to the back of the letter so that the birth stats monogram can hang in my niece’s room!
It makes such a cute decoration for a baby’s room!
I think the best part is that it’s totally personalized and a really sweet thing to give as a gift!
Make it in any color and with any patterned scrapbook paper you like, and you have a sweet DIY baby gift or DIY nursery decor for any newborn. I’d love for you to PIN this post so that you remember to make it later or to help others find it!
What’s your favorite gift to give a newborn?
-Bre
Seana Turner says
This is such a nice gift! I actually spent much of the winter making letters out of cardboard for Vacation Bible School. Wish I could post a picture of the finished project, because it was very crafty of me, and I think you would be proud:) I used 4 layers of cardboard for each letter, then covered them with paper mache, then sanded and painted them. It was fun!
Bre says
Seana that is so cool!! I love that project. I wish you could post a picture, too. I’m sure they turned out fabulous. 🙂