Six months ago when we brought home our labradoodle puppy, Jasper, I never would have imagined that he would become such a treasured member of our family! Of course I knew we would enjoy having a dog in the house, but the way he has blended into our lives and filled our hearts is remarkable.

This post is part of a social shopper marketing insight campaign with Pollinate Media Group® and the J.M. Smucker Company, but all my opinions are my own. #pmedia #miloskitchen http://my-disclosur.es/OBsstV
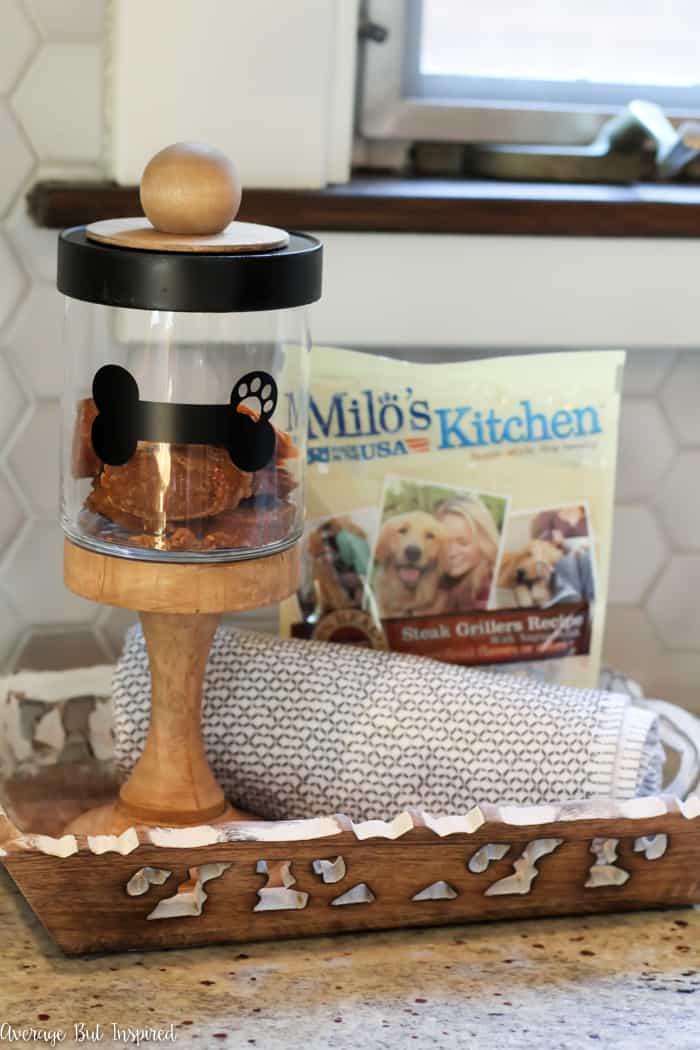
Because Jasper is such an important member of our family, it only seemed right to involve him in my blog. So, Jasper and I got to work on our first mother/dog craft project, creating an adorable DIY Dog Treat Jar filled with delicious Milo’s Kitchen home-style dog treats that he cannot resist!
Supplies Needed to Make a DIY Dog Treat Jar
- Unfinished wood pedestal
- Unfinshed wood circle cutout
- Unfinished wood knob
- Wood stain
- Black spray paint
- Glass jar (I used a candle jar that I cleaned and removed all wax from)
- Glue that binds wood and glass
- Dog bone sticker OR vinyl cutting machine and vinyl
How to Make a DIY Dog Treat Jar
In order to get your dog pumped up to craft** with you, I highly recommend bribing him or her with Milo’s Kitchen home-style dog treats, because meat is the #1 ingredient and your dog will basically do whatever it takes to get some! (**By “craft” I mean lie under the table on your feet while you work.)
Step One: Stain or Paint the Wood Pieces of the Dog Treat Jar
Jasper and I began by using our favorite pre-loaded stain cloths to add some color to an unfinished wood pedestal, a flat wooden circle cutout, and an unfinished wood knob.

Step Two: Decorate the Glass Jar
We set those aside to let them dry, and then we got to work customizing a glass jar that would hold the treats.
We used a glass candle jar that I cleaned out for this project because I liked the shape, but if you don’t have one of those, you could easily use a mason jar or empty pasta sauce jar!
To help you with any of those glass jars that you might be using, here are some helpful tips on getting glass jars ready for crafts.
How do you clean out a jar candle for crafts?
I cleaned out this candle jar by melting the rest of the candle and pouring out the wax. For the remaining wax residue inside the candle, I ran hot water over it until it softened, and then scraped it out.
How do you remove labels from glass jars for crafts?
To get labels off of jars, I soak them in water and remove as much of the label as I can by scraping it off. If any parts are stubborn, I spray them with GooGone and let it work its magic.
How do you remove ink stamps from glass jars for crafts?
Swap acetone or acetone nail polish remover over date stamps or other ink stamps on glass jars to remove them. This gets them nice and clean for crafting!
Once your jar is ready, you’ll want to make it pretty!
I downloaded a dog bone shape and cut it out on my electronic cutting machine. If you don’t have a cutting machine, just buy cute stickers in the scrapbook section of your favorite craft store. I promise you’ll find something great!
Attach your vinyl cutout or sticker to your clean jar for a cute, decorative touch!
Step Three: Glue the Glass Jar to the Wood Pedestal
Next, use a highly-adhesive glue that bonds wood and glass to attach the glass jar to the wood pedestal. Make sure to double check that your glue will work for this type of bonding! Not all glues do.
Step Four: Paint the DIY Dog Treat Jar Lid
While that is drying, spray paint the lid of your candle jar to be the color you want. I chose black to mimic the black dog bone on the front of the jar.
Step Five: Glue the Wood Pieces to the Lid
Once the lid dried, I glued the wooden circle and wooden knob to the lid in order to hide some raised text that was on there, and to add a nice finishing touch to the piece!
When the glue on both parts of this project dried, this DIY Dog Treat Container was ready to go!
I got to work filling it with Milo’s Kitchen home-style dog treats and placed it on my kitchen counter so that my family will have easy access to the dog treats that Jasper loves!
This DIY Dog Treat Container is such a cute addition to my kitchen! (Not pictured here: Jasper trying to jump onto the counter to get his treats. Bad dog!)
I truly believe that nothing says “I love you” more than something made with love and care. That’s why a homemade dog treat container and Milo’s Kitchen home-style dog treats go hand in hand; they’re perfect for any dog who is a cherished member of your family!
Do you believe that dogs are family, too? How do you show your pet that you love him or her?
-Bre
Rebekah Purnel says
How sweet! I have fallen in love with it!!! I’m an avid DIYer and always try to be busy with some new projects! Was searching for a unique idea. Yours made me stop and crazy to do it asap! In a hurry to make one for my loving dog. Wish me a good luck Bre! 🙂
Bre says
Our little pups need special things too, don’t they, Rebekah?!? 🙂
Seana Turner says
Oh, I’m loving this one! I have so many clients who are dog/cat lovers, and who have a lot of leftover glass LOL! I always enjoy your projects because you give every little detail I might need to actually do the project. Have a great day, thanks for sharing:)
Bre says
Thank you so much, Seana!! I am so glad the little details are helpful! It’s always a struggle to know how much (or how little) to include. 🙂
Norma Rolader says
Jasper is so precious Thank you for the adorable treat jar God bless
Bre says
Aw, thank you, Norma!! He is very precious except when he’s stealing (and chewing) the kids’ stuffed animals or socks! Ha! 🙂