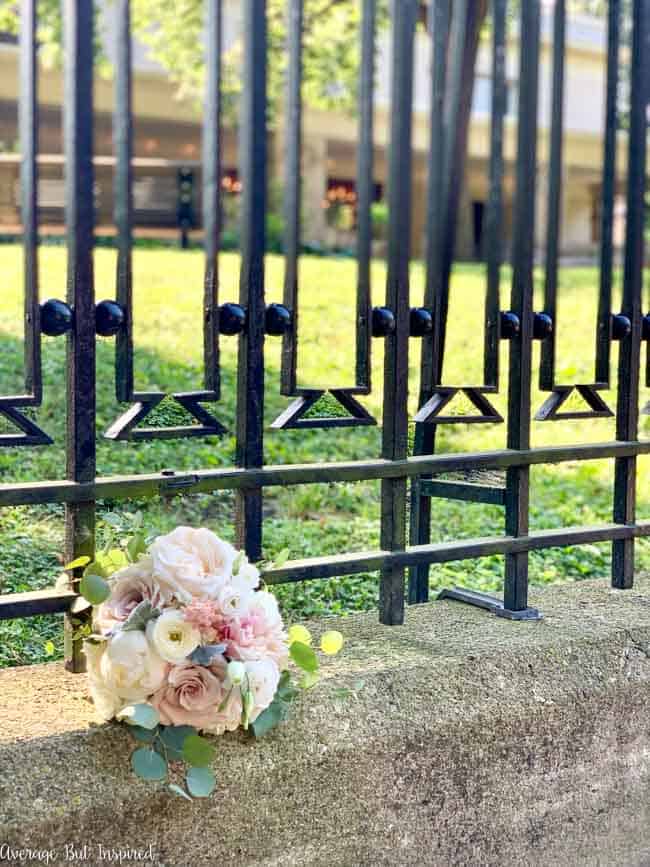
My sister got married in July and she had the most beautiful bouquets and flower centerpieces. I loved my matron-of-honor bouquet so much that I decided to create a wedding keepsake with some of the flowers in my bouquet. It turned out wonderfully, so I decided to show you how to press flowers in a book in case you have any flowers you want to preserve in the future! 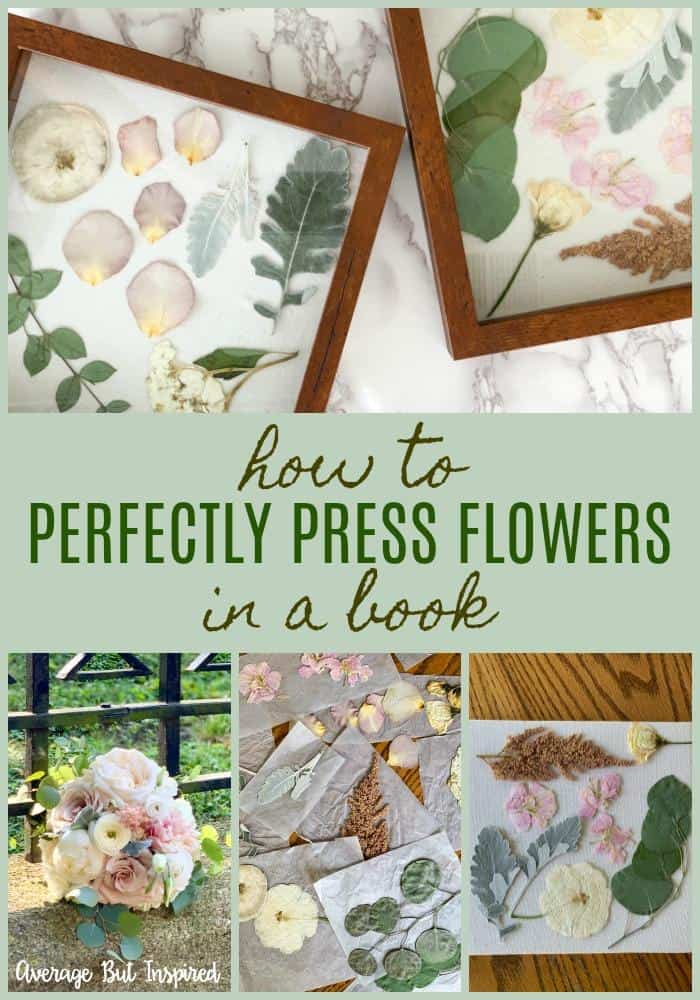
Before I show you how I pressed and preserved flowers from my bouquet, let me show you what it looked like on the wedding day! Filled with peonies, roses, dahlia, eucalyptus, dusty miller, and other beautiful flowers I don’t know the names of (LOL!), my bouquet was really a stunner!
To get a perfectly preserved look, here’s what I did.
How to Press Flowers in a Book
First, I kept the bouquet in a vase of water for five days after the wedding. I wanted to enjoy the flowers as long as I could while they were still fresh-looking.
On the fifth day, I took them out of the vase and disassembled the bouquet. (Note: if you try this, five days may be too long to wait. It depends entirely on how fresh the flowers are that you’re working with. You don’t want to wait so long that they start to brown. Make sure to begin the flower pressing process before that happens.) 
I selected several flowers that I liked best and that were freshest, and decided to use those for my flower pressing experiment.
Next, I cut up sheets of tissue paper – just regular tissue paper used to wrap gifts – and got them ready to go. I laid the flowers and pieces of greenery on each piece of tissue paper to make sure that none of the flowers or leaves were overlapping. I then laid the piece of tissue paper with the flowers or leaves in a book.
I covered the leaves or flowers with another piece of tissue paper of the same size. I did this to make sure not to let acids from the leaves or flowers destroy the book, or to let any print from the book transfer onto the flowers or leaves.
Now, here’s the part I completely forgot to photograph! (Unbelievable.) Once I had the flowers and leaves in their tissue paper layers, I closed the books and did two things to make sure they actually pressed.
First, I placed one of the books underneath two heavy vases so that the pressure from the vases really kept the book closed and the flowers pressing.
Second, I took four ponytail holders (or rubber bands) and stretched them around the other book to hold it closed tightly.
I waited about four weeks and when I opened the books to check on my flowers and leaves, I was excited to find that both methods of flower pressing worked perfectly! Both the “stacking heavy objects on top of the book” method and “closing the book with ponytail holders” method were successful!
The flowers were dry, maintained their colors, and were totally pressed.
How to Make Pressed Flower Art
This post contains affiliate links. To read my full disclosure policy, please click here.
Since the flower pressing process went so great, I had to figure out what to do with my pressed and dried flowers. I ultimately decided to put them into small shadowboxes so that they could be displayed on a shelf or in another small spot. I could have done a larger artistic arrangement, but I didn’t really want that commitment of putting them on a large wall.
In order to get the flowers in the shadowboxes, I used rubber cement (yes, regular old rubber cement!), and a cotton swab to dab a tiny bit of rubber cement on the back of each flower or leaf. Remember what they taught your kids about glue in preschool: “dot, dot, not a lot”? Make that your mantra here!
Rubber cement is really cheap, so that’s awesome. If you don’t have rubber cement or don’t like the smell, you could try a different acid free glue. I’m sure there are lots of options at any craft store.
After the glue dried, the back of my first shadowbox looked like this:
I used the rest of the pressed flowers to fill up the other shadow box, and I’m happy to say that my pressed flower art looks lovely in my office.
The glare on the glass was pretty severe in this spot, so I snapped some photos of the dried flower art in a less sunny location as well.
I love how special and meaningful these dried and pressed flowers are – making them even more beautiful to me!
How to Make 3D Dried Flower Art
Now, I know that this post is all about how to press flowers, but I also want to tell you that there is a way to dry and preserve flowers in 3D form – including entire bouquets!
The company I used to work for, ACTÍVA Products, makes a product called Flower Drying Art, which is a silica gel that dries and preserves flowers over time or even in the microwave. It’s completely reusable because you can re-charge the silica gel crystals, so you can dry as many flowers as you want, all with one package. Plus, it helps the flowers retain their color instead of turning brown and crusty like they can when simply air dried.
I don’t have any photos of projects I made for this blog using the product, but I used it many times during the course of my work with ACTÍVA, and I promise that it’s easy to use and gives great results. Professional wedding bouquet preservationists (yes, there are such a thing!) even use Flower Drying Art to preserve bouquets for clients.
So, if a 3D flower art project or bouquet preservation is something you’re interested in, you might want to try Flower Drying Art.
Well, that’s all I’ve got for you on pressing flowers in a book. I hope it was helpful to you! Let me know if you’re going to try pressing and preserving some flowers. I hope they turn out beautifully!
-Bre
Wendy says
When I was young we always pressed flowers between waxed paper. Now I am wondering if that holds in moisture? I have read now several authors who used the tissue paper or regular copy paper. I would have thought that the flowers would stick to that? I am planning on pressing about 20 dogwood flowers for a project with a Sunday school class. I will only have one shot to get it right. Thank you for your post.
Bre says
Hi, Wendy! Oh my goodness – that sounds like a wonderful Sunday school project! Is it relating to the Holy Trinity? 🙂 I always loved that “story” about dogwood blossoms. Anyway, yes I have no issue with petals sticking, and I think you could be right about wax paper retaining moisture. However, I myself have never tried that method with wax paper, so I’m not 100% sure. Anyway, I hope the project turns out wonderfully!
Lorraine Galloway says
Hi Bre There is another way to press flowers and that is between glass. I am in the process of doing it at the moment with all the beautiful flowers from my garden. They do not lose any of their colour either. I have pressed flowers for many years and made them into flower arrangements and framed them. Pretty large size pictures when framed. I am going to try your way also so thank you for the post,very interesting.
Regards Lorraine
lorraine_galloway@hotmail.com
Bre says
Hi, Lorraine! Yes, that is a wonderful process! I think your garden flower art must be incredible!