Last month my mom decided to get rid of a cherry Queen Anne sofa table, and she gave it to me! It was the perfect size for behind my family room couch, but not quite right in terms of style. So I gave it a makeover, and I’m happy to share with you some great ideas for how to update cherry furniture- with or without paint!
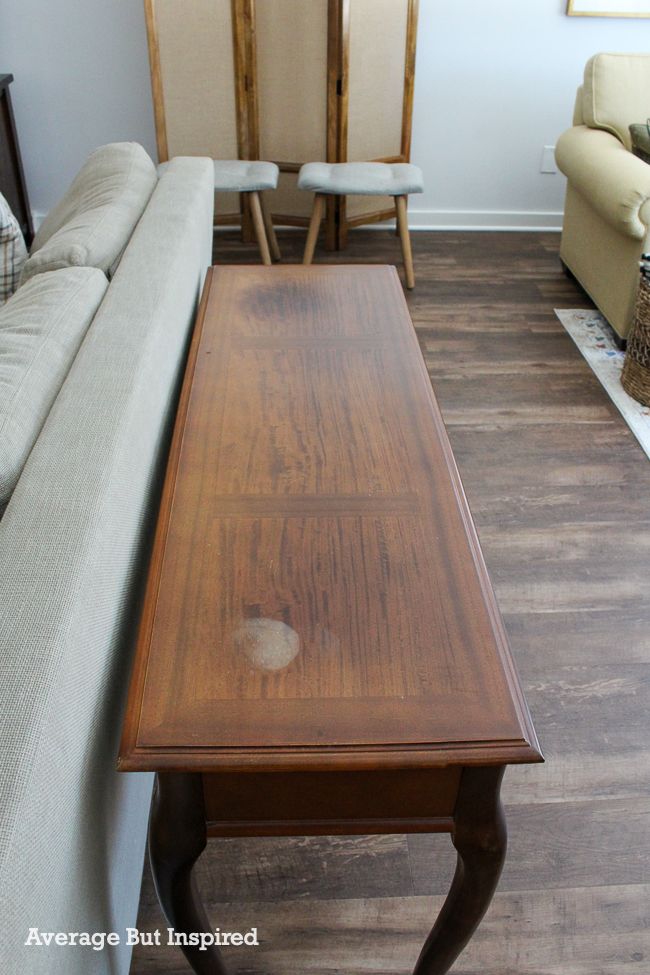
This is the BEFORE photo of the console table. It felt sad and tired because the gold-plated hardware was quite dated, and it had significant sun fading and staining on top.
Because of the damage on top, I decided to paint this cherry wood furniture. (But if you’re not into painting, don’t worry! I have other ways to modernize old furniture later in this post!)
How to Paint Over Cherry Wood Furniture
I’m going to walk you through the process of painting cherry furniture to update it easily and for a lasting finish. You can do this, trust me!
Supplies Used for This Painted Cherry Furniture Makeover
This post contains affiliate links. To read my full disclosure policy, please click here.
These are the supplies I used to paint this sofa table.
- 220-grit sandpaper
- Clean towel
- Kilz Premium stain-blocking primer
- Folk Art Home Decor Chalk paint in Rich Black
- DecoArt Americana Decor Creme Wax
- 2″ angled paint brush
- Small paint roller (depending on the type of piece you’re painting)
- Wax brush
- Clean lint-free cloth
How to Paint Cherry Furniture
I’ve been painting furniture for years and I know that cherry furniture can be tricky to paint because of the bleed through that can happen! (Bleed through is when tannins in the wood seep through the painting finish, causing discoloration that makes you want to cry.)
Because of that, prep work is important when painting cherry wood! Typically I like to take the easiest route possible when it comes to painting furniture (meaning no sanding and no priming), but I don’t recommend that when painting cherry.
Step One: Sand the Furniture Piece
People get freaked out when they think about sanding, but this is nothing to be scared of. It will take you ten minutes tops! Just scruff up the surface of the cherry wood furniture piece with 220-grit sandpaper.

This will give the primer and paint a better base to stick to, and will help get rid of imperfections in the finish, like dents and dings!
After sanding, wipe off the dust and debris, and make sure it’s all gone.
Step Two: Prime the Furniture
Normally when I paint a piece with chalk paint, I don’t prime. But in this case, the staining on top and bleed through issue I mentioned above were weighing heavily on my mind. Because of that, I primed the top of the sofa table with a wonderful water-based stain blocking primer.
I did not prime the sides or legs because I was going to paint the table black, so bleed through wouldn’t be a huge issue. If I were painting this cherry table white or a light color, I would have primed the whole thing.
Some little discoloration spots popped up on the top of my table, so I added a second coat of primer on those little spots only. (Wouldn’t you be sad if you didn’t prime, and then these things started appearing on your finished paint job?!?)
Step Three: Paint the Cherry Wood
Once the primer dried, I painted the entire table with two coats of Folk Art Home Decor Chalk paint in Rich Black. This is the first time I used this brand of paint, and I really liked it! The color is definitely rich, and the coverage was very good.
I brushed the paint onto the table legs, and I used a small roller to apply it to the top of the table.
Step Four: Seal the Painted Cherry Wood Furniture
Finally, to protect this lovely new painted finish, I sealed the table with wax, using my wax brush. Typically I use Paste Wax to seal painted furniture (I LOVE the finish and durability), but it smells very bad so I can only use it outside.
Since I refinished this table indoors in the winter, I used an odorless wax alternative, DecoArt’s Americana Decor Creme Wax.
I have used this wax many times before and like it, but I am not in love with it the way I love S.C. Johnson Paste Wax – lol!
Other Ways to Modernize Old Furniture
Some furniture pieces are not meant to be painted, and sometimes, you just don’t feel like painting a piece of furniture. Taking cues from this project, let me give you ideas of other ways to modernize old furniture that don’t involve paint.
Add Modern Accessories to Old Furniture to Update It
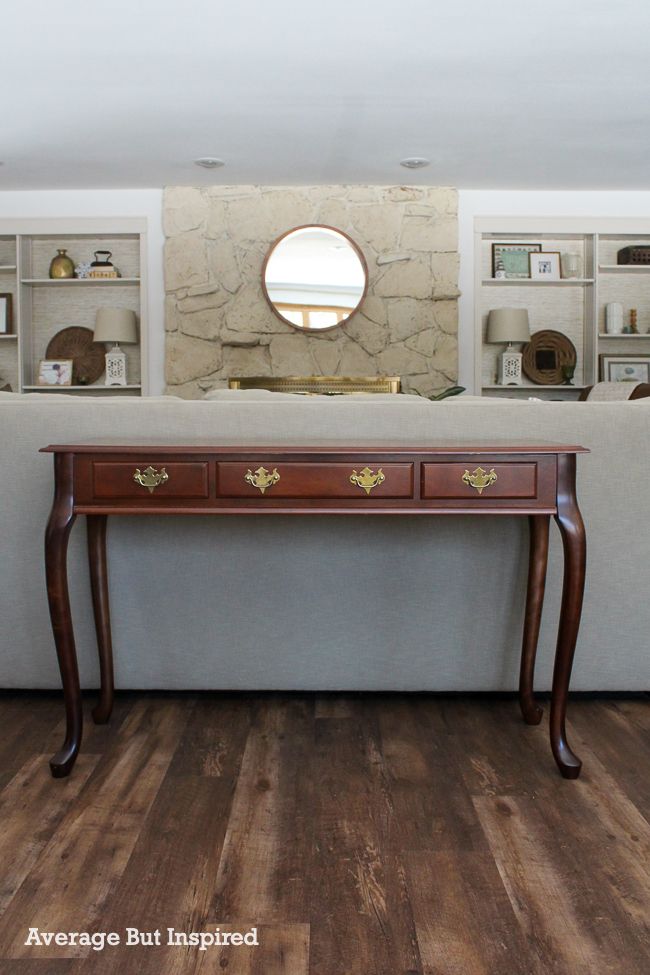
My sofa table is a PERFECT example of how adding modern accessories to an old furniture piece can take years off the look! Pretend I didn’t paint it, but look at the accessories: the modern pops of black and white, the gold sculptural object, and the overall collected look make you think this furniture is young and fun (just like me – ha!). 🙂
Swap the Hardware
You may have noticed that I’ve chosen to display my newly-painted sofa table BACKWARDS! Yep, backwards! I’m hiding the fake drawers that are on the front of the piece, and presenting this console table in a more sleek and streamlined way.
If that works for the old furniture you’re looking to update, see what that does for the look of the piece!
If that doesn’t work, try adding some new hardware for a fresh look. I ordered new hardware for this table so that I could show you what that would look like, but it was the wrong size (off by just a hair!), so I need to return it. Womp womp.
If you need some other ideas of ways to modernize old furniture without paint, check out that linked blog post on how to do just that!
The bottom line is you can update cherry furniture with paint or without, and make it work for your home and your style!
Chris says
I have a shaker style cherry dining room table. The finish on the table top is semi shiny.. and over the years.. it shows every glass ring, etc. I don’t really want to refinish the entire table. I just want a matt finish on the table top to make it look more modern.. and hide defects. Is this even possible?
Janell says
Thank you for the instruction. Am I correct in understanding that you did not sand or strip the sides and the legs at all? I thought the legs would at least need to be scuffed up a bit to create a little grit for holding the paint. I am trying to decide what to do with a dated cherry dinning table. Thank you for your advice.
Glenda says
I have a whole house full of shiny cherry furniture that I need to do something with. Is there a way to refinish it to have the wood grain show without it being red or having a red tint?
Bre says
Hi, Glenda! Well, I have seen that sometimes people are able to strip the existing finish (like by using Citristrip), and sand it down to a raw wood look. Then they topcoat with clear, matte sealer, and get a totally different look! I think that might work well for you!
Elaine Dunlap says
I didn’t miss a * section, but I can see why you wouldn’t dare published it.
Bre says
I have no idea what you’re referring to.
Elaine Dunlap says
I’m an antique collector. In my opinion, you ruined that cherry table by painting it. You could have brought it back to life with Brewax and it wouldn’t have devaluated the value it has now and would have more in the future.
Bre says
Elaine, thanks for giving me the best laugh this morning! Blessings to you.
Tim Boyer says
Thanks for sharing. My wife and I are considering the refinishing of a cherry dining room table and chairs–do you have any advice? Thanks!
Jennifer m. says
I had my mother in laws end tables from the 1960’s that was cherry wood. At some point someone got a hold of them and spray painted them with a Auto paint. They got left out in the rain and started peeling. So, I asked if I could have a try at fixing them back up. Turns out cherry wood is beautiful grain and a light warm color. I was wowed by the beauty of the wood so I found a cherry stain to use. First I conditioned it up. Then applied the cherry stain. Super pleased with the end rusults.
Bre says
Jennifer, that sounds gorgeous!!! I can’t believe someone painted those tables with auto paint, oh my gosh! 🙂