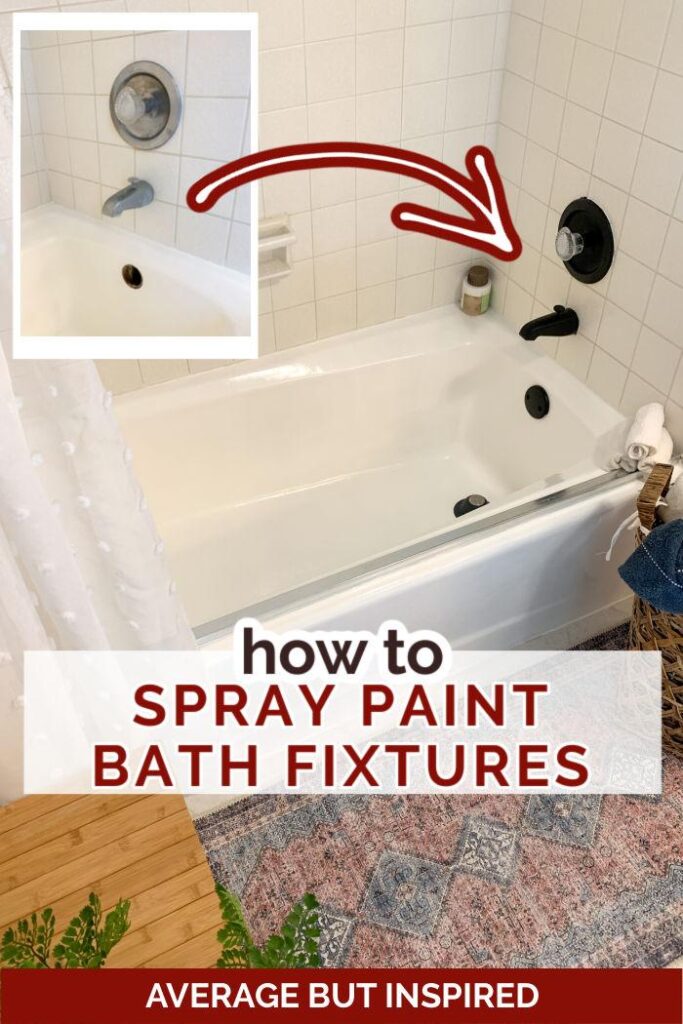
I will paint anything. Really. But being totally honest, I was nervous to spray paint my bathroom faucet and tub fixtures. Thankfully, it was a HUGE success, and I can’t wait to show you the best way to spray paint a faucet and bathroom fixtures for a lasting finish!
I completed this tub fixture painting project months before writing this post so I could be sure the process actually works. I didn’t want to give you bad advice about spray painting faucets (or any other bathroom fixture, for that matter)!
I stand behind this process and the products used, and I believe this inexpensive painting project can be an integral part of updating any bathroom!
Spray Paint a Faucet: Supplies Needed
This post contains affiliate links. Read my full disclosure policy for more information.
To spray paint my bathroom fixtures as I show you in this post, these are the exact supplies I used.
- Lime-A-Way cleaner
- Comet cleaner
- Sponge
- Rubber gloves
- Sandpaper (I used 150 grit)
- Tack cloth
- Painters tape
- Masking film
- Rustoleum spray Automotive Primer
- Rustoleum Matte Finish Custom Shop automotive spray paint
How to Spray Paint a Faucet or Bathroom Fixtures
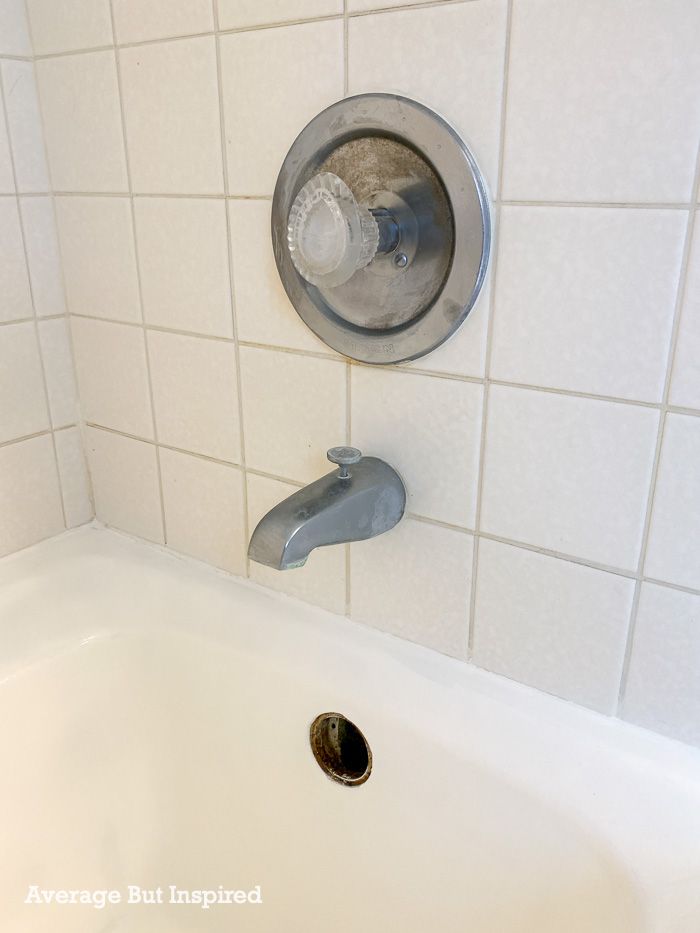
After I painted this bathroom’s bath tub, the tub fixtures looked even dingier and gross than they did before. I was hesitant to try and remove them because they were strongly caulked in place, and I was worried about disturbing old plumbing and causing problems for myself.
I worked up the courage to paint the tub fixtures, including the faucet, and I’m so glad I did! I was concerned that I’d accidentally get spray paint on my newly-painted tub or the shower tile, but it all worked out.
Step One: Clean the Faucet and Fixtures
As with any painting project, one of the most important things to do is clean the surface properly!
In this case I scrubbed the faucet and fixtures with Comet cleaner, and then followed up with Lime-A-Way to remove the calcium and lime buildup from the pieces.
The tub overflow plate was especially gross with tons of buildup, so I put that in a Ziploc bag and let it sit. The Lime-A-Way ate through the bag, but luckily I had it sitting on a plate so it didn’t ruin the table I had it sitting on! Just be careful if you use Lime-A-Way as it seems pretty caustic.
Step Two: Sand the Bathroom Fixtures
Once the fixtures were clean, I lightly sanded them with 150 grit sandpaper and then removed all of the dust with tack cloth.

Step Three: Protect the Surrounding Area
Next to cleaning the fixtures, protecting the surrounding surfaces is probably the second most important thing to do!
For this, I hung masking film from the shower ceiling and sides, and then carefully cut small holes to push the tub fixtures through. Once the fixtures were through the masking film, I taped up the rest of the film on the opposite wall.
Then I draped masking film over and into the bath tub, and taped that to the masking film on the walls.
This was sufficient to protect everything from overspray – thank goodness!
Step Four: Prime the Faucet and Fixtures
Now it’s prime time! For this step I sprayed the faucet, trim valve / handle, shower arm, and overflow plate with Rustoleum Automotive Primer. (Instead of painting the shower head, I purchased this matte black shower head, which I added to the shower arm after the fact.)
It dries very quickly, and I topcoated it (next step) within one hour of application. Note that if you don’t apply a topcoat within an hour, you’re supposed to wait 48 hours before topcoating.
Step Five: Spray Paint the Faucet and Bathroom Fixtures
And here is where the magic really started to happen! I spray painted the faucet and fixtures with Rustoleum Matte Finish Custom Shop spray paint in black.
I applied a light coat to everything, and recoated almost immediately. Unlike other spray paints I’ve used in the past, this spray paint allows you to recoat at any time.
Two coats of the automotive spray paint did the trick and covered the faucet and fixtures perfectly.
I let this dry for two days, which is longer than the spray paint can recommended. I figured better safe than sorry!
The spray painted finish is holding up absolutely perfectly on the tub faucet and fixtures. My kids use this tub/shower two times daily, so the paint finish is definitely getting a test.
Cleaning Spray Painted Faucets and Fixtures
Part of the secret to maintaining painted faucets and painted bath fixtures is using gentle cleaning products on them.
I clean both the painted bath tub and the painted fixtures with a mix of hot water and Mr. Clean concentrate, and apply with a sponge cloth. I wipe off water spots with a soft cloth and avoid using paper towels to clean these surfaces, as the paper fibers could scratch them (maybe?).
Once these spray painted fixtures start to chip or flake, I will update this post. For now, everything looks amazing! If you’re looking to give your bathroom a low-cost update, consider spray painting the fixtures!
2025 Update
As promised, here is an update on the condition of the spray-painted bath fixtures. The paint did start flaking off this year, and once it started, it was hard to stop it.
That being said, I still think spray painting is a great option if you’re prepared to re-spray them down the road! It’s so inexpensive compared to buying new fixtures that the trade-off is worth it (in my opinion).
If you’d like to see how they looked once they started chipping and see our new Bath Fitter tub and fixtures in here, watch my Instagram Reel!
AC says
Hey! In retrospect now with knowing you have hard water, what color would you spraypaint it? We have VERY hard water here as well.
Bre says
Hi! Sorry for the delayed response! OK so I think that a silver (like brushed nickel) would be best for hiding hard water. But . . . I wouldn’t have done that because it wasn’t the look I was going for, you know?
Dawn says
YAY! I was hoping someone else would have tackled this already! Is it still holding up?
Why did you choose that particular Rustoleum paint? Because of the matte black? I want mine to be gold/brass, and I am not finding gold offered in that exact same product, but Rustoleum has other automotive sprays in gold. Also, how bad were the fumes doing that inside?? Thanks for being brave and sharing!
Bre says
Hi! I’m so glad this was helpful to you! OK – it is still holding up BUT I find it difficult to clean. We have very hard water so I should be using abrasive cleaning products to get the mineral deposits off, but I don’t want to wreck the paint finish! So, now I have some mineral build up on there. Definitely NOT perfect, but it’s been a good solution. I did choose the paint because of the matte finish. As for the fumes, they weren’t too bad! If you can open a window and/or use a fan, that would be best. Good luck!!
Julie says
Are painted fixtures still holding up?
Bre says
Hi, Julie! I would say they look 85% good after two years. I plan to refresh them this summer! Strangely the only part that has worn off is the little thing you pull to drain the bath tub – and that is just around the edges. I am not sure why it’s happening there since we don’t really touch that much, but who knows.
Mallarie says
Great tutorial, thanks for sharing! I’m debating on paint one of my bathroom fixtures black, it’s currently chrome. How has yours held up?
Bre says
Hi, Mallarie! So far so good! It’s been just over a year now and I’m still super happy with this! Unfortunately there is a bit of lime or calcium build-up on the faucet (at the end where the water comes out), and I can’t seem to get it off. But that’s not a problem with the paint – it’s the water. Because I painted the fixture black the staining is a little more noticeable than if it were chrome. So maybe take that into consideration if you have hard water!
Adam Hunt says
Still homding up?!?
Bre says
Yes! So far so good! 🙂
Kayla says
This is so awesome! I’m gearing up to spray our bathroom fixtures as well and am curious if it’s still holding up strong for ya 🙂 thanks so much for posting the details in here, I was nervous about the overspray!
Bre says
Hi, Kayla! Yay! So glad it’s helpful! Yes it’s still looking great! I kind of can’t believe it – ha! 🙂
Jenny says
You didn’t have to do a topcoat of any kind of sealer?
Bre says
Hi! No, I didn’t!
Rachel says
Thank you, thank you! I got the delicate tape and all my supplies and will begin next week. Nervous but so excited!
Bre says
Aaaah! That’s so exciting! I hope the project goes amazing. I know it will!
Rachel says
Hello,
Thank you for this post! I plan to repaint my tile and also spray my fixtures and shower frame black. I assumed starting with the spray paint would make sense so that I don’t overspray on tiles. But I also worry about putting painters tape on the fixtures after they are painted. Do you have any thoughts?
Bre says
Hi, Rachel! OK, I think spray painting the fixtures first would be best (so, the opposite of how I did it)! Just make sure to get the delicate Frog Tape painters tape for the fixtures once you’re finished. It is the yellow Frog Tape. That is my favorite – it protects well but is very gentle on the painted surface. Also, make sure to leave the right amount of time in between finishing spray painting and taping to paint the tub. You want that spray paint to be fully cured before taping it! :-). Check the cans to see what it says for full cure time.
Anna says
I can’t find the “Rustoleum Matte Finish Custom Shop automotive spray paint” anywhere – where did you get it? Even online it says, it’s going to be at least 2 weeks to get to me. My shower is currently unassembled so wanted to do this ASAP.
Bre says
Hi, Anna! I purchased it in-store at Lowes. When I look on Lowes’ site this morning, it says my store has 10 available, so maybe a local Lowes will have it for you, too? Also, I know stores like O’Reilly Auto Parts sell it!
Jasmine Reyes says
Any update on your bath fixture? How did it hold up?
Bre says
Hi, Jasmine! I am so happy to tell you that it is still looking PERFECT!!! My kids use the shower every day (so, two showers a day), and nothing has chipped at all. 🙂
Kristine C. says
Wow! You are brave, but so smart to paint instead of replace. I hope it holds up for you. I’m always inspired by the home projects you do. I’m still mustering the courage to limewash our stone on the front of our house! Keep the projects coming!
Bre says
Hi, Kristine – thank you so much!! Oh my goodness was I scared to do this though! :-). So far so good – I feel like this automotive paint is a winner! And that is fantastic about the limewash. You can totally do it. I promise: that stuff is foolproof. You’ve got this!!!