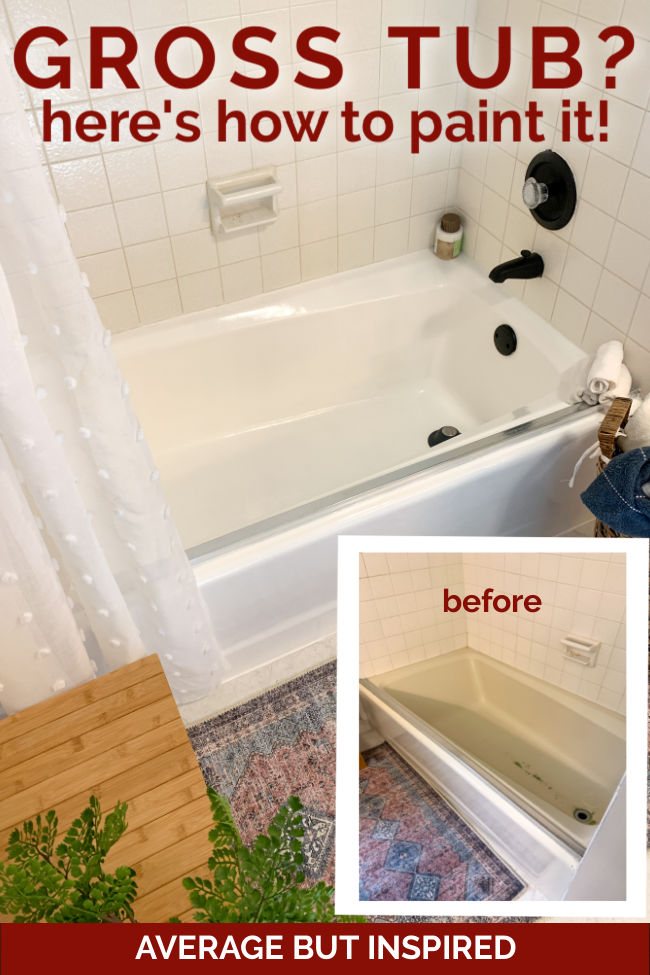
I’m in the middle of a modern vintage bathroom makeover, part of which included refinishing the almond-but-once-avocado-green bath tub. Refinishing the tub made it look BRAND NEW, but the project was not without its challenges! I’m going to show you how to paint a tub with Rustoleum Tub and Tile, an epoxy tub paint, and give you tips to make your project as smooth as possible.
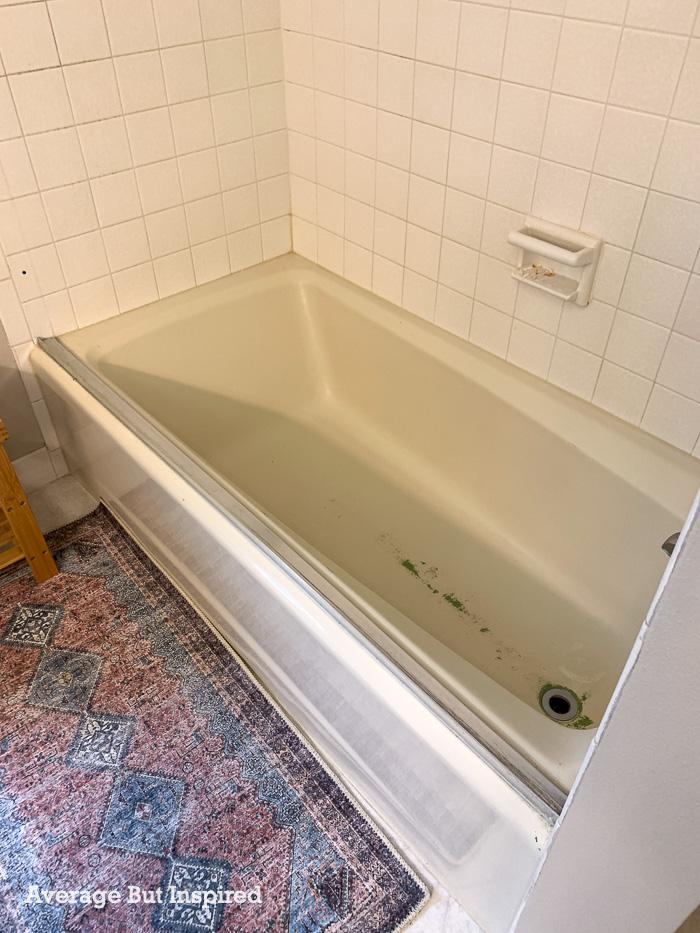
The Bath Tub Before Refinishing
The bath tub had already been reglazed or refinished at some point in the past. I guess the owners decided that avocado green was no longer their style! Unfortunately for us, that finish had started wearing off, leaving the tub with a very ugly, splotchy appearance.
This post contains affiliate links. To read my full disclosure policy, please click here.
The original green tub finish was appearing on the inside more with every day that passed. Everything about this bath tub looked dirty. I decided to paint the tub with the Rustoleum Tub and Tile Kit to see if I could improve it, and figured I would hire a pro to refinish it if I failed.
Spoiler alert: with some bumps along the road, it ended up turning out beautifully! I’m so glad I can share my experience and instructions for how to paint a tub with you – I really think it will help!
Things to Consider Before Painting a Tub Yourself
Before you jump right in and start painting your tub, there are a few things you should consider.
First, the Rustoleum Tub and Tile Kit has terrible instructions. I was amazed at how inadequate they are. They do have a somewhat helpful video about repainting a tub, but otherwise the instructions are just bad. Reading blog posts like this and customer reviews on sites like Amazon and Home Depot may be very helpful to you.

Next, you need to consider the timing of this project in terms of weather conditions and your availability. With respect to weather, you must do this project when the weather is good: not too hot and not too cold. I explain that later in this post (in the “Ventilate the Bathroom” section).
As for your availability, each step of the tub painting process needs to happen within specific timeframes, and there is a three-day period once you finish painting where you can’t use the tub. You’ll need to plan out how you can accomplish the painting and the waiting period so that this doesn’t happen when you have a house full of guests arriving and no tub available.
Finally, understand that there is more cost involved than just one painting kit. Rustoleum makes it seem like you buy one kit and you have a brand new tub, but it doesn’t work quite like that. As I explain later in this post, I needed two Tub and Tile Kits. I also purchased primer and then all of the supplies like paint brushes, etc. I still came out way ahead of having someone else paint the tub for me, but it was more expensive than the cost of one paint kit.
Click to view any of the posts in this series!
Supplies Needed to Prep a Tub for Painting
Now that you know a bit more about what to expect when painting a tub, let’s talk about what you need to thoroughly prep the bath tub. These are the supplies I used to get the tub ready to be painted:
- Comet powder cleaner
- Lime-A-Way cleaner
- ScotchBrite Heavy Duty Scour Pads
- Caulk remover tool (or utility knife)
- 400 grit wet/dry sandpaper
- Tack cloth
- Rubber gloves, mask, protective eyewear
- Optional: vacuum
How to Prepare a Tub for Painting
For this project, I did all of the prep work the night before I planned to paint the tub. It took around two hours to complete this portion of the project. The reason I prepped the night before was to ensure that the tub would have enough time to completely dry before priming and painting.
Clean with Comet
I started by giving the tub the best cleaning it’s ever gotten. I scrubbed it like crazy with Comet powder cleaner, and then rinsed all of the nastiness down the drain.
Remove the Caulk
Next, I used a caulk remover tool to take out as much of the caulk around the tub as I could. I didn’t do a perfect job, but I got most of the old caulk out.
This was a harder job than I expected! Once I finished with this part, I used a little industrial vacuum to suck up all of the caulk bits.
Clean with Lime-A-Way
We have well water and a whole ‘lotta minerals in our water, so I made sure to do a second sweep with Lime-A-Way. I sprayed it on, let it sit for five minutes, and then scrubbed the tub again. It looked so clean I couldn’t believe it!
Even if you don’t have a lot of minerals in your water, a second cleaning is a really good idea. You need the tub to be spotless when you paint it. Any residue left on the tub will cause adhesion issues with the paint, so cleaning is key!
Sand the Tub
I wiped down the tub with a towel, and then sanded the entire thing with 400 grit wet or dry sandpaper. 400 grit sandpaper is a very fine grit sandpaper, and it helps to slightly rough up the surface before painting (giving it something to hold onto), and also to remove any flaking paint from a previous refinishing job.
Remove the Dust
Finally, the last tub painting preparation step is removing the dust. I washed everything down the drain, dried the tub, and then went over it with tack cloth to get any fine particles that were left.
Once I finished this, I let the tub dry overnight and poured myself a nice glass of wine. (Okay, maybe two glasses.)
Supplies Needed to Paint a Bath Tub
The next day I was ready to paint the tub and begin the beautification process! Here are the supplies I used:
- Tub Cast primer (NOTE: As of April 2024 it does not seem that this product is being made anymore! BUT, it is an optional step so it won’t kill your project that you can’t get it.)
- Rustoleum Tub and Tile Kit (NOTE: get two kits. You will probably need to use two. If you end up only needing one, you can return the other.)
- 4″ foam rollers (at least 4)
- 4″ roller tray
- 2″ foam brushes (at least 4)
- Painters tape
- Microfiber cloth
- Stir sticks
- Paper towels
- Drop cloths
- Disposable gloves, mask, protective eyewear
- Recommended: air purifier and fans
- Tub caulk
How to Paint a Tub
As I mentioned above, the timing of this project is really important in terms of both weather (don’t do it when you can’t have the windows open) and product application (each coat needs to be applied within a certain timeframe). So keep that in mind if you decide to do this yourself!
Ventilate the Bathroom
The biggest drawback of this tub and tile paint is the terrible smell. Think of an awful smell and multiply that by ten. It’s really bad.
I highly recommend doing this job in a window of time where you can have the windows in the bathroom and the rest of the house open for at least two days. Do not attempt it in the middle of winter or the dead of summer. Please.
Also, make sure to have a fan going and wear a ventilator or N95 mask.
If you can swing it, consider using an air purifier while painting a tub, too. I was gifted this Mi Air Purifier 3C and have loved using it during this bathroom makeover. The carbon filter helps remove odors, and the HEPA filter removes 99% of pollutants in the air (including bacteria and viruses). An air purifier pulls double duty because when I’m not using it for my DIY projects, it’s amazing for my daughter who has terrible seasonal allergies.
Apply the Primer
Tape off around the edges of the tub with quality painters tape so you don’t accidentally get paint where you don’t want it.
Then, apply a coat of wipe on TubCast primer with a microfiber cloth. The Rustoleum Tub and Tile Kit does not come with primer and it does not say that you need to use primer. I have painted enough tricky surfaces in my day to feel like primer is a must have, so I researched and found this product, which has been tested with Rustoleum Tub and Tile paint. You can skip this step if you just want to apply the Rustoleum epoxy tub paint alone.
(NOTE: it appears that this tub primer product is no longer available as of April 2024. I do not have a recommendation for an alternate primer – I’m sorry!)
If you do apply the TubCast primer, it only takes twenty minutes to be ready for topcoating, so you don’t have to wait long at all! You just wipe it on – it’s not even like paint.
Mix the Rustoleum Tub and Tile Paint
Once the primer is dry (if you chose to do that step), it’s time to mix the Rustoleum Tub and Tile Paint components. You will mix Part A and Part B for two minutes each, and then pour Part A into the Part B container, and continue mixing for two minutes.
On the package instructions it says that there is no need to wait to use the paint once it’s been mixed. However, my experience was that the paint, as mixed, was extremely runny at the top of the paint can – almost like really thin milk – and that the runny part at the top would not blend with the thicker paint at the bottom of the can.
Apply Two Coats of Rustoleum Tub and Tile Paint
So, for the first coat of tub paint that I applied, it was practically transparent and – to be frank – awful. It was very runny and streaked all down the sides of the tub. I worked quickly with the foam roller to smooth out streaks and do the best I could.
The instructions said the second coat needed to be applied within six hours, so I left the first coat and the rest of the paint in the can, and took a two-hour break to pick up my son at camp and eat lunch. When I came back, the paint seemed to have thickened in the can, so I was hopeful that the second coat would apply thicker.
Indeed, it did! The second coat was much more opaque and provided more coverage than the first coat of paint on the tub. I again applied small parts of paint in the corners of the tub with the foam brush, and rolled the rest of the tub. The paint self-leveled nicely and I did not have an issue with streaks, drips, or runs with the second coat of paint.
Apply a Third Coat of Tub and Tile Paint
Because the first coat of paint was so thin, it was clear that I needed a third coat of paint on the tub. Because the paint, as mixed, has to be used within six hours, I had to use a second Tub and Tile Kit on the next day to get a third coat of paint.
Learning from the runny paint experience the day before (or so I thought), I mixed the paint per the package directions and let it sit in the can for about 1.5 hours. When I came back to get to work, it still seemed runny to me at the top, so I poured about half of the paint into a disposable plastic cup and set it aside on the vanity.
I then used the thicker paint that was at the bottom of the can to apply the third coat of paint to the tub. As with the day before, it went on nice and thick, and the third coat gave me the coverage I needed.
When I finished painting the tub, I got up and could not believe my eyes: tub and tile paint was all over the granite countertop, in the sink, and running down the front of the vanity I’d just painted. The epoxy paint had EATEN THROUGH THE CUP and gone EVERYWHERE. It was a disaster and I freaked out.
Thankfully my husband was home, and he heard me screaming so he ran in to help. We got most of the epoxy off of the granite and floors. I had to repaint the vanity and order new hardware, but it could have been much worse! Moral of the story: do not transfer this paint to any other container. It is extremely caustic! I really think Rustoleum needs to add this as a warning to its product information. This was a terrible experience!
Remove the Painters Tape
I was traumatized from the “epoxy on everything” experience, so I forgot to remove the painters tape from around the tub within an hour of applying the last coat.
I removed it about six hours later, and it was fine. Phew!
Caulk Around the Tub
The next day, once the paint was totally dry, I caulked all around the tub with DAP Kwik Seal Plus tub caulk. This made a perfect transition between the tub and tile, and tub and wall, and was the cherry on top of the tub paint job.
Let the Tub Paint Cure for Three Days
Finally, I let that tub paint cure and harden for at least three days. There was no way I was going to ruin this beautiful paint job after all the hard work and tears that went into it! As Tom Petty says, “the waiting is the hardest part” and that is true! Sharing a tiny bathroom with my kids while this paint was curing wasn’t the most fun, but it was worth it!
In the waiting period, I spray painted the tub fixtures (I will have a tutorial on that soon), to freshen up this bathroom even more!
The DIY Painted Bath Tub
In the end, the results of this project exceeded my expectations! (You can see how I spray painted the faucet and the tub/shower fixtures, too!)
This bath tub looks BRAND NEW. Really. I’m not just saying that because it was a tricky project.
I saved around $200 doing it myself, and absolutely love the results. The kids have been using it for about three weeks now, and there are no signs of chipping or flaking.
I’m optimistic that with gentle cleaning, this painted tub finish will last for several years. (See my update below!)
If you’re scared to paint your tub, I totally get it. Think about this: what’s the worst that can happen? I think the worst thing happened to me (paint everywhere!), but you won’t make that mistake because I filled you in! You can do this – give your tub a brand new life and look. You’ll be so happy you did!
2025 Painted Tub Update
It’s been four years since I painted this tub, and you might be wondering how it held up. Well, it lasted about as long as expected and started to peel this year. And once it started peeling, it didn’t stop.
I still think it was worth it to do the DIY reglazing, as the finish lasted as expected. If you’d like to see what it looked like when it was peeling, and what I did to fix up this tub and shower, watch my Instagram Reel with all the details on our new solution!
-Bre
Jeffrey says
Did you sand in between coats?
Bre says
Nope!
홀덤뉴스 says
That sounds like an exciting transformation! Refinishing a bathtub with Rustoleum Tub and Tile epoxy paint can make a huge difference
Timothy Culberson says
Great article and excellent step by step. I am so glad you admitted to it eating through the cup! That is about every project I do around the house, what seems as a catastrophe is fixed and in the long run still cheaper than hiring someone. Well done!
Priscella says
Thank you so much! Very detailed step by step instructions & supply list. I appreciate You taking the time & posting pics as well!!
Bre says
Hi, Priscella – thank you!! I’m so glad to hear this helped you!
Carmen says
Thank you for this informative article! I am about to do the same project. Regarding the 4” inch roller tray, the link takes me to a plastic tray in the HD site. I am worried since reading your solo cup incident that the paint will eat through the tray. Please advise.
Bre says
Hi, Carmen. That is such a great observation!! You’re correct that I used a plastic tray. A couple of things: the plastic on a roller tray is thicker than those Solo cups, so I think that helped. The other thing is that you’re only pouring a little bit of the epoxy paint into the tray at a time – not the entire container. And you’re using it pretty quickly. So, there probably isn’t enough in the tray to cause any damage. If you’re worried though, you can always set a roller tray inside of a larger, metal tray! Then even if it ate through there, you wouldn’t have a disaster like me. :-). GOOD LUCK with your project!!
Carmen says
Thank you for you quick reply! One more thing: I could not find the tub primer you have in the list. Do you recommend another brand?
Bre says
Hi, Carmen- oh no! I noticed recently that it had been removed from Amazon and was only on Walmart, and now it seems it can’t be purchased anywhere! They must have discontinued it. I personally do not have a recommendation for a different primer. However, use of a primer is not required by Rustoleum for this tub and tile kit, so it isn’t a necessary step. If you’re concerned, you could reach out to Rustoleum’s customer care line and ask if they have a suggestion, I suppose. I am sorry I don’t have more info for you!
Sarah Rein says
Hi Bre! We’re looking to paint the tile in our main bathroom. This includes tile that is not in a shower surround as well as tile in a shower surround / interior.
Do you recommend your Stix process for the tiled walls outside of the shower even though the room will have moisture due to a bath/shower in the room? Or should we do the entire bathroom using your epoxy tile paint (rustoleum) process?
Bre says
Hi, Sarah! Great question!! For the bathroom as you’ve described it, I would stick to the Rustoleum epoxy tile paint and not use the Stix primer. Good luck!!!
Annette Gannucci says
The bathroom looks great. My question is why did you leave the metal strip? I have one from the old shower door. Can I remove it?
Bre says
Hi! Great question! This strip had no visible way to remove it! I’m talking no screws, no loose part to pry up – nothing! I was terrified of doing severe damage to the tub or it (like leaving sharp edges), so I had to leave it. Not ideal, but oh well!
Bre says
And to answer the second part of your question – yes you can totally remove yours if you can see a way to do it! Good luck – I hope it comes off easily for you.
Harold Scott Downey says
I must have been glued onto the tub. Use a propane torch and heat that strip up and pry it off.
Lots of heat removes things, just do not directly heat the tub.
And I think there is some epoxy filer could go under this epoxy paint to fill gouges and worn spots and cracks.
Bre says
Thanks for the suggestion, Harold!
Maddie says
I am painting my tub surround but not tub, can I mix a & b can in a metal can so I can mix it throughly.
Bre says
Sorry for the delayed response! Yes I think that metal should work fine!
Cynthia Morgan says
I too had a mishap with the red solo cup. I saw what looked like pink on my brush (at first I thought it was the fumes) and caught my mistake before it completely ate through the cup.
Bre says
Oh my gosh!! I’m so glad you caught it before it went everywhere. So crazy!
Kathy says
I just purchased the spray because I’m only interested in fixing the bottom of the tub. Everything else is fine. My thought is I would concentrate on spraying the bottom, and the mist would fade onto the sides. What do you think?
Bre says
Hi! This could work! I haven’t used the spray so I can’t say for sure, but it’s worth a shot. Just an FYI – I just used the touch up kit around the drain, and it was much brighter than the other parts of the tub that I refinished. So, there is a chance the fresh spray may not blend entirely.
Penny says
I have a question about cleaning, what kind of products can you use to do that? And also can you use scrub brushes?
Another question, is this process also good for the tile on the walls?
Bre says
Hi, Penny! OK to answer your first question, I clean with Mr. Clean liquid concentrate that I mix in a bucket. I use a soft, microfiber rag to clean. It has worked amazing! I do not use scrub brushes because I am babying this finish!!! As for this process on the walls, yes! You can absolutely do this for the tile on the walls. Let me know if you have any other questions!
Jean W Robbins says
Can you apply this with a paint sprayer?
Bre says
Hi! I don’t think this particular product can be sprayed. However, Rustoleum does make a version in an aerosol can!
John says
Granted this post was almost 2 years ago, I read your mixing dilemma. The one thing I would recommend would be to order the activator into the quart can close the lid and shake it. I see the issue and almost every single video that I’ve come across. I don’t understand why people are not closing the lid and shake mixing the contents.
Bre says
Well, personally I would be scared the lid would pop off and the stuff would fly everywhere! And, if I recall correctly, the instructions tell you to stir it, not shake it.
William says
how did you effectively paint that soap dish?
Thank you for your wonderful article.
Bre says
Hi, William – thank you for your note! The soap dish was already white so I didn’t paint that. Thank you!
The Lost One says
I am planning to do this project very soon. I made the mistake of renting my dad’s house out after he passed away and the people destroyed it. I can’t replace the cast iron tub myself or afford to do so. So I’m just curious how it’s holding up? Has it started peeling/flaking? I am intending on selling the home once I finish remodeling it so I’d like to be able to tell the new owners the life expectancy and care of it and not be blindsided by a failing tub a few months down the road.
And a quick tip….. Scouring Stick (pumice stone) is amazing at cleaning up stains on porcelain sinks/toilets.
The renters got red hair dye all over the bathroom vanity and nothing was removing it Since they didn’t believe on cleaning ANYTHING I had to purchase multiple of them in order to clean the toilets. I tried it on the stained vanity and with just a few rubs over the stains they disappeared!
Bre says
Hello! Oh gosh, I am so sorry to hear about the problems you had with renters. That is awful!!! As for my tub, I am happy to report that I have ZERO complaints! We had one spot where someone must have dropped something because the paint chipped all the way down to the original green finish. It was a tiny spot that I touched up with the tiny spot repair kit (a much easier process than the Tub and Tile Kit process). It blended right in and has held up great. So I have zero regrets and am really pleased with this. And, as for the pumice stone tip – THANK YOU!
Geoegr Tyree says
Glad the job became what you desired👍👍👍Thanks for sharing😎
Bre says
Thank you!! I am glad, too! 🙂
Tina says
OMG!! I am so glad I saw this. I was about to start but wanted to use a foam roller and the instructions say 1/4” nap roller and I could just see all the fuzz-balls, visually, in my tub at the end…. So i looked up if i could use foam roller and found this. Besides…. Now i need to wait because it is 20 degrees outside and therefore….
Thank you so much (and sorry about the cup). I did have to laugh when you said you screamed….not that its funny, its just so understandable, because I too just painted my cabinets!
Bre says
Hi, Tina! OH good – I am so glad that helped!!! And oh gosh . . . the melting cup. Never in my life did I expect THAT to happen!! Best of luck with your project when it warms up outside!
Barbara Nicholas says
I have refinished my bathtub also and the results were astonishing! I even refinished my old stainless steel kitchen sink and that also turned out amazingly. I don’t believe I went through all the prep work you did, however er. But I did follow the printed instructions. My next door neighbor is a young single lady with a tub as old as mine and looked as bad. When she was out if town for a few days I checked with her mom for approval and then I refinished her tub as well. Wow! Was she ever pleasantly surprised.
Bre says
Barbara, that is AWESOME!! I wish you lived next door to me and would’ve done mine. Ha! :-). Neighbor of the year!
Kassie says
Hi, it’s been over a year since you refinished your tub, how is it holding up?
Can you share what you use to clean your refinished tub?
Also curious did the color hold? Any yellowing or color change?
Lastly, was your tub fiberglass or iron?
Thank you for the detailed instructions.
iris says
You forgot to mention to turn off the water. I started painting and, “splash”…drip by drip. I turned off the water. It continued to drip..drip…drip. Perhaps, I was shaking the tub too much? Was the water coming from the shower head down to the faucet? Screamed for my husband…maybe his fingers were stronger. The telephone rang as we entered the bathroom. “Do not answer the phone!” He answered. Drip…drip…drip. I grabbed a gravy bowl. Maybe the spout would reach under the drip. It stopped. In the meantime, I got paint on the sink, my car keys and my top was stuck on part of the rim. Pure panic. I wiped the watery paint away…a few times…hopefully the last time meant that the paint around the drain was not going to peel. Bet it’s going to peel. Next time…mention the water and add gravy boat.
Bre says
Oh my goodness – I’m so sorry this happened to you! Ugh, it’s always something. How did it turn out, and have you experienced any peeling?
IRIS says
I was searching for the time involved. I thought I had, maybe, 20 minutes to 30 minutes to get ALL the paint onto the tub and was going to do a real rush job. I, also, had worries that I might get paint on myself leaning into the tub IF I had to get it all on in a jiffy. You made it a reality that I could let the first coat dry and leaning, with my short arms, would not be a problem as I would want to lean again into the tub.
Thank you,
WELL EXPLAINED
Bre says
Hi, Iris – thank you! I’m glad the explanation helped. 🙂
Lindy says
How does it look now? Almost a year later? Did it hold up? I just bought a house and it has a yellow tub/shower combo and I and trying to find a solution, so if this worked for you I would just copy paste everything you did!
Thank you!
Bre says
Hi, Lindy! It’s holding up great! I have one TINY spot where it chipped because somebody dropped something funny. It went all the way down to the green (which was underneath the almond paint before my paint job), so it wasn’t like the Rustoleum paint peeled. Next week I am using the chip repair kit to touch up that spot before we go out of town. I am very pleased with it so far!
Caitlin says
Hi there! Thanks for this thorough explanation…I need to refinish just the bottom of my tub where something scraped and caused rust. Do you think it would be okay to use on just the bottom or small areas of the tub with just as good a result or does it need to be spread everywhere?
Bre says
Hi, Caitlin! Yes! You could absolutely just do the bottom. It may look different than the sides, but it would not be a problem functionality-wise to just do the bottom. 🙂
Stephanie says
Looks great! Live that shower curtain. Can you please tell me where you got it from?
Bre says
Hi, Stephanie! I bought it on Wayfair. I think you left me a comment on my Instagram about it, too, which I responded to with a link. I hope that helps!
Alexander says
This was one of the most insightful articles I’ve found on using the Tub & Tile kit! Lots of helpful tips. I was about to go about painting my bathroom tile from a relatively pale pink (that must have been installed in the 60’s?!) to the Rust-Oleum Tub & Tile kit in the Coastal Gray color. I keep going back and forth if I want to also paint the tub, which is not quite white and looks a little dingy.
My question is, do you find the tub to be very slippery? That is my main concern right now with the idea of also painting the tub with this kit.
I think I will have to buy another kit as well for the walls / the tiles, since I have to cover up a pink colored tile.
Thanks!
Micki says
I painted my tub with this, and had no issues at all with it being slippery afterwards. I am getting ready to move, and I’m using this same stuff on the tub there because I liked it so much. I do highly recommend using a mask/ respirator if you don’t have great ventilation. It didn’t start out so bad, but about 1/3 of the way through the first coat, I figured out what people were talking about.
Bre says
Micki, I’m so glad you didn’t have a problem with it being slippery! And . . . I’m glad to hear you liked it so much you’re doing it again! That’s awesome. 🙂
Bre says
Hello, Alexander! Thanks for your question! Yes, the tub was slippery after I refinished it, so I put down a grippy mat so my kids wouldn’t fall. They said that has made it much better! I recommend definitely buying more of the kits than you think you might need, because you don’t want to run out mid-project! Good luck!!
David says
Great work!
I agree the Tub & Tile instructions could be improved a lot. Regarding the runny paint after you first mix it, I found a solution. You just keep mixing it by continually dragging the thick paint from the bottom to the top and stir at the same time and the paint will mix and no longer be runny at the top. It can take up to 10 minutes of doing this to be consistent from top to bottom. My first can was a bit runny on the first coat as I only stirred it for 2 or 3 minutes and didn’t drag up the thick stuff enough. I have since used another 5 cans over a bathroom and a laundry and they all mixed fine, it just takes longer to mix than any paint or 2 pack glue I have ever used. Once the paint is consistent you don’t have any issues with runs on the first coat and the application of both coats becomes very similar, which makes application a lot easier.
Bre says
Hi, David – thank you for this helpful tip!!! I did not mix long enough I guess! And I did notice the bottom was so much thicker than the top. Appreciate this so much!
Becky A Anderson says
do you think this can be used on a bathroom sink. And also, all other blogs I read say ” we did this in a bathroom that we dont really use, so it has held up well.” Is your bathroom one that you use daily and if so, hows it going?
Bre says
Hi, Becky! My kids use this bathroom tub twice a day, 7 days a week. (Like they each take one shower a day, every day.) It is perfect still! I wash it with a soft microfiber cloth and cleaning liquid (I think it’s Mr Clean), and it’s staying on strong! As for the sink – I am 99% sure it can be used on a sink. Double check with Rustoleum (maybe on their site or contact customer service) but I seem to recall them saying it is good for a sink too.
Stacey says
Looks great! I used it on our blue tub & tile surround & while I was so nervous, it came out great! Question; when you caulked after painting did you use painters tape for straight lines? That’s the point I’m at but scared to put tape on the painted walls even though thoroughly dry w/the fear of it pulling it off. Thanks for the tips!
Bre says
Hi, Stacey! I did not use painters tape because I was also scared about pulling off paint or epoxy by mistake! I just did the best I could. I hope yours turned out well. Sorry it took me long to respond – my site isn’t notifying me of comments for some reason!
Rosita says
Thank you! Just found your post …been considering doing this for our main big bathroom! Amazing! Really appreciate all the helpful advice! ~Blessings to you & yours!
Bre says
Hi, Rosita – thank you!!! I’m so glad it is helpful. Feel free to reach out with any questions. Thanks again!
rob says
It does say to put it in a solvent resistant container crazy that you put in a thin plastic cup , and the primer you used it’s actually a solvent cleaner the company have just called it a a tub primer it’s not paint
Bre says
Hi, Rob – shoot! Sounds like I should’ve just consulted you before doing this project. P.S. did you ever stop to think that maybe they revised the instructions since I did this project? I assure you that I wouldn’t have used a plastic cup if there would have been any mention of suitable containers for mixing the product.
Bond Corp says
Thank you for sharing this informative article! All the information provided by you is really very helpful for all. I would like to say that we should use tack cloth for removing small dust particles from the surface because it gives you the perfect finishing. Keep posting! Keep sharing!
Bre says
Yes – tack cloth is a must have!!
Robin says
Looks great! I feel for you, I also used a red cup to put something in and it ate through the cup and stained my kitchen sink. It took months for me to get the red out (by the way a paste of Oxy Clean powder is the only thing that gets stains out of my sink). Thanks for sharing how to do so many things.
Bre says
Robin, oh my gosh! Thank you!! I can’t believe that happened to you, too! Yikes! I am so glad you were able to get the stain out of your sink. And thanks for the tip re: the OxyClean powder. I will remember that for the future if I have a stubborn stain!
Victoria says
Yep. I fell victim to the red solo cup disaster myself.
Bre says
Stop it! That is CRAZY!!! I am so sorry it happened to you, too!!
Al says
How is the tub holding up now?? So curious to see if it lasted??
Bre says
Hi! I am happy to tell you that it is still holding up GREAT!!! I have a little flaking near the drain, and I think it’s because my husband poured Draino in it without knowing he wasn’t supposed to do that. So, I will touch that up with the Tub and Tile touch up kit. The finish still looks amazing otherwise, and I am really happy with it!