The pile of scrap wood in my garage reached hoarder-level status: it was a dire situation. From it was born this wood table runner, which is an absolutely awesome DIY scrap wood project (if I do say so myself)!

I’ll give you my supply list, but know that you can tweak the plans for this DIY wood table runner to use up your scrap wood stash! Get creative and have fun (and stop tripping over your wood pile).
Wood Table Runner Supplies
These are the materials I used to build the table runner shown in this post. Some of the links are affiliate links, and you can read my disclosure policy for more information.
- Pine Boards:
- 1×8 pine wood (cut down to a custom size for my table)
- 1×2 pine wood, cut down to four 7.25″ long pieces (which is the actual width of the 1×8 pine board)
- Screen Trim (1/4″ pine)
- Brad Nailer (I truly love my brad nailer. It’s one of those things I never thought I’d use as much as I do! If you don’t have a brad nailer, you could use wood glue and clamps, though the project will take longer to finish.)
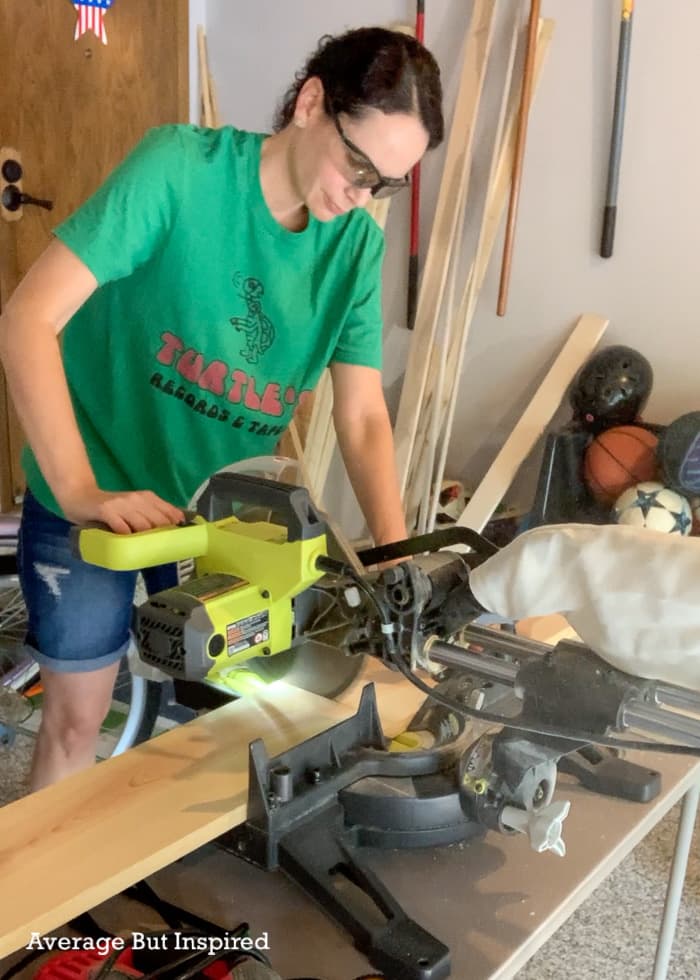
- Miter Saw (note: you could also use a circular saw or even a hand saw with a miter box!)
- Felt (acrylic craft felt works)
- E6000 multi-surface glue
- Wood stain (I used Minwax Fiesta Orange because I made this for a fall tablescape.)
- Paint brush
How Do You Make a Wooden Table Runner?
First up – measure the table on which you want to place the table runner so that you can make it the perfect size. Standard table runner sizes range from 36″ to 108″, but you can make a wooden table runner any size you like!
Next, cut the 1×8 pine piece to the desired size. I used my miter saw to cut down the board because I get a straighter cut that way. If you don’t have a miter saw, use a circular saw or even a hand saw!
To give the table runner some height, cut pieces of 1×2 pine into four, 7.25″ long pieces.
Then use the brad nailer to attach the feet to the bottom of the board. Try to evenly space them so that the board stays level once it’s set up on your table.

Here’s where the fun begins: creating the decorative pattern on the top. For this I used screen trim that was left over from my Flat Panel Door Makeover project.
I cut screen trim down to five, 7.25″ long pieces (the width of the 1×8 board serving as the base of the table runner), and attached those vertically to the center of the 1×8.
Then I cut twelve pieces of screen trim to run horizontally down the 1×8 board, on either side of the vertical pieces of screen trim.
I attached all of these pieces with the brad nailer. I eyeballed the spacing, but you could use a spacer if you are looking for perfection. :-). I figured that since this would be covered in “stuff,” I didn’t need it to be perfect.
After this, I stained the wood table runner, and then glued felt to the bottom “feet” to prevent the runner from scratching my table.
DIY Wood Table Runner
In the end, it came out awesome! The orange is such a great contrast with my Waller Green China Cabinet that I made over a couple years ago.
I also like that a wood table runner is an unexpected piece of table decor.
At the very least it could be a conversation starter at your next dinner party!
Claudia Thunberg says
I wish I could order one from you and have one in a color for every season! I love this but you know that this family missed the craft gene when they were being handed out.
Love following you so much and such a talent you are.
Bre says
Aw, Mrs. Thunberg!!! You are the sweetest! :-). Thank you so much for your nice note. PS I hope you are getting lots of baby snuggles these days!!! xo
Lynn Arnold says
You are so creative and talented. Another of your projects that is sooooo cool! Love it! It is so simple and looks super expensive. I love those kind of results.
Bre says
Lynn, thank you!! This is so sweet! Really appreciate your kindness. Thank you!