
Add functionality and folding space with a DIY laundry room countertop.
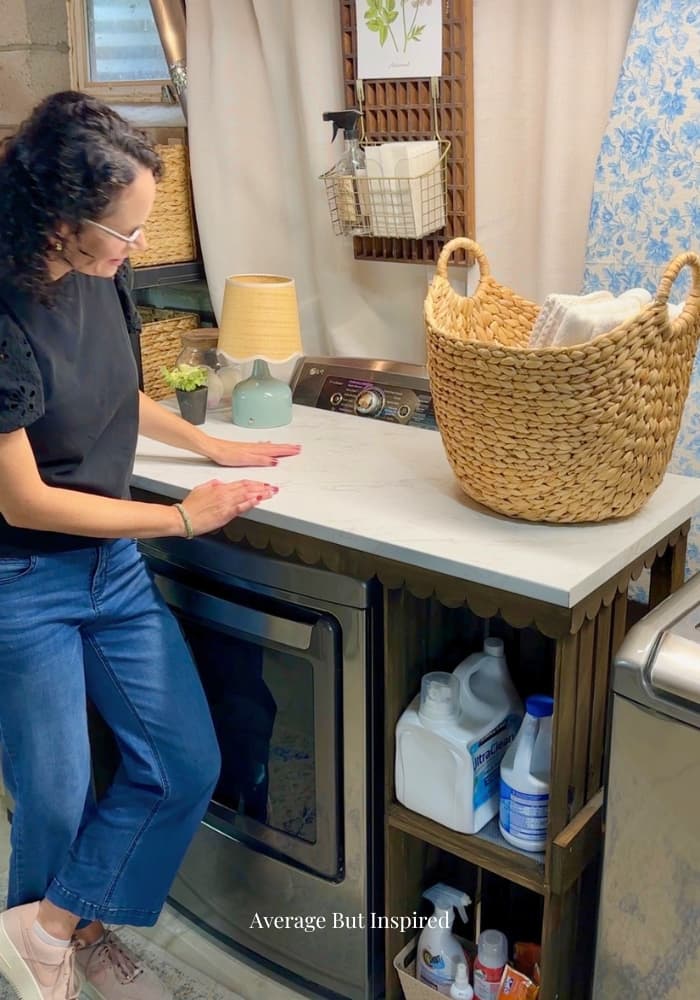
I decided that just because my washer and dryer are in the basement, I don’t have to feel like I’m doing laundry in a dungeon. So, I gave the space a good cleaning and realistic makeover (more on that soon), which included building this DIY laundry room countertop.
This post contains affiliate links. Please read my disclosure policy for more information. Also, I partnered with VT Industries, Inc. to create an Instagram Reel featuring the Stretta countertop. The countertop that was part of that partnership is featured in this project.
I can confidently say it is the BEST upgrade to this space, and I wish I would’ve built it sooner!
I’m going to show you how I did this, but before I do, I want you to know two important things: (1) you can customize this rolling laundry countertop to your laundry room’s configuration and machine types; and (2) I have the most basic woodworking skills, so if I can do this, you can, too!
Why I Built a Rolling Laundry Countertop
Prior to building this, I would carry all the laundry upstairs and either fold it at the coffee table or on my bed. Sometimes I just wanted a place to dump the laundry quickly, and I figured that using the space above the front-load dryer would be a good idea.
Then, I decided to build this countertop on casters so that I could wheel it away from the machine, if needed. I thought it would be good to have access to the dryer vent and pipes behind the machine, so I wanted this to roll out easily.
And, finally, I also thought I could use the rolling countertop for other purposes, like filming craft videos. Of course, I wouldn’t film those in the laundry room, so I needed to be able to move this easily.
Materials Used to Build This DIY Laundry Countertop
Here’s the complete list of supplies I used to build this countertop. Remember that I’m a “bare bones builder,” so there are probably more sophisticated ways to build something like this (such as with pocket screws and fancier wood). But, it got the job done!
Materials
- Stretta laminate countertop (I used the 4’ length)
- Stretta laminate endcap strips
- Two wood crates
- Three 2×3 wood studs (8 feet long)
- Two 1×6 pine boards (8 feet long)
- 1 1/4” wood screws
- 2 ¾ inch wood screws
- Four 3×3 inch corner braces
- Four 2-inch locking casters
- Painters tape
- Scallop-edge trim
- Wood stain
Tools
- Tape measure
- Circular saw
- Circular saw blade with 140 teeth
- Electric drill
- Brad nailer
- Clamps
- Sawhorses
How I Built My Rolling Laundry Countertop
This was not a complicated build, and I finished it over the course of a couple of afternoons. If you’re an experienced builder, you’ll probably get it done even faster.
Make the legs
I wanted to have some storage built in for things like laundry detergent and stain remover (whyyyy do we need so much of it in this house?), so I made one of the legs out of premade wooden crates. I just screwed two of them together vertically with 1 ¼” wood screws.
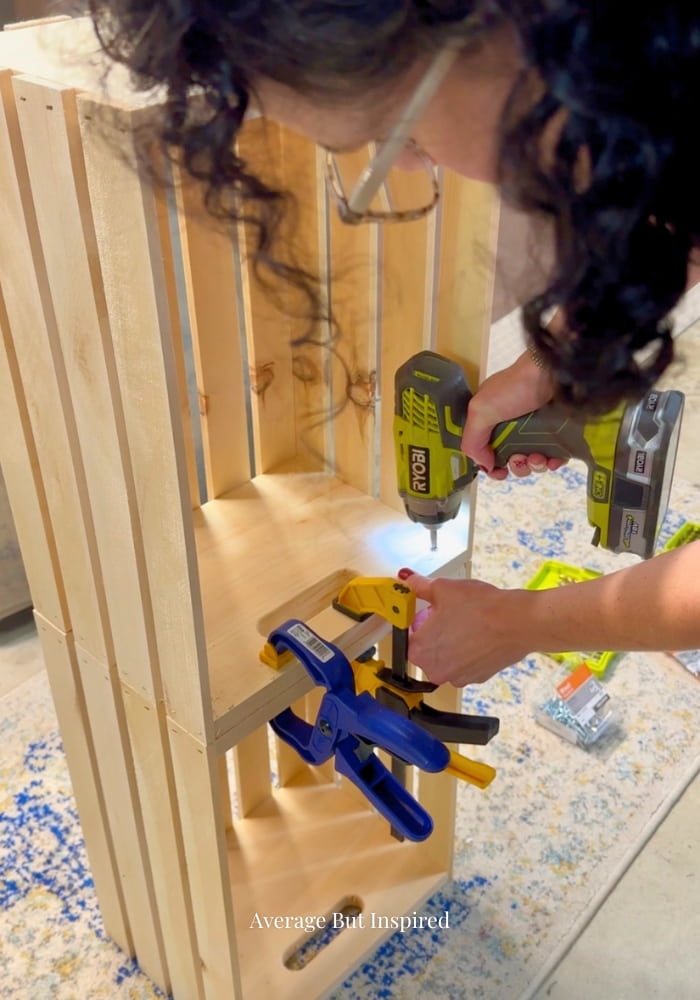
To reinforce their stability, I cut a 1×6 to size and screwed that to the back of the crates.

The stacked crates measured 36” tall, so I cut three 2×3 studs to 36” each to serve as the other legs for the countertop.
(Note: The legs alone are not tall enough to extend over the dryer. But with the addition of the casters and the frame underneath the countertop, the height of the finished product was perfect to easily fit over my dryer.)
Cut the countertop to size
Although the length of the laminate countertop was exactly what I needed at 4 feet long, I decided to cut down the depth so that it wouldn’t hang over the front of the dryer too much.
To do that, I measured on the top of the countertop, drew a line in pencil, and put painters tape over the center of that line.
Then I flipped over the countertop and drew a line in the same place. I clamped wood to the countertop to serve as a saw guide, and then cut a few inches off the back of the countertop to make it 22 inches deep.
I used a circular saw blade with 140 teeth, and this resulted in no chipping at all! The last time I cut a laminate countertop (this exact same countertop for my DIY Dry Bar Build), I didn’t use a blade with as many teeth, and I had some chipping, so I think this is really important.
Build the countertop support
With the countertop the size I wanted, I measured to create a frame to hide underneath.
For this, I ended up cutting my 2×3 studs down to 46 inches long (two pieces), and 15 inches long (three pieces).
I screwed the pieces together into a rectangle with 2 ¾ inch wood screws, with an additional piece in the center. Then I attached corner braces into the four corners of the frame. This gave the frame additional support and is how I planned to attach the frame to the countertop.
Attach the countertop support to the legs
Next, I attached the stacked crates and the three legs to the countertop frame.
With the frame on the floor, I put the crates on top in one corner and screwed down through the edge of the crate into the frame below.
Then, for the other three legs, I propped things up and screwed down through the frame into each leg. I used 2 ¾” screws for this, too.
Add support to the legs
To make the legs sturdier (especially upon moving), I cut down 1×6 boards to the length of the distance between the legs on each side. I attached two supports on the left side, and one on the right.
Attach the casters
I flipped the whole thing over and screwed 2-inch locking casters to the bottom of each leg. I attached the caster to the crate on the far outside edge of the crate at the front.
Attach the countertop
With the legs and frame attached to one another, I set the countertop onto the frame and clamped it in place. I then crawled underneath to screw the countertop to the frame. I used 1” wood screws that I drove through the corner braces and into the bottom of the countertop.
When I got over to the crate leg part, I realized that the crates covered the corner brace. Oops! So, for that corner I used a longer wood screw to drill through the crate and directly into the countertop.
Apply the countertop endcap strip
To finish the unfinished ends of the countertop, I applied the peel-and-stick Stretta laminate countertop endcap strips to both sides (not the back) of the countertop.
To help the adhesive make contact with the countertop, I put painters tape on top of the endcap strip overnight to press the strip on very well.
Add finishing details
The rolling laundry countertop could have passed for finished here, but I couldn’t help myself and had to add some pretty finishing details.
First, I secured adorable scalloped wood trim to the face of the countertop body with a brad nailer. I just love this detail!
Next, I stained all of the wood with a water-based wood stain. I used water-based stain so that I could stain indoors without any fumes. It’s so great!
Once the stain dried, my over-the-dryer laundry countertop was ready for use!
I absolutely love it and am so proud of myself for coming up with this plan and executing it! There’s nothing like having an idea and making it come to life.
Watch The Reel On How I Made This Laundry Countertop
I am really happy to have this laundry room countertop and hope that this tutorial will inspire you to make a countertop for your laundry room, too!
No matter your space or setup, there’s a way to make something like this work!
Leave a Reply