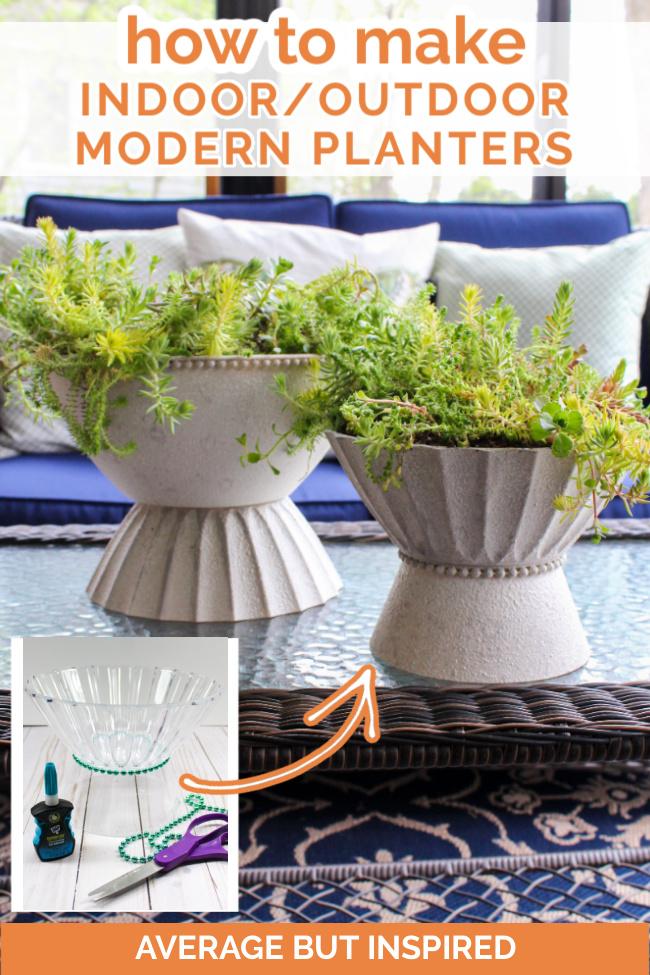
Pretty planters are a great way to add style to any space, but have you seen the price tag on the good-looking ones? YIKES! To save some cash and get a trendy look, why not make a DIY modern planter of your own? I’ll show you how!
A current trend for indoor and outdoor planters is a handcrafted and timeworn look. Think sculptural elements-like bowls, pedestals, and fluting-and natural materials like concrete and clay. Not surprisingly, details like these add to the cost.
The good news is that we can definitely get the look for less (YES!!!), by using smart materials that let these modern planters work indoors or outdoors.
Supplies Needed to Make a DIY Modern Planter
This post is sponsored by DAP Products, Inc. The project and opinions are all my own. Also, this post contains affiliate links. To read my full disclosure policy, please click here.
- RapidFuse Fast Curing Gel with Gel Control Applicator (check out the helpful “Where to Buy” button on the product page to find it in a store near you)
- Optional: RapidFuse Plastic Primer Kit (in case the plastic you’re working with is proving difficult to bond, DAP makes this primer kit, which will solve that problem!)
- Plastic serving bowls in a variety of sizes. For each planter you will need two plastic bowls: one larger than the other. I used this large plastic bowl, these medium plastic bowls, and this fluted serving bowl.
- Masking tape
- Electric drill
- Plastic beaded necklaces
- Gloves
- Spray paint (I used a base color spray paint, stone finish spray paint, and matte finish spray sealer)
- Multi-surface acrylic craft paint in gray
- Artist paint brush
How to Make a DIY Modern Planter for Indoor or Outdoor Use
I feel like I say this a lot, but you’re not going to believe how EASY it is to turn plastic serving bowls into beautiful, modern planters. You’re going to wish you did this sooner!
Step One: Drill Drainage Holes in the Plastic Bowls
Even those of us with the blackest thumbs know that drainage holes are a must in any planter. Drilling through plastic can be tricky though – especially if it’s the hard plastic like my serving bowls are made of.
To help drill through plastic without cracking it, put a piece of masking tape on the spot where you want to drill, and then put another piece on the opposite side.
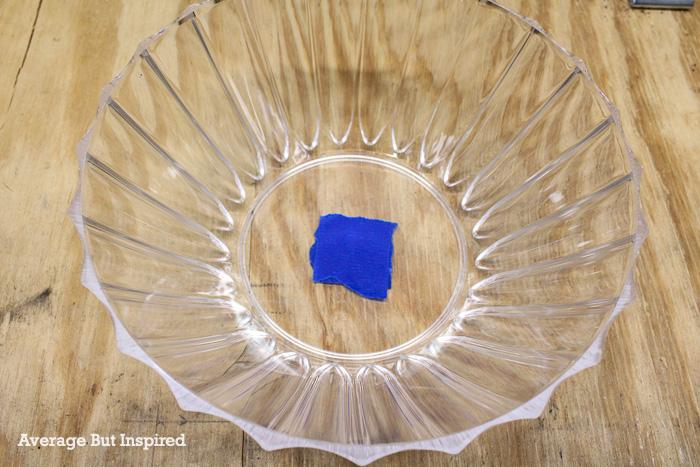
Slowly drill through the tape with a small drill bit. Once you’ve drilled a hole all the way through, slowly go through that hole with a larger drill bit to make the drainage hole bigger.

Repeat this drilling process on the other bowl that you’re using for the planter, and make sure to drill in the same spot(s) as the first planter so that the holes line up and water can flow through from the top bowl to the bottom bowl.
Step Two: Glue the Bowls Together
To create the modern pedestal planter look, glue the bottoms of the bowls together. For this step, it’s extremely important to use the right adhesive. Otherwise your planters will look messy or quickly fall apart.
RapidFuse Fast Curing Gel with Gel Control Applicator is exactly what you need. Unlike many glues, RapidFuse Fast Curing Gel with Gel Control Applicator bonds plastic, has a controlled application that doesn’t run or squish out where you don’t want it, and it is safe for indoor or outdoor use. That is KEY for these DIY modern planters!
Flip one of the bowls over, and with gloves on, run a thin line of RapidFuse Fast Curing Gel with Gel Control Applicator around the bottom rim of the bowl.
Then carefully press the bottom of the other bowl on top, making sure to line up the drainage holes you drilled in step one.
Gently apply pressure to the top bowl, pressing it onto the bottom bowl, and hold it in place for a few moments. RapidFuse Fast Curing Gel with Gel Control Applicator sets up very quickly, so you don’t have to hold the bowl in place for long – just long enough to ensure that a bond has formed between the two bowls. Once that happens, let the bowls sit for at least thirty minutes.
Step Three: Glue on Decorative Detailing
To up the style quotient on your DIY modern planter, consider adding some decorative detailing. I used RapidFuse Fast Curing Gel with Gel Control Applicator to glue plastic bead necklaces around the middle of one planter, and around the top of the other.
And in case you’re wondering . . . no, I didn’t earn these necklaces at Mardi Gras. Ha!
Working one small section at a time, I ran a line of RapidFuse Fast Curing Gel with Gel Control Applicator along the bowl, pressed the beaded necklace down, and held it there for a couple of minutes until the glue set up.
The precise applicator tip made this step very easy, as I didn’t have to contend with too much glue coming out. The no-drip gel formula also made it clean and easy to apply these beads to a vertical surface! Can you imagine doing this with regular glue? No thanks.
These beaded necklaces were great for adding consistent detailing, but if you prefer a more random look, you could use RapidFuse Fast Curing Gel with Gel Control Applicator to apply items like wood beads, buttons, dowels, and more.
Step Four: Paint the Planters
Once the adhesive has dried on the decorative details, it’s time to add the finishing touch to the DIY modern planter – the color.
First, I sprayed the planters with two coats of spray paint formulated for use on plastic, and also for use indoors or outside.
After that layer of spray paint dried, I top coated the planters with a stone texture spray paint. Again, I made sure that this spray paint works on plastic and that it was also good for both indoor and outdoor use. (In this photo you can see that the stone texture has been applied to the planter on the left, while the planter on the right has not yet been top coated.)
To really make the fluted detailing and the beaded elements pop, I brushed on a light coat of soft gray multi-surface acrylic craft paint. I was careful to touch just those raised areas in order to accentuate them a bit.
The stone texture spray paint with the added darkening of the raised details went a long way toward making these planters look like cement or natural clay.
After that paint dried, I sealed the planters with spray sealer in a matte finish. This is important to make sure that the DIY planters’ finish will hold up if used outdoors.
Modern DIY Planters: The Finished Product
After filling them with potting soil and a beautiful sedum sod mix, these DIY Modern Planters are ready to be the star of my patio! They’re going to look great paired with my DIY Glass Jar Lanterns, too!
You would never guess that these beautiful indoor / outdoor planters are made from plastic serving bowls and Mardi Gras beads, would you?
If you agree, I’d love for you to pin this post or share it with your friends. And make sure to tag me and DAP Products on Instagram when you make this project!
How to Make a DIY Modern Planter for Indoor or Outdoor Use
Learn to make a DIY modern planter that works inside or outside. Create a pedestal bowl planter with plastic serving bowls and embellishments.
Materials
- RapidFuse Fast Curing Gel with Gel Control Applicator
- Plastic serving bowls (two in different sizes)
- Masking tape
- Drill
- Plastic beaded necklaces
- Gloves
- Spray paint (base color, stone texture, and sealer)
- Multi-surface acrylic craft paint
- Small paint brush
Instructions
- Drill drainage holes in the bottoms of each of the plastic bowls. Make sure to drill them in the same spot on each bowl so that the holes line up when the bowls are glued together.
- Run a thin band of RapidFuse Fast Curing Gel with Gel Control Applicator adhesive along the bottom of one of the plastic bowls.
- Press the other bowl onto the bowl with the adhesive, making sure line up the drainage holes, and hold the bowls together for a few moments until the adhesive sets up.
- Let the adhesive cure for 30 minutes.
- Use the RapidFuse Fast Curing Gel with Gel Control Applicator to attach a beaded necklace around the top or the middle of the planter. This will add detail and interest to the planter.
- Spray paint the planter with the base color spray paint. Let it dry, and repeat another layer of base color spray paint. Let it dry.
- Spray paint the planter with the stone texture spray paint. Let it dry.
- If desired, use multi-surface acrylic paint in a darker color to add highlights to the raised areas of the planter. Let the paint dry.
- Use spray sealer to protect the paint on the planters.
- Add soil and flowers or greenery and enjoy your DIY modern planter.
Notes
In order for this planter to be suitable for outdoor use, make sure to use the recommended adhesive, RapidFuse Fast Curing Gel with Gel Control Applicator, and spray paints that are indicated for outdoor use.
Marlee Jansen says
This is awesome! I intend to put it on my list to try at some point this summer. Wondering if I could do this to some of the plastic pots I already have . . .
Bre says
Marlee!!! Hi! Thank you! Yes – you can use any types of pots at all! Show me a pic when you make them! Thanks for visiting – 🙂
Rebecca Payne says
I love this project.
Bre says
Hi, Rebecca – thank you!!! I am so glad you like it!