• Skip to primary navigation
  • Skip to main content
  • Skip to primary sidebar
Average But Inspired logo - DIY and craft

Average But Inspired

Craft a home you love. DIY and craft tutorials.

  • About
    • Contact Me
    • Disclosures
    • Privacy Policy and Copyright Policy
  • DIY
    • Furniture
  • Crafts
    • Dollar Store Crafts
    • Seasonal
      • Patriotic & Summer
      • Valentine’s Day
      • Easter & Spring
      • Fall & Halloween
      • Christmas & Winter
  • Home Decor
    • Organization
  • Shop
    • DIY Swag
    • DIY Guides
  • Home

Homepage Crafts

Colorful DIY Glass Jar Lantern Craft

May 20, 2021 by Bre 2 Comments

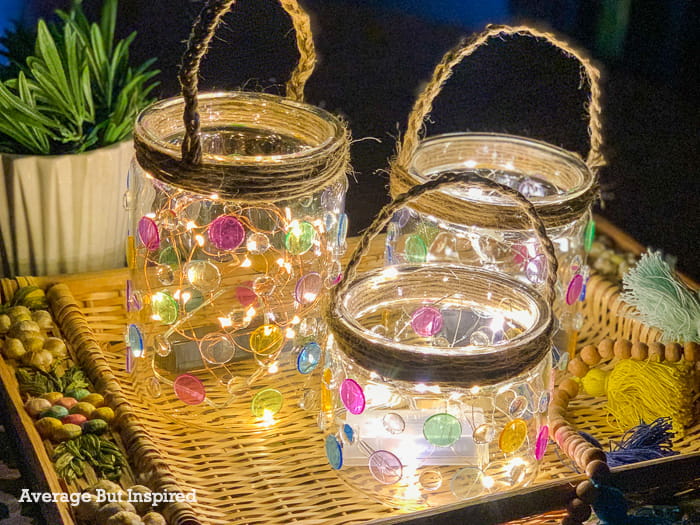
This summer I’m determined to make the most of my yard and patio, and I know many of you are feeling the same!  A great way to make outdoor spaces more inviting is with accessories, like outdoor pillows, pretty planters (try these DIY Modern Planters!), and ambient lighting.  Speaking of which, this DIY glass jar lantern craft is the perfect way to add color and style to your outdoor space-day or night!

The colorful gems on these lanterns make them adorable decorations during the day.  When you light them up at night, their colors dance and bring a whole new feel to your patio or deck!

This glass jar lantern craft is so cute! It's the perfect DIY lantern anyone can make with a glass jar. The lanterns look great on the patio lit up at night, or even during the day with their cute and colorful details.

Supplies Needed to Make Glass Jar Lanterns

This post is sponsored by DAP Products, Inc.  The project and opinions are all my own.  Also, this post contains affiliate links.  To read my full disclosure policy, please click here.

  • RapidFuse Ultra Clear All Purpose Adhesive
  • Glass jars in varying sizes
  • Clear glass gems or clear glass cabochons
  • Colorful bingo chips
  • Twine
  • Twine-wrapped wire or jute-wrapped wire
  • Scissors
  • Craft clamps
  • Battery-operated candles OR battery-operated fairy lights

Make adorable DIY glass jar lanterns with some simple supplies.

Glass Jar Lantern Craft: How-To

Before jumping in and creating these cute and colorful lanterns, make sure the glass jars you’re using are clean and dry-both inside and out.  I wiped the outsides of my jars with rubbing alcohol just to be safe.  Soap and water will work well, too!

Step One: Secure the Glass Jar

Once that is taken care of, it’s time to get down to crafty business.  Set a glass jar on a level surface.  To keep it from rolling away while you’re working, place objects underneath it on both sides.  I used little wood blocks to keep my jars from rolling around.

Colorful DIY lanterns for indoor or outdoor use are easy to make with DAP RapidFuse Ultra Clear All Purpose Adhesive.

Step Two: Glue Bingo Chips to the Lantern with RapidFuse Ultra Clear

Working one section at a time, glue colorful bingo chips to the jar with RapidFuse Ultra Clear All Purpose Adhesive.  This glue is a MUST HAVE for this project because it forms a crystal clear bond between the bingo chips (and glass gems to come later), and the glass jar.  This is essential for creating a flawless and clean look, and for letting these lanterns shine at night!

Make adorable DIY glass jar lanterns with bingo chips and glass gems. It sounds like a funny combination, but it creates a beautiful lantern.

Only use a tiny amount of glue on the back of each bingo chip.  Trust me: a little goes a long way!  You can apply the glue directly from the RapidFuse Ultra Clear bottle, or you can use a small paintbrush to dab on a tiny bit of glue.

Step Three: Attach Clear Gems or Cabochons with RapidFuse Ultra Clear

Next, in that same section where you just glued on bingo chips, use RapidFuse Ultra Clear to attach clear glass cabochons to the jar.

Glue glass gems to glass jars to create pretty glass gem lanterns! Using RapidFuse Ultra Clear makes these lanterns work indoors or outside.

These clear glass gems are great for filling in empty spots on the lantern, and they help bounce the light around at night. 

Learn how to make colorful glass jar lanterns with glass gems and bingo chips!

The RapidFuse Ultra Clear is perfect for attaching these clear glass gems because it won’t yellow as it ages.  Can you imagine how gross that would look if you had yellow glue spots all over your lanterns?  No thanks.  (*Making a mental note: use RapidFuse Ultra Clear for all crafts with glass gems going forward.)

Once the RapidFuse Ultra Clear has set up (usually in less than 30 minutes), rotate the glass jar and repeat steps 2-3 on the next section.  Do this until the entire jar is covered with bingo chips and glass gems.

Step Four: Create the Lantern Handle

After the RapidFuse Ultra Clear has set and cured, it’s time to create handles for these DIY lanterns.  Start by wrapping twine around the top of the glass jar and securing it in place with a liberal amount of RapidFuse Ultra Clear and a craft clamp.

Create handles for these DIY lanterns with twine.

Once dry, remove the clamp.  Then, cut three pieces of twine-wrapped wire and braid them.  Attach them to the twine on the jar with Rapid-Fuse Ultra Clear and craft clamps. 

Unlike hot glue or other adhesives, the RapidFuse Ultra Clear will dry totally clear and not leave glue clumps all over.

Twine-wrapped wire that's braided together forms a pretty handle for these colorful outdoor lanterns.

To finish off the look, wrap twine around the ends of the handle.  Again, secure this twine with RapidFuse Ultra Clear and craft clamps.

Wrap twine around the mouth of the glass jar to create a pretty handle for the lantern.

Step Five: Clean Up Excess RapidFuse Ultra Clear, if Necessary

Your DIY lanterns are almost ready, but before they make their debut on your fabulous summer patio, check to see if you got excess glue anywhere that you’d like to clean up.  I had a couple of glass gems slide away (due to excessive glue application and/or turning the jar too soon) and leave a glue trail, but it was not a problem.

RapidFuse Ultra Clear that has cured is easy to remove with acetone nail polish remover! Just dip a cotton swab into the acetone nail polish remover, put it on the excess glue and let it sit, and then gently scrape off the RapidFuse Ultra Clear with a utility knife or the end of scissors.

If you need to clean up any excess RapidFuse Ultra Clear, acetone nail polish remover will do the trick.

Colorful DIY Glass Jar Lanterns

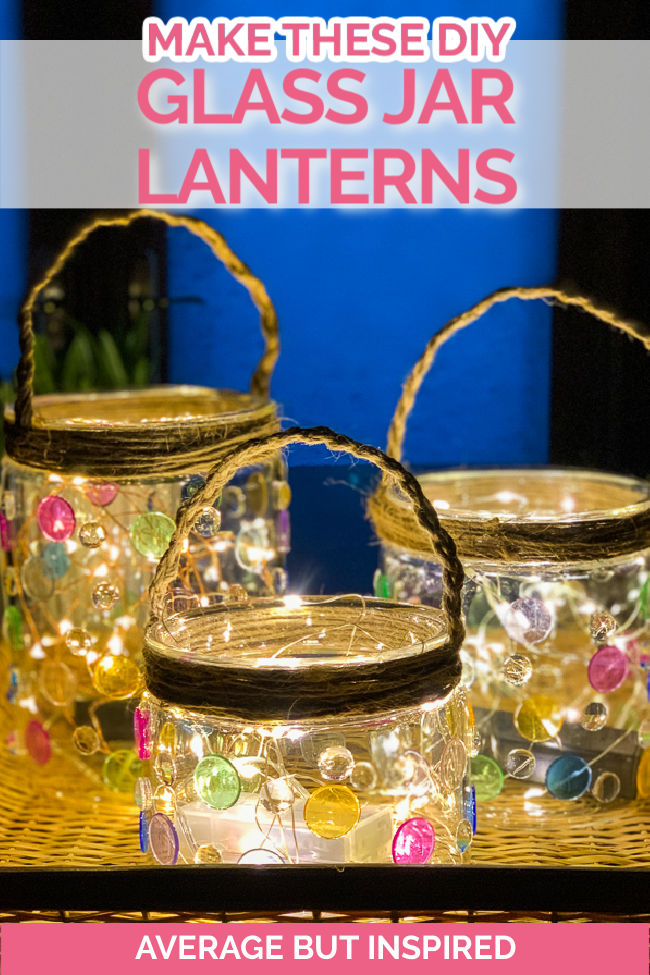
Pop in battery-operated candles or battery-operated fairy lights, and these DIY jar lanterns are ready to dress up your outdoor space!

Make these pretty DIY glass jar lanterns for your outdoor space! The colorful details make them pretty during the day, and the colors pop at night when they're all lit up!

Check out how gorgeous they are filled with fairy lights.  The colors dance and add magic to summer nights!

This DIY lantern craft is so awesome! Use glass jars and pretty glass gems to create these lovely lanterns.

And, you don’t have to worry about using these lanterns outdoors.  RapidFuse Ultra Clear All Purpose Adhesive is an interior and exterior adhesive that’s water-resistant once cured, so you can use these outside safely. 

Make a bunch of them and they’ll be the star of your outdoor space.

DIY Glass Jar Lantern Craft

DIY Glass Jar Lantern Craft

Yield: 1
Prep Time: 5 minutes
Active Time: 1 hour
Total Time: 1 hour 5 minutes
Difficulty: Easy
Estimated Cost: $10

This DIY Glass Jar Lantern Craft will be the star of your patio! Embellish glass jars with colorful and clear gems to create colorful lanterns that shine during the day and also at night.

Materials

  • RapidFuse Ultra Clear All Purpose Adhesive
  • Glass jar
  • Clear glass gems
  • Colorful bingo chips
  • Twine
  • Twine-wrapped wire
  • Battery-operated fairy lights

Tools

  • Scissors
  • Craft clamps

Instructions

  1. Clean the glass jar to remove any dirt or residue.
  2. Stabilize the glass jar on a level surface to keep it from rolling away.
  3. Glue colorful transparent bingo chips to the glass jar with RapidFuse Ultra Clear All Purpose Adhesive.
  4. Glue clear gems to the glass jar with Rapid Fuse Ultra Clear All Purpose Adhesive.
  5. Wrap twine around the top of the jar and secure in place with RapidFuse Ultra Clear All Purpose Adhesive.
  6. Braid together three pieces of twine-wrapped wire to create a handle. Glue it to the sides of the glass jar with RapidFuse Ultra Clear, and use craft clamps to secure the bond and hold the handles in place.
  7. Once the glue has dried, wrap another layer of twine around the base of the handles to cover the seam. Secure to the jar with RapidFuse Ultra Clear.
  8. Fill the glass jar lantern with fairy lights or battery-operated candles.

Notes

When gluing the glass gems and bingo chips to the glass jar, only use a very small amount of RapidFuse Ultra Clear. Too much adhesive will cause the gems and chips to slide down the side of the jar.

Remove excess cured RapidFuse Ultra Clear with acetone nail polish remover.

© Bre Eggert
Project Type: Home Decor / Category: Crafts
blank
 

Filed Under: Crafts, Homepage Crafts

DIY Modern Planter {for Indoor or Outdoor Use!}

April 29, 2021 by Bre 4 Comments

blank

Pretty planters are a great way to add style to any space, but have you seen the price tag on the good-looking ones?  YIKES!  To save some cash and get a trendy look, why not make a DIY modern planter of your own?  I’ll show you how!

A current trend for indoor and outdoor planters is a handcrafted and timeworn look.  Think sculptural elements-like bowls, pedestals, and fluting-and natural materials like concrete and clay.  Not surprisingly, details like these add to the cost.

The good news is that we can definitely get the look for less (YES!!!), by using smart materials that let these modern planters work indoors or outdoors.

Learn how to make DIY modern planters for indoor or outdoor use with plastic bowls. It's an easy project and a great way to get that modern planter look without the hefty price tag.

Supplies Needed to Make a DIY Modern Planter

This post is sponsored by DAP Products, Inc.  The project and opinions are all my own.  Also, this post contains affiliate links.  To read my full disclosure policy, please click here.

  • RapidFuse Fast Curing Gel with Gel Control Applicator (check out the helpful “Where to Buy” button on the product page to find it in a store near you)
  • Optional: RapidFuse Plastic Primer Kit (in case the plastic you’re working with is proving difficult to bond, DAP makes this primer kit, which will solve that problem!)
  • Plastic serving bowls in a variety of sizes.  For each planter you will need two plastic bowls: one larger than the other.  I used this large plastic bowl, these medium plastic bowls, and this fluted serving bowl.
  • Masking tape
  • Electric drill
  • Plastic beaded necklaces
  • Gloves
  • Spray paint (I used a base color spray paint, stone finish spray paint, and matte finish spray sealer)
  • Multi-surface acrylic craft paint in gray
  • Artist paint brush

How to Make a DIY Modern Planter for Indoor or Outdoor Use

I feel like I say this a lot, but you’re not going to believe how EASY it is to turn plastic serving bowls into beautiful, modern planters.  You’re going to wish you did this sooner!

Step One: Drill Drainage Holes in the Plastic Bowls

Even those of us with the blackest thumbs know that drainage holes are a must in any planter.  Drilling through plastic can be tricky though – especially if it’s the hard plastic like my serving bowls are made of.  

To help drill through plastic without cracking it, put a piece of masking tape on the spot where you want to drill, and then put another piece on the opposite side.

To make modern bowl planters, drainage holes must be drilled.

Slowly drill through the tape with a small drill bit.  Once you’ve drilled a hole all the way through, slowly go through that hole with a larger drill bit to make the drainage hole bigger.

Making modern bowl pedestal planter is easy. To drill drainage holes, start with a small drill bit and work your way up in size.

Repeat this drilling process on the other bowl that you’re using for the planter, and make sure to drill in the same spot(s) as the first planter so that the holes line up and water can flow through from the top bowl to the bottom bowl.

Step Two: Glue the Bowls Together

To create the modern pedestal planter look, glue the bottoms of the bowls together.  For this step, it’s extremely important to use the right adhesive.  Otherwise your planters will look messy or quickly fall apart.

To make DIY modern planters, glue plastic bowls together with DAP RapidFuse Fast Curing Gel Adhesive. This glue has precise application and is safe for outdoor use.

RapidFuse Fast Curing Gel with Gel Control Applicator is exactly what you need.  Unlike many glues, RapidFuse Fast Curing Gel with Gel Control Applicator bonds plastic, has a controlled application that doesn’t run or squish out where you don’t want it, and it is safe for indoor or outdoor use.  That is KEY for these DIY modern planters! 

Flip one of the bowls over, and with gloves on, run a thin line of RapidFuse Fast Curing Gel with Gel Control Applicator around the bottom rim of the bowl. 

Run a band of DAP RapidFuse Fast Curing Gel Adhesive around the bottom edge of one of the bowls.

Then carefully press the bottom of the other bowl on top, making sure to line up the drainage holes you drilled in step one.

Press the two plastic bowls together, with the drainage holes aligned, to let the adhesive set and to create the shape of the. modern planter.

Gently apply pressure to the top bowl, pressing it onto the bottom bowl, and hold it in place for a few moments.  RapidFuse Fast Curing Gel with Gel Control Applicator sets up very quickly, so you don’t have to hold the bowl in place for long – just long enough to ensure that a bond has formed between the two bowls.  Once that happens, let the bowls sit for at least thirty minutes.

Step Three: Glue on Decorative Detailing

To up the style quotient on your DIY modern planter, consider adding some decorative detailing.  I used RapidFuse Fast Curing Gel with Gel Control Applicator to glue plastic bead necklaces around the middle of one planter, and around the top of the other.

And in case you’re wondering . . . no, I didn’t earn these necklaces at Mardi Gras.  Ha!

Add decorative details to the DIY modern planters. Here, a string of beads was glued on to add dimension.

Working one small section at a time, I ran a line of RapidFuse Fast Curing Gel with Gel Control Applicator along the bowl, pressed the beaded necklace down, and held it there for a couple of minutes until the glue set up. 

The precise applicator tip made this step very easy, as I didn’t have to contend with too much glue coming out.  The no-drip gel formula also made it clean and easy to apply these beads to a vertical surface!  Can you imagine doing this with regular glue?  No thanks.

A band of beads was glued to the top of the DIY modern planter in order to give it some dimension.

These beaded necklaces were great for adding consistent detailing, but if you prefer a more random look, you could use RapidFuse Fast Curing Gel with Gel Control Applicator to apply items like wood beads, buttons, dowels, and more.

Step Four: Paint the Planters

Once the adhesive has dried on the decorative details, it’s time to add the finishing touch to the DIY modern planter – the color. 

First, I sprayed the planters with two coats of spray paint formulated for use on plastic, and also for use indoors or outside.

Spray paint the DIY Modern Planters with spray paint that is safe for indoor and outdoor use.

After that layer of spray paint dried, I top coated the planters with a stone texture spray paint.  Again, I made sure that this spray paint works on plastic and that it was also good for both indoor and outdoor use.  (In this photo you can see that the stone texture has been applied to the planter on the left, while the planter on the right has not yet been top coated.)

Once the base coat of spray paint has dried, top coat the planters with stone texture spray paint. This will give the modern planters a concrete look.

To really make the fluted detailing and the beaded elements pop, I brushed on a light coat of soft gray multi-surface acrylic craft paint.  I was careful to touch just those raised areas in order to accentuate them a bit.

The stone texture spray paint with the added darkening of the raised details went a long way toward making these planters look like cement or natural clay.

After that paint dried, I sealed the planters with spray sealer in a matte finish.  This is important to make sure that the DIY planters’ finish will hold up if used outdoors.

Modern DIY Planters: The Finished Product

After filling them with potting soil and a beautiful sedum sod mix, these DIY Modern Planters are ready to be the star of my patio!  They’re going to look great paired with my DIY Glass Jar Lanterns, too!

These DIY Modern Planters were made with plastic serving bowls from the dollar store! Learn how to make these indoor OR outdoor modern planters in this post.

See how she made modern bowl planters with plastic serving bowls from the dollar store!

You would never guess that these beautiful indoor / outdoor planters are made from plastic serving bowls and Mardi Gras beads, would you?

Can you believe that these beautiful modern pedestal planters are DIY planters made from serving bowls? Get the full project tutorial in this post.

If you agree, I’d love for you to pin this post or share it with your friends.  And make sure to tag me and DAP Products on Instagram when you make this project!

How to Make a DIY Modern Planter for Indoor or Outdoor Use

How to Make a DIY Modern Planter for Indoor or Outdoor Use

Yield: 1
Prep Time: 5 minutes
Active Time: 1 hour
Additional Time: 1 hour
Total Time: 2 hours 5 minutes
Difficulty: Easy
Estimated Cost: $20

Learn to make a DIY modern planter that works inside or outside. Create a pedestal bowl planter with plastic serving bowls and embellishments.

Materials

  • RapidFuse Fast Curing Gel with Gel Control Applicator
  • Plastic serving bowls (two in different sizes)
  • Masking tape
  • Drill
  • Plastic beaded necklaces
  • Gloves
  • Spray paint (base color, stone texture, and sealer)
  • Multi-surface acrylic craft paint
  • Small paint brush

Instructions

  1. Drill drainage holes in the bottoms of each of the plastic bowls. Make sure to drill them in the same spot on each bowl so that the holes line up when the bowls are glued together.
  2. Run a thin band of RapidFuse Fast Curing Gel with Gel Control Applicator adhesive along the bottom of one of the plastic bowls.
  3. Press the other bowl onto the bowl with the adhesive, making sure line up the drainage holes, and hold the bowls together for a few moments until the adhesive sets up.
  4. Let the adhesive cure for 30 minutes.
  5. Use the RapidFuse Fast Curing Gel with Gel Control Applicator to attach a beaded necklace around the top or the middle of the planter. This will add detail and interest to the planter.
  6. Spray paint the planter with the base color spray paint. Let it dry, and repeat another layer of base color spray paint. Let it dry.
  7. Spray paint the planter with the stone texture spray paint. Let it dry.
  8. If desired, use multi-surface acrylic paint in a darker color to add highlights to the raised areas of the planter. Let the paint dry.
  9. Use spray sealer to protect the paint on the planters.
  10. Add soil and flowers or greenery and enjoy your DIY modern planter.

Notes

In order for this planter to be suitable for outdoor use, make sure to use the recommended adhesive, RapidFuse Fast Curing Gel with Gel Control Applicator, and spray paints that are indicated for outdoor use.

© Bre Eggert
Project Type: Home Decor / Category: DIY
blank
 

Filed Under: DIY, Homepage Crafts

Pressed Flower Craft: Air Dry Clay Flower Plaque

July 7, 2020 by Bre 4 Comments

blank

With two months left of the kids’ summer vacation and every activity canceled, I’m wracking my brain trying to find things to keep them busy! Last week we got crafty with some leaves and flowers we found in our yard, and we made a pretty pressed flower craft – lovely air dry clay flower plaques!  I’m excited to show you how to make them, too!

Learn to make pretty pressed flower plaques in this post! This is an easy air dry clay craft that's fun for kids and adults alike.

Surprisingly, my son enjoyed this activity the most!  He loved foraging around the forest (not really a forest – just some junk trees in a shady spot in the yard – but forest sounds more magical), to find pretty flowers and leaves to use on his plaques.

What types of flowers are best to press into air dry clay?

This part of the activity was nice because it got us talking about what was growing outside and what types of blooms and greenery might work best for flower pressing and leaf pressing.

Once we collected enough specimens to make our pressed flower plaques, we headed inside and got down to business.  We quickly realized that the flatter the flowers or leaves were to begin with, the better they were to press into the clay.  Bulky flowers had too much dimension to be pressed flat into clay, and very veiny leaves had the same problem.

What type of air dry clay is best for pressing flowers into?

I had air dry clay leftover from previous projects (like my air dry clay keychains and air dry clay garden markers), and so we didn’t need to buy anything new for this project!  

The air dry clay we used was totally natural clay (not polymer clay), which I think is best when working with flowers as there are no chemicals to discolor the flowers or leaves.

Pressed flower crafts are a wonderful nature craft! Learn to make pressed flower plaques in this post.

This project was really simple but quite fun; rolling the clay, pressing the flowers into it, poking holes so that the plaques could be hung once dry.  We had a nice time together and made so many of these pressed flower plaques, which we plan to hang in our sun room.

If you make it with kids, not only will you end up with a nice piece of decor, but you’ll also have sweet memories of your time together.
This pretty pressed fern plaque is an easy DIY. Learn how to make this pressed flower craft in this blog post.

Pressed Flower Craft: Air Dry Clay Flower Plaque

Pressed Flower Craft: Air Dry Clay Flower Plaque

Yield: 12
Prep Time: 5 minutes
Active Time: 20 minutes
Additional Time: 1 day
Total Time: 1 day 25 minutes
Difficulty: Easy

Create a pretty pressed flower craft with blooms and leaves from your yard! Use air dry clay to create this pretty floral craft.

Materials

  • Terracotta Air Dry Clay
  • Clay Roller Kit
  • Clay Sculpture Tools
  • Twine
  • White Craft Paint
  • Painting Sponge
  • Flowers & Leaves

Tools

  • Paper Towels
  • Drying Rack

Instructions

  1. Roll a piece of terracotta clay into a ball. Roll a chunk of terracotta clay into a ball.
  2. Partially flatten it with the clay roller or a rolling pin. blank
  3. Lay a leaf or flowers onto the partially flattened piece of clay. blank
  4. Using the clay roller or rolling pin, gently press the leaf or flowers into the clay. Take care to press all portions of the leaf or flower into the clay so that nothing is sticking up out of the air dry clay. blank
  5. Using a pointed object (such as the poker in the Clay Tools Set), poke two holes near the top of the air dry clay plaque. blank
  6. Gently set the pressed flower plaque on a cookie cooling rack and let it dry. It will probably take around 24 hours for the air dry clay to dry on both sides. It may take a little longer for the pressed flowers or leaves to fully dry. blank
  7. Once the air dry clay and the pressed flowers or pressed leaves are dry, you may want to add a bit of "age" to the flower plaque with some white craft paint. To do this, dab a little bit of white paint on a painting sponge, and gently press it along the clay plaque. Wipe off or dab off any excess with a paper towel. blank

Notes

The beauty of this project is the imperfections. These enhance the rustic or natural feel of this craft. Don't worry about your plaque being the perfect shape or if your clay starts to crack or wrinkle. Embrace the imperfections!

© Bre Eggert
Project Type: Home Decor / Category: Crafts
blank
I’d appreciate it if you’d share this post with someone who might enjoy it! Send them the link or share it on Pinterest – thank you!

Create beautiful pressed flower plaques with air dry clay. This is a beautiful nature craft that is fun for adults and kids alike!

Filed Under: Crafts, Homepage Crafts

The Easiest DIY Trinket Dish Ever

March 28, 2018 by Bre 27 Comments

blank

Trinket dishes are one of my favorite additions to my home decor because they’re SO useful (hello, great place to keep rings and jewelry, and catch-all for random tiny things!), and because they can be so darn cute! 

I have them near every sink that I use regularly and in other spots like on my dresser.  I decided to try my hand at a DIY Trinket Dish recently and had so much fun making this quick and easy but oh-so-darling craft, that I couldn’t wait to share it with you!  

This has to be the easiest DIY trinket dish ever! With a few simple and inexpensive supplies, you can make an adorable trinket dish to store your jewelry and other treasures. A perfect ladies' craft night project or quick weekend craft - this is a project everyone can do!

Not only is this DIY Trinket Dish cute, but it is so useful!  The best part is that it was very quick to make and required only a few inexpensive supplies.

Supplies Needed for a DIY Trinket Dish

Some of these links are affiliate links.  To read my full disclosure policy, please click here.

    • Porcelain soap dish or small bowl
    • Pretty paper napkins 
    • Mod Podge
    • Scissors
    • Paintbrush  

This has to be the easiest DIY trinket dish ever! With a few simple and inexpensive supplies, you can make an adorable trinket dish to store your jewelry and other treasures. A perfect ladies' craft night project or quick weekend craft - this is a project everyone can do!

How to Make a DIY Trinket Dish

You’ll love making this project!

DIY Trinket Dish Step One: Cut Up the Napkin

Begin by cutting apart a paper napkin with whatever elements of the design you want to use on the trinket dish.  You can see I tried to cut as close to the printed design as I could – leaving off as much white space around the design as possible.

This has to be the easiest DIY trinket dish ever! With a few simple and inexpensive supplies, you can make an adorable trinket dish to store your jewelry and other treasures. A perfect ladies' craft night project or quick weekend craft - this is a project everyone can do!

Next, make sure to remove the second layer of the paper napkin.  All you want for this project is the top, printed layer of the design!

Step Two: Mod Podge the Dish

Once you’ve done that, spread a thin layer of Mod Podge onto the part of the soap dish or bowl where you’ll be placing your napkin pieces.  You should probably only do a little part of the dish at a time to prevent the Mod Podge from drying before you’ve placed anything there.

This has to be the easiest DIY trinket dish ever! With a few simple and inexpensive supplies, you can make an adorable trinket dish to store your jewelry and other treasures. A perfect ladies' craft night project or quick weekend craft - this is a project everyone can do!

Step Three: Lay Down the Napkins

Gently place the napkin pieces where you want them and make sure to gently smooth the pieces down to remove any ripples.  Be careful not to rip the napkin!  

This has to be the easiest DIY trinket dish ever! With a few simple and inexpensive supplies, you can make an adorable trinket dish to store your jewelry and other treasures. A perfect ladies' craft night project or quick weekend craft - this is a project everyone can do!

Once you have the soap dish or bowl decorated just how you like it, let the pieces dry. 

Step Four: Topcoat with Mod Podge

After about twenty minutes/when everything is dry, cover the entire dish with another coat of Mod Podge.  It will look funky for a little bit, but it will dry clear!

This has to be the easiest DIY trinket dish ever! With a few simple and inexpensive supplies, you can make an adorable trinket dish to store your jewelry and other treasures. A perfect ladies' craft night project or quick weekend craft - this is a project everyone can do!

Once the Mod Podge is completely dry, the white parts of the napkin blend in with the dish, and the printed design looks like it’s printed or painted right on there!  

This has to be the easiest DIY trinket dish ever! With a few simple and inexpensive supplies, you can make an adorable trinket dish to store your jewelry and other treasures. A perfect ladies' craft night project or quick weekend craft - this is a project everyone can do!

If you’re not careful to remove the second layer of the napkin though, it won’t look as good!  I accidentally left the second layer on that green leaf on the side of the trinket dish (pictured below), and you can absolutely see the white around the leaf.  Bummer!  Oh well, the name of this blog is Average But Inspired – not Perfect But Inspired.  đŸ˜‰

This has to be the easiest DIY trinket dish ever! With a few simple and inexpensive supplies, you can make an adorable trinket dish to store your jewelry and other treasures. A perfect ladies' craft night project or quick weekend craft - this is a project everyone can do!

Wouldn’t this make a fun ladies’ craft night project with your friends?  Anybody can do this and it’s so inexpensive!  Get that on the calendar!  You’ll be glad to spend time with your friends and walk away with a cute place to put your jewelry and trinkets.

This has to be the easiest DIY trinket dish ever! With a few simple and inexpensive supplies, you can make an adorable trinket dish to store your jewelry and other treasures. A perfect ladies' craft night project or quick weekend craft - this is a project everyone can do!

-Bre

Filed Under: Crafts, Dollar Tree, Homepage Crafts

Primary Sidebar

Let’s Connect!

Hi, I’m Bre! Thanks for visiting Average But Inspired, where I show you how to work with what you’ve got to create a home you love.

Bre of Average But Inspired - a DIY and craft blog

Love DIY? Subscribe to Get Posts E-mailed!

How Can I Help You?

blank

7 Tips for Hosting a Party on a Budget

blank

My DIY Kitchen Makeover Reveal!

blank

How to Paint a Countertop to Look Like Marble!

blank

Limewash Stone Fireplace Makeover: Bye Bye Orange Stone Fireplace, Hello Neutral Stone Beauty!

Looking for Something?

Copyright © 2013-2022, Bre Eggert (Average But Inspired). All rights reserved.
  • Home
  • DIY
  • Crafts
  • Home Decor
  • Privacy Policy and Copyright Policy
  • Disclosures
  • Contact Me