
• Skip to primary navigation
  • Skip to main content
  • Skip to primary sidebar
Average But Inspired logo - DIY and craft

Average But Inspired

Craft a home you love. DIY and craft tutorials.

  • About
    • Contact Me
    • Disclosures
    • Privacy Policy and Copyright Policy
  • DIY
    • Furniture
  • Crafts
    • Dollar Store Crafts
    • Seasonal
      • Patriotic & Summer
      • Valentine’s Day
      • Easter & Spring
      • Fall & Halloween
      • Christmas & Winter
  • Home Decor
    • Organization
  • Shop
    • DIY Guides
  • Home

Painted Furniture

How I Painted Fabric Chair Cushions Instead of Reupholstering

May 5, 2026 by Bre Leave a Comment

When I spotted this chair at my local Habitat ReStore, I knew it had good bones. But the fabric? Let’s just say it was giving the Golden Girls‘ living room. Bold floral upholstery that was not exactly my style.
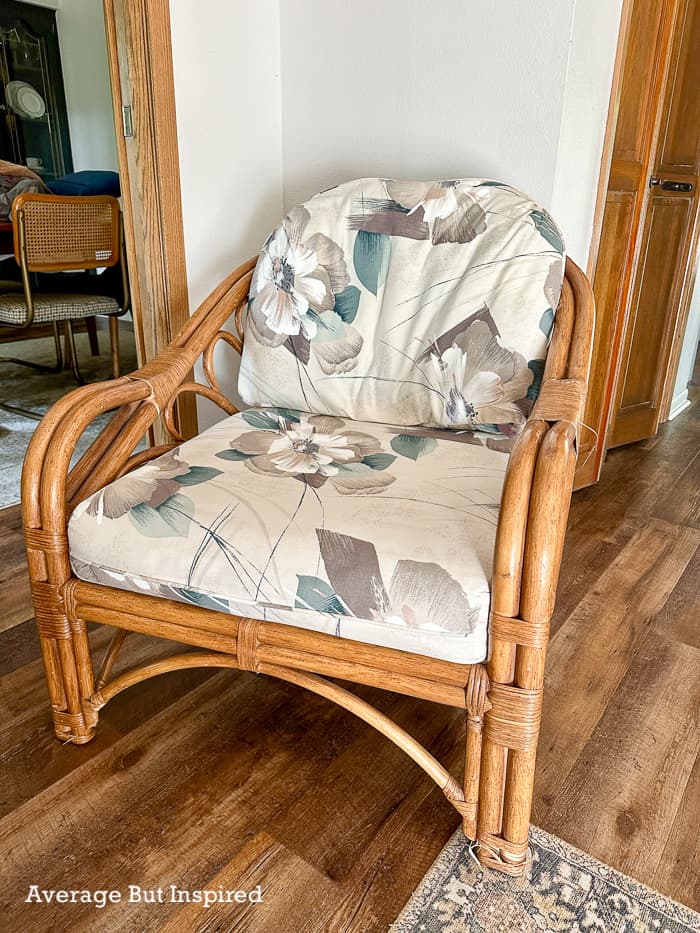
BEFORE: a 1980's style cane chair with floral fabric upholstery was in need of a refresh. Painting the fabric cushions was all it took.

The typical solution would be to reupholster the cushions, but that’s time-consuming, can get expensive, and honestly, I wasn’t sure it was worth it for a thrift store find. So I decided to try something I’d been curious about: painting the fabric directly.

Two years later, I’m so glad I did.

Upholstery Painting Supplies

This post contains affiliate links. Please read my disclosure policy for more information.

  • Chalk paint (in your color of choice)
  • Fabric paint medium
  • Chalk paint brush
  • Extra fine grade sandpaper
  • Spray bottle with water
  • Iron or heat press
  • Mixing cup and stir stick

How to Paint Seat Cushions

Painting fabric upholstery like this is actually pretty easy. I will walk you through each step so you can try it if you like.

Wash the cushion covers

If you can get them off, wash the cushion covers in the washing machine. If they’re not able to be removed, spot clean and vacuum them.

Mix your paint

Combine your chalk paint (any brand works!) with the fabric medium, according to the medium’s instructions.

The fabric medium is the key to this entire project. It keeps the dried paint flexible so it won’t crack or feel stiff when you sit on it.

Fabric painting supplies for painting fabric seat cushions.

Apply your first coat

Spritz the fabric with a light coat of water, and then paint your first coat of paint onto the cushion fabric. Work the paint into the fibers as you go, and don’t worry if it looks a little rough at this stage. That’s normal. Let it dry completely.

Painting fabric seat cushions

Sand lightly

Once the first coat is fully dry, take your extra fine grade sandpaper and lightly sand the surface. This knocks down any stiff or raised fibers, and gives you a much smoother finish on the second coat. Wipe away any dust before moving on.

Repeat the painting, drying, and sanding process

Yep, do it all again (and maybe even again) until you get the paint coverage you want.

First coat of painted upholstery with chalk paint and fabric painting medium.

I stopped at two coats. I liked that some of the large, white flowers peeked through instead of a totally solid color.

Heat-set with an iron

Once everything is dry, heat-set the paint using an iron (or a Cricut heat press like I used). This step helps lock in the paint and makes it much more durable over time.

Use a pressing cloth if needed to protect the surface, and follow the guidance on your fabric medium for temperature settings.

Heat setting painted upholstery helps the fabric paint medium last for a long time.

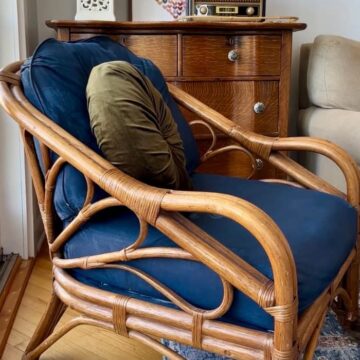
That’s it! The whole process is surprisingly simple, and the results are genuinely impressive. My chair cushions have held up beautifully for two years now with no cracking, no peeling, and they’re still comfortable to sit on.

Painted fabric chair cushions brought new life to a thrifted chair.

If you’ve got a piece of furniture you love the shape of but can’t stand the fabric, this method is absolutely worth trying before you commit to a full reupholster.

A rattan chair got new life with painted cushions and upholstery.

Have you ever painted fabric furniture? I’d love to hear how it turned out in the comments!

Filed Under: DIY, Furniture Tagged With: Painted Furniture

Vintage-Look Green Painted Table for a Cottage Bunk Room

February 20, 2025 by Bre 2 Comments

blank

A hand-me-down table got a new, old look with kelly green paint and distressing.

I love having friends who think of me for their furniture castoffs. I am the designated collector of junk, after all.

Recently my friend, Megan, passed along this little vanity that her daughter no longer used.

BEFORE: a mint green painted vanity table was given to Bre to refinish.
BEFORE: the vanity table was painted with mint green gloss paint.

This post contains affiliate links. Please read my disclosure policy for more information.

While I have no need for a vanity (let’s just say I’m pretty low maintenance), I did have a need for a small desk at the lake cottage.

Although I really don’t want people working there, I know there will be times someone needs to do homework or send an email. So I decided this piece would become the designated work spot.

And while it was cute with its glossy mint green paint, it wasn’t exactly the look I needed. I felt that a distressed painted finish in a vintage kelly green color was the direction we needed to go.

The Vintage Table Makeover

I started by stripping the gloss paint off with this low-odor paint stripper. Within thirty minutes most of the paint on top was bubbled and ready ready to come right off.

Low odor furniture paint stripper worked quickly to soften the paint for removal.

The paint scraped off very easily on the top, but on the legs it was as if the paint stripper had started to freeze!

The mint green paint removed easily from the top of this vanity.

I brought the table inside and wiped it down with mineral spirits to get the remaining paint stripper off, and then I took the table to the garage to sand it.

Check Out More Of My Furniture Makeovers!

Since I wanted a vintage look, I wasn’t concerned about removing all of the paint. I didn’t expect the table legs to look so awful though! They were definitely paint-grade wood and not meant to be stripped and re-stained.

Oops.

This table looked terrible once all of the paint was removed! The paint-grade wood on the legs was in very rough shape.

Oh well. I carried on and found the most perfect shade of vintage kelly green chalk paint at Michaels.

I applied a coat with a round paintbrush and then used my orbital sander with 220-grit sandpaper to remove some of that first coat of paint.

Using an orbital sander to remove some of the kelly green paint on the table helped to give it a distressed or vintage look.

I took off a little too much paint, so I dry brushed on another coat of green. Once I that second coat of paint dried, I applied a thin layer of clear wax to the table to help protect the new paint job.

This wax isn’t my favorite furniture wax, but it’s pretty good. I like to use it when I’m working indoors because it has no odor at all.

This clear wax was used to help seal the painted table.

I then added new hardware to the drawer (it was actually the hardware from a 1927 window in our old home), and blue gingham cardstock to line the drawer.

Blue gingham paper lined the drawers of the newly-refinished vintage green desk.

The Vintage-Look Green Painted Table

This newly-made over desk or table fit perfectly in front of the window in one of the cottage bedrooms.

A lake cottage bedroom with bunk beds and a vintage-look green painted table desk.

The distressing on the finish is just what this piece needed.

This table or desk has a vintage look with kelly green paint in a distressed finish, blue gingham drawer liner, an antique brass window pull as the drawer pull, and overall charm.

And the kelly green reminds me of a color you’d see used in an old cabin. I think it’s so charming!

A small vintage green desk in a cottage bunkroom.

I love how it turned out and I’m thankful it was the perfect size for this cozy cottage bedroom.

This new table was distressed and painted in a vintage green paint to make it look old for this lake cottage.

What do you think of it’s new look? Can it pass for an old table?

Filed Under: Furniture Tagged With: Cottage, Painted Furniture

Primary Sidebar

Let’s Connect!

Hi, I’m Bre! Thanks for visiting Average But Inspired, where I show you how to work with what you’ve got to create a home you love.

Bre of Average But Inspired - a DIY and craft blog

Love DIY? Subscribe to Get Posts E-mailed!

How Can I Help You?

blank

Limewash Stone Fireplace Makeover: Bye Bye Orange Stone Fireplace, Hello Neutral Stone Beauty!

blank

How to Paint a Door to Look Like Wood (It’s Easier Than You Think!)

blank

7 Tips for Hosting a Party on a Budget

blank

How to Paint Over Tile

Looking for Something?

Copyright © 2013-2022, Bre Eggert (Average But Inspired). All rights reserved.
  • Home
  • DIY
  • Crafts
  • Home Decor
  • Privacy Policy and Copyright Policy
  • Disclosures
  • Contact Me