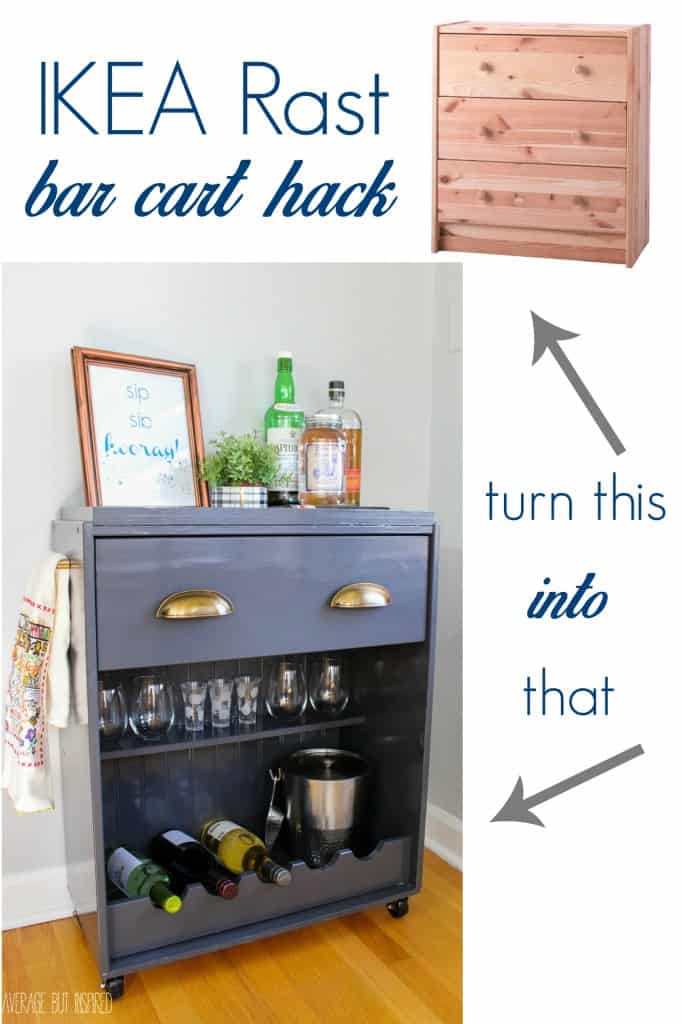
This IKEA bar cart hack will have you saying “sip sip hooray!” OK, sorry, I know that’s cheesy, but I couldn’t help myself! I’m so pumped to show you how to transform an IKEA Rast dresser into a portable bar cart for the home.
A big thanks to both Hickory Hardware and Pittsburgh Paints for providing some of the materials I used on this project!This post contains affiliate links. Please read my disclosure policy for more information.
Why turn the IKEA Rast into a bar cart?
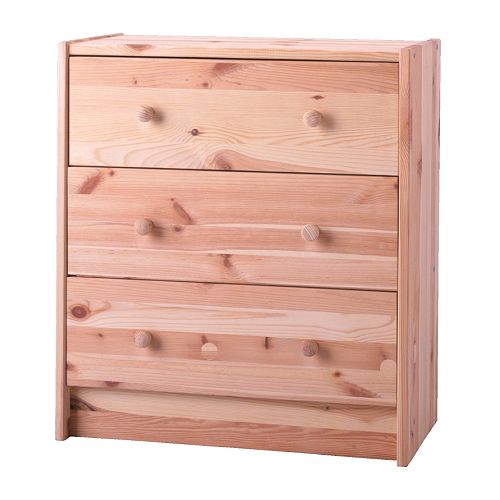
When assembled, the IKEA Rast dresser is extraordinarily basic and very small in scale. Honestly, it’s more like a nightstand than a dresser.
Perhaps because of its small stature, it is priced at only $59.99! (That’s the current price at the time of updating this post in 2026.)
It’s SO plain that it’s the perfect piece to hack into a bar cart with ample storage for everything you need in a bar cart! The drawer is especially handy for storing things, too.
Because of that, I knew I wanted to transform the Rast dresser into a bar cart. Let me show you why and how!
Supplies Needed for This IKEA Bar Cart Hack
With the basic shape of my bar cart in mind, I set aside some supplies I had on hand and also went shopping at my new Menards (which is amazing, by the way), to take my IKEA Rast from Plain Jane to amazing.
Here’s what I used to transform my Rast dresser into a fabulous bar cart:
Step One: Assemble the Majority of the Rast Dresser
So with the help of my three-year-old son and his plastic tools (yes, seriously), I assembled the majority of the dresser, but left off the back particle board, the bottom two drawers, and the bottom lip (that goes under the bottom drawer). I assembled everything else according to IKEA’s directions.
Step Two: Fill Holes
Next, I used wood filler to fill in the preexisting hardware holes in the drawer and along the inside of the dresser (where the bottom two drawers would have been).
Step Three: Create the Wine Bottle Holder
Next, using the jigsaw, my husband helped me cut semi-circles out of the bottom lip of the dresser to create the wine bottle holder! You can see in the photo below that I traced semi-circles where I wanted him to cut.
Once it was all cut, I then put that piece onto the bottom of the dresser, right in its designated spot.
Step Four: Cut the Bar Cart Backboard and Bottom
Next up, my husband cut the beadboard (for the back of the bar cart), and birch plywood (for the bottom of the bar cart), to size for me. (I wish I had the dimensions for you, but I’m sorry that I didn’t write that down!)
He was not thrilled about this and kept lecturing me about how I need to learn to use the power tools. I bought him some beer to calm him down. (UPDATE: Now (2021) I could totally do this myself.)
Step Five: Sand and Prime
Next, I primed everything with a coat of oil-based primer. (Remember, I was using the oil-based trim and door paint that is no longer available. Depending on the paint you choose, you may not need oil-based primer!)
Step Six: Attach the Backboard and the Bar Cart Bottom
Once the primer dried, I nailed the beadboard into place for the back of the bar cart, and screwed the bottom onto the cart.
Step Seven: Create the Bar Cart Top Tray
Then came the worst part. I had to do a lot of measuring (I really do not like math), in order to make a tray-type trim around the top of the bar cart. My husband was cracking up at me trying to “measure twice, cut once” and took this lovely photo of me. (OK, he actually took like 50 because it took a super long time. You don’t need to see all of those.) And even with all the time spent, I still messed up a couple of times. Good thing I had an extra dowel.
And then, I think simply for his own amusement, he had me hand saw the square dowels in the miter box so that I’d get a perfect fit for the tray trim on top. I seriously think I pulled a muscle from all that sawing. But I have to admit that he was right – using the miter box was the way to go. (Another 2021 update: now I would’ve used my Ryobi Miter Saw).
I glued the dowels to the top of the dresser/bar cart with a thin layer of wood glue and clamped (and weighted) them down to make sure they’d really stick. (Can you see the bribery beer in the top right of this picture?)
Step Eight: Drill Holes
After I was convinced my dowels were not going anywhere, I drilled holes for my new hardware in the drawer and on the left and right side of the dresser/bar cart, drilled holes for my casters on the bottom, and got ready to add some color!
Step Nine: Paint the Bar Cart
I gave the dresser/bar cart two coats of Pittsburgh Paint Trim Door and Furniture Paint in Charcoal, and that was it. Because it’s a gel-type consistency with a hard finish, no topcoat was needed! (Again, this paint is no longer available!)
Step Ten: Add the Hardware and Casters to the Bar Cart
After letting it thoroughly dry, I popped in my new hardware from Hickory Hardware and my casters, and rolled my bar cart inside! Isn’t she cute?!?
She’s so perfect for a small at-home bar, too! Wine rests in the bottom scalloped shelf, and glassware fits right in the little shelf above.
The drawer is the perfect spot for storing things like bottle openers, wine stoppers, martini shakers, coasters, etc. And I just LOVE how the gorgeous hardware pops against the charcoal finish of the piece!
The drawer pulls I added to each side are a great place to hang tea towels. They also serve as handles for moving the bar cart around. Double duty!
And the little tray-edging I added around the top is a great way to prevent things from falling off the cart when it’s moving.
I’m so happy with how my IKEA bar cart hack turned out! Can we raise a glass and cheers to that? I really hope you enjoyed this IKEA Rast hack! Now go have a drink. Cheers!
– Bre
Reader Interactions
Comments
Alana Wellssays
Question, do you by chance know the color name and brand of your walls!?
That pale grey is exactly what I’ve been looking for!
Thank you so much, Anika! I am just so glad I had my husband to help me cut that part or it never would have come to fruition! Thanks so much for stopping by. 🙂
Oh wow! Such a cool and creative project! It turned out awesome 🙂 I would have never thought of that. I have these same drawers and I need to update them…the handles look great. I might have to find something similar!
Hi, Megan! Thank you so much!!! The handles are awesome; they are so sturdy! I know Hickory Hardware sells their product at Menards, so if you have one close by it may be worth checking out! Have a great weekend!
Sarahsays
I love what you did! Fantastic idea! I recently used the same paint to give new life to my daughter’s old dresser. We’re pretty happy about the way the dresser looks (love the shiny gray!), we’re overwhelmed with the odor from the areas on it that were painted. It’s been over a week now, and we still can’t put it into her bedroom. I’m just curious if your project also had a horrible odor after you were finished with it. Thanks!
Hi Sarah – that’s awesome that you refinished her dresser! The shine is really beautiful – I agree! So oil based paints — which this type of paint is — always have a strong odor. And yes, my Ikea hack definitely smelled for quite a while. I left it in the garage to air out before bringing it back inside. It probably did take about a week when I think about it. I am sure it will go away soon (hopefully it has already)! At least a trade off is that it’s really durable and gives a great finish!
This is so clever! I love that it’s on wheels so you can move it around. Perfect for entertaining. Btw, I also try to do the whole measure twice, cut once thing and I’m no good at it. I’m more of a measure twice, cut wrong, go buy more wood, fill in the gaps with wood putty kinda girl. 🙂
Hahaha oh gosh, you made me laugh out loud! I mean that is exactly what happened with this project except that I never measure before I buy, so I had too much wood already (I am a chronic over-buyer). So after I totally cut it all wrong and used up my spare wood, it still wasn’t perfect and I filled it with wood putty. That’s just how it goes!! 🙂
I LOVE how this turned out!! Way to make your vision come to life – nice job! I love the bribery beer – fits perfectly for a wine/beverage cart, right?
Jenny – bribery beer works in so many situations! It really is a beautiful thing. 🙂 Thanks so much for helping me brainstorm this project back in August! 🙂
Christinesays
This is amazing, B!! You are so talented and creative!
Thanks, Emily! Well, I think there probably could be some more space for booze, but I suppose there never really is enough space for that, is there? 😉 Thanks so much!
Thank you, Seana! Yes- I think it’s actually too small to serve as a legitimate dresser, but it’s the perfect size for holding some libations! Thanks so much!

Alana Wells says
Question, do you by chance know the color name and brand of your walls!?
That pale grey is exactly what I’ve been looking for!
Anika says
Wow! Such a brilliant creative idea! Love the way you made the bottom for the wine bottles.
Bre says
Thank you so much, Anika! I am just so glad I had my husband to help me cut that part or it never would have come to fruition! Thanks so much for stopping by. 🙂
Megan says
Oh wow! Such a cool and creative project! It turned out awesome 🙂 I would have never thought of that. I have these same drawers and I need to update them…the handles look great. I might have to find something similar!
Bre says
Hi, Megan! Thank you so much!!! The handles are awesome; they are so sturdy! I know Hickory Hardware sells their product at Menards, so if you have one close by it may be worth checking out! Have a great weekend!
Sarah says
I love what you did! Fantastic idea!
I recently used the same paint to give new life to my daughter’s old dresser. We’re pretty happy about the way the dresser looks (love the shiny gray!), we’re overwhelmed with the odor from the areas on it that were painted. It’s been over a week now, and we still can’t put it into her bedroom. I’m just curious if your project also had a horrible odor after you were finished with it.
Thanks!
Bre says
Hi Sarah – that’s awesome that you refinished her dresser! The shine is really beautiful – I agree! So oil based paints — which this type of paint is — always have a strong odor. And yes, my Ikea hack definitely smelled for quite a while. I left it in the garage to air out before bringing it back inside. It probably did take about a week when I think about it. I am sure it will go away soon (hopefully it has already)! At least a trade off is that it’s really durable and gives a great finish!
Amy | Canary Street Crafts says
This is so clever! I love that it’s on wheels so you can move it around. Perfect for entertaining. Btw, I also try to do the whole measure twice, cut once thing and I’m no good at it. I’m more of a measure twice, cut wrong, go buy more wood, fill in the gaps with wood putty kinda girl. 🙂
Bre says
Hahaha oh gosh, you made me laugh out loud! I mean that is exactly what happened with this project except that I never measure before I buy, so I had too much wood already (I am a chronic over-buyer). So after I totally cut it all wrong and used up my spare wood, it still wasn’t perfect and I filled it with wood putty. That’s just how it goes!! 🙂
Jenny @ Refresh Living says
I LOVE how this turned out!! Way to make your vision come to life – nice job! I love the bribery beer – fits perfectly for a wine/beverage cart, right?
Bre says
Jenny – bribery beer works in so many situations! It really is a beautiful thing. 🙂 Thanks so much for helping me brainstorm this project back in August! 🙂
Christine says
This is amazing, B!! You are so talented and creative!
Bre says
Aw, thanks, friend! You are too sweet. 🙂
Katie @ Little House of Four says
Bre, this is incredible! Such a clever idea and I love the dark paint with gold knobs. Great job!
Bre says
Thanks, Katie! I wish I could have you over to share a drink! 🙂
Amy @ StowandTellU says
This is cool in so many ways. The hardware and paint combo is awesome and that’s adorable that your little guy helped with his own set of tools!
Bre says
Amy, thank you so very much! I had fun putting it together with him, even though it took about twice as long. 🙂 Thanks so much for stopping by!!
Emily @ Table & Hearth says
Love this Bre!!! It’s the perfect size, color, and amount of storage! And that sign is super cute 🙂
Bre says
Thanks, Emily! Well, I think there probably could be some more space for booze, but I suppose there never really is enough space for that, is there? 😉 Thanks so much!
Kristi says
BRILLIANT! SO super creative! And love those handles!
Bre says
Thank you, Kristi! Oh I love the handles, too! They are such a gorgeous color and make this piece look so much nicer!
Seana Turner says
This is so clever and classy. I think the casters really make it seem special — many nice touches. And a nice size that could fit into so many spaces.
Bre says
Thank you, Seana! Yes- I think it’s actually too small to serve as a legitimate dresser, but it’s the perfect size for holding some libations! Thanks so much!