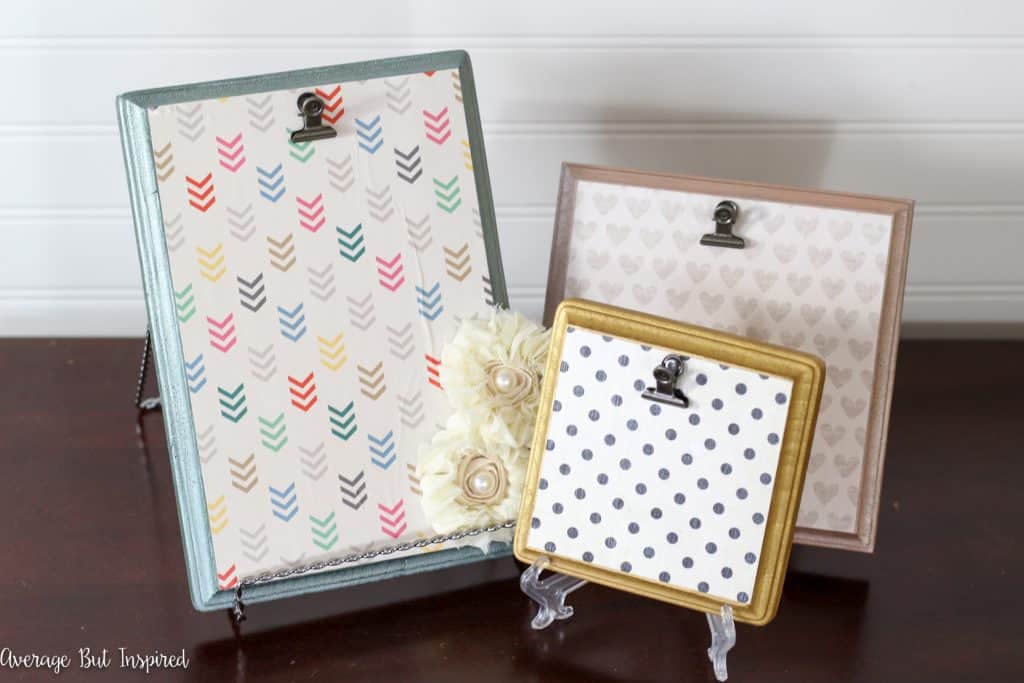
Wood plaques are a craft store staple. They come in a million shapes and sizes, and are pretty darn cheap. I always wondered what to do with them though; they seemed kind of pointless if you ask me. That is until I had an idea to turn them into cute wood plaque picture frames with the help of some adorable patterned scrapbook paper and metallic paint. And here they are as my entry for this month’s Monthly DIY Challenge! 
In case you’re unfamiliar with the Monthly DIY Challenge, each month some of my favorite blogger friends and I get together to create different projects that revolve around a common item or theme. In the past, we’ve used things like wooden crates, cork, and plumbing pieces. This month we all were challenged to use metallic paint. You can check out all of the projects by clicking the links at the bottom of this post, but first, here’s a sneak peek! 
Supplies Needed to Make Wood Plaque Picture Frames
This post contains affiliate links. To read my full disclosure policy, please click here.
- Unfinished wooden plaques in shapes and sizes of your choice
- Patterned scrapbook paper (the thicker the better)
- Metallic craft paint (I used Dazzling Metallics in Dark Patina; Dazzling Metallics in Mink Pearl; and Americana Multi-Surface in Gold)
- Mod Podge in Glossy Finish
- Foam Brush
- Scissors or Paper Cutter
- Small metal clips
- Elmer’s ProBond Glue
- Sawtooth hangers and/or small easels
Directions to Make Wood Plaque Picture Frames
First, sand any rough edges on your wood plaques. Mine had crazy splinters all over the place, so be careful! Once you’ve done that, wipe off any sawdust. 
Next, measure the front surfaces of your wood plaques and cut the scrapbook paper slightly smaller than those dimensions. Using a paper cutter makes this step so easy! If you don’t have one but craft regularly, you need to get one! I have had mine for over ten years and use it all the time!
Then paint the beveled edges of the wood plaques with the paint colors of your choice. I used metallic paint because that was the theme of this month’s challenge, and I LOVE the colors I chose! Metallic paints come in so many more colors than your typical silver and gold. I am totally obsessed with this Mink Pearl color. Anyway, make sure to paint a little bit around the edges of your plaques’ front surfaces so that unfinished surface will not show where your paper is a little smaller. 
After the paint has dried, use a clean foam brush to apply a thin, even layer of ModPodge to the front surface of your plaques. CAREFULLY put the scrapbook paper into place on the plaques. Take care to put the paper down smoothly, and try to avoid getting any wrinkles or bumps in the paper. You want it as smooth as you can get it! If you do get any bumps or wrinkles, try to smooth them very carefully. The thinner your paper the more likely you are to rip it. 
After the bottom layer of ModPodge has dried, apply a thin, even layer of ModPodge to the top of the scrapbook paper.
Once that has dried, use a little of the Elmer’s ProBond glue to attach a metal clip to the top of each plaque. Hot glue will not work for this; you need something sturdier! This ProBond glue is my absolute favorite for bonding different types of objects together. It works fabulously! 
Finally, attach a sawtooth picture hanger to the back of each plaque if you want to hang them on the wall. If you plan to display them on a table, simply pop them onto tabletop easels. 
And that’s it! These are a fast project, but they’re really cute. 
You could make them so festive for holidays with themed scrapbook paper. You could also use them in a different way, such as to hold notes or small printables. 
Thanks for checking out how I used metallic paint on my wood plaque picture frames for this edition of the Monthly DIY Challenge. Now that you’ve seen what I did, I hope you’ll visit my friends’ posts, too! Then make sure to pick up some metallic paint and get to work on your own shiny project!


Colleen Howell says
These are adorable, I will be making some of these for sure. Thanks for the tutorial
Bre says
Thank YOU for leaving me this nice note, Colleen! I am glad you enjoy this project! Have a great rest of your day.
Katie says
Such a cute idea, and so easy! I love how the frames turned out!
Katie
Bre says
Thank you very much, Katie!! 🙂
Amy | Canary Street Crafts says
This is such a cute way to display photos. You’re so creative, Bre!
Bre says
Thanks, Amy! This was a really fun project!! You could make amazing versions of these for your shop! Use chalk paint instead of metallics, and maybe some of those vintage graphics you have, and they would be darling!
Brooke Riley~Re-Fabbed says
These are SO cute!! I love them and will definitely be doing some of my own! Thanks for the inspiration 🙂
Bre says
Aw, thanks so much, Brooke! 🙂
Helen Holley says
I absolutely love this!
So going to do this!
Great post and thanks for sharing,
Helen H
Bre says
Hi, Helen! You are so sweet! Thank you for this nice note. I hope you love your frames once you make them! Enjoy the rest of your day. 🙂
Erica @ Dwell Beautiful says
These are seriously so fun! I had no idea metallic paint came in colors like teal and pink – I just love it! What a fun alternative to regular picture frames 🙂
Bre says
Girl it comes in ALL the colors! It is SO FUN! 🙂
Seana Turner says
I love this project! I’m talking to a group today, and one of the topics is about printing out and displaying the photos you love (instead of letting them get lost in your computer.) This is a simple and fun way to do that. You could even make one with Valentine’s colors and give it as a gift!
Bre says
Hi, Seana! I hope your speech went well! Printing out photos is a kick in the pants I definitely need! 🙂