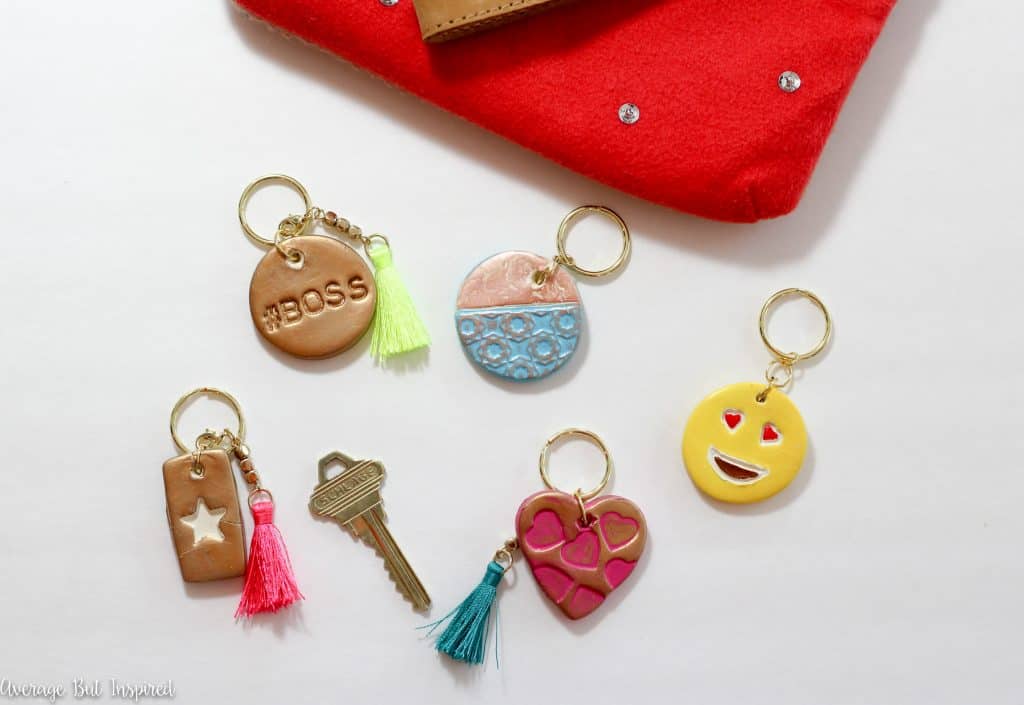
Air dry clay (basically, PlayDoh for grownups), is one of my favorite craft supplies! It’s inexpensive and you can do so much with it! Take these air dry clay keychains, for example. They’re super cute and fun to make!
This post contains affiliate links. Please read my disclosure policy for more information.
Before we get down to the nitty-gritty of this project, let me fill you in on one of my favorite craft supplies!
What Is Air Dry Clay?
Air dry clay is EXACTLY what it says it is- clay that dries when left out in the air! You don’t need a kiln, and you do not bake it in the oven (unless the package tells you to do so). Some air dry clays even warn you NOT to bake in the oven – so pay attention to that!
Traditional air dry clay lets you create the project and let it sit out for several hours to several days to dry fully.
What Is the Best Air Dry Clay Brand?
Coincidentally, some time after I wrote this blog post, I got a job working for a company that sells air dry clay!
I loved that job and learned so much about this craft supply. One major lesson was that there are lots of brands of air dry clay on the market, and some are REALLY bad!
My personal favorite air dry clay brands are Supreme air dry clay (it is inexpensive, dries extremely tough, and comes in great colors like natural, terracotta, and black), and Hearty Clay air dry clay (it is so lightweight – almost like a marshmallow – and has an ultra-white color). I really think these are the best air dry clay brands around!
What Supplies Do You Need to Make Air Dry Clay Keychains?
To make these clay keychains as shown in this post, you’ll need the following supplies:
- Air dry clay
- Clay lettering set
- Small-shaped clay cutters
- Clay texture sheets
- Needle or some other object capable of poking a hole through the clay
- Large jump rings
- Key rings
- Optional: tassels, charms, or other embellishments
- Acrylic paint
- Metallic wax (I used this gold wax and this rose gold wax)
- Small paintbrushes
- Small pliers
- Rolling pin or clay roller kit
How to Make Air Dry Clay Keychains
I did this project with my kids one afternoon, and they were SO excited to be using some of my craft supplies. This would be an awesome project to make with older kids as a camp or scouting activity.
(If you’re interested, another great project to make with kids is these Air Dry Clay Pressed Flower Plaques or Air Dry Clay Garden Markers.)
Step One: Roll Out the Air Dry Clay
So first, I took a chunk of clay and rolled it flat and about 1/4″ thick. Use a rolling pin or a clay roller kit (which is great if you work with clay a lot!).

Step Two: Cut Out Shapes in the Clay
I used the clay shape cutters to cut out several shapes and sizes.

Step Three: Emboss Letters and Textures in the Clay
Next, I had fun using the clay letter embossing tool and the textured pattern pieces to make all different kinds of designs on my shapes.
Step Four: Poke Holes in the Clay
Once I finished embellishing all of my shapes just the way I wanted them, I found a random tool in a drawer and used it to poke holes near the top of each shape. (Any idea what that thing is?)
TIP: when you do this, make sure you poke the holes near the top of the clay, otherwise it will be very hard to fit jump rings through the holes once the clay has dried. Some of mine were a little too far down, and they were unusable as a result. Womp womp.
Step Five: Wait for the Clay to Dry
Next came the hard part. I had to wait just about two days for my creations to dry! That felt like an eternity. For a person who has real issues with patience, this was a test.
Step Six: Paint
Luckily, I survived the two-day clay-hardening period and lived to paint my clay creations with all the different colors of acrylic paint.
Once the paint dried, I applied metallic wax to some of them for some added shimmer and shine!
Step Seven: Add a Jump Ring and Key Ring to the Clay Keychain
Finally, I added a jump ring through the holes in each piece of clay and then attached the key rings to each.
Small pliers will be really helpful to get these pieces on the keychains.
On some of the key rings, I added some cute tassels, too! I kinda love them and want to put tassels on everything.
So easy and so fun. If you can get past the waiting 48 hours for the clay to dry, you’re golden.

I really enjoy using air dry clay, and I think you will, too! If you liked this project, too, I’d love for you to pin it so you can find the directions later!
Kate Cook says
Am going to try these with my kindy class. I’m nervous but optimistic!
Bre says
Hi! SO FUN!!! Don’t be nervous; you’ve got this!
Allie says
Love this no bake I do have some air dry clay that I’ve been playing with, but my question is how do you stop them from breaking. I bough a mold and been play playing with it love the pattern but I fine them still to break. They sit for a few days as I work so they do sit for a few days then boom as I pick them up they break so easy. One is the craolay clay and one is from a Dollar store. Any tips one thos
Bre says
Hi, Allie! OK I hate to say this, but you’re working with the worst possible clays and that’s why you’re experiencing so much breakage. Crayola clay is really bad, and I can’t even imagine what the dollar store is selling. Those products will definitely not dry nicely. You really need a better clay with some more plasticity to keep from breaking. The kind I used in this post is great, and I really like a kind called Hearty Clay (which is a very lightweight clay). I hope that helps!
Paula Amaral says
Did you use varnish of any kind? Or just acrilic paint? Love your work!
Bre says
Hi, Paula – thank you! No varnish used; just the acrylic paint! But, you absolutely could seal with varnish or even ModPodge. :-). Have fun!
Liz says
Hi, you only mention one air dry clay was just wondering what makes the others are as you say brands (implying more than one). Thanks.
Becca says
Hi! My daughter and I are having trouble removing the clay from the wax paper – do we need to do that while it’s wet, or can we wait until dry? We’re currently trying while it’s still wet. Any tips?
Bre says
Hi, Becca! Sometimes if I’m trying to move it while wet, I slide a spatula underneath the clay/between the clay and wax paper, to help lift it off. If it is too unwieldy, I leave it until it’s dry and then it removes pretty easily. Hope your project was fun!
Jeane says
Hi!
Where do you buy your tassels?
Bre says
Hi, Jeane! I got those tassels at Michaels, but they don’t always have them, unfortunately! If you search on Amazon for craft tassels, you will find lots of options! Good luck!
Yoanna Lara says
Hello
Do the key chains easily break?
I made charms and they break.
Bre says
Hi, Yoanna – I didn’t find that they broke easily. Did you use the same type of clay I used in this post? Different types of air dry clay break much easier than others. This kind I used is super strong! Also, the thickness of your project / clay piece can impact how easily they break, too. I’m sorry you had a hard time with your charms!
JoAnn says
Oh question- if I paint them, then can I use a clear spray instead of metalic ? Thanks
Bre says
Hi, JoAnn – yes you absolutely can! Or ModPodge works great as a sealer, too!
JoAnn says
Love them!! I think I will also use a KEY & tell the kids they “hole the KEY to my heart!
Thanks for sharing- some great ideas here.
Bre says
LOVE this idea, JoAnn! 🙂
Samantha says
I made my own air dry clay keychain and sealed it with gloss glaze instead of the metalic wax that you used. I ended up with dents and scratches from my keys.. Did you experience a similar problem?
Bre says
Hi, Samantha! Oh no! I’m sorry that happened! I wonder if it could be the clay? Maybe different types of clay harden differently? Mine have a few minor scratches but nothing too serious. I’m sorry yours aren’t holding up so well! Maybe you could try polymer clay next time…
Emily @ Table & Hearth says
I wouldn’t have guessed these were made out of just air dry clay!! You made them look so cute and high-end!! I could totally see these in Francesca’s 😉
Bre says
OMG, I am obsessed with Francesca’s so that is a huge compliment! Thanks so much, girl!
Bre says
So cute Bre! And such a fun project to do with the kiddos!
Bre says
Thank you, Bre! Just think . . . soon Baby E will be helping you with projects, too! 🙂
Katie @ Little House of Four says
These turned out great, Bre! I love all the fun designs. And how did I not know they made a clay embossing kit? I may have to get one for my kids 🙂
Bre says
Seeing your daughter’s clay talents, you should DEFINITELY get her one of these. She would love it! 🙂
Erica @ Dwell Beautiful says
These are seriously too fun! The #BOSS and the heart eyes one are my faves – so cheeky and adorable!
Bre says
Ha! Thanks, girl. Gotta have some fun with the projects every once in a while!
Nicole B. says
These are so cute!!!! And it sounds like you and your kids had so much fun making them!
Bre says
Someday little man C will be helping you with your projects too, Nicole! It’s great (sometimes). 🙂
Erin says
These are great! I bet they’d go over well as charms on a sweet little bracelet too!
Bre says
Thanks, Erin! Yes – totally! Bracelet, necklace, dog collar – you name it! 🙂
Amy | Canary Street Crafts says
Such a cute idea, Bre! I bet your kids loved helping with this one.
Bre says
Thanks, Amy! Yes – they had an absolute blast. And we have so much clay left over that I am SURE they will think of something else to make with it, too. 🙂