If you ever visit flea markets, you know that old AV carts or projector carts are a common find.
Usually they’re rusty and gross, just like this one I found at the Kane County Flea Market in Illinois. (The amazing flea market that spawned my Flea Market Shopping Tips post.)
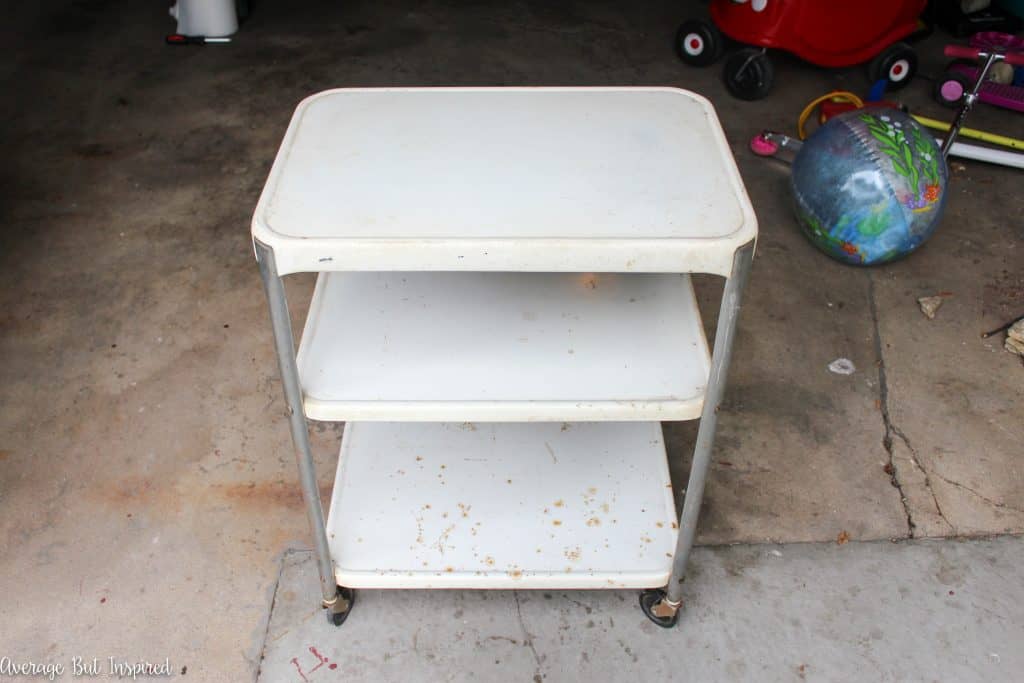
But I knew this junky old metal cart had potential. Unlike my husband (“You went all the way to Kane County to buy that?”), I had a vision. And that’s how this vintage metal cart makeover came about.
Well, and it also came to be thanks to the generosity of HomeRight through its sponsorship of this post.
Alright, well let’s get down to the dirty details of this project, shall we?
Vintage Metal Cart Makeover Supplies
This post contains affiliate links. For more information, please read my disclosure policy.
- Wagner SprayTech large Spray Shelter
- Spray primer
- Spray paint in color of your choice for the shelves (I used this mint color)
- Spray paint of your choice for the legs (I used this color)
- (As an alternative to spray paint in a can, you could use the HomeRight FinishMax Sprayer and paint of your choice.)
- Patterned masking tape or washi tape (I found my patterned masking tape at Target)
How to Make Over an Old Metal Cart
First of all, if you’re working with an old projector cart, you’ll need to clean it really well. Mine was disgusting and I had to wash it about three times.

Once it was clean, I took it apart.
Next, I got to work protecting my garage from the spray paint bonanza that was about to ensue. I laid down a drop cloth and got to work assembling my HomeRight Spray Shelter (which is now the Wagner SprayTech Spray Shelter).

It stores easily in a small bag, and it went together quickly so that I could get to work on making this projector cart pretty!
I started by spraying the shelves and legs with primer. Because I was working with metal (and rusty metal at that), I wanted to make sure that the pretty colors I had chosen wouldn’t chip off!
After the primer dried, I went back inside the tent to check things out. I was SO excited to find that, for the first time in the history of me spray painting anything, my pieces were perfect.
Typically I spray paint outside and something always goes wrong; whether it’s leaves or debris in the air landing on the wet paint, the drop cloth flying up and sticking to the wet paint, or an animal using my project as its bathroom (thanks, birds), something always goes wrong. But not this time – the pieces were pristine because I sprayed them in the Spray Shelter.
Because of that great primer finish, I sprayed the shelves and they looked ah-maaaa-zing!
Next up, the legs. They were really gross and needed a fresh coat of silver, so that’s what they got.
While I waited for the pieces to dry, my kids dreamed of all the ways that THEY could use the HomeRight Spray Shelter. (“Can we camp in it, mommy?” Um, no. Sorry – this mama does NOT camp.)
They were happy when I called them inside the Spray Shelter to help me reassemble the projector cart once it had dried. (Not pictured here: me getting irrationally annoyed with the assembly process.)
After a few failed attempts at putting it back together, I finally got it done and brought the newly beautified projector cart inside, where I embellished the edges with patterned masking tape. (Note: do you see how smooth my finish is? No leaves or debris on this baby!)
And just like that, I gave that vintage projector cart a beautiful new look and a great new purpose as a craft cart for some of my favorite supplies!
Can you believe this is the same vintage metal cart I showed you above?
I am so happy with the perfect finish I got on this vintage projector cart to craft cart because of using the Wagner SprayTech Spray Shelter. I am telling you that it made the biggest difference in my opinion of spray paint projects!
And for small projects that I spray, like lamps and decor accessories, I will be using the Wagner Small Spray Shelter, which you can use right on top of a table! It just pops right open and is ready to use!
Laura says
Love my full size spray shelter and now I HAVE to have the table top one!
Bre says
Laura – it is FABULOUS!!! The easiest thing in the world to open up and put away. It’s definitely a game changer!
SONJA HANSEN says
Great job. I think using the washi tape is so clever. Gives that extra spark without having to sweat the small stuff in painting.
Bre says
Thank you, Sonja! I am also happy with the fun detail it added in practically no time at all! Thanks for stopping by.
Mary Cain says
I have a vintage rocker in dire need of a new look. It’s one of those with slats and spindles that are almost impossible to paint with a brush. A sprayer would make things so much easier! Thanks for the giveaway opportunity.
Bre says
Mary – a sprayer would be the PERFECT thing for your chair! Fingers crossed for you!
Kim says
What a finish. Love the cart and the shelter idea is great. I always have problems with over spray and debris in my paint when painting outdoors. Thanks for the inspiration.
Bre says
Thank you, Kim! The shelter is LIFE CHANGING! 🙂 Seriously. I am actually going to spray paint some chairs that I have waiting in my garage (instead of brush painting them), because this shelter made it so much easier for me! Thanks for stopping by.
Breanna says
Bre, this turned out SO good! I love it! And the added washi tape detail is perfect. Shame on your husband for having no vision 😉
Bre says
Thanks, Bre!! 🙂 Yeah, sometimes I’m not sure if he really has no vision, or if he just enjoys giving me a hard time. It might be a combo of both. 😉
Erica @ Dwell Beautiful says
WHOA. What an amazing transformation!! I love the color you chose and the fun washi tape detail around the edge – this is the perfect craft cart! And I’m always a fan of when spray painting goes right and there aren’t bits of things stuck to it or drips everywhere. Score!
Bre says
HAHA totally! Thanks, Erica! 🙂
Cindy says
Love this transformation! I can see some cabinets in my future!
Bre says
Thanks, Cindy! I appreciate it! Good luck with your cabinet project!
Debi m says
Love your makeover! I have the same cart, this will be my project.
Bre says
Thanks, Debi! Oh, that is awesome!!! Yes – you will love the fresh new look! Good luck 🙂
Kendra @ www.joyinourhome.com says
That is the prettiest cart ever, Bre! Love the color you chose! Also, your kids are soo sweet! xo
Bre says
Thank you so much, Kendra!
Katie @ Little House of Four says
Ahhh, such a fantastic makeover! The combination of mint and silver is perfect and I love how you organized all your craft supplies, especially the craft paint. Such a great “trash to treasure” makeover.
Bre says
Thanks, Katie! I am really happy it turned out as well as it did! I always wanted one of these for some reason I can’t explain!
Kristi says
WOW! SUCH a difference! Love how it turned out Bre!
Bre says
Thank you, Kristi! 🙂
Cassie @ little red window says
Obvious I’d tackle the infamous dresser! 😜
Bre says
YES! You can borrow my shelter!
Stacey Cartwright says
SO CUTE!! You know I love a good bar cart makeover, you did a fnatastic job!
Bre says
Thanks, Stacey!! Yes, your cart makeover is AMAZING!!!
Seana Turner says
Wow – that is “vision”…. I never would have thought that old, rusty metal could be painted like that. I’ve also never heard of the Spray Shelter – it definitely beats getting spray paint all over the grass, which is what usually happens with me when I start painting and the wind picks up and the paint sprays off of my tarp and onto the grass. I figure at least I can trim the grass. Clearly, there is a better option! That could be a homework cart as well:)
Bre says
Seana – aaaah I honestly hated spray painting prior to having this shelter! I always had spray paint everywhere, or stuff flying onto whatever I was painting! If you spray paint regularly, I would definitely recommend getting one of these, or the tabletop shelter for smaller projects. And yes, this cart can be put to many uses, for sure! 🙂