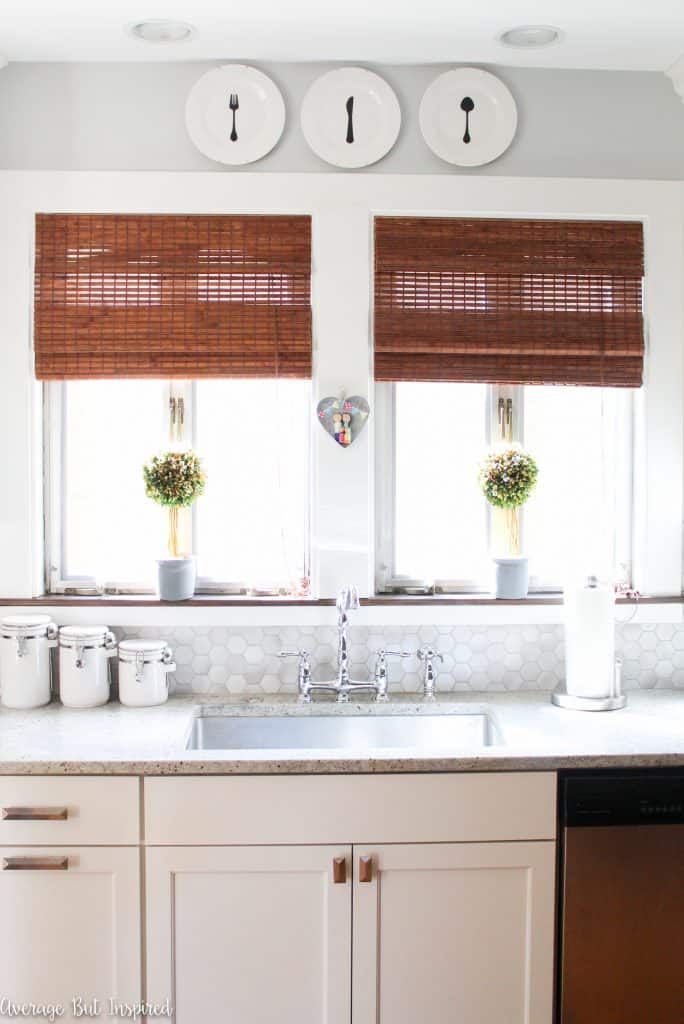
If you have a spot in your kitchen that could use a little something, try making these DIY Decorative Plates! It is so easy to turn plain dollar store plates into adorable wall art for your kitchen.
Supplies Needed to Make DIY Decorative Plates
This post contains affiliate links. To read my full disclosure policy, please click here.
- Plain plates from the dollar store (or hey, if you have champagne taste and a matching budget, you can buy your plates somewhere else)
- Black cardstock
- Silhouette machine or Cricut machine (**If you don’t have a cutting machine, read below to find out how you can replicate this look with a printer, a pencil, and scissors.)
- Mod Podge Dishwasher Safe Waterproof Sealer
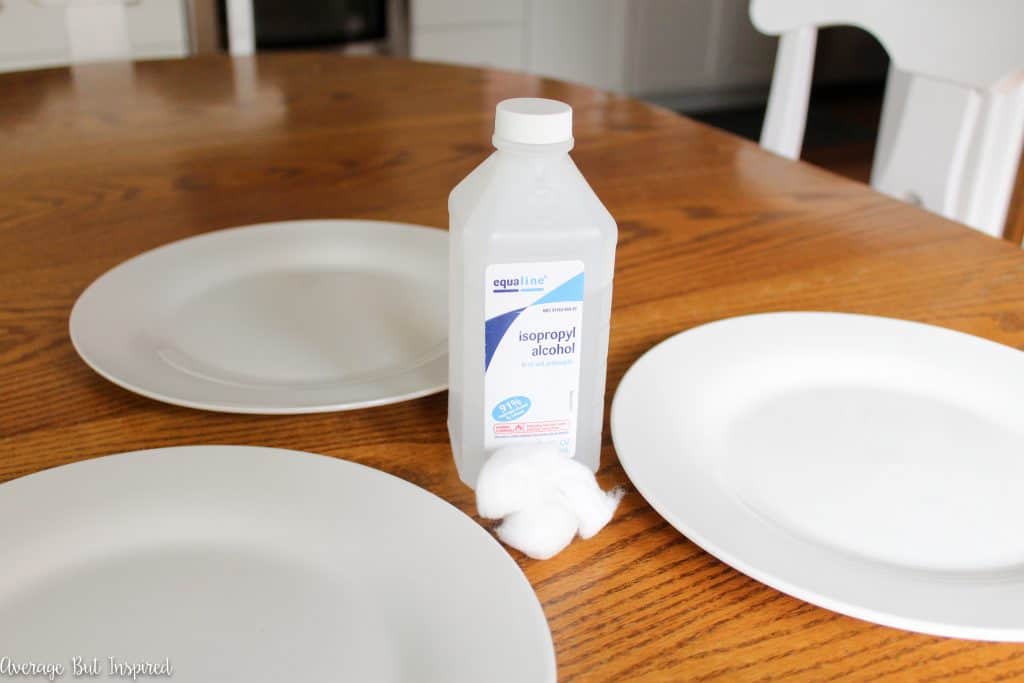
- Rubbing alcohol & cotton balls
- Artist’s paint brush
- Optional: Mod Podge brayer
How to Make Dollar Store DIY Decorative Plates
First, it’s important to prepare the plates for the Mod Podge, so you’ll need to wipe them off with rubbing alcohol.
Next, use the Silhouette machine or Cricut machine to cut out a fork, knife, and spoon onto black cardstock.
If you don’t have a cutting machine, you can still do this project! All you need to do is find utensils clip art on Google, print it out in the size you need for your plates, cut out the shapes and trace them onto the black cardstock, and then cut them out. Easy!
Once your shapes are cut, apply a thin layer of Mod Podge Dishwasher Safe Waterproof Sealer to the middle of each plate. If you’re just going to hang these plates on the wall, you can use a regular variety of Mod Podge instead of the dishwasher safe variety.

Then, apply a thin layer of Mod Podge Dishwasher Safe Waterproof Sealer to the back of each utensil cutout.
Press each cutout firmly into place on each plate. If you have a Mod Podge brayer, that will work perfectly for getting these cutouts flat and bubble free on the plates! (Let me tell you that this tool has absolutely revolutionized my decoupage abilities! I used to get bubbles and wrinkles in most of my projects, and now I hardly get any! I am obsessed with it.)
If you don’t have a brayer, try using a credit card to smooth out any wrinkles or air bubbles.
Once the base layer of Mod Podge Dishwasher Safe Waterproof Sealer has dried, apply a layer to the faces of each of the plates. Repeat per the instructions on the label.
After the plates have dried, you will be ready to display your beautiful DIY decorative plates in your home!
They’re a really simple project that adds a little bit of charm to any kitchen! I used inexpensive plate hangers to hang mine over my sink! (Make sure to buy the right size plate hangers if you take this route!)
The great thing about these plates is that because I used the Mod Podge Dishwasher Safe Waterproof Sealer, I can pop these babies in the dishwasher anytime they get dusty and need a refresh. (Lord knows I would never wash anything by hand unless I absolutely had to.)
If you enjoyed this project, I’d love for you to “pin” this post!
-Bre
Jane says
question – Your plates look great and do not appear to have brush strokes. How did you apply the mod podge? I used a sponge brush and there are sponge brush strokes on the glass that I did.
Bre says
Hi, Jane! Thank you! There actually are some brushstrokes on mine, too, but they probably just don’t really show in the photos. I have read that using soft bristled brushes work best for minimizing brush strokes so maybe that will help for next time? Thank you!
Megan says
Is there a way to make these and be able to eat off of them?
Bre says
Hi, Megan – I’m not sure! I think you could check out the dishwasher safe Mod Podge and see if that means it’s also food safe, but I am not 100% sure about that.
Nicole B. says
This is seriously THE cutest idea to put above a kitchen window! Love it!
Bre says
Thanks, friend!! 🙂 xo
Claire says
Love this idea, the plates make for a great decoration.
Bre says
Thank you, Claire! 🙂
Stacy says
What a great giveaway! I want to make fall decor – modpodge pumpkins especially! I’d also like to use the fabric modpodge along with my Cricut to make freezer paper tshirts for my nephew 🙂
Bre says
Oh, Stacy that sounds like such an awesome project idea!! Isn’t Mod Podge the best? Thanks so much for stopping by and good luck with the giveaway!
Mary Cain says
I like the simplicity of these. So many fun things to do with mod podge, and a great giveaway too!
Robyn Gist says
Would finish up my end tables!
Robyn Gist says
Super cute!
Faye Gates says
I love the plates! Great job! I need to get to work on my powder room.
Amanda says
So cute! I love Dollar Store projects!!!
Cynthia Chilson Finger says
These are so cute, Bre. Thanks for sharing, Cynthia
Bre says
Thank you, Cynthia! 🙂 xo
Robin Kelley says
Very cute and it certainly seems like a very easy project! Thanks for sharing.
Bre says
Hi, Robin – thank you! Yes these are SO easy! I think my 4 year old could make them! 🙂 Appreciate you stopping by.
Erin says
This is going on my craft inspiration board… like beyond Pinterest… the white board in my craft room…as a MUST do! I had used my brayer for stamps, but never thought to use it for decoupage before… Fabulous!
Bre says
Aw, thanks, Erin! I’m so glad you like them!! And yes – trust me the brayer is a game changer. My decoupage has been taken to a whole new level (HAHAHAHA)!
Bre says
Bre these are so simple and amazing! Love!
Bre says
Thanks Breezy! xo
Amy | Canary Street says
These are really pretty, Bre! I love easy, inexpensive DIY wall art.
Bre says
Thank you, Amy! Yes – there is no reason to pay a lot of $$$ for wall art! I agree!
Kendra @ www.joyinourhome.com says
They’re so cute, Bre! They go perfectly above your sink! And by the way, I loved your riddle! 😉
Bre says
Hahaha – thanks, Kendra! I am such a nerd.
Erica @ Dwell Beautiful says
Oh, I love these so much! Love the clean black and white and the utensil theme. Too cute! They go so perfectly in your kitchen 🙂
Bre says
Thanks, Erica! Yeah – these are so simple (not usually my style so much), so I was surprised that I LOVE them! Thanks, friend!
Kristi says
SO creative Bre!!! They look adorable in your kitchen!
Bre says
Thanks, Kristi!