• Skip to primary navigation
  • Skip to main content
  • Skip to primary sidebar
Average But Inspired logo - DIY and craft

Average But Inspired

Craft a home you love. DIY and craft tutorials.

  • About
    • Contact Me
    • Disclosures
    • Privacy Policy and Copyright Policy
  • DIY
    • Furniture
  • Crafts
    • Dollar Store Crafts
    • Seasonal
      • Patriotic & Summer
      • Valentine’s Day
      • Easter & Spring
      • Fall & Halloween
      • Christmas & Winter
  • Home Decor
    • Organization
  • Shop
    • DIY Swag
    • DIY Guides
  • Home

Dollar Tree

DIY Wood Bead Bunny Wreath: A Dollar Tree Spring or Easter Door Hanger

March 17, 2025 by Bre 1 Comment

You can make the cutest DIY wood bead bunny wreath for your spring door decor. Let me show you how!

When wood bead hoops first appeared at Dollar Tree a few years ago, I purchased some without a plan. Typical me – lol.

I stashed them away and finally came up with the PERFECT idea for them: turning them into a DIY wood bead bunny wreath!
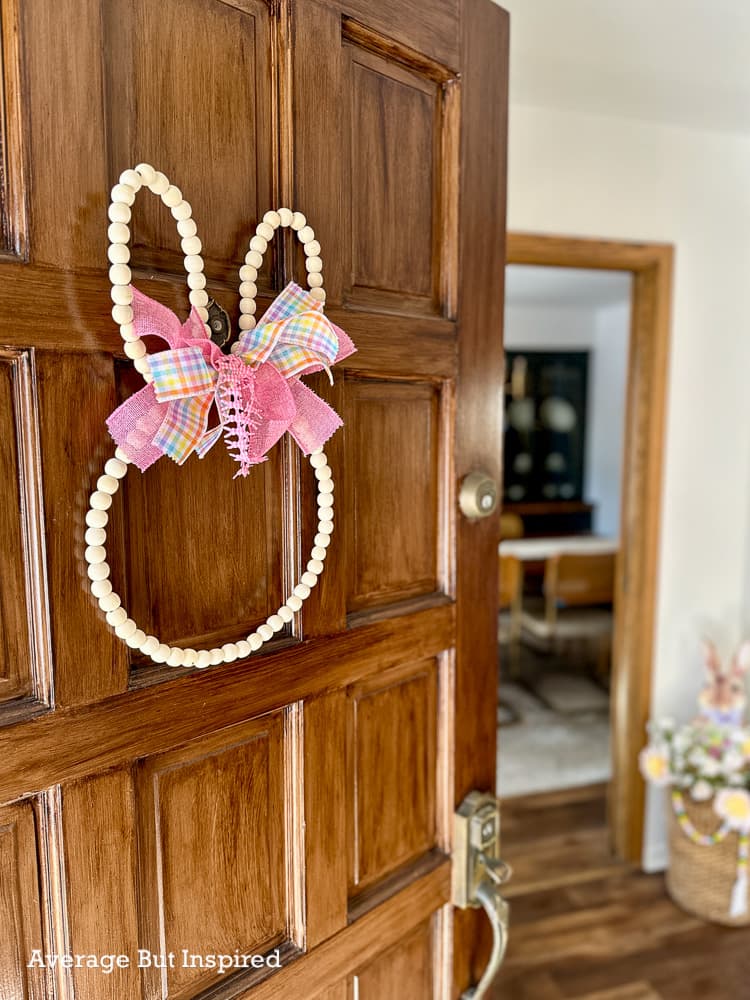
Make a DIY wood bead bunny wreath with Dollar Tree craft supplies! This is a great wood bead wreath idea for Easter or spring.

This simple spring door decor is perfect to leave up all the way through Easter! And, it’s a really quick project that’s easy on the wallet, too.

Here’s how you can make your own charming Easter bunny wreath.

DIY Wood Bunny Wreath Supplies

This post contains affiliate links. Please read my disclosure policy for more information.

  • Wood bead wreaths (x2)
  • Wire
  • Wired ribbon
  • Needle nose pliers

How to Make a Wooden Bead Bunny Door Hanger

You’re going to love how easy this Dollar Tree spring craft is!

Start by using the needle nose pliers to take apart one of the wooden bead wreaths.

With that beaded wreath separated, fold it in half, and then bend both ends in toward the center of the beaded strand. This is how you make the bunny ears.

Dollar Tree wood bead wreaths can be turned into the cutest spring door decor. Bend one of the wreaths into the shape of ears.

Use the needle nose pliers to bend the end wire pieces outward. Then fasten those ends to the wood bead wreath that’s still together.

Use wood bead wreaths or wood bead hoops to make a beautiful DIY easter bunny wreath for spring.

Cut a piece of floral wire and wrap it around the center of the ears to attach the ears to the wreath in that center point.

Check Out My Other Spring Door Decor Ideas!

DIY Mossy Basket Wreath

Spring Carrot Door Hanger

DIY Egg Tray Wreath

You can also make a loop with the ends of the wire so that you can hang the bunny wreath when it’s complete.

Use floral wire to attach the wood bead hoops together to create an Easter bunny wreath.

Now, make as simple or as elaborate of a bow as you like!

I cut six pieces of wired ribbon and stacked them on top of one another. Then I twisted floral wire around the center of that stack and cut the ends to make a bow without loops.

Dollar Treewired ribbon makes the cutest bow for this DIY spring wreath.

Once the bow was complete, I wired it onto the wood bead bunny.

Make a DIY wood bead bunny wreath or door hanger for Easter or spring. This is a cute Dollar Tree spring craft.

Super simple but super cute! I love it when I find a reason to use supplies I’ve been hoarding for so long.

Like this bunny wreath idea? I’d love for you to “pin it”!

Use Dollar Tree wood bead wreath hoops to make this adorable DIY Easter wreath or DIY spring door hanger! This post shows you how to make this spring craft for adults.

Filed Under: Dollar Tree, Easter Tagged With: Dollar Tree, Easter, Spring, Wreath

Dollar Tree Flocked Bunnies: The Cutest 2025 Easter Decorations

March 11, 2025 by Bre 5 Comments

blank

If you’re looking for budget-friendly Easter decoration ideas, here’s a cute way to use the Dollar Tree Plus flocked bunnies this spring.

This post contains affiliate links. For more information, please read my disclosure policy.

I went into Dollar Tree to buy birthday cards and I walked out with three flocked bunnies.

Not on the shopping list! 🙂

But these mossy-look bunnies in the Dollar Tree Plus section were so cute that I had to have them.

Dollar Tree flocked bunnies are the perfect addition to your Easter tablescape or spring centerpiece. Read this post to see how this blogger used them in her spring decorating.

They come in three poses and measure 10 inches high, so they’re a perfect size for Easter tablescapes, spring centerpieces, Easter crafts, and just general spring decorating!

And at $3 each, the price is right.

You know I couldn’t leave them as-is, right?

I cut off their tags and raffia bows. Then I cut strips of floral fabric and attached those to the bunnies as prettier ribbons.

Dollar Tree flocked bunnies are one of the cutest Dollar Tree Easter decorations in 2025. Give them a makeover and use them in your spring decor.

I also used Dollar Tree pearls in the center of each bow, which I fastened with straight pins.

Dollar Tree Plus flocked bunnies are so cute on an Easter tablescape. This spring centerpiece with moss bunnies is also filled with thrifted items to make beautiful Easter table decor.

I used the flocked bunnies on my dining room table as part of a larger Easter tablescape.

This dining room Easter display is filled with thrifted finds like a wood tool caddy centerpiece that has brass flower candlestick holders, and green flocked bunnies.

Check Out Some Other Dollar Tree Easter Crafts & Spring Decor Ideas

Egg Tray Wreath

DIY Bunny Planters

The wood tool tote was a thrift store find that I filled with my Grandma’s brass flower candlestick holders, moss, and faux eggs.

A thrifted wood toolbox or tool caddy gets new life as a table centerpiece for spring. Filled with moss, artificial eggs, brass candlestick holders, and a gingham ribbon, it's an adorable thrifted tablescape.

I also used some of my dishes, woven placemats, and baskets to add height and texture to this spring centerpiece.

The Dollar Tree bunnies are the perfect addition. Will you be hunting for them?

Filed Under: Dollar Tree, Easter Tagged With: Dollar Tree, Easter, Spring

Dollar Tree Stackable Presents: Transform Them Into Beautiful Christmas Decor

November 11, 2024 by Bre 6 Comments

blank

Get your hands on the Dollar Tree stackable presents and give them a makeover! Here’s how to transform these stacked gifts into beautiful Christmas decor.

Last year I transformed the viral Dollar Tree stacked pumpkins into a pretty pumpkin topiary. It was one of my most popular crafts in 2023 and again this fall!

So, I was REALLY pumped to find that Dollar Tree introduced a whole new line of stackable holiday decor this year: a stackable snowman, stacking Christmas tree, and stacked presents.

All are priced at $5, and the stacked snowman and stackable presents are my favorites! (I have seen some cute ideas for using the Christmas trees as kids toys / in kids’ activities, though.).

Dollar Tree's stacking presents decor can be given a beautiful makeover for Christmas decor!

I was lucky enough to find two sets of the stacking presents, and of course I had to give them a makeover!

I ran into some snags along the way, so you’ll want to read about that if you’re also looking to transform this Dollar Tree Christmas decor for yourself!

Dollar Tree Stackable Presents Makeover Supplies

This post contains affiliate links. Please read my disclosure policy for more information.

  • Stacked presents decor (note: while these are “Plus” items, priced at $5, they weren’t located in the Plus aisle of my store! So, look all around any Dollar Tree you visit because they could be anywhere! As of publication they’re not available online)
  • Dollar Tree tag ornament
  • Rustoleum Universal Metallic Spray Paint in Pure Gold
  • Plaid wired ribbon, 1.5″ wide
  • Glue Dots permanent dots
  • Cricut Joy machine and white permanent vinyl OR white dot stickers and white Christmas tree stickers
  • Scissors

Stacked Presents Makeover: How To

Just like last year’s stacked pumpkins, the stacked presents are totally plastic. They’re a little cheap-looking, to be honest.

The red paint on the “ribbon” portion of the gifts was sort of chipped or missing, and the colors of the present boxes were kind of “meh” in my opinion.

These Dollar Tree stacked presents are begging for a makeover! See how they turn into gorgeous Christmas decorations.

Spray Paint the Present Boxes

Because of that, I decided to paint them. I wanted to have each gift box be a different color: one gold, one green, and one off-white.

But . . . I quickly found out that my favorite spray paint, Rustoleum 2X (which works on plastic), absolutely did not work on these plastic stacking presents!

The green and off-white presents immediately looked AWFUL. The paint didn’t stick to them at all!

Rustoleum 2x spray paint did not work to cover the Dollar Tree stacked presents.

The present box I spray painted gold with a different spray paint, Rustoleum Universal Metallic Spray Paint , worked much better!

Rustoleum Universal Metallic was the spray paint that worked for painting the stacked presents.

A couple of days later, I tried to spray over the green and off-white presents with the gold spray paint, but the paint immediately bubbled and cracked. It was not working!

So, I opened up the other set of stacking presents and sprayed two boxes from that set with the gold spray paint. (Note: the “bow” on top of the gift stack is removable, so I took that off for painting.)

Rustoleum Universal in Pure Gold is the spray paint that successfully covered the Dollar Tree stacked presents.

Two coats of paint was all it took for good coverage. Unfortunately the spray paint did run in places. It’s almost like the metallic flakes in it settled strangely in spots. BUT, I was able to cover those problems for the most part! (See more below!)

Attach Ribbon to the Stacked Presents

For the next part of the project, I attached real ribbon to the present boxes. I started with the bottom gift box and cut 1.5″ wide wired ribbon to the length needed to cover each section of plastic ribbon on the box.

I pressed Glue Dots permanent dots to the “ribbon” on the box, and then pressed the real ribbon onto that. I used Glue Dots instead of hot glue because hot glue and plastic don’t always play well together.

Glue Dots were used to hold the ribbon on the presents.

You could try a different type of glue, but it might be hard to hold the ribbon in place while the glue sets up or hardens. The Glue Dots gave an instant hold, which I liked for this project.

Once I had the base present finished, I attached ribbon to the other two present boxes. For the top box, I cut two very long pieces of ribbon and wrapped those over the top of the gift box.

Plaid ribbon pressed onto the face of the stacked presents adds a festive touch.

Then I made a bow out of the same ribbon and hot glued that to the overlapping ribbon on that top box.

A real bow takes the place of the plastic bow on the Dollar Tree stackable presents.

Hang a Gift Tag From the Box

Next, I hung a Dollar Tree ornament that looks like a gift tag from the bow on the top of the box.

It’s the perfect size for this present stack decoration!

I Think You’ll Love This Other Dollar Tree Christmas Craft, Too!

Dollar Tree DIY Candy Cane Wreath

Add Details with Vinyl or Stickers

Because I wanted my stacked presents to be multiple colors, I didn’t love the solid gold look of my project.

So, I cut permanent vinyl with my Cricut Joy into dots and Christmas Trees. Then I stuck that onto the bottom gift box and the middle gift box to help them look like patterned wrapping paper.

Adding vinyl cutouts to the stacked presents helps them look like they are wrapped in gift wrap.

I did not use transfer tape as I was worried that would rip off the spray paint from the presents. So, I just eyeballed the placement of each vinyl cutout and applied them like stickers.

Using these vinyl shapes was also a great way to hide the spray paint imperfections on these painted gift boxes!

DIY Stacked Presents Decoration

All in all, I’m pretty happy with how this stacked present decoration turned out. It’s definitely not perfect, but it’s not horrible either.

I originally thought I would use this outside, but it’s pretty lightweight and I’m worried it might blow away. So, it will stay inside. 🙂

The Dollar Tree stacked presents got a beautiful new look for Christmas! This stackable presents decor makeover is a must see.

Have you found these adorable stacked presents in your Dollar Tree store? How do you plan to decorate them?

Filed Under: Christmas, Dollar Tree

Picture Frame Flower Box: a Mother’s Day Gift DIY

April 26, 2024 by Bre 5 Comments

Make a DIY Picture Frame Flower Box out of Dollar Tree picture frames! This is an awesome Mother's Day gift DIY idea!

Looking for a sweet and sentimental Mother’s Day gift DIY project? Try this easy DIY picture frame flower box!

This DIY picture frame flower box craft is SO cute! And because it’s a bit sentimental, I think it’s a great DIY Mother’s Day gift.

But . . . it’s definitely NOT limited to Mother’s Day.

You could make this for anyone at any time. 🙂

Now that we have that disclaimer out of the way, let me fill you in on how you can make this adorable picture frame vase. Best part? The supplies are SO inexpensive! They’re all from Dollar Tree!

Use Dollar Tree wood bead picture frames or other 4x4 picture frames to create a DIY flower box. This picture frame vase is a wonderful Mother's Day gift DIY project!

Supplies Needed to Make a Picture Frame Flower Box

This post contains affiliate links. Please read my full disclosure policy or more information.

  • Four, 4×4 picture frames (unfortunately Dollar Tree no longer appears to sell the frames I used for this project)
  • Wood box
  • Vase
  • Hot glue gun
  • Lazy Susan (optional but amazing)
  • Pictures
  • Flowers

How to Make a DIY Picture Frame Flower Box as a Mother’s Day DIY Gift

Start by removing the stand or flap on the back of each frame.

Remove the flaps from Dollar Tree frames to create a picture frame flower box craft.

Then, hot glue one of the frames to the front of the wood box. If you buy the same box I used, they come in a set of three (like nesting boxes), and you’ll use the largest of the three boxes.

Glue picture frames to a wood box to create a photo frame flower box.

Next, glue a frame to the outside edge of that first frame. This second frame will not touch the wood box (if you’re using the same box I did). None of the other frames will touch that box – just the first frame!

Glue wood bead picture frames from Dollar Tree to create a sentimental Mother's Day gift DIY.

Continue gluing the frames together until you’ve formed a cube.

Create a photo cube with four Dollar Tree picture frames.

Love Dollar Tree Crafts? I Bet You’ll Also Like These Dollar Tree Projects!

  • DIY Decorative Plates Decor
  • DIY Vase Fillers
  • DIY Bud Vases

Now you can insert some special photos, and then – if you’re extra – glue a lazy susan or turntable to the bottom so that it can spin. Mom will love turning her photo cube planter to see the special photos!

Want to see it spin? Check it out in this Instagram Reel!

Finally, place the vase into the wood box.

Fill it with flowers and present this as a beautiful and sentimental Mother’s Day gift!

Use Dollar Tree picture frames to create this Mother's Day gift DIY! It's a beautiful picture frame flower box vase that mom will love.

I also think photo flower boxes like this could be beautiful centerpieces at things like bridal showers, weddings, milestone birthday parties, and more!

Filed Under: Crafts, Dollar Tree Tagged With: Dollar Tree

Dollar Store DIY Pumpkin Topiary

September 11, 2023 by Bre 6 Comments

blank

Get ready for the autumn season with a beautiful DIY stacked pumpkin topiary.

A piece of fall decor that I’ve always admired is a pumpkin topiary. I love the way stacked pumpkins look when added to a pretty planter on a front porch, or when displayed on a cozy fireplace hearth.

On a recent trip to Dollar Tree I spotted a set of plastic stacking pumpkins in the “Plus” section, and I knew I had to have them! My dreams of a pretty pumpkin topiary were within reach!

Dollar Tree Plus plastic stacking pumpkins

(Sidenote: do you have Dollar Tree Plus in your store yet? In mine it’s essentially one aisle of higher-priced items (in the $3-$5 range). They seem to have a lot of seasonal decor, home organization, and crafting items in the “Plus” section. It’s also online.)

These faux pumpkins were quite plastic-looking and not realistic at all (hello, candy corn colors!). But, for $5 I decided to see what I could do to make it work. Let me show you!

BEFORE: a stacked pumpkin topiary looked very fake.

Supplies Used to Make a DIY Pumpkin Topiary

This post contains affiliate links. Please read my disclosure policy for more information.

Here are the materials I used to create the DIY stacked pumpkin topiary as shown in this post. Feel free to substitute items to make this project your own!

  • Stacking pumpkins (from Dollar Tree)
  • Terracotta spray paint
  • Brown acrylic paint and paint brush
  • Faux leaves
  • Faux sunflowers
  • High-temperature hot glue gun and hot glue

How to Make Stacked Pumpkin Topiaries for Indoors or Outdoors

This project came together so quickly that I was able to make it in between soccer games one Saturday. How great is that? Practically instant fall decor!

Step One: Spray Paint the Pumpkins

As I mentioned, these Dollar Tree Plus plastic pumpkins are quite fake-looking. To combat that and give them a more natural look, I spray painted them in a traditional fall color: orange.

I used flat spray paint in a terracotta shade, that was suitable for indoor or outdoor use. Make sure to choose a spray paint that works outdoors if you plan to display your topiary outside!

Terracotta spray paint on plastic pumpkins

Two coats of paint later and the candy corn color scheme was gone. Yay!

Step Two: Add Detail with Brown Paint

As with anything spray painted a solid color, the pumpkins looked a little flat in their solid terracotta color.

To help fix that, I decided to add some detailing using brown craft paint. I used a pared down version of the technique I shared for how to make fake pumpkins look real, and this went a long way to improving the appearance of these plastic pumpkins.

I also painted the stem brown, as it had gotten a heavy coat of terracotta spray paint in step one.

Add detail to plastic pumpkins with brown craft paint

Step Three: Embellish the Pumpkins with Fall Decorations Like Fall Leaves and Faux Flowers

These particular pumpkins fit together nicely and did not require any modifications for stacking. So, the only thing left to do was dress them up a bit and make them even more cute.

I cut apart stems of fake fall leaves (in cream shades) and fake flowers (cream sunflowers), and used extraordinarily hot hot glue to fasten them to the stacked pumpkin topiary.

Glue fall leaves and fall flowers to plastic pumpkins to create a pretty pumpkin topiary

If you don’t have a hot glue gun that gets to a VERY high temperature, I recommend using a glue like E6000 to fasten your fall embellishments, because regular hot glue will not work well for attaching anything to the plastic pumpkins.

Step Four (Optional): Add Weight Inside the Bottom Pumpkin

This pumpkin topiary is pretty lightweight, so if you plan to display it outside, you should add rocks or something heavy inside the bottom pumpkin. This will keep it from blowing away.

***

That’s where I finished my DIY pumpkin topiary project, and I love how it turned out! Some other things I’d like to add to it eventually are grapevine and perhaps some twinkling fairy lights. Wouldn’t those look beautiful on it, too?

I plan to put this on my front porch once I get my fall decorating underway out there. Where would you display a stacked pumpkin topiary?

Make a beautiful fall decoration with this DIY pumpkin topiary project. Stacked pumpkins from Dollar Tree look beautiful on a fall front porch or on a fall fireplace.

Filed Under: Dollar Tree, Fall and Halloween

DIY Wood Block Craft: Create Your Own Picture Holder

June 7, 2023 by Bre 2 Comments

blank

Unfinished wood blocks are full of craft potential! Learn how to make a picture holder or picture frame with this wood block craft project.

Whether you buy unfinished wooden blocks at the craft store, Dollar Tree, or make your own cubes with scrap wood, you can create this simple project!

Turning wood blocks into personalized photo holders or printable holders is not only fun, but it’s also so easy to do.

In this tutorial I will show you how to make your own version of this simple wood block craft, which is a great project to do with the kids or to use as a handmade gift idea.

Grab a craft wood cube or unfinished wood block at Dollar Tree (or make your own!), and create a custom wood block photo holder! This is an easy wood block craft idea that can be customized any way you like!

DIY Wood Block Photo Holder Supplies List

These are the basic supplies I used to create the wood block picture holder shown in this post. Some of the links are affiliate links, and you can read my disclosure policy for more information on that.

  • Unfinished wood block (I purchased this craft wood cube at Dollar Tree. Craft stores also sell wooden blocks, and you can make your own with scrap wood, too.)
  • Hand saw and miter box (you could also use power tools, like a miter saw, if you’re so inclined)
  • Ruler and pencil
  • Acrylic craft paint, water, and a paintbrush
  • Scrapbook paper
  • Mod Podge and a paintbrush

There are so many ways to personalize this project to suit your style! Other supplies you could use include rubber stamps, stickers, rub on transfers, vinyl, ribbon, napkins or tissue paper (for decoupage), 3D embellishments, and more.

How to Make a Wood Cube Picture Holder

Although this is one of the easiest projects you’ll ever do, step by step instructions may help! So, here we go!

First, draw a straight line across the top of the wood block. This is where you’ll create the slot for the picture or printable to go. I drew the line about 2/3 of the way back, but you could really place it wherever you like.

To make a wood block photo holder, draw a line at the top of the block before sawing into the cube.

Next, fasten the block into a miter box and saw along the line you drew. Don’t saw too deep – you need just enough of a slit that the picture can stand upright in the block, but you don’t want it so deep that the picture rests too far into the block (obstructing the picture’s visibility).

Use a hand saw and miter box to cut a slit in a wood cube to make it a photo holder.

With that slit in place, it’s time to customize the photo holder! As I mentioned before, you can do this part however you like!

A shallow slit cut into a craft wood cube will serve as a picture holder.

I created a faux stain by watering down craft paint and brushing that over the entire cube.

Once the whole thing was painted, I cut scraps of floral paper into little pieces. I then put a thin layer of Mod Podge on the back of that paper and pressed it onto the wood block.

Use Mod Podge to attach scrapbook paper to the wood block.

Looking for Other DIY Picture Frame Ideas?

  • $1 Picture Frame Upgrade
  • DIY Wood Plaque Photo Frames
  • DIY Boutique-Style Frame

After about twenty minutes, I covered the top of the paper with another thin layer of Mod Podge. This seals that paper in place and helps make sure it won’t come off!

Decoupage scrap paper onto a wood cube to make this pretty picture holder.

And with that, my adorable wood block photo holder was complete.

It looks great with a regular photo in it . . .

Learn how to make a DIY wood cube picture holder in this post.

and even holding a free printable for my Fourth of July decor! (It’s a vintage sheet music cover printable. I have a set of six available in that linked blog post if you want them!)

A DIY picture holder or printable holder made from a craft wood block is an easy craft project idea!

Now, after I made this, I realized these would also be great for wedding table numbers, place card holders, and they would even make great centerpieces with a dinner menu propped inside. So, you’re not limited to photo holder wood block crafts by any stretch of the imagination!

I hope you enjoyed this creative wood block craft idea. Please let me know in the comments what you think and if you have any questions!

Filed Under: Crafts, Dollar Tree

  • Page 1
  • Page 2
  • Page 3
  • Interim pages omitted …
  • Page 8
  • Go to Next Page »

Primary Sidebar

Let’s Connect!

Hi, I’m Bre! Thanks for visiting Average But Inspired, where I show you how to work with what you’ve got to create a home you love.

Bre of Average But Inspired - a DIY and craft blog

Love DIY? Subscribe to Get Posts E-mailed!

How Can I Help You?

blank

How to Create a Faux Antique Brass Finish with Paint

blank

My DIY Kitchen Makeover Reveal!

blank

Limewash Stone Fireplace Makeover: Bye Bye Orange Stone Fireplace, Hello Neutral Stone Beauty!

blank

How to Paint a Countertop to Look Like Marble!

Looking for Something?

Copyright © 2013-2022, Bre Eggert (Average But Inspired). All rights reserved.
  • Home
  • DIY
  • Crafts
  • Home Decor
  • Privacy Policy and Copyright Policy
  • Disclosures
  • Contact Me