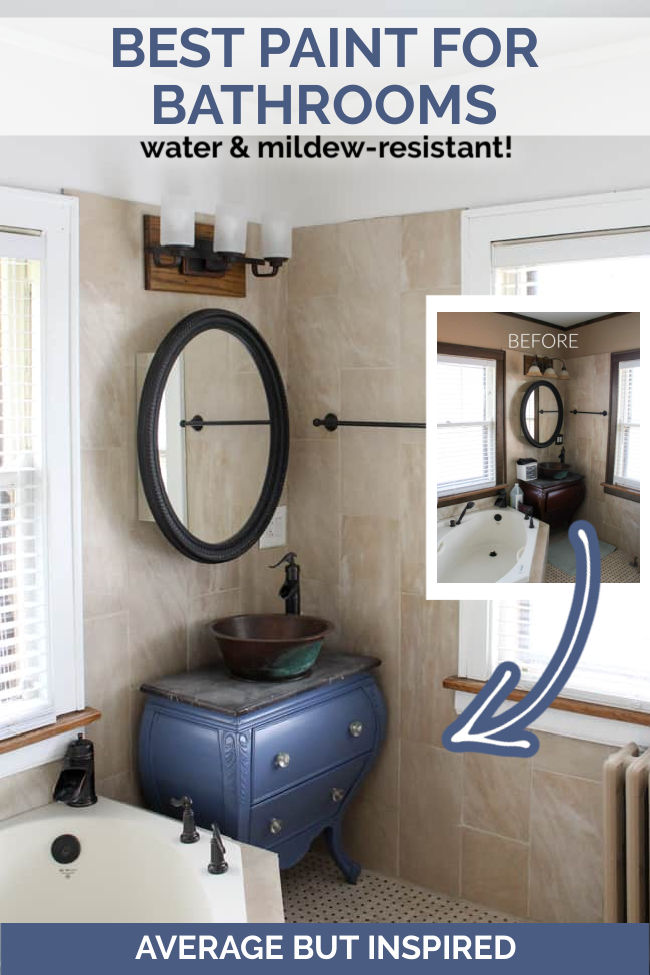
Holy moly, you guys! We’re into Week Four of the One Room Challenge already! If you’ve been following along with my master bathroom makeover over the past several weeks – thank you! And if you’ve just made your way here for the first time – welcome! This week I’m sharing how I went from dark trim and walls to light and airy with mildew resistant paint that’s PERFECT for a bathroom!
I can’t wait to fill you in on how I’m kicking my bathroom’s mold and mildew problem to the curb with paint that’s formulated to resist that grossness.
But first, let me quickly recap what I’ve accomplished so far, and what I still have left to do for this master bathroom makeover.
Bathroom Makeover Progress So Far
- Week One: I shared all of the “before” photos and the master bathroom makeover plans, including the color scheme and breakdown of work.
- Week Two: I patched drywall, scraped the ceiling, and cleaned mold and mildew from the shower ceiling. Eeew.
- Week Three: I painted the bathroom vanity, shined the copper sink, and spiffed up the countertop.
Painting the Bathroom Walls and Trim
Now that you’ve seen what I’ve done so far, let me tell you that this week I worked myself to exhaustion – no joke! By Sunday evening I was absolutely D.O.N.E and was actually crying over this bathroom.
Trying to do all of this work by myself while working and running my household is getting to me! But I feel like I’m over the hump now (famous last words), and with two weeks left to go I’m trying to give myself a pep talk to finish strong.
Anyway, my HUGE progress this week was priming and repainting the bathroom walls, molding, and windows. If you’ve ever taken a room from dark to super light, you know just how much work goes into it!
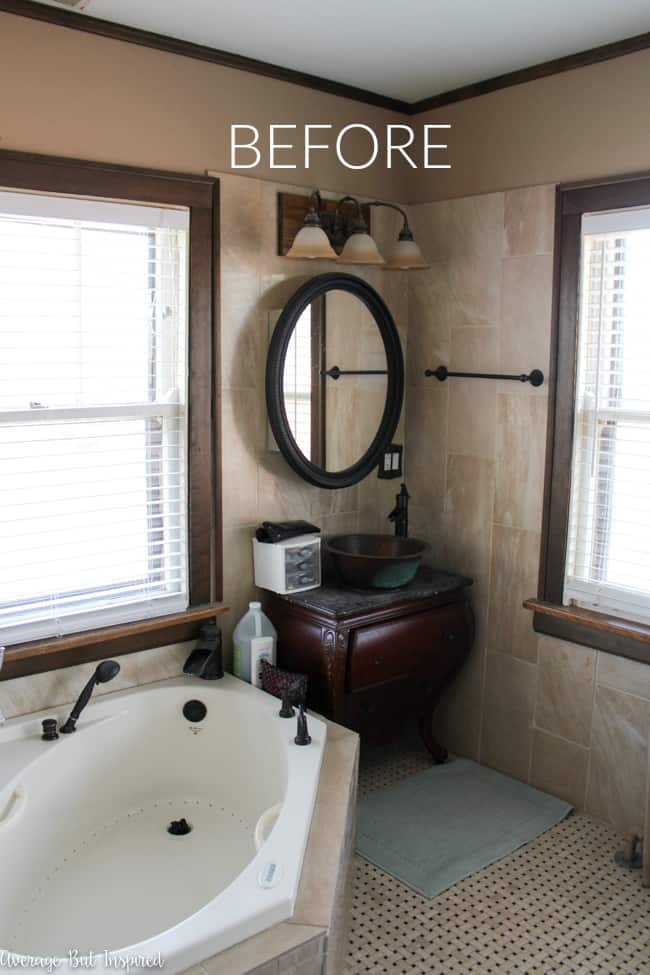
Before I show you the incredible difference a paint job made in this bathroom, let me remind you of what the paint, trim, and molding looked like when I started this challenge.
Thank you to Sherwin-Williams for providing the paint used in this project. The opinions in this post are entirely my own.
And here’s what it looks like now!

It’s like a night and day difference (get it – dark to light? So funny!)!
Painting the Bathroom with Sherwin-Williams Mildew Resistant Paint
Not only does the fresh paint look good, but it’s going to actually function well in this bathroom.
Do you remember how I disclosed the mildew problem we were having in this bathroom (if not, check it out in Week One’s post)? The poor ventilation was leading to a cracking ceiling and mildew on the ceiling and walls. So gross.
Because of that I did some research on how to combat mildew in bathrooms, and I was surprised to find out that you can actually buy paint that inhibits mold and mildew growth, and it’s perfect for bathrooms! How brilliant is that?
Mildew-Resistant Paint Products Used
Armed with this knowledge and my makeover plan, I headed into Sherwin-Williams and picked up all of the supplies I needed to help mildew-proof my bathroom walls:
- Water Blocking Primer/Finish (now called LOXON Water Blocking Primer/Finish)
- Emerald Interior Acrylic Latex Paint (for the walls in Snowbound)
- ProClassic Alkyd Interior Enamel (for the trim in Extra White)
How to Paint a Bathroom to Resist Mold and Mildew
And then I got to work. Big time. Despite this bathroom not having a lot of paintable surface area, this was no small task.
Step One: Prime with Water Blocking Primer
I started by priming all of the dark wood moulding and trim with Sherwin-Williams LOXON Water Blocking Primer/Finish. This primer reduces odors and blocks moisture, which is EXACTLY what I need to happen in my bathroom.
Not so glamorous, but necessary.
Once the primer dried on the moulding and trim, I moved onto the walls. (This was strategic to do as little taping as possible. It made sense in my mind to do it this way.)
Step Two: Paint with Mildew Resistant Paint
I used Emerald Interior Acrylic Latex Paint in a creamy white called Snowbound. It’s a paint and primer in one that has stain-blocking technology built in, contains agents to inhibit the growth of mold and mildew (SCORE!).
It’s also really easy to wash and clean. In short, it is the perfect paint for any bathroom!
Look at this beautiful white wall! (And try not to notice the 100% illegal electrical panel on that wall. I told you before that this previous owner’s DIY bathroom was a DISASTER!)
The Emerald paint went on smoothly and evenly, and I cannot wait for it to do its mildew-preventing job!
Step Three: Paint the Molding and Trim
Once I finished painting the walls, I moved onto actually painting the molding and trim.
For this I used ProClassic Alkyd Interior Enamel, which is a great paint that goes on very smooth (minimal brush marks), and has great durability and washability. When you’re going extra white, that’s important!
After working most of Sunday to get the moulding and trim from dark to bright white, I was ecstatic to have a smooth and glossy finish on my trim and windows! (See the smile on my face in the mirror? I’m so happy.)
I still have some touchup work to do on the trim and windows (filling some gaps, putting another coat on some missed spots, etc.), but on the whole I’d say this painting job is done! It looks good and I am thrilled that it will help prevent the mildew we were seeing before.
And that means the pretty details will be working their way into my master bathroom soon!
Bathroom Makeover To-Do List
Let’s take a look at the to-do list now that the painting is finished:
Patch drywallScrape ceilingRe-paint ceilingPaint mouldingPaint windowsPaint walls- Paint pocket doors (or maybe replace these . . . )
- Re-stain window sills
Change light fixturesPaint vanity- Make cornice boards for over windows
- Create art to replace mirror near toilet
- Tailor shower curtain to fit non-standard shower entry
- Shop for decor for bathroom
With two weeks to go I feel like I am in pretty good shape. But . . . I am traveling this weekend so maybe I’m not. We’ll see.
Anyway, thanks for checking out this week’s progress! I hope you’ll come back next week to see some of the fun decorative elements making their way into this bathroom!
-Bre
Natalie Eilee says
Hi Bre! I really like Emerald white, no comparison between white and rest of colors.
Bre says
Hi, Natalie – thanks! Yes, that is a great shade of white!!
UncommonSensesc says
I love how this is going – it makes me want to redo our bathroom (of course, it still isn’t finished from years ago but I still dream). Is the vanity/sink centered under the mirror and light? It may be the angle of the picture, just asking (I strongly requested my husband move some things to get ours centered). This is really nice!
Bre says
Ugh, no it isn’t and it drives me NUTS!!!! I swear, whoever put this bathroom in initially did the worst job. We tried to fix it but couldn’t (I cannot remember the exact reason why now), so we decided we’ll wait until we do an actual reno of the bathroom. Until then, we live with it off-center!
Lora says
Paint is so amazing! So much brighter, lighter, and more modern.
Bre says
Thank you, Lora! Yeah, wow – paint is the BEST, isn’t it? 🙂
Sarah Sofia Knepp says
What a difference paint makes right? So much brighter and love the color blue too! Excited to see this space on reveal day! Sarah
Bre says
Thanks, Sarah! Yeah – paint is incredible! It never ceases to amaze me. Looking forward to seeing your space on reveal day, too!
Jenny says
WOW! I can see why you were tired – that is a ton of painting! It’s looking great – I can’t wait to see it all come together.
Bre says
Aw, thanks, Jenny!!! I always forget how exhausting painting is. I have a new appreciation for professional painters after this makeover! 🙂
Kristi Mercer says
It looks SO much brighter! What a difference! You’ve got this my friend!
Bre says
Thanks, Kristi! It is crazy the difference some simple paint has made in there! Can’t wait to wrap it up.
Bre says
Girl I give you mad props for doing all of this yourself! Take some time to rest before finishing up!!
Bre says
Thanks so much, Bre! Yeah I might have bitten off more than I can chew. . . but I took it easier this past week and now I’m ready to get it all finished. I am so excited to see your bathroom progress this week!
Caryn Fisher says
It looks amazing! You are into the home stretch now, and you will be able to enjoy all your hard work for years to come! Cover the electrical panel with a picture!
Bre says
Thank you so much, mom! You’ll have to check out this week’s update to see the awesome picture I got to hide that electrical panel! 🙂