Summer backyard living is the best kind of living: agree or disagree?
I’m definitely on the “agree” side of that statement! Hanging on the patio is one of my favorite ways to unwind.
Looking at two telephone poles and part of a neighbor’s swing set sort of killed the easy living outdoor space vibe though. Because of that, I (with help from my husband) built a freestanding DIY outdoor privacy screen.
And I’ll show you how to build a decorative outdoor privacy screen of your own!
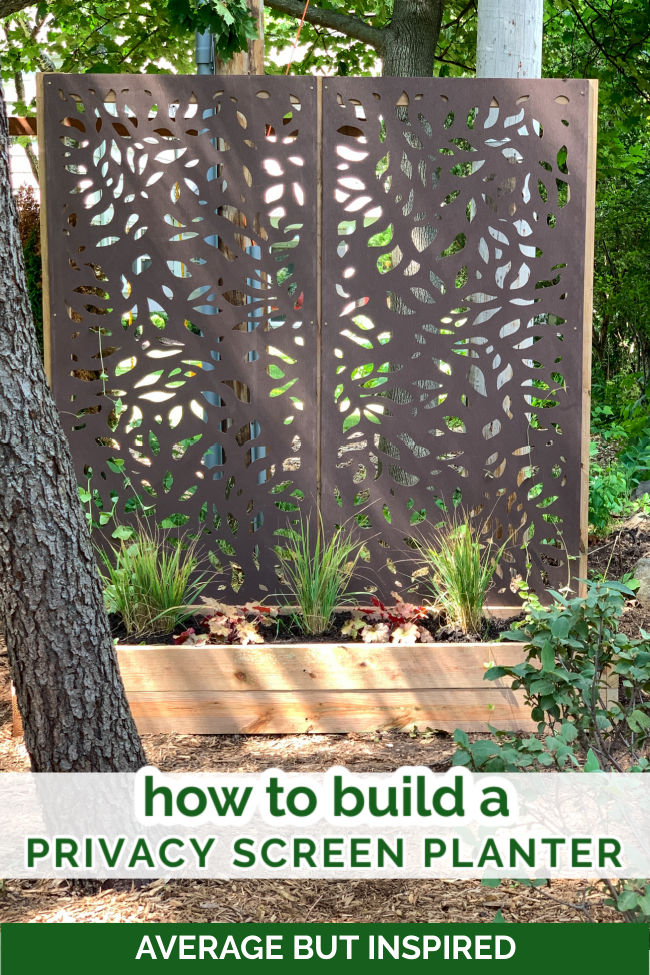
This wood privacy screen was a quick build: finished in a few hours over the course of a weekend.
And the best part? It’s totally freestanding. We didn’t dig any holes or pour any concrete.
Freestanding Privacy Screen Materials
These are the materials and tools I used to build the privacy screen planter as shown in this post. Feel free to substitute anything to make this outdoor screen your own! Also, this post contains affiliate links. For more information, please read my disclosure policy.
- Pressure-treated cedar tone 2×6’s (four cut down to 2′ each; four cut down to 6′ 2″ each; six cut down to 10.5″ each)
- Pressure-treated cedar tone 2×4’s (three cut down to 7′ each; two cut down to 32 1/8″ each)
- Deck screws (2.5″ long)
- Composite privacy screen panels, quantity 2 (substitute with lattice from the home improvement store if you don’t like a composite panel. This privacy screen planter from Gina Michele Blog uses lattice.)
- Metal spike
- Copper tube straps
- Miter saw (or a circular saw)
- Tape measure
- Drill or impact driver
- Level
- Pencil
- Dirt and plants
Why Build a Freestanding Privacy Screen?
Typically, privacy screens are fixed in the ground so that they don’t blow over.
Here, because we were placing the screen close to the telephone poles and there are all kinds of buried cables there (including our Internet cable, which got sliced twice during a recent landscaping project), we did not want to dig in the area.
(Also, helpful tip if you’re wanting to block any utility poles, boxes etc: check your utility company’s website for what is permitted. Most have information on what can be placed near their equipment and where.)
Even if you’re not facing the same issues we did, you may want to build a freestanding privacy screen (instead of a fixed screen), if you want to place it on a patio or deck, or if you plan to move and want to bring it with you!
This type of free standing outdoor privacy screen will work in any outdoor living space!
DIY Outdoor Privacy Screen Planter Instructions
Now that you know why we chose to build the type of privacy screen we did, let me show you how we did it!
Don’t Want to Build Your Own Privacy Screen? Check Out This Other Post!
Step One: Build the Planter Box
The first part of this DIY free standing privacy screen is building the planter box base.
To accommodate two of the composite privacy screen panels, I used my miter saw to cut pressure-treated 2×6’s into four 2-foot sections and four 6-foot, 2-inch sections.
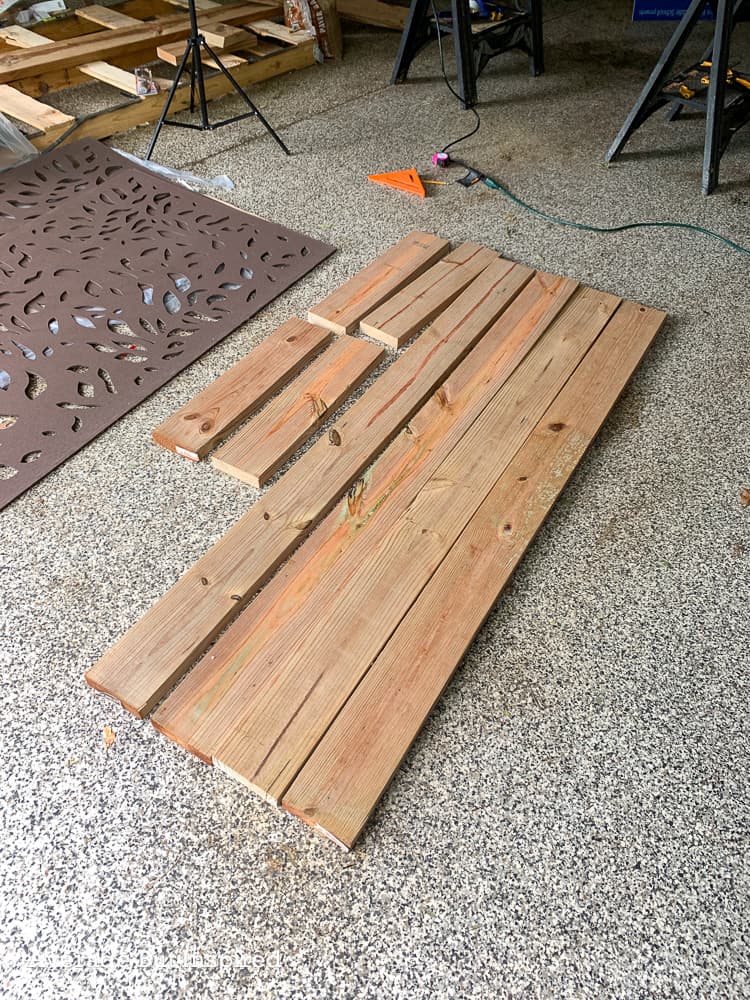
Then I screwed the boards together to form a simple box without a bottom.
Then I attached six pieces of scrap 2×6 wood (cut down to approximately 10.5″ high), in the four corners and centers of each long run of wood. This helped give the box a little more stability.

Step Two: Attach the Privacy Screen Panel Supports
Once the planter box was constructed, my husband and I moved it to the installation location.
Then I cut three pieces of 2×4 pressure-treated lumber into 7-feet pieces.
We attached those pieces of lumber to the outside back of the planter box, and made sure each was plumb. This required a little bit of adjustment, but we finally got it right!
Once the three vertical supports were up, I cut two pieces of 2×4 lumber to serve as the top supports for the composite panels.
My husband screwed those in at an angle to attach them to the vertical supports.
Step Three: Check for Level
At this point we checked to make sure everything was level.
Spoiler alert: it was not. (Is it ever? Ha!)
To fix this, we leveled out the ground beneath with a rake, and propped up one part of the box base with some rocks.
Step Four: Attach the Privacy Screen Panels
The easiest part of all of this was attaching the gorgeous composite privacy screen panels to the frame we constructed.
If you’re not a fan of the composite panels we chose, you could easily modify this project and create a wood slat privacy screen, bamboo privacy screen, or even a DIY lattice privacy wall.
We simply screwed them onto the front of the frame. You could screw them onto the back of the frame if you wanted them to have a framed appearance. It’s totally your choice!
Step Five: Stake the Planter
For a little extra stability, I decided to stake the planter into the ground in the front of the box. All this required was driving a metal spike into the ground and attaching it to the inside front of the box with copper pipe straps.
Step Six: Fill the Planter Box
Finally, fill the planter with dirt and plants! This took 12 bags of topsoil and garden soil to fill. Yikes!
I planted grasses, which will get larger and fuller, vines to grow up the panel, and some coral belles for a little color.
This privacy screen planter was the perfect solution for blocking those utility poles! And also, I have to say that it looks pretty darn good with my DIY Vertical Planter nearby!
Let me know if you have any questions about this DIY outdoor privacy screen project or these panels! I always love to hear from you.
Chrissy says
How did it withstand the elements? Were in northern Illinois. Im just wondering if ill be chasing panels around from strong winds.
Bre says
Hi! I’m in SE Wisconsin so I have comparable weather! This privacy screen looks as good as the day we built it! The screws are holding those panels in place perfectly and we have had zero issues with wind. 🙂
Sally says
What kind of metal spike did you use? What is the length?
Thanks.
Bre says
Hi, there! Sorry for the delay in response! It was just a metal landscape anchor spike. They sell them at Home Depot I know. As for the length, I’m sorry but I don’t have that handy. It was whatever the standard size spike is. I hope that helps!
Jan says
We love these composite screen panels… used them on our deck as railing with deck boards on top (nailed into the beams, not the paneling). Home Depot carries a lot of choices.
Bre says
Jan, that’s great to know! I’m really glad you’re happy with the composite panels, too!