Get ready for the autumn season with a beautiful DIY stacked pumpkin topiary.
A piece of fall decor that I’ve always admired is a pumpkin topiary. I love the way stacked pumpkins look when added to a pretty planter on a front porch, or when displayed on a cozy fireplace hearth.
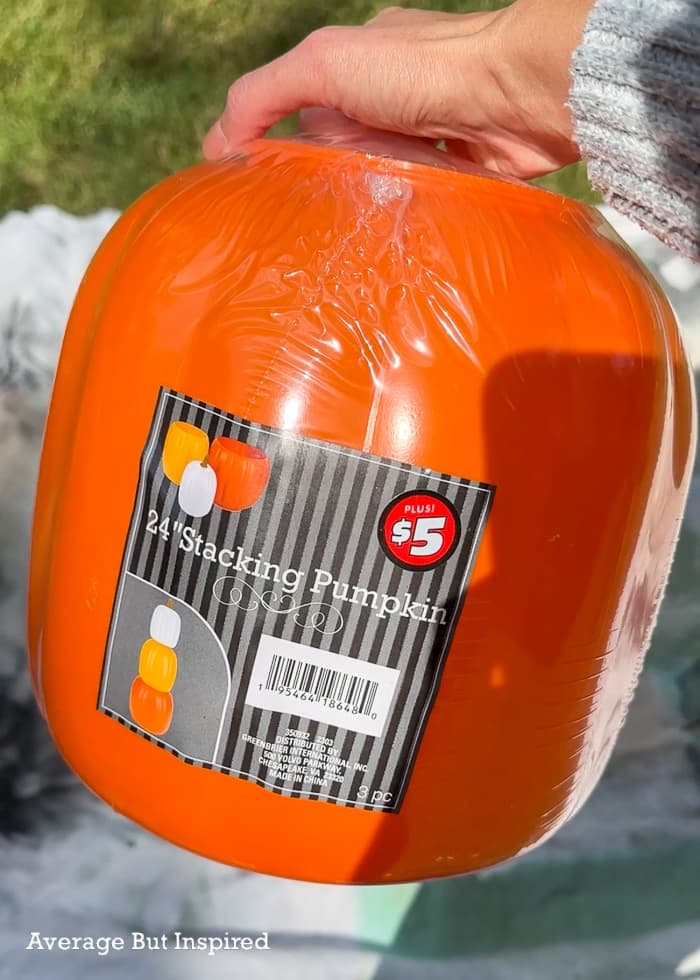
On a recent trip to Dollar Tree I spotted a set of plastic stacking pumpkins in the “Plus” section, and I knew I had to have them! My dreams of a pretty pumpkin topiary were within reach!
(Sidenote: do you have Dollar Tree Plus in your store yet? In mine it’s essentially one aisle of higher-priced items (in the $3-$10 range). They seem to have a lot of seasonal decor, home organization, and crafting items in the “Plus” section. It’s also online.)
These faux pumpkins were quite plastic-looking and not realistic at all (hello, candy corn colors!). But, for $5 I decided to see what I could do to make it work. Let me show you!
Update: In 2025 these Dollar Tree stacked pumpkins are in-store at a price of $7.
Supplies Used to Make a DIY Pumpkin Topiary
This post contains affiliate links. Please read my disclosure policy for more information.
Here are the materials I used to create the DIY stacked pumpkin topiary as shown in this post. I purchased most of the materials in-store at Dollar Tree, but have linked similar online versions for your convenience. Feel free to substitute items to make this project your own!
- Stacking pumpkins (from Dollar Tree)
- Terracotta spray paint (the brand I used is out of stock; linked spray paint is similar)
- Brown acrylic paint and paint brush
- Faux leaves
- Faux sunflowers
- High-temperature hot glue gun and hot glue
How to Make Stacked Pumpkin Topiaries for Indoors or Outdoors
This project came together so quickly that I was able to make it in between soccer games one Saturday. How great is that? Practically instant fall decor!
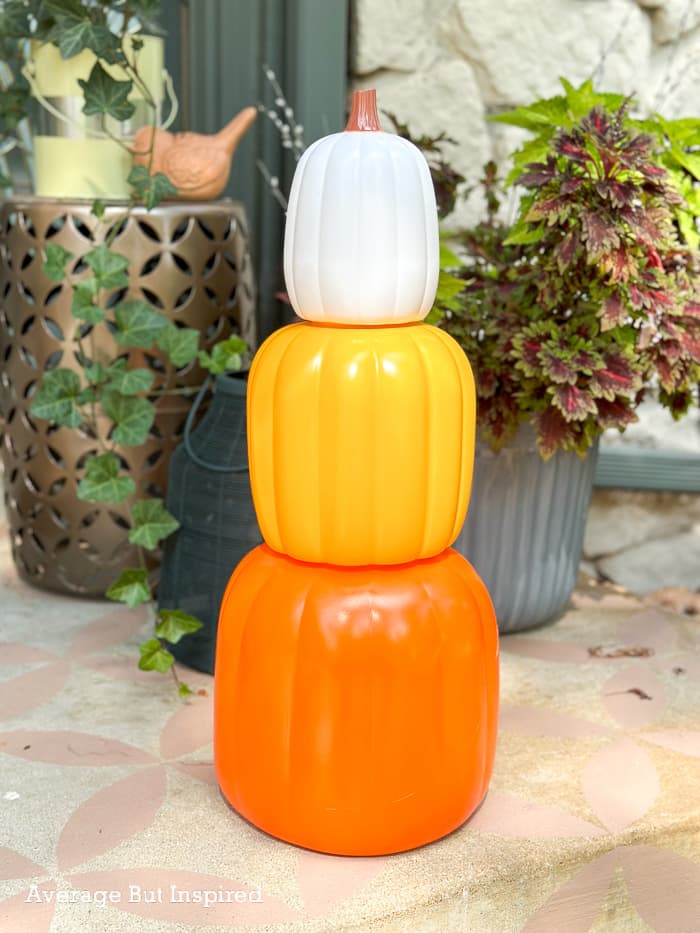
Step One: Spray Paint the Pumpkins
As I mentioned, these Dollar Tree Plus plastic pumpkins are quite fake-looking. To combat that and give them a more natural look, I spray painted them in a traditional fall color: orange.
I used flat spray paint in a terracotta shade, that was suitable for indoor or outdoor use. Make sure to choose a spray paint that works outdoors if you plan to display your topiary outside!

Two coats of paint later and the candy corn color scheme was gone. Yay!
CHECK OUT DOLLAR TREE’S 2025 NEW MINI STACKED PUMPKINS AND THE MAKEOVER I GAVE THEM!
Step Two: Add Detail with Brown Paint
As with anything spray painted a solid color, the pumpkins looked a little flat in their solid terracotta color.
To help fix that, I decided to add some detailing using brown craft paint. I used a pared down version of the technique I shared for how to make fake pumpkins look real, and this went a long way to improving the appearance of these plastic pumpkins.
I also painted the stem brown, as it had gotten a heavy coat of terracotta spray paint in step one.
Step Three: Embellish the Pumpkins with Fall Decorations Like Fall Leaves and Faux Flowers
These particular pumpkins fit together nicely and did not require any modifications for stacking. So, the only thing left to do was dress them up a bit and make them even cuter.
I cut apart stems of fake fall leaves (in cream shades) and fake flowers (cream sunflowers), and used extraordinarily hot hot glue to fasten them to the stacked pumpkin topiary.
If you don’t have a hot glue gun that gets to a VERY high temperature, I recommend using a glue like E6000 to fasten your fall embellishments, because regular hot glue will not work well for attaching anything to the plastic pumpkins.
Step Four (Optional): Add Weight Inside the Bottom Pumpkin
This pumpkin topiary is pretty lightweight, so if you plan to display it outside, you should add rocks or something heavy inside the bottom pumpkin. This will keep it from blowing away.
***
That’s where I finished my DIY pumpkin topiary project, and I love how it turned out! Some other things I’d like to add to it eventually are grapevine and perhaps some twinkling fairy lights. Wouldn’t those look beautiful on it, too?
I plan to put this on my front porch once I get my fall decorating underway out there. Where would you display a stacked pumpkin topiary?
Brenda says
How do you weight them down since the bottom of the pumpkin is open, not closed.
michele Seifried says
Where can I buy them?
Celeste Adams says
I love your site!!!!!
Bre says
You are so sweet! Thank you so much for visiting and checking it out! Appreciate you.
Bindu says
Nice idea to make on a budget!
Bre says
Thank you so much, Bindu! Appreciate it!