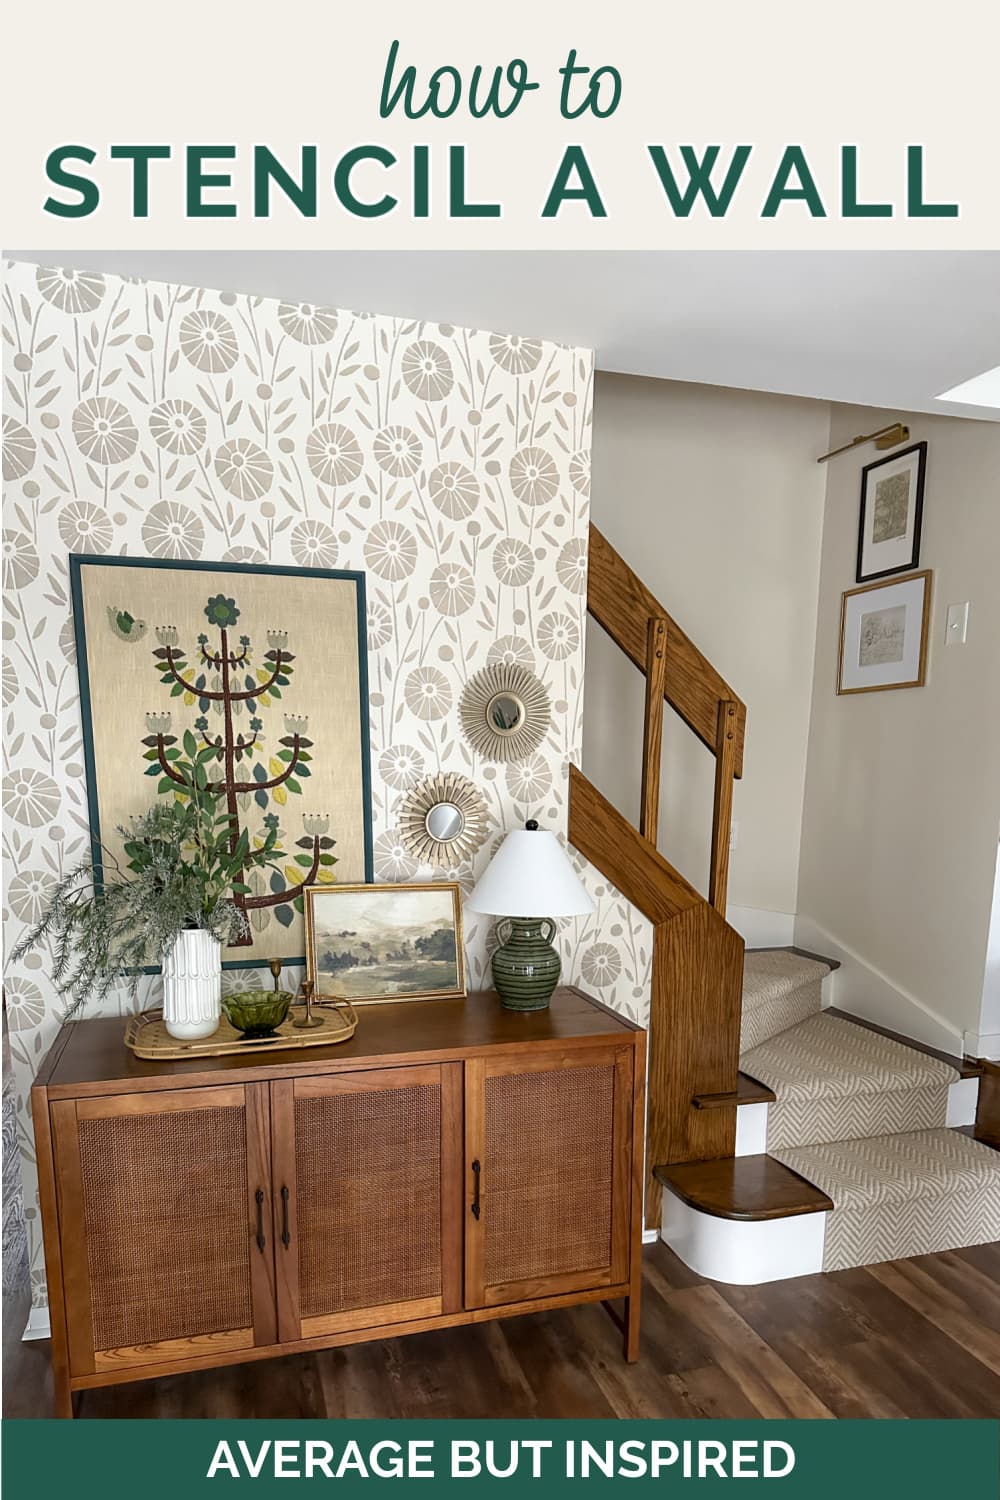
Let me show you how to stencil a wall and get a beautiful wallpaper look for less!
Shortly after we moved into our current home, I painted a grid design as an accent wall in my foyer.
I liked it (even though many – including my husband – did not), but once I refreshed my staircase with a new runner, I decided the foyer needed to get spiffed up, too! (Isn’t that the way it always goes?)
I wanted a beautiful floral wallpaper, but when I priced it out, I decided that wallpaper manufacturers are crazy. And then I also thought that the texture on my walls might not be the best for wallpaper.
As such, I decided to stencil the wall! I learned a lot and am excited to share my stenciling tips so that you can learn how to stencil a wall in your space, too.
Supplies Needed to Stencil a Wall
This post contains affiliate links. Please read my full disclosure policy for more information.
These are the supplies and tools I used to stencil my foyer accent wall, including the exact stencil I chose.
- Wall stencil
- Spray adhesive
- Painters tape
- Laser level (or level and pencil, but I highly recommend a laser level so you don’t have to erase pencil marks)
- Paint (base color and stencil color(s))
- Paint roller & roller tray
- Paint brush
- Dauber brush / stencil brush
- Paper plate or paint palette
- Small paint brush (like an artist’s brush)
- Scissors
- Sharpie marker
- Straight edge (like a ruler, level, etc.)
- Dropcloth
- Recommended: hair dryer
Tips for How to Stencil a Wall to Look Like Wallpaper
When shopping for stencils, I recommend searching for stencils that are actually described as wall stencils. If you purchase a different type of stencil, it may be very small, which could look funny on your wall, but also will take much longer to stencil!
Great places to purchase wall stencils are Amazon, Etsy, Cutting Edge Stencils, and Royal Design Studio.
This garden peonies wall stencil is the one I used in my home.
Now that you know all of that, let’s jump into stenciling a wall!
Step One: Paint the Wall Base Color
Maybe your wall is already a great color to stencil on. If so, you can skip this step. If not, start by cleaning the wall you’ll be stenciling on, and then protecting any surfaces you don’t want to accidentally get paint on!
Next, paint the wall the base color you’ve chosen.
I painted my wall Benjamin Moore Ballet White, because it is what I painted in my stairwell that connects to this accent wall.
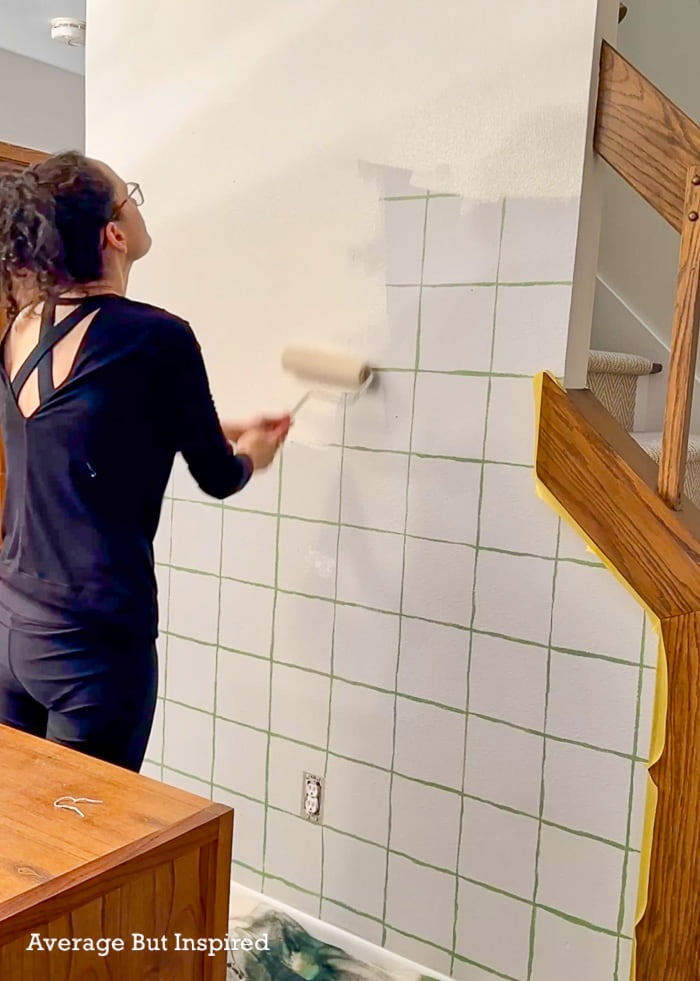
Before you do anything else, make sure to let the base color paint dry. It’s probably best if you can let it dry at least overnight so that you don’t accidentally remove any of the new paint while stenciling.
Step Two: Spray the Back of the Stencil with Spray Adhesive
If you have textured walls, you’ll definitely want to spray the back of the stencil with a thin coat of lightweight, repositionable spray adhesive.

Spray adhesive isn’t meant to actually hold the stencil in place (though it does help somewhat). Instead, it is meant to give the stencil as flush a fit with the wall as possible. With textured walls that’s very helpful in getting crisp stencil lines instead of a lot of bleedthrough.
Step Three: Place the First Stencil
Now it’s time to place the first stencil on the wall!
Where you do this is dependent on the type of stencil you purchase. You should read the instructions that come with the stencil or that are in the product listing to see what the manufacturer recommends. But generally, initial placement depends on what type of stencil you have.
Stencils That Come with Ceiling Filler Stencils
Some stencils come with special thin pieces (called “ceiling filler stencils”) that allow you to get the design up against the ceiling without cutting your stencil apart. Manufacturers like Cutting Edge Stencils and Royal Design Studio sometimes have those. If they do, you’ll see that in the stencil description.
For those types of stencils, you start at the top of the wall in the center with that piece. Make sure it’s level (NOTE: the ceiling line may not be level, so do not work off of that. Make sure to check that the stencil is level!), tape it in place, and then begin using the full stencil. Once you’ve completed the entire wall, you go back and fill in along the ceiling line with the ceiling filler stencil.
Stencils That Do Not Come with Ceiling Filler Stencils
Not all stencils come with those convenient ceiling filler stencils, but that’s okay! For those stencils, it’s recommended to start in the middle of the wall like I did here.
Step Four: Apply Paint to the Stencil
With the stencil in place, check to make sure it’s as flat against the wall as possible. If you need to adjust it, now’s the time to do so!
Then, load either a dauber brush or a roller with paint. Use a dauber if you have textured walls, as you’re less likely to get bleedthrough with a dauber or stencil brush. If you’re lucky enough to have smooth walls, a roller will work perfectly.
Before slapping that paint on the wall, remove as much paint as possible from whatever applicator you’re using. Less paint is more when it comes to stenciling!
Dab or roll on the paint, and check to see that the stencil remains flat against the wall as you’re working.
Once the entire stencil is complete, go over the paint with a hair dryer (if you like), or let it dry for a few minutes before removing it from the wall.
Step Five: Stencil the Rest of the Wall
With that first stencil in place, it’s time to line up the patterns and cover the rest of the wall.
Registration Marks
Some stencils come with “registration marks,” which are typically little slashes or crosses in the corners of the stencil. You line up these marks with the stencil pattern to get a perfect placement of your next stencil.
For more information on registration marks (including videos showing how to use them), you can read more on Royal Design Studio’s website.
The stencil I used didn’t have these types of marks, and so I just lined up the stencil over the corresponding pattern I’d already stenciled on the wall. This worked perfectly and gave the seamless effect you see on my wall (in the finished result).
Use a Hair Dryer
To keep the stenciling process moving along quickly, and to minimize accidentally transferring paint to a place you don’t want it, I recommend using a hair dryer to dry the paint on the stencil and the wall before moving it to the next spot.
Where to Go Next?
Where you place your stencil next depends on your wall.
For my wall, I moved to as many places where I could do a full stencil first. I saved the small, tricky parts for last. I recommend you do the same.
When I had those full sections complete, I was left with a blank strip across the top of the wall and around the handrail.
Step Six: Cut or Resize the Stencil
Because wall stencils are quite large, you’ll probably need to cut down the stencil to work in small or tight spaces. These wall stencils are typically unwieldy to bend and hold in place.
Before you start cutting, make sure you’re finished using the stencil in its full size. Once you’ve double checked, you can get to work cutting it down.
Figure out which section(s) of the stencil you need for the remaining blank parts of the wall. Then, use a straight edge to draw a line on the stencil with Sharpie marker, and cut it with scissors.
I had to do this a few times to get the different stencil sections needed for my wall. But once those pieces were cut to size, I repeated the process set out above and got the whole wall covered.
I had a couple of spots to touch up, and I did that with a tiny paint brush and the base color paint. Even if you’re very careful while stenciling, you’re bound to get a couple of drips or spots here and there.
Once I put this area back together with my rattan console table, starburst mirrors, and vintage crewel embroidery print, I was in love!
This stencil wall is so funky and fun, but subdued in the color palette I chose.
And it looks just perfect with the new staircase runner.
I hope these tips on how to stencil a wall were helpful to you! If they were, please consider subscribing to my email list or following along on social media!
Leave a Reply