Get your hands on the Dollar Tree stackable presents and give them a makeover! Here’s how to transform these stacked gifts into beautiful Christmas decor.
In 2023, I transformed the viral Dollar Tree stacked pumpkins into a pretty pumpkin topiary. It has been one of my most popular crafts since then!
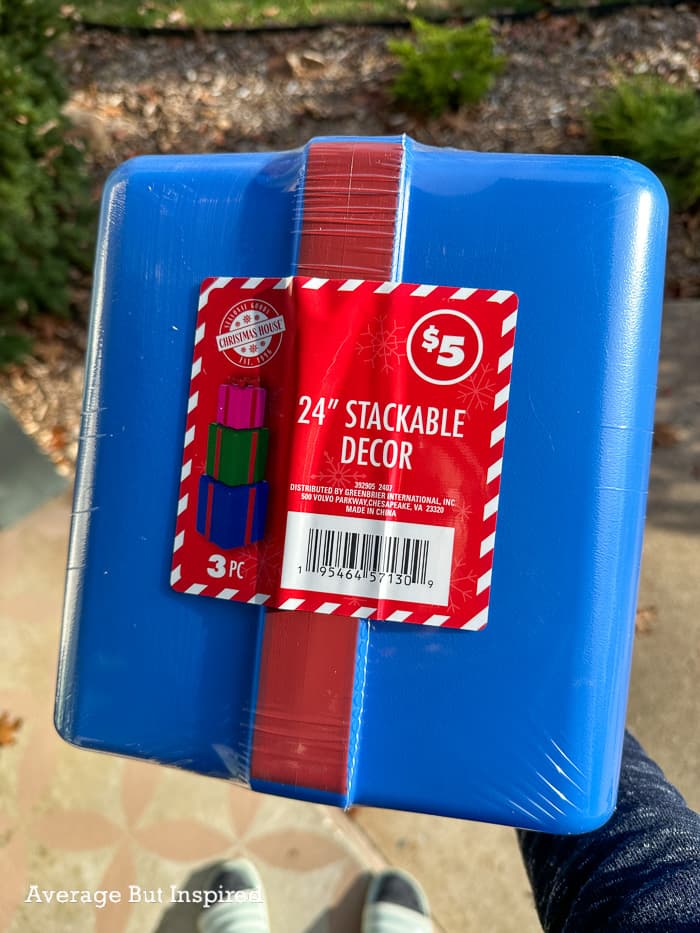
So, I was REALLY pumped to find that Dollar Tree introduced a whole new line of stackable holiday decor this year: a stackable snowman, a stacking Christmas tree, and stacked presents.
All are priced at $5, and the stacked snowman and stackable presents are my favorites! (I have seen some cute ideas for using the Christmas trees as kids’ toys / in kids’ activities, though.).
I was lucky enough to find two sets of the stacking presents, and of course, I had to give them a makeover!
I ran into some snags along the way, so you’ll want to read about that if you’re also looking to transform this Dollar Tree Christmas decor for yourself!
Dollar Tree Stackable Presents Makeover Supplies
This post contains affiliate links. Please read my disclosure policy for more information.
- Stacked presents decor (note: while these are “Plus” items, they weren’t located in the Plus aisle of my store! So, look all around any Dollar Tree you visit because they could be anywhere! As of publication, they’re not available online.)
- Dollar Tree tag ornament
- Rustoleum Universal Metallic Spray Paint in Pure Gold
- Plaid wired ribbon, 1.5″ wide
- Glue Dots permanent dots
- Cricut Joy machine and white permanent vinyl OR white dot stickers and white Christmas tree stickers
- Scissors
Stacked Presents Makeover: How To
Just like last year’s stacked pumpkins, the stacked presents are totally plastic. They’re a little cheap-looking, to be honest.
The red paint on the “ribbon” portion of the gifts was sort of chipped or missing, and the colors of the present boxes were kind of “meh” in my opinion.
Spray Paint the Present Boxes
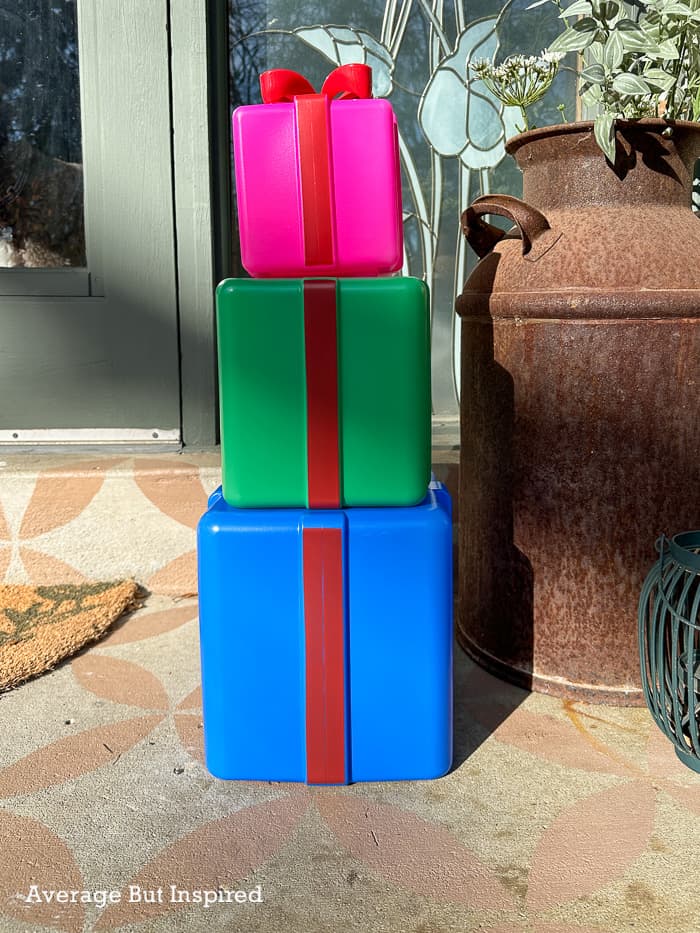
Because of that, I decided to paint them. I wanted to have each gift box be a different color: one gold, one green, and one off-white.
But . . . I quickly found out that my favorite spray paint, Rustoleum 2X (which works on plastic), absolutely did not work on these plastic stacking presents!
The green and off-white presents immediately looked AWFUL. The paint didn’t stick to them at all!

The present box I spray painted gold with a different spray paint, Rustoleum Universal Metallic Spray Paint, worked much better!
A couple of days later, I tried to spray over the green and off-white presents with the gold spray paint, but the paint immediately bubbled and cracked. It was not working!
So, I opened up the other set of stacking presents and sprayed two boxes from that set with the gold spray paint. (Note: the “bow” on top of the gift stack is removable, so I took that off for painting.)
Two coats of paint were all it took for good coverage. Unfortunately, the spray paint did run in places. It’s almost like the metallic flakes in it settled strangely in spots. BUT, I was able to cover those problems for the most part! (See more below!)
Attach Ribbon to the Stacked Presents
For the next part of the project, I attached real ribbon to the present boxes. I started with the bottom gift box and cut 1.5″ wide wired ribbon to the length needed to cover each section of plastic ribbon on the box.
I pressed Glue Dots permanent dots to the “ribbon” on the box, and then pressed the real ribbon onto that. I used Glue Dots instead of hot glue because hot glue and plastic don’t always play well together.
You could try a different type of glue, but it might be hard to hold the ribbon in place while the glue sets up or hardens. The Glue Dots gave an instant hold, which I liked for this project.
Once I had the base present finished, I attached ribbon to the other two present boxes. For the top box, I cut two very long pieces of ribbon and wrapped them over the top of the gift box.
Then I made a bow out of the same ribbon and hot-glued that to the overlapping ribbon on that top box.
Hang a Gift Tag From the Box
Next, I hung a Dollar Tree ornament that looks like a gift tag from the bow on the top of the box.
It’s the perfect size for this present stack decoration!
I Think You’ll Love This Other Dollar Tree Christmas Craft, Too!
Add Details with Vinyl or Stickers
Because I wanted my stacked presents to be multiple colors, I didn’t love the solid gold look of my project.
So, I cut permanent vinyl with my Cricut Joy into dots and Christmas Trees. Then I stuck that onto the bottom gift box and the middle gift box to help them look like patterned wrapping paper.
I did not use transfer tape as I was worried that would rip off the spray paint from the presents. So, I just eyeballed the placement of each vinyl cutout and applied them like stickers.
Using these vinyl shapes was also a great way to hide the spray paint imperfections on these painted gift boxes!
DIY Stacked Presents Decoration
All in all, I’m pretty happy with how this stacked present decoration turned out. It’s definitely not perfect, but it’s not horrible either.
I originally thought I would use this outside, but it’s pretty lightweight and I’m worried it might blow away. So, it will stay inside. 🙂
Have you found these adorable stacked presents in your Dollar Tree store? How do you plan to decorate them?
Saira Aamir says
Such a creative and budget-friendly idea for beautiful Christmas décor! A perfect DIY for adding a festive touch without overspending.
Bre says
Thank you!
Celeste Jones says
I am looking for them and cannot find them ANYWHERE! How can I order them
Bre says
Oh man – I’m sorry you haven’t found them! I’m crossing my fingers for you. I don’t think they’re online so I don’t think you can order them. I’m sorry!
christine carey says
I have the Christmas tree snowman and the presents. I am having difficulty snapping them together to be flush. The snowman stuck together, but the tree and the presence are not staying together. They don’t click in place. Did you have any problems with that?
Bre says
Hi! OK my top present “box” is not sticking flush with the middle box. I thought it was maybe because I’d painted it – but maybe it’s a design issue!