Average But Inspired

Inspiring creativity with crafts, DIY, and home decor projects.

  • About Bre
  • Contact Me
  • Disclosures
  • Policies
  • Home
  • Shop
  • DIY
  • Crafts
    • Dollar Store Crafts
  • Seasonal
    • Patriotic & Summer
    • Valentine’s Day
    • Easter & Spring
    • Fall & Halloween
    • Christmas & Winter
  • Home Decor
  • Furniture
  • Organization

March 27, 2014 by Bre

Dollar Store Easter Bunny Decor

Since the beginning of time, I have been a sucker for a good makeover.

All of my Barbies got makeovers when I was little.  Some of my favorite TV shows have involved makeovers (think What Not To Wear and Extreme Makeover: Home Edition (DON’T JUDGE – they always got me when they moved that bus!)).  And I love a good makeover for myself at the Bobbi Brown counter every once in awhile.

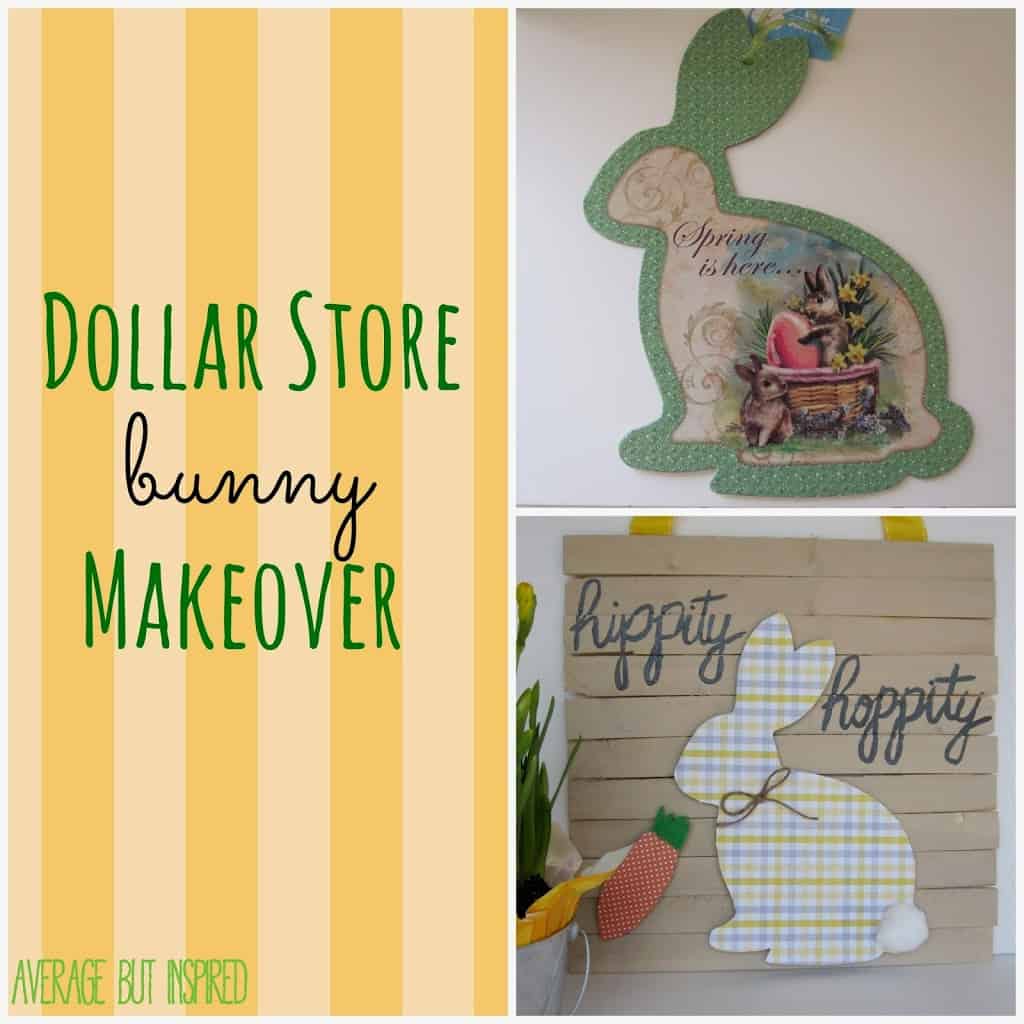
So how excited do you think I was when I spotted an ugly cardboard bunny decoration at Dollar Tree that I knew could be made adorably happy and springy with a little TLC?  Goodbye weird bunny displaying an image of another bunny holding an egg almost as large as itself, as well as the lie that “[s]pring is here . . . ” (it is not here.  In fact, it may never be coming to Chicago.  LIES!).  Hello cuteness!

Turn a dollar store Easter decoration into an adorable piece of decor for your spring home! Get the full tutorial at averageinspired.com.
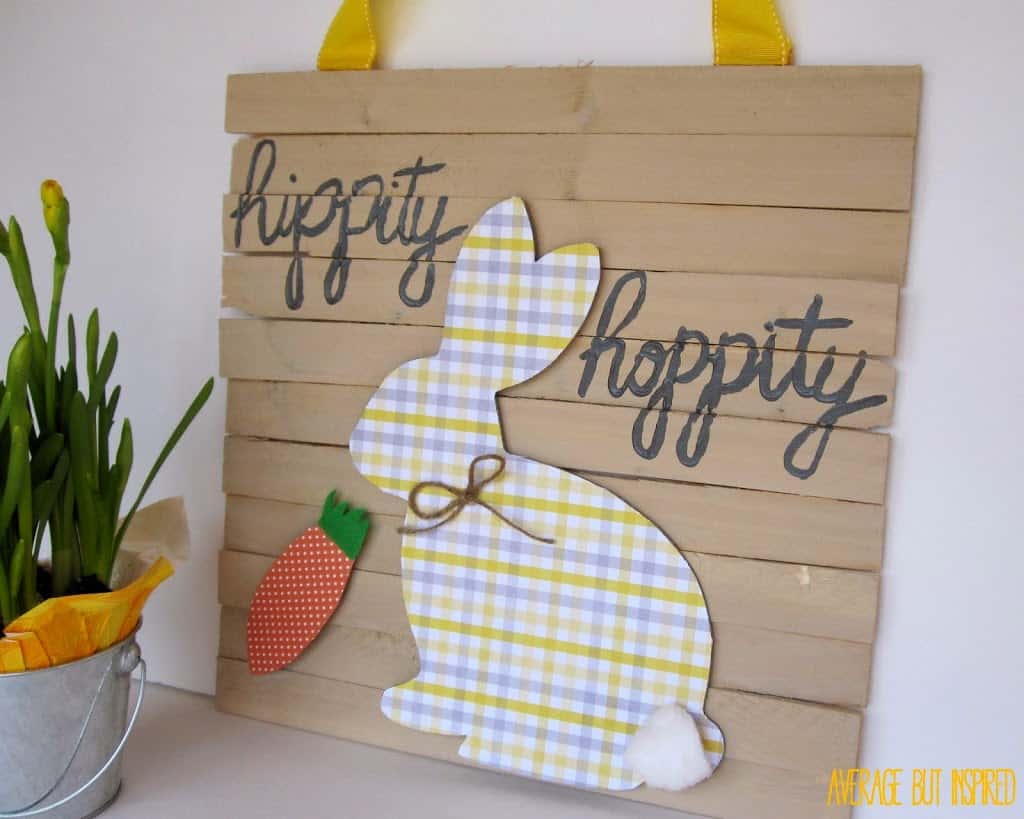
Loved this makeover!  It was super easy and super inexpensive.  And it adds a dose of happiness to my back door.  Hippity Hoppity!
Turn a dollar store Easter decoration into an adorable piece of decor for your spring home! Get the full tutorial at averageinspired.com.
 Supplies Needed for Dollar Store Easter Bunny Decor
  • Cardboard bunny from Dollar Tree
  • Small piece of cardboard for your carrot (I used part of a shipping box rescued from the recycling bin)
  • 2 pieces of 12″ x 12″ scrapbook paper (1 for the body of the bunny; 1 for the carrot)
  • Spray adhesive
  • Wood shims
  • Wood glue
  • Acrylic paint (two colors – one for wood background; one for text), and brush
  • Ribbon
  • Hot glue
  • Scissors or x-acto knife
  • Optional: Green felt (for carrot top); Twine or ribbon (for a bow at bunny’s neck); Cotton ball or pom pom (for bunny’s tail); Paint tips (for easy text painting)
Now, here’s how I did this!
STEP ONE

Spray your bunny and the scrapbook paper with spray adhesive.  Adhere the bunny to the paper and press down all over to ensure a good bond.

STEP TWO

Cut around the bunny with your x-acto knife or scissors.

blank
STEP THREE
Draw a carrot shape on your cardboard.  (Fix it over and over again until it doesn’t look totally deformed, as shown in the photo below.)  Repeat steps two and three to decorate your carrot.
blank
STEP FOUR
Take two of the wood shims and place them parallel to one another, vertically on your table.  Place some wood glue at the bottom and begin to affix your other shims perpendicular to those lying on the table.  Glue shims all the way to the top.
blank
STEP FIVE
Once your wood shim backdrop has dried (it might take a couple of hours), paint it however you like.  I used watered-down acrylic paint for a more unfinished look.
blank
STEP SIX
Once the paint has dried, determine the placement of your bunny and carrot (but don’t glue them yet).  Then, write your text in pencil, wherever you like.
blank
STEP SEVEN
Now, paint over your text with acrylic paint.  I used acrylic paint bottle tips, which made painting the text really easy.  Then I went over that painted writing with a small paintbrush to give it a flatter and broader look.
blank
blank
STEP EIGHT
Affix your bunny and carrot to your wood background.  Add any decorative elements you like (for example, a ribbon at the bunny’s neck and a cotton ball or pom pom at the tail).  Glue your ribbon at the top of the wood background for hanging.
Turn a dollar store Easter decoration into an adorable piece of decor for your spring home! Get the full tutorial at averageinspired.com.
Cute, right?
blank
I feel like this makeover would get Clinton and Stacy’s stamp of approval.  What do you think?  Turn a dollar store Easter decoration into an adorable piece of decor for your spring home! Get the full tutorial at averageinspired.com.
– Bre
❮❮ Previous Post
Next Post ❯ ❯

Comments

  1. Elizabeth Dietz says

    March 27, 2014 at 4:04 pm

    That is absolutely adorable!! I wish I could see something like the bunny and turn it into something so amazing!!

    Reply
    • Bre Eggert says

      March 28, 2014 at 6:01 pm

      Hi Elizabeth! Thank you very much! You’re so sweet.

  2. Ashley @ 3 Little Greenwoods says

    March 28, 2014 at 2:16 pm

    Love you to made a Dollar Store find into your own Easter artwork! Too cute

    Reply
    • Bre Eggert says

      March 28, 2014 at 6:02 pm

      Hi Ashley! Thanks so much! 🙂 Have a great weekend!

  3. Paper & Fox says

    March 28, 2014 at 3:37 pm

    Really cute. It looks so much better than the original.

    Reply
    • Bre Eggert says

      March 28, 2014 at 6:02 pm

      Hi! Thank you! Yes, I think the original is pretty much hideous so anything would’ve been an improvement! Hahaha! Have a great weekend. 🙂

  4. Jill @ Create.Craft.Love. says

    March 29, 2014 at 12:07 am

    I LOVE this, Bre! That little bunny hanging is too cute! Would love for you to link up to The Creative Connection! http://www.createcraftlove.com/2014/03/creative-connection-10.html

    Reply
    • Bre Eggert says

      March 29, 2014 at 1:08 am

      Jill! Thank you! I just linked up. I can’t believe you stopped by my little blog . . . thank you so much! Have a great weekend. 🙂

  5. Katie {Little House of Four} says

    March 29, 2014 at 1:41 am

    This is adorable! Shims are great for so many things and I love how you used them here. Great job 🙂

    Reply
    • Bre Eggert says

      March 29, 2014 at 1:35 pm

      Hi Katie! Thanks very much! I am loving shims – so inexpensive and so many uses! Have a great day. 🙂

  6. Cathy Carroll says

    March 29, 2014 at 12:16 pm

    This is really cute. I love that you used shims for the background – I picked some up by mistake thinking they were all even and was having trouble figuring out how to use them… I like that they are uneven and still look great.. Thanks for sharing.. Cathy

    Reply
    • Bre Eggert says

      March 29, 2014 at 1:36 pm

      Hi Cathy! Thank you! Yeah, it is kind of a bummer that they’re all uneven, but if you alternate the thick side and the thin side, it works out pretty well for a rustic, imperfect look. I hope you have fun making whatever you’re planning. Thanks for stopping by!

  7. Ronda Waters says

    March 30, 2014 at 1:15 am

    So adorable! I love dollar store upcycles! 🙂 Thanks for sharing!

    Reply
    • Bre Eggert says

      March 30, 2014 at 1:15 pm

      Hi Ronda! Thank you so much! I appreciate you stopping by. Have a great Sunday!

  8. Erlene A says

    March 30, 2014 at 9:05 am

    So clever to recover a Dollar Store bunny with pretty craft paper. Love the idea and would love to share it on my weekly roundup (with link back).

    Reply
    • Bre Eggert says

      March 30, 2014 at 1:17 pm

      Hi Erlene! Thank you! Yes, please feel free to use it in your roundup. I would be honored! Have a great day!

  9. Angela @ Life in Velvet says

    March 30, 2014 at 6:48 pm

    This is so pretty! What a great transformation! Happy spring! Thanks so much for linking up at Thursday STYLE 🙂

    Reply
    • Bre Eggert says

      March 31, 2014 at 12:43 pm

      Hi, Angela! Thank you. Happy spring to you, too! Hooray!

  10. Ana Lopes says

    March 30, 2014 at 7:20 pm

    Super cute project! What a lovely idea! Thanks for sharing tutorial!
    Would love to have you visit me sometime 🙂
    Hope you have a wonderful day and week!
    Hugs from Portugal,

    Ana Love Craft
    http://www.lovecraft2012.blogspot.com

    Reply
    • Bre Eggert says

      March 31, 2014 at 12:44 pm

      Hi, Ana! Thank you very much! I’m looking forward to checking out your blog, too. Have a wonderful day!

  11. Kim Seghers says

    March 31, 2014 at 1:14 am

    Very cute. I saw those bunnies at the Dollar Tree would never have thought about covering them . thanks for sharing this wonderful project.

    Kim ~ This Ole Mom

    Reply
    • Bre Eggert says

      March 31, 2014 at 12:45 pm

      Hi, Kim! Thank you!! Yeah the bunnies aren’t much to look at – I almost walked right by them. Thanks for commenting and have a wonderful day. 🙂

  12. Emily says

    March 31, 2014 at 6:22 pm

    Great transformation! Love it!

    We would love for you to come and link up with us at Your Designs This Time, Mondays 8:00am EST. htttp://www.elizabethjoandesigns.com

    Reply
    • Bre Eggert says

      April 1, 2014 at 12:44 pm

      Hi, Emily! Thank you! I will link up. Have a great day. 🙂

    • Emily says

      April 5, 2014 at 1:49 am

      Thanks for coming by and linking up with us at Your Designs This Time!
      Emily & Erin @ elizabethjoandesigns.com

  13. Alyssa says

    April 1, 2014 at 5:02 pm

    I love how you made over that bunny. You did a great job. I just wanted to let you know that I am linking to this post on 4/1 at http://www.simply-creative-living.com if you don’t mind.

    Reply
    • Bre Eggert says

      April 1, 2014 at 7:03 pm

      Hi, Alyssa. Thank you!! And thanks for linking to the post. That’s awesome! Have a great day.

  14. srpprcrftr says

    April 2, 2014 at 3:55 am

    Even tho I have that same ugly bunny hanging from my shutter shelf I want to make what you did. I did trace the bunny for a template to make others in my own way. Good thing we’ll be going to town tomorrow so I can get some shims or maybe I’ll see if we have enuf boards from pallets to make this. Would love to have hubs cut out a couple of those bigger bunnies. I just love making Easter things, finally had to take a good look at living room and decided to tone things down a bit, maybe a bit much, lol.
    Have fun making Easter things, enjoy. Sorry it’s not Springy weather there for you yet. We live in Western CO but at least we don’t have snow.

    Reply
    • Bre Eggert says

      April 3, 2014 at 1:00 pm

      Hi there! Yes, this bunny has a really good shape, don’t you think? I love that you traced him to make additional ones. I just bought several but I should have traced them. Good thinking! Have fun making your Easter decorations and I’m glad you don’t have any snow! 🙂

  15. Amy W says

    April 3, 2014 at 2:04 pm

    This is really adorable! Thank you for sharing at our link it or lump it party!
    Amy @ Delineate Your Dwelling

    Reply
    • Bre Eggert says

      April 3, 2014 at 6:58 pm

      Hi Amy! Thank you! I really appreciate your sweet note, as well as your wonderful link party!

  16. Katie @ Addicted 2 DIY says

    April 3, 2014 at 3:06 pm

    Bre, this is adorable! Great job! You’re being featured tonight on Thursday S.T.Y.L.E. for the most clicked link! Thanks for linking up with us:)

    Reply
    • Bre Eggert says

      April 3, 2014 at 6:59 pm

      Hi Katie! Oh my goodness! Thank you! That is so cool!!! (Can you tell that I’m excited by all the exclamation points I’m using?). Thanks so much, Katie!

Leave a Reply Cancel reply

Your email address will not be published. Required fields are marked *

Let’s Connect!

  • Facebook
  • Instagram
  • Pinterest
  • Twitter
  • YouTube
blank

Hi, I'm Bre! I believe in working with what you've got to create a home you love. I hope to inspire you to do the same!

Love DIY & Decor? Join the Fun!

    How Can I Help You?

    blank

    7 Tips for Hosting a Party on a Budget

    blank

    10 Dollar Tree Craft Supplies You Need

    blank

    How to Build a Backyard Fire Pit

    blank

    How to Organize Digital Photos Using Amazon Photos

    Looking for Something?

    blank

    Modernizing a Mirrored Wall: Tape to the Rescue!

    One of the biggest challenges in my Office and Guest Room Combo Makeover was modernizing a mirrored wall that screamed “hello, it’s 1980.”  OK, obviously it didn’t really scream that, but it might as well have! Of course I thought about removing the mirrored wall altogether.  But when I researched how to do that, I […]

    blank

    DIY Dollar Tree Easter Carrot Decor

    I’ve made a lot of Easter crafts over the years, and they’ve all tended to focus on bunnies and eggs.  Now I’m in an Easter carrot decor phase.  (It’s a real thing.)  Last year’s Easter craft post was this Carrot Door Hanger, and this year it’s all about the carrots, too. You’d think that I […]

    Cute butterfly bench for a little girl! The "before" definitely did not look like this!

    A Butterfly Bench for My Daughter

    Slowly but surely I’ve been working on my little guy’s “big boy” bedroom makeover.  (Emphasis on the “slowly.”)  And that’s left my little girl feeling, well, a bit jealous. “Uh, mommy, why are you ALWAYS making things for his room.  You never make ANYTHING for me.  EVER.” Whatever, drama queen.  The truth is that almost every piece […]

    blank

    Office and Guest Room Combo: How to Create a Double-Duty Space

    Our ‘new’ home has one more bedroom than at our last house, and because of that, we had no furniture for it.  It’s pretty tiny, but with some creative planning I turned it into an office and guest room combo space that easily pulls double-duty, making it a totally functional WIN for my family!   With […]

    Copyright © 2013-2021, Bre Eggert (Average But Inspired). All rights reserved.

    Pretty Chic Theme By: Pretty Darn Cute Design