One of my favorite things is finding a way to make seasonal decor items multi-season or multi-purpose. My house doesn’t have a lot of storage space, so I like to try and get as much use out of seasonal decor as I can. That’s why this painted wood sign that I made, which reverses from Christmas to winter, is so great! Display the “BELIEVE” side at Christmas . . . 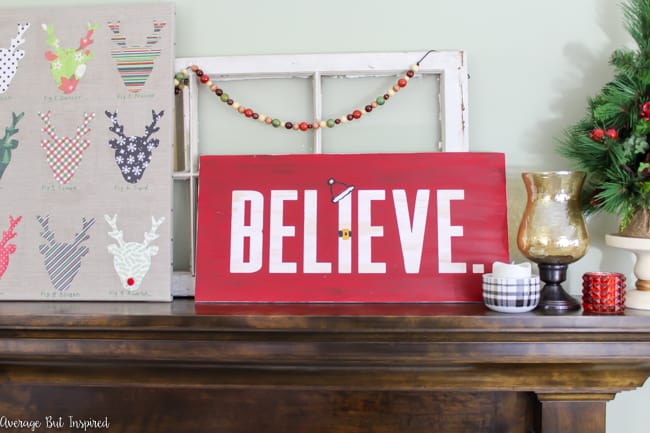
and then reverse to “LET IT SNOW” come January! 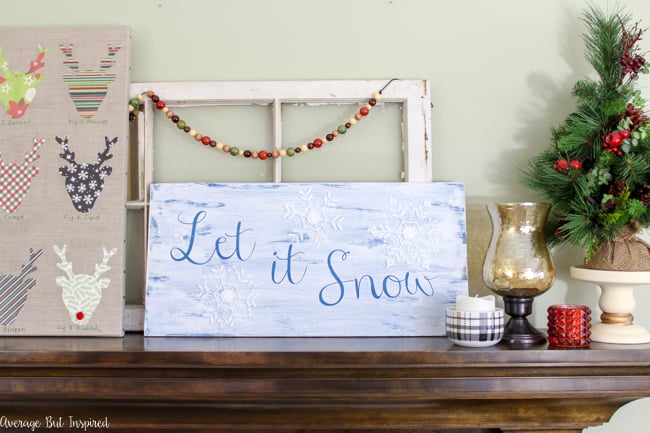
You can make one for your own home with any scrap wood you have in your stash, or with a piece of precut plywood from the home improvement or craft store. Easy!
Supplies Needed to Make a Reversible Painted Wood Sign
Some of the links in this post are affiliate links, which means that I earn a small commission at no added cost to you if you purchase through them. To read my full disclosure policy, please click here. Thank you to DecoArt for giving me the paint I used in this project.
- Wood scrap or unfinished wood sign
- Americana Decor Chalky Finish Paint in Carbon, Everlasting, Inheritance, Legacy, and Rouge
- Americana Decor Creme Waxes in Clear and Dark Brown
- Ruler
- Pencil
- Foam Roller
- Small artist paintbrushes
- Electronic cutting machine* (If you don’t have a cutting machine, you could use stencils or large letter stickers to achieve this look)
- Adhesive vinyl* (If you are using the cutting machine you need this)
- Plastic snowflakes (I got them at Dollar Tree)
- Hot glue and glue gun
How to Make a Reversible Painted Wood Sign
Using a foam roller, paint a large rectangle in white paint in the middle of the wooden board. 
Next, use the electronic cutting machine to cut the word “BELIEVE” in a font of your choice. Affix the vinyl stencil to the portion of the painted wooden board and press down firmly along the edges. If you don’t have a cutting machine, you could use large letter stickers from the craft store for this step, or you could use a stencil.
Paint over the entire surface with two coats of red paint and let the sign dry. Once it is totally dry, remove the vinyl letters (or stickers) to reveal the word BELIEVE.
Using a pencil, lightly freehand a belt buckle in the middle of the letter “I” and a Santa hat on top of the same letter.
Fill in the belt buckle and hat with black, white, and yellow paint.
Once dry, flip the wooden board over and paint the entire surface with two coats of blue paint.
Using the electronic cutting machine, cut out the phrase “Let it Snow.” Affix to the wooden board and press down firmly along the edges. Alternatively, place large letter stickers on the sign to write the phrase.
Cover the entire surface in white paint, allowing some of the blue paint underneath to show through. Let dry. Once dry, remove the vinyl to reveal the phrase.
Seal both sides of the sign with Creme Wax.
Create a faux distressed finish with Creme Wax in Dark brown, if desired. You can also use the sandpaper to further distress the finish, if desired.
Once dry, hot glue the snowflakes to the “Let it Snow” side of the sign.
This project is really easy but takes a little longer than my typical projects, simply because of the drying time involved! If you’re short on time, you could always use a hairdryer to speed up the process.
It’s worth it to spend a little extra time to get some longevity out of this project though!
If you agree and like this sign, I’d love for you to PIN IT! Thanks!
Happy holiday decorating!
-Bre
You May Also Like This DIY Reindeer Specimen Art
Leave a Reply