Looking for a Dollar Tree laundry basket idea? Why not turn one into a pretty basket! This is a great, low-cost makeover for any home!
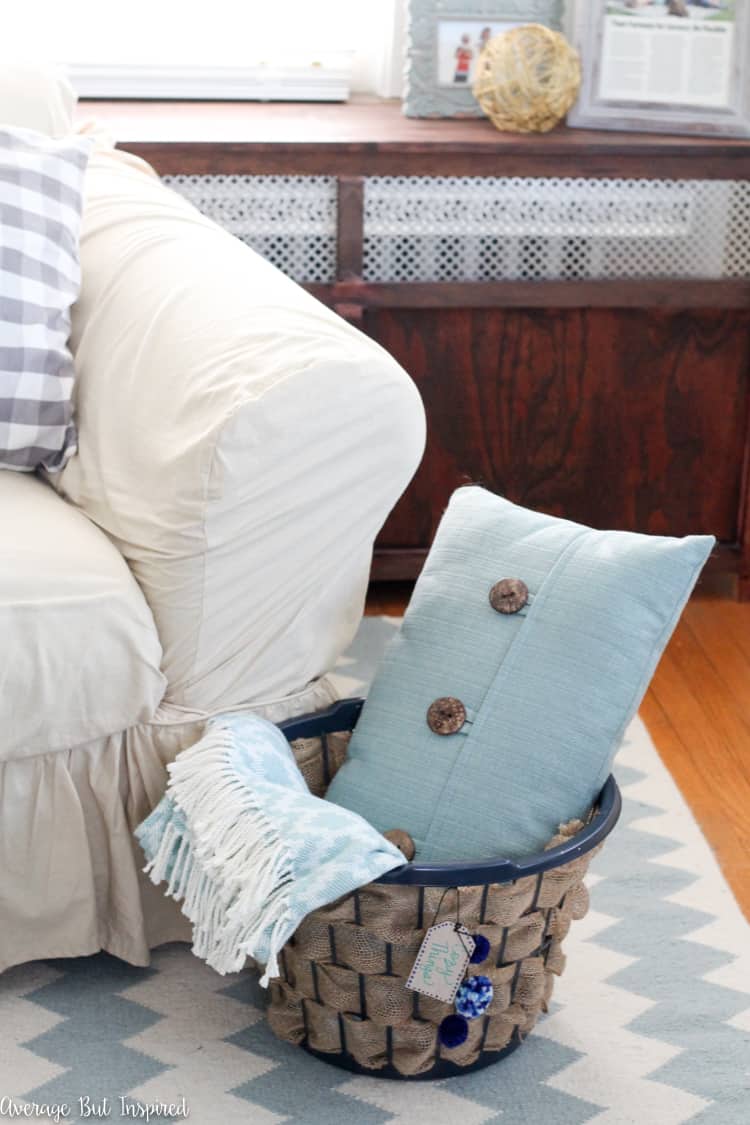
Baskets are an organization and decor staple; you can never have enough! They’re a perfect spot to plop your pillows and blankets, stick a potted plant, or hide some junk when you need to do a quick house pick up before guests arrive.
Because there is no such thing as too many baskets, I decided to add another to my collection with this upcycle of a Dollar Tree laundry hamper to a pretty decorative basket for my office space!
Now, let me show you how to upgrade a plain laundry basket into a stylish burlap basket for your home!
Supplies Needed to Make a DIY Basket from a Laundy Basket
This post contains affiliate links. Please read my disclosure policy for more information.
- 5 inches wide x 10 yards roll burlap ribbon
- Dollar Tree laundry hamper
- Scissors
- Plastic spray paint in the color of your choice
- Small wooden tag
- Paint pen
- Yarn pom poms
How to Make a Burlap Basket from a Laundry Hamper
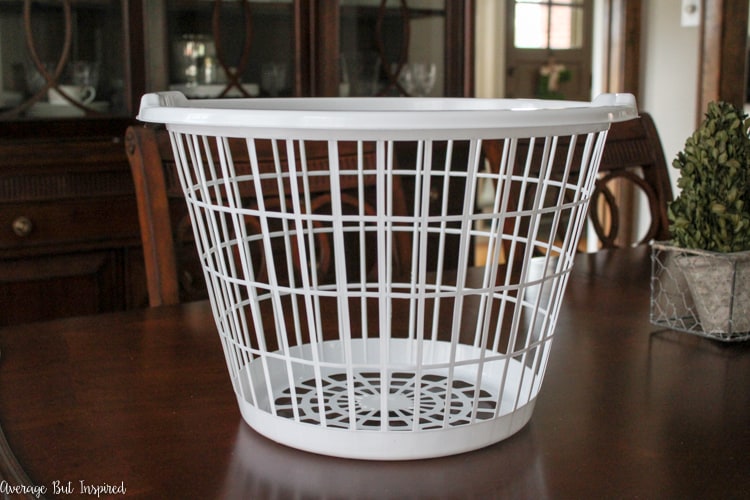
Before I give you instructions, I have to show you the plain old laundry basket that I bought at Dollar Tree. So simple, right?
Step One: Spray Paint the Laundry Basket
I started by spray painting the laundry basket with spray paint that adheres to plastic. My favorite type of plastic spray paint is Rustoleum 2x, but I had to use a different kind from Target for my project.
The Target spray paint worked just fine in case you were wondering.

After I spray painted, I let the basket dry for a looooong time to make sure it really stuck to the plastic hamper, and I plotted the best way to transform it from a laundry basket to a pretty basket.
Love Dollar Tree DIY? I Think You’ll Like These Projects, Too!
Step Two: Cut Burlap Ribbon Into Strips
Once it dried, I grabbed some soft burlap ribbon that is extra wide at 5″ across, and that has sewn edges to reduce fraying. This burlap ribbon comes in an 11 yard roll, which is the perfect size for this project!
To begin, I cut a piece that measured 1.5 times longer than the circumference of the laundry hamper base. (How do you like me throwing around those math terms from second grade?)
Step Three: Weave the Burlap Ribbon
Then I began weaving the burlap ribbon in and out of the slots in the bottom row of the laundry hamper.
Step Four: Cut the Excess Burlap
When I got all the way around the base of the basket, I tied off the ends on the inside of the basket and cut off the excess burlap ribbon.
Step Five: Repeat the Process
Next, I cut another piece of burlap ribbon and moved up to the next row of slats on the basket; repeating the steps above and making sure to start my weaving one column of slats to the right in order to offset the weaving pattern.
I did this until all of the basket was woven with burlap ribbon!
In all, I probably used about 8 yards of the burlap ribbon, so I’m glad this spool came in such a long length!
To finish off this burlap basket, I added a little hang tag that reads “Cozy Things,” and some pom poms. Pom poms are my fave.
Can you believe how easy it was to transform a plain Dollar Tree laundry hamper into a pretty basket?
Jasper couldn’t resist posing for this photo shoot. He’s a big fan of this DIY burlap basket. 🙂
Next time you see one of those small laundry baskets at the store, make sure to pick one up and transform it into a cute piece of functional decor for your home!
And please make sure to pin this post to share the love!
Seana Turner says
Love this little project, Bre. I’m not sure there is no such thing as too many baskets… I have been in houses where I’m an urging the client to do some “letting go,” but this is a great way to transform an affordable basket into something pretty. I had no idea there was spray paint for plastic. I’m always learning from you!
Bre says
YES! Baskets are the best! They are an absolute must have for a tidy home! 🙂 So glad you like this project, Seana! And yes – now go spray paint all the plastic. 🙂
Erica @ Dwell Beautiful says
What an adorable upcycle! I just love how you totally transformed the hamper into something so cute and functional. Such a great project!
Bre says
Thanks, Erica!
Amy | Canary Street Crafts says
Love how this turned out, Bre! Such a simple way to completely change the look of that basket.
Bre says
Thanks, Amy!
Erin says
Bre! This is a great upcycle!! I think it would be a good alternative to a plant pot for a Christmas tree! Pinned and saved 😀 <3
Bre says
Oh that is a great idea, Erin! Especially since the basket is plastic – any Xmas tree goop wouldn’t ruin it!
Amanda Fettig says
I love it!! And you’re right, you can never have enough baskets. 🙂 Such a clever way to use the burlap!!
Bre says
Thanks so much, Amanda!
Kendra @ www.joyinourhome.com says
What a great idea, Bre! Gives a plain basket such a nice touch!
Bre says
Thanks, Kendra!
Bre says
This is such a genius idea Bre! Love it. And I want to steal Jasper 🙂
Bre says
Thanks, Bre! And no way – you’ve got Oaks to keep you busy! 🙂