Pizza pans from Dollar Tree are the new “hot” crafting item. People have so many creative ways to use them, and I’m going to add another Dollar Tree pizza pan craft idea with this pretty memo board project!
This is a great project because it is really fast to make and the supplies used are inexpensive!
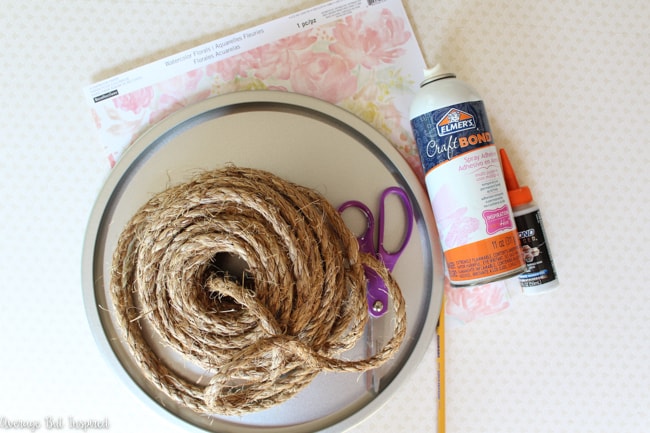
Supplies Needed to Make a Dollar Tree Pizza Pan Memo Board
Some of these links are affiliate links, which means I earn a small commission at no added cost to you if you purchase through them. To read my full disclosure policy, please click here.
- Pizza pan (they’re $1 at Dollar Tree – don’t buy anywhere else!)
- Scrapbook paper
- Spray adhesive (permanent)
- Elmer’s ProBond Adhesive
- Pencil
- Scissors
- Multi-surface acrylic paint or chalky finish paint in the color of your choice (I used this paint)
- Small paintbrush
- Natural Rope (1/4″ thick)
- Ribbon
- Small 3M Command Hooks
Dollar Tree Pizza Pan Craft Instructions
This pizza pan craft project is fun to make!
Step One: Paint the Pizza Pan
To begin, flip the pizza pan so its upside down, and paint around the outer edge. This will ensure that if your scrapbook paper circle isn’t perfectly shaped (mine definitely was not!), it will still look nice and not as much like a pizza pan!

What kind of paint do you use on a pizza pan?
Make sure to use a paint that has good adhesion properties! I used chalk paint because it sticks to just about anything. You could also paint a Dollar Tree pizza pan with a multi-surface acrylic paint. Two coats of acrylic paint will likely be needed, whereas you can probably get away with just one coat of chalk paint.
Step Two: Cut Scrapbook Paper to Fit the Pizza Pan
Once the paint has dried, trace the pizza pan onto the scrapbook paper.
Then cut about 1/4″ smaller than the circle you traced.
Step Three: Spray the Pizza Pan and Scrapbook Paper with Spray Adhesive
Next, spray the pizza pan and the scrapbook paper with spray adhesive, and carefully place the scrapbook paper onto the pizza pan. It will be hard, if not impossible, to move the paper once it’s made contact with the pizza pan, so be very careful in your placement.
If there is a significant amount of scrapbook paper sticking over one side or the other, you can carefully trim the excess with the scissors.
Step Four: Add Rope to the Edge
Next, cut a piece of rope long enough to wrap around the pizza pan.
Glue the rope around the edge of the pizza pan and weigh it down with heavy objects or craft clamps to get it to lie in place and form a strong bond with the pizza pan.
Step Five: Get the Pizza Pan Memo Board Ready to Hang
When everything has dried, flip the pizza pan over and press two 3M Command hooks to the back of the pizza pan, upside down.
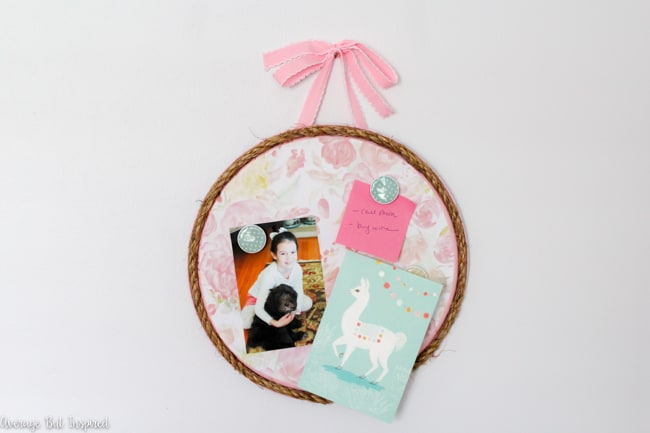
Run a ribbon through the hooks and tie a bow at the top, and then you’re ready to hang your Dollar Tree pizza pan memo board!
It is just that easy to upgrade a pizza pan to a stylish and functional magnet board!
Two important things on this to-do list: (1) call mom; (2) buy wine. (That’s my to-do list; not my daughter’s.)
And I just have to show you these adorable magnets my daughter picked out for her magnet board – they’re animals and pretty glass gems!
I might have to borrow those animal heads for my own workspace! 🙂
If you enjoyed this project, would you please pin it so others can find it, too?
Now that we have a cute magnet board for my daughter’s room, let’s hope that it will help control some of the clutter she manages to keep in there!
-Bre
Carolyn says
I got the supplies to make some of these for Christmas presents. I can’t wait to try it, I’m new at crafting.
Bre says
Hi, Carolyn! That is so fun to hear!! Are you hooked on crafting yet? I bet you’ll be amazed at how quickly your supply stash grows – ha! 🙂 Thanks again for reading! Hope you’re having good luck with your projects.
Jackie says
Love this! Can’t wait to try it!!
Bre says
Awesome! Thanks so much, Jackie! Have a great day!