• Skip to primary navigation
  • Skip to main content
  • Skip to primary sidebar
Average But Inspired logo - DIY and craft

Average But Inspired

Craft a home you love. DIY and craft tutorials.

  • About
    • Contact Me
    • Disclosures
    • Privacy Policy and Copyright Policy
  • DIY
    • Furniture
  • Crafts
    • Dollar Store Crafts
    • Seasonal
      • Patriotic & Summer
      • Valentine’s Day
      • Easter & Spring
      • Fall & Halloween
      • Christmas & Winter
  • Home Decor
    • Organization
  • Shop
    • DIY Guides
  • Home

Organization

DIY Ribbon Holder Tutorial: a Simple Ribbon Rack

April 3, 2023 by Bre 4 Comments

Looking for an effective way to organize ribbon? Make this DIY Ribbon Holder and get your ribbon stash in order!

Confession: my ribbon storage used to consist of a box where I’d throw ribbon spools and ribbon scraps alike.

It was a jumbled mess and almost impossible to find what I needed for any given project. I was like an animal burrowing in the dirt in that ribbon box! Imagine wild tails of ribbon flying everywhere in my craft room. What a disaster!

When I was given a large quantity of beautiful craft ribbon recently, I knew this had to change! I needed an effective ribbon storage organizer: something more sophisticated than my janky box.

But to my surprise, the ribbon organizers available at craft stores were too small, and the ribbon storage racks available online were too expensive. No thank you!

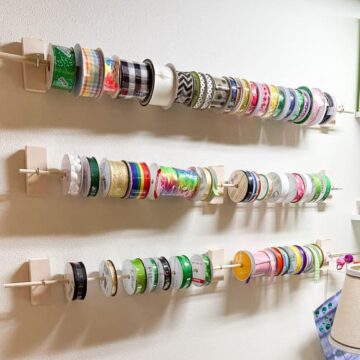
Since nothing pre-made seemed to meet my needs, I knew I needed to take matters into my own hands. As a result, I came up with this DIY Ribbon Storage Rack, which has given me an amazing way to store ribbon and keep my craft area tidy!

A DIY Ribbon Holder is an amazing way to organize your ribbon stash! This wall mounted ribbon organizer costs hardly anything to make and goes together easily.

Let me show you how you can keep your ribbon organized, too!

DIY Ribbon Organizer Supplies

This post contains affiliate links. Please read my disclosure policy for more information.

These are the exact supplies I used to make the ribbon holder as shown in this post. Feel free to modify to make this project your own!

  • Wooden dowels (I used two 3/16″ dowel rods and one 5/16″ dowel. Note that these are the long dowels purchased from home improvement stores; not the short dowels you purchase at a craft store. Also, before purchasing dowels, it will be helpful if you look at your ribbon collection to find the spools with the largest center holes and the smallest center holes. Purchase dowels that fit both sizes to accommodate your collection.)
  • 1″ x 2″ common board (I cut one board into six pieces that are each approximately 3″ long)
  • Circular saw or hand saw (or have the boards and dowels cut at the home improvement store)
  • #6 Zinc screw eye hooks (I used 8 total: 6 with the 3/16″ wooden dowels and 2 with the 5/16″ dowel)
  • Command Picture Hanging Strips (12 pound rating or more)
  • Recommended: Electric drill
  • Optional: paint

How to Make a DIY Ribbon Holder or Ribbon Rack

This wall mounted ribbon storage goes together so quickly and easily that I know you’re going to wish you made one for your ribbon collection sooner!

Step One: Measure and Cut

The first step is to determine how much space you have for your ribbon organizer. Measure the wall space, and then cut the dowels to fit within the width of that space.

It’s very easy to cut the dowels with a hand saw, so you don’t need to use power tools for this part!

Next, cut the common board into 3″ pieces. I needed eight three-inch pieces (“blocks”) to make the ribbon storage shown in this post (three rows of ribbon storage).

Cut a 1x2 board into 3" pieces to make the DIY ribbon holder and ribbon organizer.

The thinner 3/16″ dowels required three blocks each, while the 5/16″ dowel only needed two.

I used my circular saw to cut the board, and I wasn’t overly precise in my cuts. If you want the blocks to be perfectly straight, it may be better to use a hand saw in a miter box (tedious) or a miter saw.

Cut the common 1x2 board into 3" pieces. These blocks serve as the backer for your ribbon rack.

Note: if you want to paint your DIY ribbon organizer, do it now – before you hang it on the wall! That might sound obvious, but I didn’t paint at first, and only after I had it on the wall did I decide to paint the wooden blocks. That was dumb.

Step Two: Attach Screw Eye Hooks to the Wooden Blocks

Next, I drilled a small pilot hole in the middle of each wooden block, and was careful not to drill all the way through.

Then I screwed a screw eye hook into each of the blocks, making sure the screw hooks were straight up and down on each block.

Put screw eye hooks into the wooden blocks. The screw eyes are what the dowel will rest in.

Note that I did not screw them all the way into the blocks – it is actually good to have them sticking off the block as much as possible. The more space you have between the dowel and the wall, the easier it will be for the ribbon spools to spin when needed.

Step Three: Fasten the Wooden Blocks to the Wall

Instead of anchoring the blocks to the wall, I decided to use Command Picture Hanging Strips, which are one of my favorite inventions of all time. Not only do I love them because they don’t damage the wall, but they also make it really easy to get things like this level! You can readjust them easily until you get it just right, which is wonderful for a (sometimes) inaccurate person like me!

Anyway, I used the 12 pound Command Picture Hanging Strips, and mounted two on the wall; putting them at a distance that the 5/16″ dowel could rest in the screw hooks with a little bit of overhang on each side.

The wooden blocks with screw eyes inserted into them are attached to the wall.

I put some of the largest ribbon spools onto the dowel, and then used that sizing to determine how far down to hang the next set of wooden blocks and corresponding dowel.

The second wall-mounted ribbon rack is hung.

The next two rows were for the skinner dowels, which cannot accommodate as much weight without sagging, so I placed an additional block with hook in the center for each of the 3/16″ dowels (not pictured above!).

Step Four: Place the Ribbon Spools Onto the Ribbon Rack

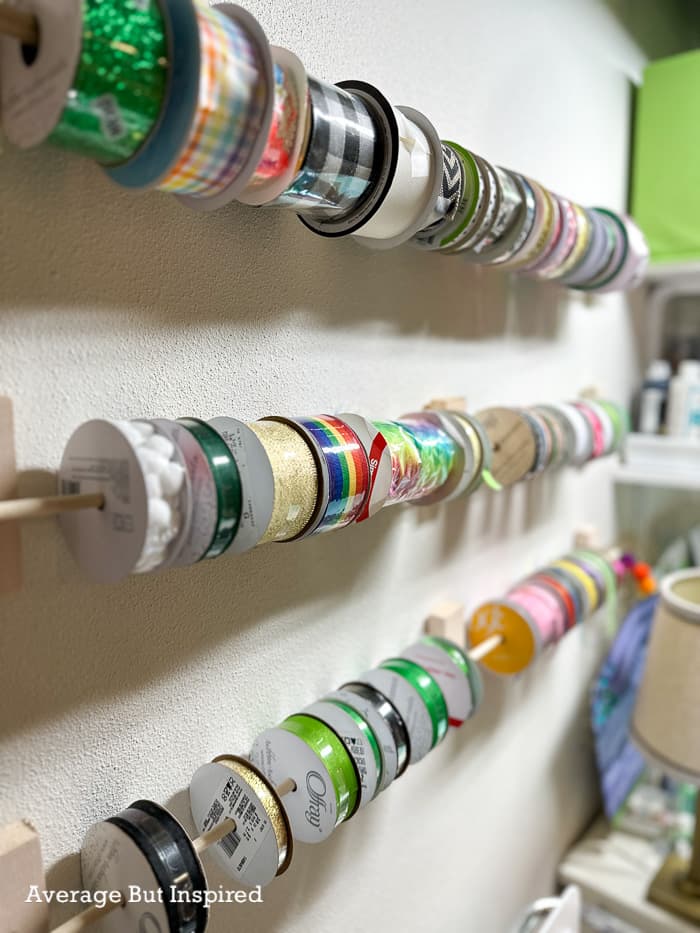
Finally, slide one end of the dowel out of the screw hook, and place the spools of ribbon onto the new ribbon rack!

Ribbon spools with large center holes fit best on the wider dowel, whereas ribbon rolls with smaller center holes fit best on the skinnier dowels.

This inexpensive DIY ribbon holder organizer makes ribbon storage a breeze.

This inexpensive but effective method for storing ribbon has made my craft table work area so much neater! And, it’s so much easier to find what I need! (I even found ribbon that I know is from 2103! I used it to make this DIY Ribbon Chandelier!)

How to Organize Ribbon Scraps

While the DIY ribbon storage organizer has solved the problem of what to do with all those spools of ribbon, you might be wondering what I did with the previously mentioned ribbon scraps.

Obviously they can’t hang on the rods like the spools!

Well, my “janky” old ribbon box is still being used, but in a much more effective way now!

I’ve grouped types of ribbon or string and put them into Ziploc bags within the box. But another creative idea for DIY ribbon storage of scraps is to wrap them around cardboard scraps. Store them in old shoe boxes or plastic storage containers.

More Ribbon Storage Organizers

Okay, if my DIY ribbon storage ideas aren’t for you, maybe you’d benefit from a premade or store-bought ribbon organizer! Just because those didn’t work for me doesn’t mean they won’t be a perfect solution for you.

Here are some of the best ribbon storage options I’ve found for your craft room! Click any picture to shop.

blank

**

Comment below with any questions about my DIY Ribbon Storage Rack! I’m always happy to help.

Make this and get your ribbon storage in shape! This DIY ribbon organizer is an easy way to store ribbon on the wall with no damage!

Filed Under: Crafts, DIY, Organization

Deep Pantry Organization: 5 Tips To Make the Most of Your Pantry!

January 3, 2023 by Bre 1 Comment

Deep pantry organization tips to help you make the most of your space!

The dreaded tall pantry with deep shelves: definitely NOT the walk in pantry of our HGTV dreams!

My own kitchen pantry storage situation was less than ideal (aka: it was a MESS). Sadly, I did nothing to the pantry when I did my DIY Kitchen Remodel.

Struggling with deep pantry organization? This tall pantry with deep shelves was a mess! But simple changes made it organized and clean.

It took me two years of tweaking and experimenting to create an organized pantry that maximizes use of the deep shelves and the vertical space.

But now I have a fantastic deep pantry organization system in place. YAY!

A deep pantry can be difficult to organize, but this post gives you the tools you need to make the most of a tall and deep pantry.

So how, exactly, do you organize deep pantry shelves? Read on for five great deep pantry organization tips! You’re on your way to loving your pantry with deep shelves!

This post contains affiliate links. Please read my disclosure policy for more information.

Clean Out the Pantry

The essential first step in any pantry organizing project is cleaning out the old food, expired items, and things that are no longer needed.

You’ll be amazed (in a deep pantry, especially) how much junk is in there!

Once you’ve gotten rid of the rubbish, you’ll have a much better picture of what you’re actually working with. (Side note: I’m not British, but I think “rubbish” is such a charming word.)

Create Zones

Next, group your pantry items into zones or categories such as everyday items, lesser-used items, and appliances.

Knowing which products are the most frequently used (and vice versa), will help dramatically with laying out the pantry storage.

Start With the Top Shelf

In a tall pantry, there tends to be a significant dead space simply because people can’t easily reach items stored above their heads.

But, consider this a storage goldmine because the upper shelf is a wonderful spot to stash food items, appliances, and paper products that are not needed on a daily basis.

Use shelf risers to make use of vertical pantry space

Use shelf risers at the back of deep shelves, and place items on top of them so they are visible when the pantry is open.

I placed paper plates, paper napkins, and plastic utensils on the shelf risers in the top back of my pantry because I do not access these daily. However, since they’re high above the things in front, I can see them easily (and I’m making use of that extra vertical space in the pantry).

Clear bins and containers help you see what’s on higher shelves

Then, in front of the shelf risers, use large clear bins to house things like baking supplies (baking powder, baking soda, brown sugar, etc.), that don’t need to be accessed regularly.

Clear bins on top shelves of a deep pantry. Shelf risers in the back put additional items up high where they can be seen.

Placing these things in clear containers also gives a quick view of what is stored where. No more digging around and making a mess to find the cornstarch!

Pro tip: keep a folding stool in the bottom of the pantry to make accessing the high shelves a snap.

Store a folding stool in a deep pantry to access upper shelves and hard to reach spots.

Put the Most-Used Items in the Middle Shelves

Next, it’s time to make those deep shelves in the middle of the pantry work for you. Because this area of the pantry is at eye-level, this is where you place the things you use the most.

Add pull out drawers to deep pantry shelves

To maximize deep pantry storage, adding pull out drawers is a MUST (in my humble opinion).

The first part of my pantry organization work was to add Elfa drawers from the Container Store. They made a huge difference instantaneously, and went a long way toward keeping my pantry organized.

I installed sliding drawers on three of the deep shelves in the middle of the pantry. I used a variety of heights and sizes based on the types of food items I was storing.

For breads and chips, I used a wider but shorter Elfa drawer.

For pastas and grains, and then canned goods, I used tall and wide Elfa drawers.

And finally, for snacks and treats, I used tall and extra narrow Elfa drawers.

These drawers are wonderful for deeper pantries, because they let you see and access everything on a shelf simply by pulling out the drawer. You’re not sticking your head into the shelf and moving things around (making a mess!), trying to find what you need.

And, clip on labels placed on the front of the drawers help ensure that people are putting things where they belong, and not treating the pantry as a dumping ground after family members go grocery shopping.

Keep space for adjustable shelving

Instead of outfitting all of the shelves with drawers, I intentionally left some open space. This allows me to fit in those oddly-shaped items or rare purchases that don’t fit in a drawer. It’s important to maintain some flex space in a pantry.

Use clear containers for food items in flimsy packaging

Baking supplies (like flour and sugar), and breakfast items (like cereal), tend to be packaged in flimsy bags or cardboard. These packages open, causing the food inside to go bad or make a mess in the pantry. They also take on strange shapes that don’t work well for organizing.

Transferring items like this to clear storage containers eliminates all of these problems, and it lets you quickly see how much of each product you have.

For the middle pantry shelves, I purchased clear containers for cereal. My kids NEVER closed the cereal boxes properly, and the cereal was always stale. They also shoved the boxes wherever they could find a spot.

Instead of placing food items with flimsy packaging into the pantry, transfer them to clear food storage containers. This lets you see what you have, it leads to fewer messes, and it allows items to be stored more uniformly.

Using these clear cereal containers has been a game changer for our organized pantry storage (and the taste of our morning breakfast- ha!).

Add small containers or lazy susans for more effective storage

Depending on your needs, using small containers, stacking bins, or a lazy susan may help you create more space in the pantry.

For example, I use a small basket in the canned goods drawer to house soft-sided items like seasoning packets.

I do not use a turntable in the pantry (I use one in the refrigerator though), but those can be excellent additions – especially for things like canned goods.

Make Use of the Lower Shelves in a Deep Pantry

As with the upper shelves, the lower shelves in a deep pantry can be very useful if organized correctly! They can be harder to access, so it’s essential to use this pantry storage area for the right items (not the food you need quick access to).

Place small appliances on a rolling cart

For ease of access, use a rolling cart at the bottom of the deep cabinet to store heavy items you don’t need regularly.

I keep my Instant Pot (which I LOVE, by the way – my favorite appliance ever!), on a rolling printer cart. Instead of having to reach deep in there and pull it out, I just roll the cart out and grab it.

A rolling cart in the bottom of a deep pantry is a perfect place to store small appliances like an Instant Pot.

The shelves on the bottom of the cart also give me a space to store extra food items, like snacks that aren’t ready to be opened and placed in the snack drawers on the middle shelves! I call this my “stockroom.”

Add portable drawers

As with the middle section of the pantry, drawers can be very useful in the bottom.

A portable Elfa drawer stand in the base of my pantry is a dedicated spot for my husband to stash his nutrition supplements that he uses for his triathlon training. The shelf on top is a great spot to store drinks before they make it to the refrigerator.

Because the drawer unit is portable, it can be moved to accommodate any large items that need to be stored in the pantry at any time. It gives us flexible space that makes the most of the benefits of deep pantry storage.

Create extra kitchen storage

The base of a deep pantry can also be a perfect spot for extra kitchen storage. Things like cleaning supplies and large bags are perfectly placed on the bottom shelf or in the base of the pantry.

For example, I put reusable shopping bags in a basket on the floor of the pantry. I also have enough space to store any overflow items from other cabinets or when it’s a fully stocked pantry.

***

Alright, well would I rather have a walk in pantry like you see in all the new homes on TV? Yes, yes I would.

But, all of these products and solutions that I’ve added to my deep pantry over the past two years have made a huge difference, and I no longer hate my pantry. That’s a win!

A tall, deep pantry got an organizational makeover. It features pull out drawers, a rolling cart, clear bins, and more. All of these organization items make this deep pantry more user-friendly.

I hope my experiences will help you arrive at a positive working relationship with your pantry, too!

Shop My Deep Pantry Organization Items

Although I linked the products I used throughout the post, here’s an easy reference list, too!

  • Shelf Risers
  • Large Clear Bins
  • Folding Stool
  • Clear Food Storage Containers / Cereal Containers
  • Small Bins / Baskets
  • Rolling Cart
  • Clip On Labels
  • Elfa Drawer Stand / Portable Drawers
  • Elfa Pull Out Drawers (I used the Elfa Extra-Narrow 2-runner for snacks and treats, the Elfa Narrow 1-runner for bread and chips, and the Elfa narrow 2-runner for pasta, grains, and canned goods)

Filed Under: Organization

Cardboard Box Ideas: Upcycled Cardboard Wall Organizer

September 29, 2022 by Bre 6 Comments

Upcycle a cardboard box into a cool wall organizer.

Let’s face it: with the ease of online shopping, we are all drowning in cardboard boxes! You can toss them in the recycling bin, or you can transform some by finding clever cardboard box ideas online, like this upcycled cardboard wall organizer!

I made this cardboard organizer all the way back in 2013! Because of that, you’ll have to forgive me for the poor image quality and sizes. (Thankfully I’ve improved a lot since that time.) The idea and instructions are still good, though!

Looking for cardboard box ideas? Look no further! Learn how to upcycle a cardboard box into a beautiful and functional wall organizer. This post teaches you how to do that in an easy afternoon project.

This idea hit as I was hauling yet another empty jumbo box of diapers to the recycling bin – use a diaper box to DIY a fabric wall organizer!  Smart, right?

Hey! Here’s another great idea for using a cardboard box: use it as a template to create a cool DIY accent wall!

Cardboard Wall Organizer Supplies

These are the supplies I used to turn a cardboard box into a decorative and functional wall pouch. Some of these links are affiliate links, and you can get more information about that in my disclosure policy.

  • Empty cardboard box
  • Sharp scissors or utility knife (these electric scissors making cutting through cardboard a breeze!)
  • Spray adhesive
  • Hot glue and hot glue gun
  • Fabric (you need enough fabric to cover one side of your cardboard plus 2″ extra on all sides. Then you also need enough fabric to create pockets to fit your cardboard, plus 2″ extra on all sides.)
  • Iron
  • Command Picture Hanging Strips
  • Optional: flat thumbtacks

Instructions for Making a Cardboard Wall Pouch

Think you want to give it a try?  Here are my instructions for creating your own cardboard wall pouch!

Making the Cardboard Base

First, cut a flat piece of cardboard to the desired size. This will serve as the base of the wall organizer.

Next, cut the fabric that will cover the base piece by laying that fabric on top of the cardboard and cutting so that approximately 2″ of fabric hangs over each side.

Upcycle a cardboard box into a DIY wall organizer! Covering the cardboard with fabric helps it look pretty.

Using the spray adhesive, spray the front side of the cardboard with the adhesive and smooth the fabric over it.  I recommend doing this outside.  The excess fabric will be hanging over each side, with no adhesive on it.

Then, cut a diagonal slit in each corner of the excess fabric.  This will allow you to fold the fabric inwards for gluing much more easily.

Learn how to upcycle a cardboard box and turn it into a wall pouch to keep things organized.

Use the hot glue gun to fasten the excess fabric of your base piece to the back of the base cardboard.

Create a cardboard box wall organizer.

Making the Wall Organizer Pockets

Next, determine how large you want the fabric pockets to be.  Mine are approximately 8″ tall, so I cut my fabric 9.25″ tall by the width of my box plus 2″.

To create a nice edge, fold the bottom of the fabric in approximately .5″ and iron it flat.

Create pockets with fabric to add to a DIY wall organizer.

If you’re creating two pockets, repeat that process on the second piece, and also do this to the top of that fabric pocket.

Next, glue the ironed seams down with hot glue.

Attaching the Pockets to the Base Cardboard

Once the pockets are glued, hot glue the bottom pocket to the fabric-covered base board.  I took the un-ironed side and hot glued it around the base of the cardboard.

Next, wrap the pocket sides around and hot glue them down.  I pulled the fabric tight at the base and left a little more of a gap at the top in order to make the pocket a bit roomier.  You can see the gap in the photo below.

Ironing the edges of fabric to create pockets for a DIY wall organizer gives a clean look.

Take the fabric piece that has both the top and bottom seam glued down.  Hot glue the bottom edge finished seam to the front of the base board. Then, repeat the process of wrapping the fabric around the sides of the cardboard and hot gluing.  The back of your board will now look like this:

This is the back of a cardboard box wall organizer.

For added style, press in metal thumbtacks around the base. These look like nail heads and add a cute touch.

This is a cardboard box that has been transformed into a pretty DIY wall organizer.

I hung this directly on my wall with 3M Command Picture Hanging Strips.  I seriously love those things.

This is such a great cardboard box idea, and an awesome way to help your countertop or desk stay clutter free! Let me know if you have any other great cardboard upcycling ideas to share, too! I love to hear from you in the comments and on my social media!

Filed Under: Crafts, Organization

Tips on How to Arrange a China Cabinet

March 2, 2022 by Bre 44 Comments

Learn how to display china in a china cabinet with the helpful tips in this post! She shows you how to arrange china in a hutch for style and functionality.

While working on a mini-makeover of my dining room, I realized that I had to tell you about an AMAZING change in the room that I made for FREE.

Ready?  I reorganized my china cabinet.  I know it sounds ridiculous, but it has made an incredible difference in the look of my dining room!

Before I show you my new and improved china cabinet, I will show you the “before.” 

Prior to repainting the dining room (which required emptying the china cabinet of its contents and moving it), I snapped this photo so that I would remember where I had everything once I was able to put it all back.

Great tips on how to arrange a china cabinet for maximum visual impact and organization!

When it came time to put everything away again, I looked at the photo and thought “Ew.  This looks pretty terrible.”  Bland and disorganized – the china cabinet sort of blended into the wall without making any sort of impact at all.

P.S. this is the china cabinet from my old house.  To see my NEW built-in china cabinet and how I displayed china in that cabinet, check out my Dated Oak China Cabinet Makeover post and my Modern Vintage Dining Room Makeover.  I think you’ll love it!

China Cabinet Inspiration Pictures

I decided that there must be a better way to do justice to the china and crystal that I’ve used three times since my wedding in 2006 (lol!).  So I scoured Pinterest and Google to find just the inspiration that I needed.

The first image I came across was from Katie at Bower Power.  Look at her lovely china hutch and the beautiful way she organized her dishes.  So much nicer than mine.

This china cabinet from Bower Power is a beautiful example of how to organize a china cabinet.

The next image that caught my eye was from Jennifer at Dimples & Tangles.  Of course I LOVED the green painted cabinet, but I also noticed how nicely her dishes were arranged.

Just as with Katie at Bower Power’s china hutch, many of Jennifer’s dishes were displayed vertically to make each shelf within the cabinet pop.  My dishes were simply stacked one on top of the other, so I knew this was a change I needed to make.

This china cabinet from Dimples & Tangles is a beautiful example of how to organize a china cabinet.

Finally, I found an awesome post by Darla at Heartwork Organizing about how to arrange a china cabinet.  She gave fantastic tips about choosing a focal point, arranging with symmetry in mind, and about products that help with the display of china.

Heartwork Organizing shows you a wonderful way to organize a china cabinet.

How to Arrange a China Cabinet

Armed with these inspiration pics and advice, I reloaded my china cabinet in a way that has made an INCREDIBLE impact on the room.  If I do say so myself, my china cabinet is now a beautiful focal point instead of a bland-but-overwhelming piece of furniture.

Great tips on how to arrange a china cabinet for maximum visual impact and organization!

I only used things I already had to revamp my cabinet, and I am shocked at the improvement!  (But here’s a tip I can share from arranging my gigantic china cabinet in my new home: fill in empty spots with thrift store china, crystal, silver, etc. You’ll spend hardly any money and get that china cabinet display just right!)

Great tips on how to arrange a china cabinet for maximum visual impact and organization!

The contrast of the white dishes against the dark furniture has really helped to lighten up the room, and the symmetrical display of the items inside makes it so much nicer to look at.

Great tips on how to arrange a china cabinet for maximum visual impact and organization!

Wondering how to stand plates vertically in a china cabinet? If your china cabinet or china hutch doesn’t have a built-in ledge for displaying plates, use clear acrylic plate stands (affiliate link) to stand them up vertically without covering them up. 

The linked acrylic plate stands (affiliate link) are what I use in my new home’s built-in china cabinet, and they work wonderfully for displaying china plates vertically.

Great tips on how to arrange a china cabinet for maximum visual impact and organization!

Stacking china pieces like plates, bowls, and/or coffee cups also creates interesting variations of height within the china cabinet.  

Great tips on how to arrange a china cabinet for maximum visual impact and organization!

All of these simple tweaks make it easy to arrange a china cabinet and create a gorgeous backdrop for your next dinner party.

Let me know if you have any other tips for arranging a china cabinet that you’d like to add. (And PS – now that you’ve got a plan for your china cabinet, check out my post on how to organize a pantry!) 

Learn how to organize your china cabinet so that it not only looks pretty but functions well! These china cabinet organization tips are not to be missed!

Filed Under: home decor, Organization

Small Coat Closet Organization Makeover

March 13, 2019 by Bre 2 Comments

blank

Small coat closet organization is essential! With a tight space, you need to maximize your storage. This post will show you how!

Spring is right around the corner and your mind is probably shifting away from winter coats and toward spring jackets, but is your closet? 

This is the time of year when coat closets are exploding – hats, gloves, boots, coats, and more overflowing!  That’s why it’s the perfect time for a coat closet organization makeover. 

See how I turned my mess of a coat closet into a clean and organized closet that works so much better!  

Whip that coat closet into shape with the help of this post that gives you coat closet organization tips and tricks! Your coat closet will get organized and stay organized.

This post contains affiliate links.  Please read my disclosure policy for more information.

Before I show you the pretty and organized coat closet, I have to show you what I started with.  I always show you the ugly truth on my blog, and this is no exception! 

Such a DISASTER!  There were so many objects crammed into this small coat closet that we couldn’t even fit it all in properly. 

The "before" of this coat closet is a disaster. This disorganized coat closet got an organizational makeover and functions so much better!

And the absolute WORST part was when I cleaned it out, I found a hole in the wall that was hidden by the shoe rack, and it was clear that mice had been using that hole as a home or escape route. 

So gross – especially because they had easy access to boots, snow pants, and whatever else was carelessly tossed on the floor! 

The "before" of this coat closet is a disaster. See how the coat closet got organized and functions so much better!

My husband had a fit every time he opened the closet door, and we had to get this space organized.  

Coat Closet Organization Step 1 – Clear it Out

The first step was to clear everything out of the coat closet.  Yes, it meant that coats were strewn about in various rooms, but as with my Linen Closet Makeover, this is one of the most important steps! 

The first step of a coat closet organization makeover is to clear everything out.

Once everything was out of the closet, I went through and donated coats and warm items that didn’t fit or were no longer needed. 

I also tossed all of the wire hangers, and reassigned the plastic hangers to other closets.  (More on that later in the post.)

Small Coat Closet Organization Step 2 – Freshen it Up

Next, I ripped off the piece of quarter round with the hole in it and replaced that so no more mice could enjoy the closet. 

Then I went to Home Depot and talked to a paint expert about what paint is best for a closet.  She quickly steered me away from my plan to go dark on the walls (I wanted to hide scuff marks), explaining that lack of light in closets means you should go light or it will be even harder to see anything.  Smart!

She also sold me on buying a premium paint with primer in an eggshell finish so that it would reflect light better and have better durability. 

The second step of a coat closet organization makeover is to paint the closet.

I gave the closet two coats of paint and it looked so much fresher!  Because it isn’t a visible spot, I even let my kids try painting the walls.  My inner control-freak had to really concentrate on not correcting them too much.  It was hard for me, but I think I did okay, and they enjoyed “helping” me.

How About Some Organizing Help With These Spaces, Too?

Small Pantry Organization

Small Linen Closet Organization

Narrow Coat Closet Organization Step 3 – Make it Pretty and Functional

Once the paint dried and had a couple of days to cure, I added all new wood coat hangers so that coats would hang evenly in the closet and hangers would not bend and become deformed from the weight of the coats. 

For around a dollar a piece, wooden coat hangers were such a deal and a welcome organizational addition to my coat closet! 

Using heavy duty wood hangers in a coat closet helps the closet stay organized.

I also added decorative wrapping paper with spray adhesive to the undersides of the shelves for a playful pop of pretty!  A similar look could be accomplished with peel and stick wallpaper or shelf liner.

And, heavy duty coat hooks were added at the front of the closet for a convenient spot for my kids to hang their coats at the end of the day.

Coat Closet Organization Step 4 – Give Everything a Place

Previously on the coat closet shelves, I had mismatched soft-sided baskets.  With the amount of stuff in them, they became misshapen. 

I swapped them with large Y-weave plastic baskets , which are durable and really great quality! 

Items that aren’t used regularly go in these baskets that are harder to reach.

Pretty paper lined shelves help this coat closet look better!

I added labels so everyone in my family will know what goes in each basket.  I recommend durable clip on labels, as paper labels will not last very long.

I am a firm believer that labels help keep us all in check!  In my experience, that is the key to keeping a space organized – give everything a spot.

And every day items, like hats, gloves, and scarves, go in a clear pocket shoe organizer that hangs on the door.  Easy to access and easy to put away.

A clear shoe hanger functions perfectly in a coat closet to keep items like scarves, hats, and gloves organized.

Small Coat Closet Organization Step 5 – Put it Back Together

Finally, everything was ready to go back into the coat closet!  The coats were hung . . . 

This coat closet organization makeover is one not to be missed! Get great tips for organizing a coat closet and on how to keep it organized in the future.

and the boots got a new space with a rubber boot tray and a (slightly wobbly) boot rack that I made with scrap wood.  I had to build my own because there weren’t any pre-made ones that maximized the space in my closet. 

A narrow umbrella holder and functional boot rack help this coat closet organization makeover succeed.

The umbrellas also found a perfect space in this narrow umbrella holder that accommodates golf umbrellas and smaller umbrellas! 

Love this coat closet organization makeover! Learn how to make a small coat closet function for you!

It’s really hard to photograph a small space like a coat closet, so I hope you can tell what an improvement this is!  I also hope these coat closet organization tips will help you make your coat closet a better storage space for you and your family.

Our small coat closet is no longer a source of frustration, and it’s really nice to be able to hang guests’ coats in here now!

Filed Under: Organization

DIY Hanging Mason Jar Storage

August 29, 2018 by Bre Leave a Comment

blank

Most of the time I share “pretty” things on my blog – like decor or design projects.  But sometimes projects that aren’t as “Instagram worthy” (as the kids say these days), are the ones that deserve the most love because they’re actually useful!  That’s how I feel about this DIY Hanging Mason Jar Storage project, which is a BRILLIANT* way to gain some extra storage space for small things by using the space above your head (or under a cabinet or shelf, perhaps)!  (*No, I’m not full of myself calling this project brilliant – it was my husband’s idea so he’s the brilliant one!)  This is SO SMART! Take advantage of unused space on the ceiling or under a cabinet to create hanging mason jar storage! Use the mason jars to store and organize all kinds of small things - from tools to screws to craft supplies to spices! It couldn't be easier to create a hanging mason jar storage system in your home. This post shows you how!

We installed our hanging mason jar storage in our utility room and filled the jars with screws and such, but you could use the exact same concept to store things like spices, craft supplies, and all other small odds and ends!  Keep reading to see just how easy this is to make!

Supplies Needed for DIY Hanging Mason Jar Storage

This post contains affiliate links.  To read my full disclosure policy, please click here.  

  • Wood Strip cut to fit the space where you’re hanging the jars (we used a 1×4)
  • Plastic mason jars (note: we used glass mason jars because it’s what we already had, but if it were up to me, we definitely would have used plastic)
  • Drill
  • Screws to mount the mason jar lids onto the wood (make sure you use screws that are shorter than the depth of the wood into which you’re drilling)
  • Screws to hang the wood strip (and also anchors if your space requires it) – we used drywall screws
  • Label stickers

How to Make DIY Hanging Mason Jar Storage

Begin by cutting a wood strip to the correct length (and depth, if necessary), for the space in which you plan to hang it.

Next, drill pilot holes into the mason jar lids.This is SO SMART! Take advantage of unused space on the ceiling or under a cabinet to create hanging mason jar storage! Use the mason jars to store and organize all kinds of small things - from tools to screws to craft supplies to spices! It couldn't be easier to create a hanging mason jar storage system in your home. This post shows you how!

Place the lids onto the wood strip and screw them into place.  This is SO SMART! Take advantage of unused space on the ceiling or under a cabinet to create hanging mason jar storage! Use the mason jars to store and organize all kinds of small things - from tools to screws to craft supplies to spices! It couldn't be easier to create a hanging mason jar storage system in your home. This post shows you how!

This is SO SMART! Take advantage of unused space on the ceiling or under a cabinet to create hanging mason jar storage! Use the mason jars to store and organize all kinds of small things - from tools to screws to craft supplies to spices! It couldn't be easier to create a hanging mason jar storage system in your home. This post shows you how!

Once all of the lids are in place, screw the wood strip into the ceiling or area where you want to hang it.  Make sure to securely attach it to the ceiling!  Find your studs and/or get anchors that will hold the weight!  Obviously you don’t want this to come crashing down on your head.  Ouch.This is SO SMART! Take advantage of unused space on the ceiling or under a cabinet to create hanging mason jar storage! Use the mason jars to store and organize all kinds of small things - from tools to screws to craft supplies to spices! It couldn't be easier to create a hanging mason jar storage system in your home. This post shows you how!

Put the objects you’re storing into the jars and screw them onto the lids!  This is SO SMART! Take advantage of unused space on the ceiling or under a cabinet to create hanging mason jar storage! Use the mason jars to store and organize all kinds of small things - from tools to screws to craft supplies to spices! It couldn't be easier to create a hanging mason jar storage system in your home. This post shows you how!

Add labels to the bottoms of the mason jars to help you identify the contents of the jars.  This is SO SMART! Take advantage of unused space on the ceiling or under a cabinet to create hanging mason jar storage! Use the mason jars to store and organize all kinds of small things - from tools to screws to craft supplies to spices! It couldn't be easier to create a hanging mason jar storage system in your home. This post shows you how!

And that is IT.  So incredibly easy and such a great way to maximize space that would normally go unused!  This is SO SMART! Take advantage of unused space on the ceiling or under a cabinet to create hanging mason jar storage! Use the mason jars to store and organize all kinds of small things - from tools to screws to craft supplies to spices! It couldn't be easier to create a hanging mason jar storage system in your home. This post shows you how!

Before making this hanging mason jar storage system, we had boxes of screws and nails all over the place.  It was such a mess!  This truly helped us get our utility room area under control.  This is SO SMART! Take advantage of unused space on the ceiling or under a cabinet to create hanging mason jar storage! Use the mason jars to store and organize all kinds of small things - from tools to screws to craft supplies to spices! It couldn't be easier to create a hanging mason jar storage system in your home. This post shows you how!

So what do you think – was my husband’s idea brilliant or what?

-Bre

Looking for More Organization Ideas?  How About My Linen Closet Makeover? blank


Filed Under: Organization

  • Page 1
  • Page 2
  • Page 3
  • Go to Next Page »

Primary Sidebar

Let’s Connect!

Hi, I’m Bre! Thanks for visiting Average But Inspired, where I show you how to work with what you’ve got to create a home you love.

Bre of Average But Inspired - a DIY and craft blog

Love DIY? Subscribe to Get Posts E-mailed!

How Can I Help You?

blank

How to Paint Over Tile

blank

Limewash Stone Fireplace Makeover: Bye Bye Orange Stone Fireplace, Hello Neutral Stone Beauty!

blank

How to Paint a Door to Look Like Wood (It’s Easier Than You Think!)

blank

My DIY Kitchen Makeover Reveal!

Looking for Something?

Copyright © 2013-2022, Bre Eggert (Average But Inspired). All rights reserved.
  • Home
  • DIY
  • Crafts
  • Home Decor
  • Privacy Policy and Copyright Policy
  • Disclosures
  • Contact Me