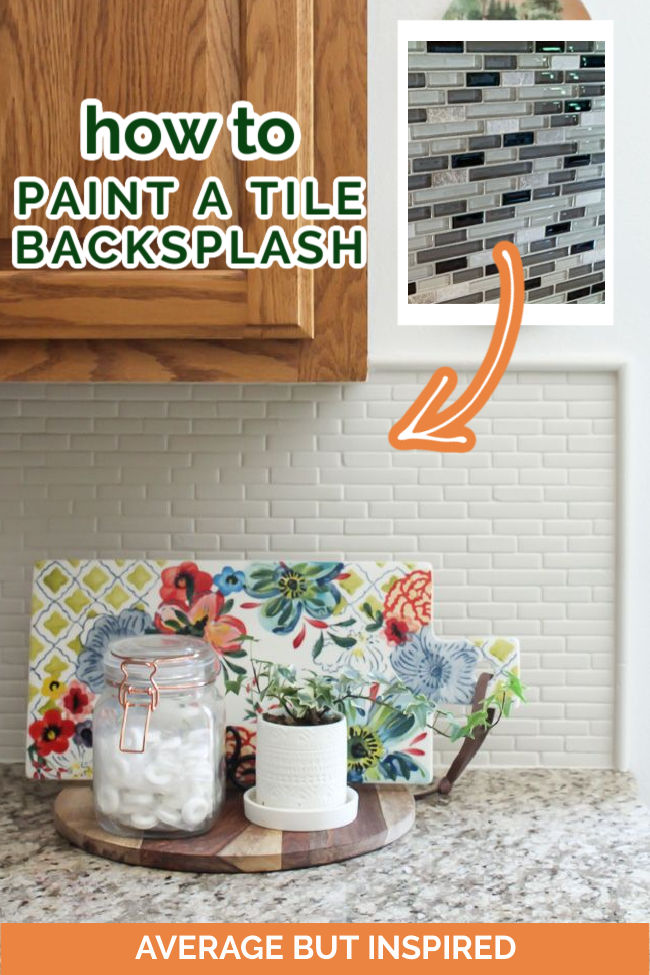
Learn how to paint a kitchen tile backsplash with a lasting finish! You’ll update your tile backsplash on a budget, but it won’t look that way.
At one point or another, most of us will have spaces in our homes that are in perfectly great condition but not exactly our style.
My kitchen is one of those spaces! The cabinets, countertops, and busy glass mosaic tile backsplash are all in good shape, but the look isn’t what I’m after.
I’m going to overhaul it without a renovation, and I accomplished the first part of the makeover by painting the tile backsplash. Yep, by painting it!
To some, it might sound crazy to paint a kitchen backsplash! Tile can be tricky to paint (hello, adhesion issues!), and the kitchen is an especially messy area, which makes cleanable surfaces a must.
However, painting a tile backsplash is an inexpensive and relatively mess-free way to update a kitchen, so it makes a lot of sense. (And I am NOT one to shy away from painting tricky surfaces. Check out my painted countertop here and my painted marble fireplace hearth here!)
I will show you exactly how to paint a backsplash for a finish that lasts. My kitchen backsplash is a mosaic of glass and stone tiles, but this tile painting method will work on any type of tile.
Supplies Needed to Paint a Kitchen Tile Backsplash
This post contains affiliate links. Please read my full disclosure policy for more information.
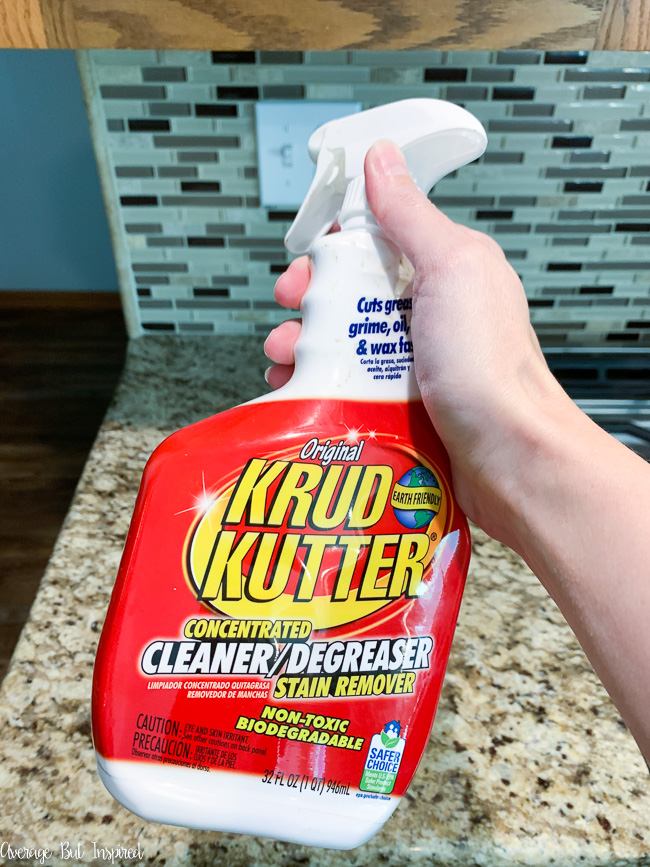
- Krud Kutter cleaning spray
- TSP
- Painters tape
- Multi-surface adhesion primer (I used less than a quart)
- Latex enamel paint (I used less than a quart)
- Mixing bucket and rag
- Rubber gloves
- Sandpaper (I used 220 grit)
- 2″ angled brush
- 3″ roller with 1/4″ nap roller cover (I used mohair)
- Screwdriver (to remove outlet covers)
- Silicone caulk (recommended)
- Paper towels
How to Paint a Tile Backsplash
It might be hard to believe, but you can finish this entire tile painting project in just two days – with dry time! That makes it a perfect weekend project!
Step One: Clean the Tile
You know that kitchens are prime spots for messes. Because of that, I fully advocate for a two-step cleaning process when painting your tile backsplash! Your paint job is only as good as your prep work, so prep right!
Start by scrubbing the backsplash with Krud Kutter. Krud Kutter is a non-toxic cleaner that is great at removing grease.
Once the entire backsplash is clean and dry, gently sand the tiles to rough them up a bit. I used 220-grit sandpaper on my little hand sander, but you can use plain sandpaper if you don’t have an electric sander. (PS not sure why my hands are soaking wet in this photo. :-)).

I painted glass and stone tiles, and obviously glass is slippery and benefits from the sanding process more than the stone tiles. However, even if you’re painting rough tiles, make sure to sand. It really helps the primer stick better!
Then it’s time for MORE cleaning! For this very important part of the preparation, mix up a batch of TSP according to the package directions, and wash the tile backsplash again.
It’s a good idea to protect your countertop during this cleaning so that you don’t accidentally damage it.
Step Two: Protect Surrounding Surfaces
Once the backsplash is dry, tape off any areas you don’t want paint to get on. I highly recommend Frog Tape over blue painters tape as I think it is much better at preventing paint seepage.
Remove your outlet faceplates and cover the countertops if you’re a messy painter.
Then you’re ready to begin painting your tile backsplash!
Step Three: Prime the Tile
Start with a multi-surface adhesion primer like the one I used. I know this primer works because I used it on many tricky surfaces (like my painted marble fireplace hearth and this painted bathroom tile).
I used a brush to apply the primer so that I could be sure to get it in all of the grout lines. You will be so happy if you’re not painting a mosaic backsplash like me, as you will have fewer grout lines to contend with!
The primer will look thin in some areas and will make you think you’ve destroyed your kitchen. But do not fear: it will be okay once you start painting!
The multi-surface adhesion primer I used is great because it has a fast dry time to topcoat. After just one hour of drying it is ready for paint!
Step Four: Paint the Tile Backsplash
The paint I used on my painted tile backsplash is the leftover paint from my mirrored built-in makeover. Although it is labeled as cabinet and trim paint, I used it here because it’s an enamel paint, which means it dries to a hard, durable finish.
I used a semi-gloss finish (color is Manchester Gray), and I think you could even do a gloss finish if you want more shine.
I rolled the paint onto the tiles, and then went back in with my brush to grout areas that the roller missed.
I let the paint dry overnight and then applied a second coat of paint to the tiles.
Once the paint was dry, I put the outlet covers back on and removed the painters tape. Then I ran a thin bead of kitchen and bath silicone caulk where the tile meets the countertops, to help protect that tile if water collects there.
What a difference! This painted backsplash worked wonders in this kitchen.
It feels calmer to me now. The tile isn’t competing with the granite (which also has a lot of “movement” as the designer folks say).
And when I paint the cabinets, it’s going to all come together and give me all the heart eyes and happiness!
(UPDATE: Check out the total kitchen makeover – complete with painted cabinets!)
How to Clean a Painted Tile Kitchen Backsplash
Because I know somebody is going to ask me, I’m going to tell you how to clean tile that’s been painted, too! And I know because I’ve already done it! (Now that my tile is painted a light color, it shows the food crud much more than it used to.)
For messes that I notice immediately, I wipe them with a soft cloth.
For food that has hardened somewhat or grease, I clean with dish soap and a soft rag.
It’s that easy!
Well, I hope that gives you enough information to paint your own tile backsplash, if you’ve been thinking of it!
Let me know what you think of my painted tile backsplash makeover or if you have any questions in the comments section below. I’m happy to help!
Cindy says
This is exactly the builders choice of backsplash when he flipped the house we bought. The browns have been zapping my vibe for 10 years, but this solution is amazing! I cannot wait to paint over them! Thanks for such an in-depth post!
Bre says
Hi, Cindy – I am so happy to hear this!!! Thanks for letting me know! I hope your project turned out amazing and that you’re so happy with the new look. 🙂
Keys girl says
we had the exact countertop and backsplash. we painted the backsplash with latex enamel same bright white and we are so happy we did! it came out just like yours and really brightened our dark wood kitchen. we also used a palm sander on the glass tiles with 220 grit but I don’t think it mattered we probably could have skipped that part. we would do this again.
Bre says
I am SO GLAD you had a great experience with painting your backsplash, too! Such a great update!
Kristen Stone says
Hi! Does it hold up in high water areas? Like behind the sink where it gets hit by a lot of water.
Bre says
Hi! It did for me, but I was careful to not let water sit there and to wipe it off if I noticed water splashed on it. Definitely use silicone caulk at the line between the tile and the countertop. And if you have a messy family, a topcoat/sealer behind the sink would give you some extra protection there. 🙂
Kim says
I did this project Friday night and I’m so happy with it! Thanks so much for the detailed steps. It made it super easy. I posted my results on Tiktok and gave you guys all the credit! Thanks again
https://www.tiktok.com/t/ZTRH2U5Pr/
Bre says
Kim, that is awesome!! Thanks for letting me know. I’m heading over to watch your TikTok now!!
Kendra says
Hello, great job!!! I am about to embark on this project. Who makes the Manchester grey paint? Thank you
Bre says
Hi, Kendra! That paint is made by Behr. 🙂
Jamie says
I’m one final coat away from finishing this project and I am SO excited with the outcome already! Our backsplash was dark and dated…now it’s bright and shiny!!! I am so thankful that I came across this post and was willing to put in some elbow grease. Thank you so much for sharing what I thought was impossible!!!
Bre says
Hi, Jamie! THANK YOU for sharing!!!! I am so happy for you!!!! I promise you won’t be able to stop walking in your kitchen and staring – haha!!
Amei Manten says
Hi, I just tried the painting on a small section and it looks incredible! What I am wondering is still what if with cleaning. Would it be wise to add a layer of polyeutherane over it or is that a definite no? Just because of behind the stove and the sink that will get more grime than anywhere else?
Bre says
Hello! That is so awesome!! OK I really do not know about the poly. I think you should check the paint specifications / with the manufacturer to see if the paint can be topcoated with poly, and if not, if there is anything it can be topcoated with. Then, if they say yes, go for it! :-). Extra protection is never a bad idea in the kitchen, I agree.
Diana barnes says
Hi! The paint color – Manchester Gray- do you happen to have the numbers from the paint can still? Thanks!
Bre says
Hi, Diana! I went and looked and the paint can and didn’t see any numbers that make sense to me. But I’m going to type out what it says in case it helps you! CLRNT 384th; CL 156; IL 64.
Fernando Romero Jr says
Curious if it’s still holding?
Bre says
Hi, Fernando! We actually replaced this backsplash when we had new countertops installed. The tile would’ve been damaged when the countertops came out, so we needed to do the backsplash at that time, too. I’m sorry I can’t give a present-day update!
Meg says
I followed your directions and it turned out BEAUTIFULLY! I am so happy with the results, and so so easy. Thank you!
Bre says
Hi, Meg! YAY!!! Thanks so much for coming back to tell me! I’m so happy it turned out wonderfully!
Linda says
Hi Bre,
I am just wondering how the painted backsplash is holding up after a few months and if any thing, such as tomato sauce, has left a stain on it? Also, would Advance paint work just has well?
Bre says
Hi, Linda! OK so we actually removed this backsplash when we replaced the countertops, but in the time I had the painted backsplash it held up great! I cleaned it by using dish soap and a soft cloth, and didn’t have any problem with it staining. Advance paint would totally work!
Pamela says
Hi! Question: did all your tiles have a smooth surface? I have a similar backsplash but there are rough stone tiles intermixed with glass tiles. Thanks in advance
Bre says
Hi, Pamela! They did not all have a smooth surface. I also had some stone tiles mixed in! :-). Also, I just did this same process on a bathroom accent wall (also with glass and stone tiles), and it worked great again! 🙂
Kaitie says
How is it holding up? Anything you’d do differently? Thinking of doing mine this weekend, ah!
Bre says
Hi, Katie! Well, we replaced it last year when we replaced our countertops (we had to rip out the backsplash in order to put in the new countertops). But, until we ripped it out it was holding up great! The only spot I had a problem in was where someone scratched it with something and the paint scratched in that one part. It would’ve been an easy fix though. If you decide to do it, good luck! It’s an easy project and definitely a quick update! 🙂
Haley says
Looks amazing!! I may have spent the last few hours reading your blog posts and all of your DIYs… hahah opps. Very impressed with all the work you have done on your own! I’m currently in the process of updating a little old lady cottage my partner and I bought and are making our home. The tub and tile in the shower area are both “almond” which I’m hoping to make white. I am going to follow your bathtub painting process but was wondering for the tile in the shower would you recommend using this method. If not, do you have any suggestions for shower tile painting ? Thanks in advance and can’t wait to see more of your posts!
Bre says
Hi, Haley! Aaaah, congrats!!! How fun – I love cottages! OK so for the tile in the shower, definitely use the same paint as you use for the tub. Do not use the paint I used to paint my backsplash, as it will not stand up to the water in a shower at all. :-). Good luck with all of your projects! I’m excited for you!
Bree says
I want to mention that if you have silicone caulking between your backsplash and counter, this may not work. I wanted to paint over the silicone and taped that way and now all of the paint is not only peeling off the silicone, but up the tiles too (I followed your prep steps too). It is coming off the tiles in spots also with a light scratch.
Bre says
Hi, Bree – oh no! I’m sorry your project didn’t turn out! Yeah, paint will not stick to silicone, and once it starts peeling off the silicone it will keep going. You could remove the paint from the grout with paint thinner, lightly sand the affected areas on the tile, re-prime with bonding primer, and topcoat again.
Debbie Fauer says
Hello,
So excited to paint my backsplash. Did you paint the walls and backsplash the same color? It’s hard to tell in your photos.
Thanks!
Bre says
Hi, Debbie! I did not paint them the same color, but they are similar. 🙂
Martha says
Your countertops and backsplash are EXACTLY what I have now!! I was so excited to find your tutorial! I’ve been thinking about painting my backsplash,it didn’t know how to go about it
Thank you. Thank you.
Bre says
Hi, Martha – that is so great!! I know your project will turn out so awesome. You’ll love it!!
Kimberly says
Literally have the same kitchen as you! Everything is the same! Currently typing with primer on my hands LOL. Stopped by the confirm my paint- wasn’t sure what was the kind I needed to use! Now I’m ready to order. Thank you for your help and advice! I’m thinking of painting the cabinets too, so I’ll be back 😉♥️
Bre says
Kimberly – sorry it took me so long to respond!! How did your project turn out?
Kate says
Hello,
I have the same backsplash, counter AND the undermount sink . With 3 kids my counters are perpetually wet at the base of the faucet, as are the base of the backsplash and grout/silicone line between them. I am concerned about how paint will hold up to having water there so often. Have you had any experience with this?
Thank you!
Bre says
This is a BRILLIANT question, Kate! To avoid having any issues, I suggest running a bead of clear silicone caulk between the painted tile backsplash and the countertop. This will protect the paint! I did this in my powder room where I painted my countertop, and it’s working perfectly! You won’t see the caulk since it’s clear, and this will keep it from peeling at all.
Amanda says
Hello, Can you tel me which brand you used to paint the backsplash and colour too, please? Love the colour!
Bre says
Hello! Thank you! I used Behr paint in Manchester Gray (which is actually more of a beige color). I have a link to it in the supply section of that post if it helps!
Kim says
So happy to find this! I have this exact tile and granite counter! Another kitchen twin! I can’t take the busyness! Would you share what adhesive primer you used please?
Thank you!
Bre says
Hi, Kim! This is so crazy how many of us have this same kitchen!! :-). If it helps, I have links to the exact primer I used in the supply list above in this post (as well as in the body of the post somewhere). The product is called Behr Multi-Surface Stain Blocking Primer and Sealer. Another option would be INSL-X Stix primer, which is what I’m actually using to prime my kitchen cabinets! Hope that helps.
S.Z says
I love the idea and the colour. Looking to change mine to the same colour. I am just concerned about the messiest part at the stove area. I usually have to use harsh materials to clean it. Do you think it will still work with the paint to clean it or it would be better to add a stove backsplash board at that area only?
Thanks
Bre says
Hello! Honestly, I would avoid using harsh cleaners. I would be very worried that it would ruin the paint. You’re probably better off adding a different backsplash board in that part. Good luck!
Jennifer says
After a few months, how is it holding up?
Bre says
Hi, Jennifer – I am glad to report it still looks perfect! I’ve cleaned it several times now and I’ve even used painters tape on it (I’m in the process of painting the cabinets), and nothing has chipped or anything. Good cleaning, adhesion primer, and enamel paint are KEY!
Danielle says
This is perfect we are kitchen twins 😊 and my backsplash needs a change, you picked a great color!
Bre says
I love that! There are so many of us with matching kitchens out there – ha!! Thanks for stopping by!
kas says
Love it! Thanks for the inspiration and encouragement! I’ve been thinking about doing this to my own backsplash that sadly was redone only last summer! I picked the wrong color & it drives me nuts, but I don’t want to pay to change it again (plus my husband would keel over!), and I still adore the shape and style of the tile I chose. So painting it seems like an easy, affordable option!
Bre says
Hello! Oh man, I’m so sorry you’re disappointed with your backsplash. That is such a bummer!!! I hope this does the trick for you. This truly is so easy and affordable, and I am a firm believer that you shouldn’t live with something you don’t like if you can fix it up for not too much money! Good luck with your project!!