• Skip to primary navigation
  • Skip to main content
  • Skip to primary sidebar
Average But Inspired logo - DIY and craft

Average But Inspired

Craft a home you love. DIY and craft tutorials.

  • About
    • Contact Me
    • Disclosures
    • Privacy Policy and Copyright Policy
  • DIY
    • Furniture
  • Crafts
    • Dollar Store Crafts
    • Seasonal
      • Patriotic & Summer
      • Valentine’s Day
      • Easter & Spring
      • Fall & Halloween
      • Christmas & Winter
  • Home Decor
    • Organization
  • Shop
    • DIY Swag
    • DIY Guides
  • Home

Homepage Featured Posts

Easy Flat Panel Door Makeover

February 3, 2021 by Bre 4 Comments

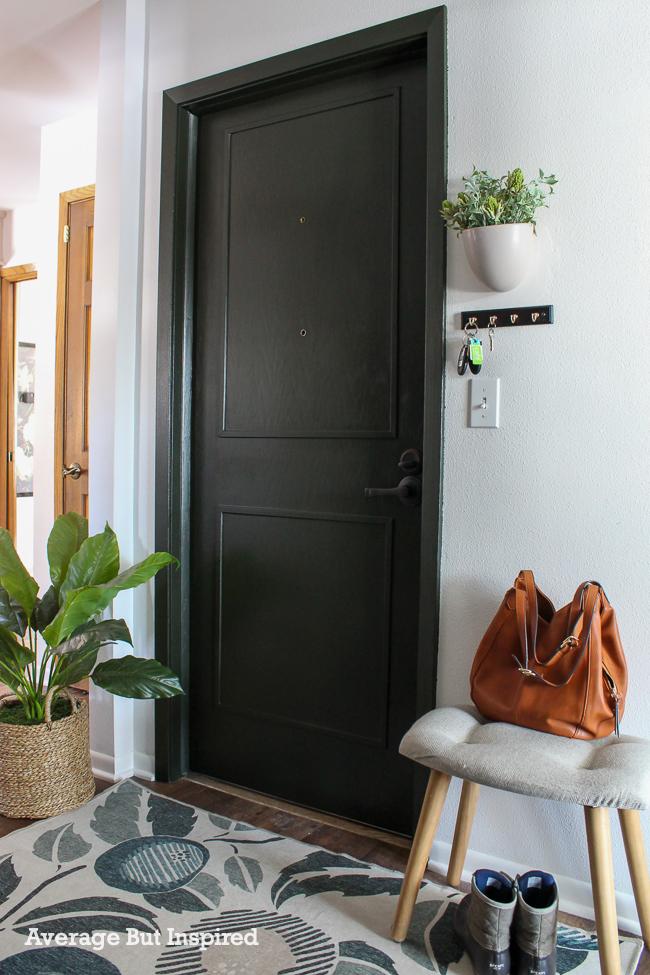
I am obsessed with inexpensive DIY projects that completely upgrade the look and feel of a space.  This easy DIY flat panel door makeover totally fits the bill!  You won’t believe how simple it is to update a flat panel door in just one weekend.

Look at what I started with.  Ohmygosh.  
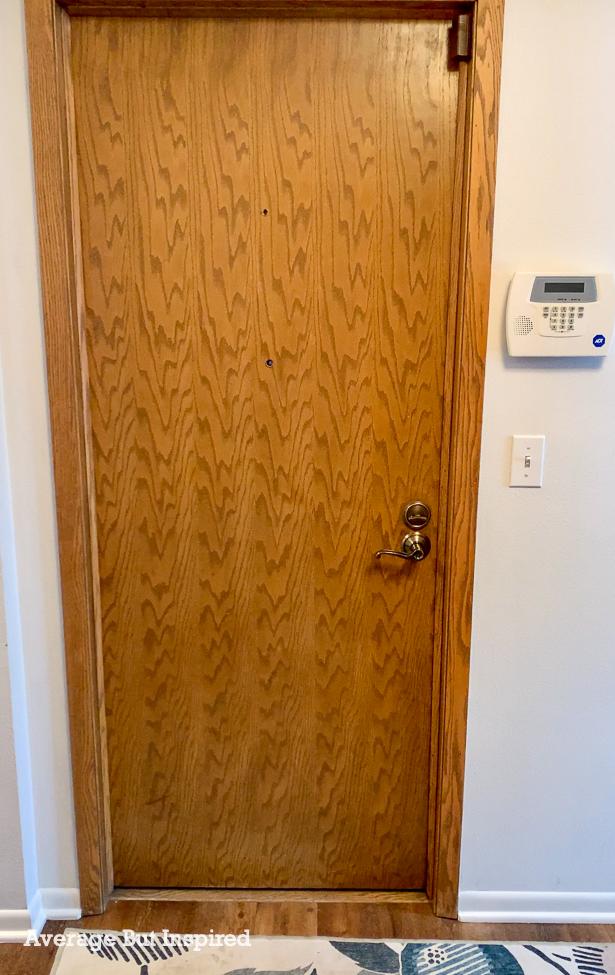
This flat panel door was dated and ugly. See how this blogger made it over and gave it new life!

This flat panel door leads out of the mudroom and into the garage.  It was so brown.  And so boring.

It is a fire door, and those are pricey to replace, so I decided to keep it and give it a fresh new look.

Supplies Needed for a Flat Panel Door Makeover

This post contains affiliate links.  To read my full disclosure policy, please click here.  Also, thank you to Brinks for gifting me the new deadbolt and lever you see on my door.

I’m breaking the supply list into sections for every part of the door makeover.  Don’t be intimidated!

Supplies used to trim out the flat panel door

  • 3/4″ pine screen trim (see instructions below for measurement information)
  • Miter box and hand saw
  • Wood glue
  • Ryobi brad nailer
  • Level
  • Tape measure
  • Pencil
  • Permanent marker

Supplies used to paint the door

  • Krud Kutter
  • Sandpaper
  • Caulk
  • Stain blocking primer
  • Sherwin-Williams SnapDry paint
  • Painters tape
  • Paint brush
  • Roller

New door hardware

  • Brinks Push Pull Rotate lever and deadbolt

How to Do an Easy Flat Panel Door Makeover

This door makeover process will add a gorgeous new look to your space.  I am sure you will not believe how this door makeover will breathe new life into your home!

How to Update the Flat Panel Door with Trim

First things first, update the flat panel door with inexpensive trim.  I used 3/4″ screen trim, but you can use fancier trim if you like!

Step One: Determine the Trim Lengths

First up, decide how long you want the trim pieces to be.

When closed, my door measures 31″ wide x 80″ high.

I cut my screen trim pieces as follows:  TOP rectangle = 23″ wide x 36″ long on top; BOTTOM rectangle = 23″ wide x 24″ long on bottom.  In all I cut 8 pieces of screen trim: 4 measuring 23″ long, 2 measuring 36″ long, and 2 measuring 24″ long.

For this flat panel door makeover, this blogger used 3/4" screen trim to add dimension to the door.

You may want to adjust these measurements depending on your door’s overall dimensions.

Step Two: Cut the Trim

I cut the screen trim by hand, using a hand saw and miter box.  The screen trim is quite thin, so it’s very easy to cut this way. A miter saw would totally work.  I was too lazy to drag it out of the basement and set it up.

Screen trim cuts easily with a hand saw and miter box.

On the back of each piece you cut, write the placement for that piece.  For example, “top left” for the piece that goes on the left side of the top rectangle.

Step Three: Determine Trim Placement on the Door

Mark off the center of the door, both vertically and horizontally.

Then, roughly decide where you want the trim rectangles to go, and lightly mark those spots on the door.

Using the level, draw the exact placement line of the bottom of the rectangle that goes on top.   

To add dimension to a flat panel door, this blogger attached pine screen trim to the door. She drew the placement on with permanent marker.

Step Four: Attach the First Piece of Trim

Run a thin line of glue on the trim piece meant for the bottom of the top rectangle, and press that onto the line you’ve drawn on the door.  

Follow up with a few brad nails.

The first step in this flat panel door makeover was attaching pine screen trim to the door to add dimension.

Step Five: Attach a Side Piece of Trim, and Repeat the Process

Now that the first piece is in place, use the level to draw a plumb line on the side.  Then repeat the glue and brad nail process to attach that piece.  

To add dimension to this flat panel door, this blogger attached pine screen trim to it.

Work your way around the rectangle until it’s complete.

Then repeat steps 3-5 on the bottom rectangle.

With this, the flat panel door will no longer be flat!  It will look a little strange at this point, but once it’s painted, it will be beautiful!

Update a flat panel door with inexpensive pine screen trim.

How to Paint the Door After Adding Trim

To make your flat panel door makeover look its best, make sure to give it a good paint job.  That includes careful prep work!

Doors get a lot of use, so make sure to clean prior to doing anything else.  I use Krud Kutter to get rid of all of the gunk.

Caulk the seams of the newly-added trim, as well as the gaps between the trim and the door.  You can also fill in any dents or gouges in the door with wood filler.

Before painting the door, caulk the gaps between the trim and the door panel.

Then, prime with a primer that’s formulated for your type of door.  Since I was painting a wood door, I used a stain blocking primer.  I chose to use a water-based primer because I can’t stand the smell of oil-based primers!

After the primer dries, paint the door!  I used a fast-drying door paint from Sherwin Williams called SnapDry.  I painted in January, so I didn’t want to leave the door open longer than I absolutely had to! 

This blogger gave her flat panel door a makeover with newly-added trim for dimension and a paint job.

This paint dried quickly and covered well with two coats.  I had it tinted to Benjamin Moore Waller Green – the same color used on my Dated Oak China Cabinet Makeover.

Update the Door Hardware For a Modern Touch

Finally, consider updating your flat panel door with new hardware!  The hardware on my door was definitely from the 1970s, so I was glad to streamline the deadbolt and lever with new ones.

This flat panel door makeover is one to see! A plain brown door got new life with trim detailing, new paint, and new hardware.

The Brinks Push Pull Rotate lever I installed is super cool because it opens three different ways: push it, pull it, or rotate it like a traditional handle or lever.  I love how easy it is to open the door when my hands are full now!

I also love how modern this door looks now.  This flat panel door makeover added a lot of style to my mudroom for a very low price!  I’d love to hear what you think of it; drop me a comment in the box below!


Filed Under: DIY, Homepage Featured Posts

How to Paint a Kitchen Tile Backsplash

August 25, 2020 by Bre 48 Comments

blank

Learn how to paint a kitchen tile backsplash with a lasting finish! You’ll update your tile backsplash on a budget, but it won’t look that way.

At one point or another, most of us will have spaces in our homes that are in perfectly great condition but not exactly our style. 

My kitchen is one of those spaces!  The cabinets, countertops, and busy glass mosaic tile backsplash are all in good shape, but the look isn’t what I’m after. 

I’m going to overhaul it without a renovation, and I accomplished the first part of the makeover by painting the tile backsplash. Yep, by painting it!

Did you know you can paint a kitchen tile backsplash? It's true, and it's actually really easy! This post tells you everything you need to paint your backsplash the right way. This blogger painted her glass mosaic tile backsplash, but the method works on any type of tile backsplash.

To some, it might sound crazy to paint a kitchen backsplash!  Tile can be tricky to paint (hello, adhesion issues!), and the kitchen is an especially messy area, which makes cleanable surfaces a must. 

However, painting a tile backsplash is an inexpensive and relatively mess-free way to update a kitchen, so it makes a lot of sense. (And I am NOT one to shy away from painting tricky surfaces.  Check out my painted countertop here and my painted marble fireplace hearth here!)

I will show you exactly how to paint a backsplash for a finish that lasts.  My kitchen backsplash is a mosaic of glass and stone tiles, but this tile painting method will work on any type of tile.

Supplies Needed to Paint a Kitchen Tile Backsplash

This post contains affiliate links.  Please read my full disclosure policy for more information.

  • Krud Kutter cleaning spray
  • Paper towels
  • TSP
  • Mixing bucket and rag
  • Rubber gloves
  • Sandpaper (I used 220 grit)
  • Painters tape 
  • Multi-surface adhesion primer (I used less than a quart)
  • Latex enamel paint (I used less than a quart)
  • 2″ angled brush
  • 3″ roller with 1/4″ nap roller cover (I used mohair)
  • Screwdriver (to remove outlet covers)
  • Silicone caulk (recommended)

How to Paint a Tile Backsplash

It might be hard to believe, but you can finish this entire tile painting project in just two days – with dry time! That makes it a perfect weekend project!

Step One: Clean the Tile

You know that kitchens are prime spots for messes.  Because of that, I fully advocate for a two-step cleaning process when painting your tile backsplash!  Your paint job is only as good as your prep work, so prep right!

Start by scrubbing the backsplash with Krud Kutter.  Krud Kutter is a non-toxic cleaner that is great at removing grease. 

When painting a tile kitchen backsplash, it's important to clean thoroughly and remove all the grease. Krud Kutter is a wonderful pre-paint cleaner.

Once the entire backsplash is clean and dry, gently sand the tiles to rough them up a bit.  I used 220-grit sandpaper on my little hand sander, but you can use plain sandpaper if you don’t have an electric sander.  (PS not sure why my hands are soaking wet in this photo. :-)).

Before painting a kitchen tile backsplash, make sure to sand it. Sanding tile before painting it helps with adhesion.

I painted glass and stone tiles, and obviously glass is slippery and benefits from the sanding process more than the stone tiles.  However, even if you’re painting rough tiles, make sure to sand.  It really helps the primer stick better!

Then it’s time for MORE cleaning!  For this very important part of the preparation, mix up a batch of TSP according to the package directions, and wash the tile backsplash again.

Before painting a kitchen tile backsplash, make sure to clean it with TSP. TSP helps remove any grease or debris left on the tile.

It’s a good idea to protect your countertop during this cleaning so that you don’t accidentally damage it.

Step Two: Protect Surrounding Surfaces

Once the backsplash is dry, tape off any areas you don’t want paint to get on.  I highly recommend Frog Tape over blue painters tape as I think it is much better at preventing paint seepage.

Before painting a tile backsplash, use painters tape to tape off areas you do not want to paint.

Remove your outlet faceplates and cover the countertops if you’re a messy painter.

Then you’re ready to begin painting your tile backsplash!

Step Three: Prime the Tile

Start with a multi-surface adhesion primer like the one I used.  I know this primer works because I used it on many tricky surfaces (like my painted marble fireplace hearth and this painted bathroom tile).  

I used a brush to apply the primer so that I could be sure to get it in all of the grout lines.  You will be so happy if you’re not painting a mosaic backsplash like me, as you will have fewer grout lines to contend with!

To properly paint a tile backsplash, make sure to use a good adhesion primer or else the paint may not stick to the tile.

The primer will look thin in some areas and will make you think you’ve destroyed your kitchen.  But do not fear: it will be okay once you start painting!

This glass mosaic tile backsplash was painted to update the look of the kitchen. Here the primer has been applied.

The multi-surface adhesion primer I used is great because it has a fast dry time to topcoat.  After just one hour of drying it is ready for paint!

Step Four: Paint the Tile Backsplash

The paint I used on my painted tile backsplash is the leftover paint from my mirrored built-in makeover.  Although it is labeled as cabinet and trim paint, I used it here because it’s an enamel paint, which means it dries to a hard, durable finish. 

I used a semi-gloss finish (color is Manchester Gray), and I think you could even do a gloss finish if you want more shine.

To paint a kitchen tile backsplash, use a paint brush and a small paint roller.

I rolled the paint onto the tiles, and then went back in with my brush to grout areas that the roller missed.

I let the paint dry overnight and then applied a second coat of paint to the tiles.

Once the paint was dry, I put the outlet covers back on and removed the painters tape. Then I ran a thin bead of kitchen and bath silicone caulk where the tile meets the countertops, to help protect that tile if water collects there.

Did you know you can paint a kitchen tile backsplash? It's true, and it's actually really easy! This post tells you everything you need to paint your backsplash the right way. This blogger painted her glass mosaic tile backsplash, but the method works on any type of tile backsplash.

What a difference! This painted backsplash worked wonders in this kitchen.

This kitchen's glass mosaic tile backsplash was painted to update the look of the kitchen. Next, the cabinets will be painted.

It feels calmer to me now.  The tile isn’t competing with the granite (which also has a lot of “movement” as the designer folks say).  

Did you know you can paint a kitchen tile backsplash? It's true, and it's actually really easy! This post tells you everything you need to paint your backsplash the right way. This blogger painted her glass mosaic tile backsplash, but the method works on any type of tile backsplash.

And when I paint the cabinets, it’s going to all come together and give me all the heart eyes and happiness! 

(UPDATE:  Check out the total kitchen makeover – complete with painted cabinets!)

Did you know you can paint a kitchen tile backsplash? It's true, and it's actually really easy! This post tells you everything you need to paint your backsplash the right way. This blogger painted her glass mosaic tile backsplash, but the method works on any type of tile backsplash.

How to Clean a Painted Tile Kitchen Backsplash

Because I know somebody is going to ask me, I’m going to tell you how to clean tile that’s been painted, too!  And I know because I’ve already done it!  (Now that my tile is painted a light color, it shows the food crud much more than it used to.)

Did you know you can paint a kitchen tile backsplash? It's true, and it's actually really easy! This post tells you everything you need to paint your backsplash the right way. This blogger painted her glass mosaic tile backsplash, but the method works on any type of tile backsplash.

For messes that I notice immediately, I wipe them with a soft cloth.

For food that has hardened on somewhat, or grease, I clean with dish soap and a soft rag.

It’s that easy!

Did you know you can paint a kitchen tile backsplash? It's true, and it's actually really easy! This post tells you everything you need to paint your backsplash the right way. This blogger painted her glass mosaic tile backsplash, but the method works on any type of tile backsplash.

Well, I hope that gives you enough information to paint your own tile backsplash, if you’ve been thinking of it! 

Let me know what you think of my painted tile backsplash makeover or if you have any questions in the comments section below.  I’m happy to help!

Filed Under: DIY, Homepage Featured Posts

DIY Modern Desk – A Beginner Woodworking Project

September 13, 2017 by Bre 18 Comments

blank

Build an easy and affordable DIY Modern Desk for your home office space!

As part of the (now defunct) Monthly DIY Challenge, I partnered with Kreg Tool Company to use their Kreg Jig® R3 pocket hole system in a DIY project. Thank you to Kreg for sponsoring this post!

I used the Kreg Jig R3 to create a gorgeous DIY Modern Desk for my sister, and I am THRILLED to tell you that ANYONE can build this desk (I swear.  I NEVER thought I could build something like this.)!  

Learn how to build a beautiful DIY Modern Desk! It's so easy and is a perfect beginner Kreg Jig project. No prior woodworking experience needed! This is an easy build for beginners.

This post contains affiliate links. Please read my disclosure policy for more information.

The DIY Modern Desk Plans

OK, so before I show you how I built this desk, let me tell you that I downloaded the plans for this desk from Ana White’s website, where she provides tons of FREE woodworking plans! 

I chose her Modern 2×2 Desk Base plan and her and her Desktop with Storage Compartments plan. 

If you want to build this desk, go to those links and download those plans.  Then come back here and check out my process photos as they might help you a bit.

Anyway, once I was armed with those instructions and supply lists, I headed to the store to buy my lumber and some other supplies.  And I have a confession . . . I was actually really nervous to go buy the materials for this project!  I was scared that I wouldn’t even be able to load the lumber into my cart or get it home. 

Once I purchased everything and got it into the car, I actually cried a tiny bit from relief.  Can you believe it?  That will tell you how much of a building novice I am!

The Desk Building Process – DIY Modern Desk Base

With the scary supply shopping part finished, I felt a little bit better about the whole prospect of building a desk for my sister.  Something about being in the comfort of my own home/garage made things seem a little better.

I started by building the base of the desk.  I grabbed my circular saw and cut the pieces for the base.  

Learn how to build a beautiful DIY Modern Desk! It's so easy and is a perfect beginner Kreg Jig project. No prior woodworking experience needed! This is an easy build for beginners.

Next it was time to start putting the base together, and here’s where I started to get nervous again. 

I had to use my new Kreg Jig R3 pocket hole system to do this, and frankly, I didn’t know what I was doing!  

Learn how to build a beautiful DIY Modern Desk! It's so easy and is a perfect beginner Kreg Jig project. No prior woodworking experience needed! This is an easy build for beginners.

Once I watched this helpful video and practiced on a few scrap boards, I got the hang of it and instantly understood why people love their Kreg Jig systems so much!

Learn how to build a beautiful DIY Modern Desk! It's so easy and is a perfect beginner Kreg Jig project. No prior woodworking experience needed! This is an easy build for beginners.

Kreg Jig pocket hole systems let you create pocket hole joints (which are very strong joints), quickly and easily, by drilling an angled hole through one board, which allows you to then drill your screw through that hole and into the other board. 

In addition to pocket holes providing strong joints, they’re also really nice because you don’t have visible screws on your projects; they’re hidden!

See those holes in the wood pictured below?  Those are the pocket holes that I drilled using my Kreg Jig R3 drill bit.

Learn how to build a beautiful DIY Modern Desk! It's so easy and is a perfect beginner Kreg Jig project. No prior woodworking experience needed! This is an easy build for beginners.

Once I had all of my pocket holes drilled, I fastened the base pieces together with the 2.5″ pocket hole screws that were recommended in my desk base plans. 

See how I drilled the pocket hole screw right through the pocket hole into the other piece of wood?

Learn how to build a beautiful DIY Modern Desk! It's so easy and is a perfect beginner Kreg Jig project. No prior woodworking experience needed! This is an easy build for beginners.

I put them all together, fastening them with my 2.5″ pocket hole screws and ended up with two base pieces that looked like this.  

Learn how to build a beautiful DIY Modern Desk! It's so easy and is a perfect beginner Kreg Jig project. No prior woodworking experience needed! This is an easy build for beginners.

Following the desk base plans, I clamped these two pieces to my temporary work table, and screwed the top bar to both of the squares in order to attach them.

Learn how to build a beautiful DIY Modern Desk! It's so easy and is a perfect beginner Kreg Jig project. No prior woodworking experience needed! This is an easy build for beginners.

Next, I screwed the footrest bar 6″ from the bottom.  

Learn how to build a beautiful DIY Modern Desk! It's so easy and is a perfect beginner Kreg Jig project. No prior woodworking experience needed! This is an easy build for beginners.

And with that, the base of my DIY modern desk was finished!  Because this part went so smoothly, I decided to keep going and build the desktop in the same day.  I was on a roll and had to keep my momentum going!

The Process – Modern Desk Build Desktop

The first thing I did for the desktop was cut 1×3 boards with my circular saw, per the desktop plans, in order to create storage compartments within the desktop. 

Then I drilled pocket holes with my Kreg Jig R3 system, and attached the pieces together with 1.25″ pocket hole screws.  

Learn how to build a beautiful DIY Modern Desk! It's so easy and is a perfect beginner Kreg Jig project. No prior woodworking experience needed! This is an easy build for beginners.

Next, I laid those storage compartment pieces on top of the base piece of my desktop.  I traced around them with a pencil and then drilled pilot holes in that piece of wood so that it would be easier to attach the compartment pieces to the desktop base.  

Learn how to build a beautiful DIY Modern Desk! It's so easy and is a perfect beginner Kreg Jig project. No prior woodworking experience needed! This is an easy build for beginners.

Once I did that, the desktop looked like this.  

Learn how to build a beautiful DIY Modern Desk! It's so easy and is a perfect beginner Kreg Jig project. No prior woodworking experience needed! This is an easy build for beginners.

I then took the other piece of plywood and cut it into three sections, per the desktop plans. 

I deviated slightly from the plans here, however, because they called for use of a circular saw to cut the top piece into three sections.  If you’ve ever used a circular saw, however, you know that it’s not super easy to get a perfect cut – and I wanted this desktop to be perfect.

My friend, who happens to be a skilled designer and craftsman, was over that afternoon hanging with my husband, and offered to bring his track saw over to help me get really straight cuts for the desktop. 

We used that and then I knew I had to have one for myself!  I didn’t even know that Kreg had JUST come out with the Kreg Rip-Cut and the Kreg Circular Saw Track, which are exactly what I could have used to get straight lines on this desktop. 

(UPDATE: I subsequently bought both of those tools and use them regularly! They especially were useful for my DIY Modern Fireplace Refacing project!)

Anyway, after the desktop pieces were cut, I fastened the outer pieces to the top of the desk with hinges.  

Learn how to build a beautiful DIY Modern Desk! It's so easy and is a perfect beginner Kreg Jig project. No prior woodworking experience needed! This is an easy build for beginners.

And then, not pictured here, I fastened the middle part of the desk with my super fun new brad nailer, which made attaching the desktop a breeze!  That completed the building of the desktop!

The Process – Modern DIY Desk Painting and Staining

The next day, I painted the base of the desk with matte black chalk paint.  This made the legs look like they are metal – giving them that modern look! 

Learn how to build a beautiful DIY Modern Desk! It's so easy and is a perfect beginner Kreg Jig project. No prior woodworking experience needed! This is an easy build for beginners.

Then I stained the top of the desk with my new favorite stain color.  (I first used this stain on the over-the-toilet storage I made for my Master Bathroom Makeover and fell in love!)

Learn how to build a beautiful DIY Modern Desk! It's so easy and is a perfect beginner Kreg Jig project. No prior woodworking experience needed! This is an easy build for beginners.

I gave it two coats of poly on top to protect it, and after it dried, I added decorative hardware to the front and screwed the desktop onto the base to fasten it all together!  

Learn how to build a beautiful DIY Modern Desk! It's so easy and is a perfect beginner Kreg Jig project. No prior woodworking experience needed! This is an easy build for beginners.

The Finished Product – DIY Modern Desk

Once I finished building this desk, I had a sense of accomplishment unlike anything I’ve felt before.  It may sound crazy, but building this desk made me prouder than graduating from law school! 

I think it’s because I didn’t really know if I could actually pull this off or not.  And when I did, it gave me so much confidence and determination to take on another building project.

Learn how to build a beautiful DIY Modern Desk! It's so easy and is a perfect beginner Kreg Jig project. No prior woodworking experience needed! This is an easy build for beginners.

If you’ve ever thought that you want to try building something, I really encourage you to do it.  It is so gratifying to see the results of your work come together in a finished piece like this! 

Learn how to build a beautiful DIY Modern Desk! It's so easy and is a perfect beginner Kreg Jig project. No prior woodworking experience needed! This is an easy build for beginners.

I have to be honest, it made me so proud to see the way my kids reacted to my DIY desk, too.  Every time someone came over to our house, my daughter would bring them to the garage to see what I built. 

Learn how to build a beautiful DIY Modern Desk! It's so easy and is a perfect beginner Kreg Jig project. No prior woodworking experience needed! This is an easy build for beginners.

That is an immense sense of pride and accomplishment to know that my kids are watching and excited about what I’m doing, too. 

Learn how to build a beautiful DIY Modern Desk! It's so easy and is a perfect beginner Kreg Jig project. No prior woodworking experience needed! This is an easy build for beginners.

And, it felt really good to bring my sister her desk and see how perfectly it fits in her apartment.

Learn how to build a beautiful DIY Modern Desk! It's so easy and is a perfect beginner Kreg Jig project. No prior woodworking experience needed! This is an easy build for beginners.

I’m so thankful for the opportunity to have been pushed out of my comfort zone and learned how to use the Kreg Jig R3. 

Learn how to build a beautiful DIY Modern Desk! It's so easy and is a perfect beginner Kreg Jig project. No prior woodworking experience needed! This is an easy build for beginners.

Not only did my sister gain a beautiful piece of furniture that is well-constructed with strong joints, but I gained a sense of accomplishment that has me dreaming up my next DIY project!

Learn how to build your own DIY Modern Desk with storage compartments! This is a a great woodworking project for beginners, and a great beginner Kreg Jig project, too!

Filed Under: DIY, Furniture, Homepage Featured Posts

Primary Sidebar

Let’s Connect!

Hi, I’m Bre! Thanks for visiting Average But Inspired, where I show you how to work with what you’ve got to create a home you love.

Bre of Average But Inspired - a DIY and craft blog

Love DIY? Subscribe to Get Posts E-mailed!

How Can I Help You?

blank

7 Tips for Hosting a Party on a Budget

blank

How to Paint a Door to Look Like Wood (It’s Easier Than You Think!)

blank

My DIY Kitchen Makeover Reveal!

blank

How to Paint Over Tile

Looking for Something?

Copyright © 2013-2022, Bre Eggert (Average But Inspired). All rights reserved.
  • Home
  • DIY
  • Crafts
  • Home Decor
  • Privacy Policy and Copyright Policy
  • Disclosures
  • Contact Me